DROPS Brushed Alpaca Silk
77% Alpaca, 23% Silk
from 5.50 CAD /25g
Get the yarn to make this pattern from 22.00CAD.

The yarn cost is calculated from the pattern’s smallest size and the yarn’s cheapest product type. Looking for an even better price? You might find it on the DROPS Deals!

DROPS SS24

Cloud's Hug

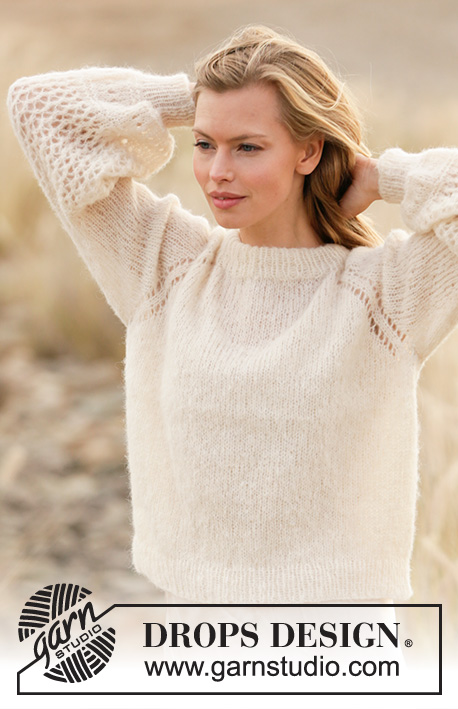
Knitted sweater with raglan in DROPS Brushed Alpaca Silk. Piece is knitted top down with lace pattern and balloon sleeves. Size XS – XXL.

DROPS 212-13
DROPS design: Pattern as-127
Yarn group C or A + A
----------------------------------------------------------

SIZE:
XS - S - M - L - XL – XXL

Finished measurements:
Chest measurements: 88-96-106-110-122-138 cm = 34⅝"-37¾"-41¾"-43⅜"-48"-54¼"
Full length: 49-52-54-56-58-60 cm = 19¼"-20½"-21¼"-22"-22¾"-23⅝"

All measurements in charts are in cm.

MATERIALS:
DROPS BRUSHED ALPACA SILK from Garnstudio (belongs to yarn group C)
100-125-125-125-150-150 g color 01, off white

KNITTING GAUGE:
16 stitches in width and 20 rows vertically in stockinette stitch = 10 x 10 cm = 4" x 4".

NEEDLES:
DROPS DOUBLE POINTED NEEDLES SIZE 5.5 mm = US 9
DROPS CIRCULAR NEEDLE SIZE 5.5 mm = US 9: Length 40 and 80 cm = 16" and 32" for stockinette stitch.
DROPS DOUBLE POINTED NEEDLES SIZE 4 mm = US 6
DROPS CIRCULAR NEEDLE SIZE 4 mm = US 6: Length 40 and 80 cm = 16" and 32" for rib.
Needle size is only a suggestion! If you have too many stitches on 10 cm = 4" switch to larger needles. If you have too few stitches on 10 cm = 4" switch to smaller needles.

-------------------------------------------------------

Alternative Yarn – See how to change yarns here
Yarn Groups A to F – Use the same pattern and change the yarn here
Yarn usage using an alternative yarn – Use our yarn converter here

-------------------------------------------------------

DROPS Brushed Alpaca Silk
77% Alpaca, 23% Silk
from 5.50 CAD /25g
Get the yarn to make this pattern from 22.00CAD.

The yarn cost is calculated from the pattern’s smallest size and the yarn’s cheapest product type. Looking for an even better price? You might find it on the DROPS Deals!

Pattern instructions

NOTE: This pattern is written in American English. All measurements in charts are in cm. For conversion from inches to cm - click here. There are different terms for crocheting in American and British English. If this pattern includes crochet, click for "crochet terms" here. For this pattern in British English, please click here.
----------------------------------------------------------

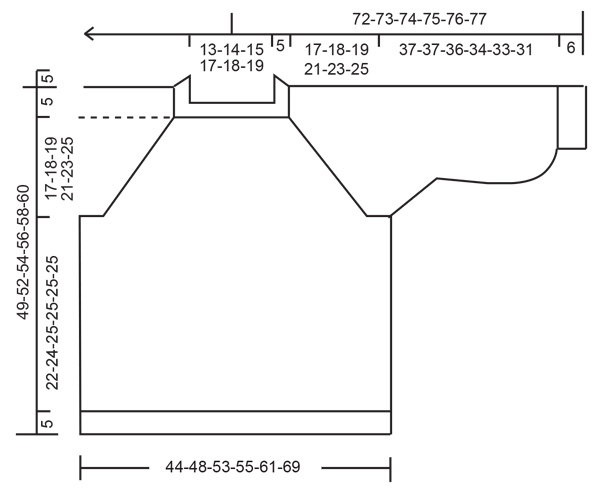
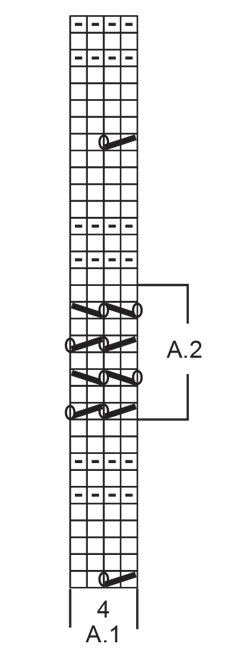
EXPLANATION FOR THE PATTERN:

----------------------------------------------------------

PATTERN:
See diagrams A.1 and A.2.

INCREASE/DECREASE TIP (evenly):
To calculate how to increase/decrease evenly, use the total number of stitches on row (e.g. 74 stitches) , and divide stitches by number of increases/decreases to be done (e.g. 22) = 3.3.
In this example increase by making 1 yarn over after alternately approx. every 3rd and 4th stitch. On next round knit yarn overs twisted to avoid holes.
If decreasing knit in this example alternately approx. every 2nd and 3rd stitch and every 3rd and 4th stitch together.

RAGLAN:
Increase 1 stitch on each side of marker thread in every transition between sleeves and body as follows: Work until 1 stitch remains before marker thread, make 1 yarn over, knit 2 (marker thread is between these stitches), make 1 yarn over. Repeat at the remaining marker threads (= 8 stitches increased on round). On next round knit the yarn overs to make holes. Then work the new stitches in stockinette stitch.

DECREASE TIP (applies to sleeves):
Decrease 1 stitch on each side of marker thread as follows: Work until 3 stitches remain before marker thread and knit 2 together, knit 2 (marker thread is between these stitches), slip 1 stitch knitwise, knit 1, pass slipped stitch over stitch worked.

BIND-OFF TIP:
To avoid a tight bind-off edge you may use a larger needle. If this also is too tight, make 1 yarn over after approx. every 4th stitch and bind off these as regular stitches.

----------------------------------------------------------

START THE PIECE HERE:

----------------------------------------------------------

SWEATER - SHORT OVERVIEW OF THE PIECE:
Work neck edge and yoke in the round on circular needle from mid back, top down. Now divide yoke for body and sleeves. Body is worked in the round on circular needle, top down. Work sleeves in the round on double pointed needles/short circular needle, top down.

NECK EDGE:
Loosely cast on 74-76-80-84-88-92 stitches on circular needle size 5.5 mm = US 9 with Brushed Alpaca Silk. Knit 1 round. Switch to circular needle size 4 mm = US 6. Work rib (= knit 1/purl 1) in the round until piece measures 10 cm = 4". Knit 1 round while increasing 22-24-28-28-32-44 stitches evenly - read INCREASE/DECREASE TIP = 96-100-108-112-120-136 stitches.
Switch to circular needle size 5.5 mm = US 9. Insert 1 marker at the beginning of round (= approx. mid back), measure yoke from this marker!

YOKE:
Now insert 4 marker threads in the piece as follows. Insert a marker thread after 16-17-19-19-21-25 stitches (= in transition between back piece and right sleeve), skip the next 16-16-16-18-18-18 stitches, insert a marker thread here (= in transition between right sleeve and front piece), skip the next 32-34-38-38-42-50 stitches, insert a marker thread here (= in transition between front piece and left sleeve), skip the next 16-16-16-18-18-18 stitches, insert a marker thread here (= in transition between left sleeve and back piece), 16-17-19-19-21-25 stitches remain on round after last marker thread. REMEMBER THE KNITTING GAUGE!
Work in stockinette stitch in the round, AT THE SAME TIME on first round begin increase for RAGLAN – read explanation above. Increase like this every other round 16-18-19-21-23-25 times in total = 224-244-260-280-304-336 stitches. Then continue in stockinette stitch until piece measures 17-18-19-21-23-25 cm = 6¾"-7"-7½"-8¼"-9"-9¾" from marker. Now divide piece for body and sleeves.
Work next round as follows: Work 32-35-38-40-44-50 stitches (= half back piece), slip the next 48-52-54-60-64-68 stitches on a stitch holder for sleeve, cast on 6-6-8-8-10-10 new stitches on needle (= in the side under sleeve), work the next 64-70-76-80-88-100 stitches (= front piece), slip the next 48-52-54-60-64-68 stitches on a stitch holder for sleeve, cast on 6-6-8-8-10-10 new stitches on needle (= in the side under sleeve), work the last 32-35-38-40-44-50 stitches (= half back piece). Then finish body and sleeves separately. NOW MEASURE THE PIECE FROM HERE!

BODY:
= 140-152-168-176-196-220 stitches. Work in stockinette stitch in the round. When piece measures 22-24-25-25-25-25 cm = 8¾"-9½"-9¾"-9¾"-9¾"-9¾", increase 10-12-12-12-14-16 stitches evenly = 150-164-180-188-210-236 stitches. Switch to circular needle size 4 mm = US 6. Work rib (knit 1/purl 1) in the round for 5 cm = 2". Bind off with knit over knit and purl over purl - read BIND-OFF TIP. Sweater measures approx. 49-52-54-56-58-60 cm = 19¼"-20½"-21¼"-22"-22¾"-23⅝" from shoulder and down.

SLEEVES:
Slip the 48-52-54-60-64-68 stitches from stitch holder in one side of piece back on a short circular needle/double pointed needles size 5.5 mm = US 9, and pick in addition up 1 stitch in each of the 6-6-8-8-10-10 new stitches under sleeve = 54-58-62-68-74-78 stitches. Insert a marker thread in the middle of the new stitches under the sleeve. Move the marker thread upwards when working. Use marker later when decreasing under sleeve. Work the different sizes as follows:

Size XS, S and M:
Work in stockinette stitch in the round. When piece measures 2 cm = ¾", decrease 1 stitch on each side of marker thread - read DECREASE TIP. Decrease like this every 4th-4th-2nd round 5-5-7 times in total = 44-48-48 stitches.

Size L, XL and XXL:
Work in stockinette stitch in the round. On 2nd round begin decrease under sleeve - read DECREASE TIP. Decrease like this on every round 4-5-7 times in total, then on every other round 4-4-2 times in total = 52-56-60 stitches.

All sizes:
Continue in stockinette stitch until sleeve measures 11-11-10-8-7-5 cm = 4⅜"-4⅜"-4"-3⅛"-2¾"-2" from division. Now work pattern A.1 in the round on round (= 11-12-12-13-14-15 repetitions of 4 stitches). On 7th round increase 16-16-16-16-12-12 stitches evenly = 60-64-64-68-68-72 stitches. When you have worked up to A.2 in diagram, repeat A.2 vertically until 16 cm = 6¼" have been worked with A.2 in all sizes (sleeve measures approx. 31-31-30-28-27-25 cm = 12¼"-12½"-11¾"-11"-10⅝"-9¾" and approx. 6 cm = 2⅜" remain with pattern + 6 cm = 2⅜" rib on sleeve). Then work the remaining rounds in diagram. Knit 1 round while decreasing 11-13-13-13-13-14 stitches evenly = 49-51-51-55-55-58 stitches. Knit 1 round while decreasing 17-17-15-15-13-14 stitches evenly = 32-34-36-40-42-44 stitches. Switch to double pointed needles size 4 mm = US 6. Work rib (knit 1/purl 1) in the round for 6 cm = 2⅜". Bind off with knit over knit and purl over purl - read BIND-OFF TIP. Work the other sleeve the same way.

ASSEMBLY:
Fold down neck edge on wrong side to that it is double and fasten it with small stitches - make sure avoid a tight seam!

This pattern has been corrected.

Updated online: 18.06.2020
New yarn amount in size L and XXL. DROPS BRUSHED ALPACA SILK from Garnstudio 100-125-125-150-150-175 g color 01, off white

Diagram

symbols = knit
symbols = purl
symbols = between 2 stitches make 1 yarn over, on next round knit yarn over to make hole
symbols = knit 2 together
symbols = slip 1 stitch knitwise, knit 1, pass slipped stitch over stitch worked
diagram
diagram

Each of our patterns has specific tutorial videos to help you.

Do you have a question? See a list of frequently asked questions (FAQ)

Knitting tension is what determines the final measurements of your work, and is usually measured per 10 x 10 cm. It is provided like so: number of stitches in width x number of rows in height - eg: 19 stitches x 26 rows = 10 x 10 cm.

The knitting tension is very individual; some people knit/crochet loosely while others work tightly. You adjust the knitting tension with the needle size, which is why the suggested needle size only serve as a guide! You need to adjust this (up or down) to ensure that YOUR knitting tension matches the knitting tension provided in the pattern. If you work with a different knitting tension than provided you will have a different yarn consumption, and your work will have different measurements than what the pattern suggests.

The knitting tension also determines which yarns can replace each other. As long as you achieve the same knitting tension you can replace one yarn with another.

See DROPS lesson: How to measure your tension/gauge

See DROPS video: How to make a gauge tension swatch

The required amount of yarn is provided in grams, eg: 450 g. To calculate how many balls you’ll need you first need to know how many grams are in 1 ball (25g, 50g or 100g). This information is available if you click on the individual yarn quality on our pages. Divide the amount required with the amount of each ball. For example, if each ball is 50g (the most common amount), the calculation will be as follows: 450 / 50 = 9 balls.

The important thing when changing from one yarn to another is that the knitting/crochet tension remains the same. This is so that the measurements of the finished piece will be the same as on the sketch provided. It is easier to achieve the same knitting tension using yarns from the same yarn group. It is also possible to work with multiple strands of a thinner yarn to achieve the knitting tension of a thicker one. Please try our yarn converter. We recommend you to always work a test swatch.

Please NOTE: when changing yarn the garment might have a different look and feel to the garment in the photo, due to individual properties and qualities of each yarn.

See DROPS lesson: Can I use a different yarn than the one mentioned in the pattern?

All our yarns are categorised into yarn groups (from A to F) according to thickness and knitting tension – group A contains the thinnest yarns and group F the thickest. This makes it easier for you to find alternative yarns to our patterns, should you wish to switch yarn. All yarns within the same group have a similar knitting tension and can easily replace each other. However, different yarn qualities have different structures and properties which will give the finished work a unique look and feel.

Click here for an overview of the yarns in each yarn group

At the top of all our patterns you’ll find a link to our yarn converter, which is a helpful tool should you wish to use a different yarn than suggested. By filling in the yarn quality you wish to replace, the amount (in your size) and number of strands, the converter will present good alternative yarns with the same knitting tension. Additionally it will tell you how much you’ll require in the new qualities and whether you’ll need to work with multiple strands. Most skeins are 50g (some are 25g or 100g).

If the pattern is worked with multiple colours, every colour will have to be converted separately. Similarly, if the pattern is worked with several strands of different yarns (for example 1 strand Alpaca and 1 strand Kid-Silk) you will have to find alternatives for each, individually.

Click here to see our yarn converter

Since different yarns have different qualities and textures we have chosen to keep the original yarn in our patterns. However, you can easily find options among our available qualities by using our yarn converter, or simply pick a yarn from the same yarn group.

It is possible that some retailers still have discontinued yarns in stock, or that someone has a few skeins at home that they would like to find patterns for.

The yarn converter will provide both alternative yarn as well as required amount in the new quality.

If you think it's hard to decide what size to make, it can be a good idea to measure a garment you own already and like the size of. Then you can pick the size by comparing those measures with the ones available in the pattern's size chart.

You'll find the size chart at the bottom of the pattern.

See DROPS lesson: How to read size chart

The needle size provided in the pattern serves only as a guide, the important thing is to follow the knitting tension. And since knitting tension is very individual, you will have to adjust the needle size to ensure that YOUR tension is the same as in the pattern – maybe you’ll have to adjust 1, or even 2 needle sizes, up or down to achieve the correct tension. For this, we recommend that you work test swatches.

Should you work with a different knitting tension than the one provided, the measurements of the finished garment might deviate from the measurement sketch.

See DROPS lesson: How to measure your tension/gauge

See DROPS video: How to make a gauge tension swatch

Working a garment top-down provides more flexibility and room for personal adjustment. For example it is easier to try the garment on while working, as well as making adjustments to length of yoke and shoulder caps.

The instructions are carefully explaining every step, in the correct order. Diagrams are adjusted to the knitting direction and are worked as usual.

The diagram depicts all rows/rounds, and every stitch seen from the right side. It is read from bottom to top, from right to left. 1 square = 1 stitch.

When working back and forth, every other row is worked from the right side and every other row is worked from the wrong side. When working from the wrong side, the diagram will have to be worked reversed: from left to right, knit stitches are purled, purl stitches are knit etc.

When working in the round every round is worked from the right side and the diagram are worked from right to left on all rounds.

See DROPS lesson: How to read knitting diagrams

The diagram depicts all rows/rounds, and every stitch seen from the right side. It is worked from bottom to top, from right to left.

When working back and forth every other row is worked from the right side: from right to left and every other row is worked from the wrong side: from left to right.

When working in the round, every row in the diagram are worked from the right side, from right to left.

When working a circular diagram you start in the middle and work your way outwards, counter clockwise, row by row.

The rows usually start with a given number of chain stitches (equivalent to the height of the following stitch), this will either be depicted in the diagram or explained in the pattern.

See DROPS lesson: How to read crochet diagrams

Instructions for working several diagrams after each other on the same row/round, will often be written like so: “work A.1, A.2, A.3 a total of 0-0-2-3-4 times". This means you work A.1 once, then A.2 is worked once, and A.3 is repeated (in width) the number of times provided for your size – in this case like so: S = 0 times, M = 0 times, L=2 times, XL= 3 times and XXL = 4 times.

The diagrams are worked as usual: begin with the first row in A.1, then work the first row in A.2 etc.

See DROPS lesson: How to read knitting diagrams

See DROPS lesson: How to read crochet diagrams

The total width of the garment (from wrist-to-wrist) will be larger in the larger sizes, despite the actual sleeves being shorter. The larger sizes have longer sleeve caps and wider shoulders, so there will be a good fit in all sizes.

The measurement sketch/schematic drawing provides information regarding the full length of the garment. If it’s a jumper or a jacket the length is measured from the highest point on the shoulder (usually closest to the neckline), and straight down to the bottom of the garment. It is NOT measured from the tip of shoulder. Similarly, the length of yoke is measured from the highest point on the shoulder and down to where yoke is split into body and sleeves.

See DROPS lesson: How to read a schematic drawing

Diagrams are often repeated on the round or in height. 1 repeat is the diagram the way it appears in the pattern. If it says to work 5 repeats of A.1 in the round, then you work A.1 a total of 5 times after/next to each other in the round. If it says to work 2 repeats of A.1 vertically/in height you work the entire diagram once, then begin again at the start and work the entire diagram one more time.

Chain stitches are slightly narrower than other stitches and to avoid working the cast-on edge too tight, we simply chain more stitches to begin with. The stitch count will be adjusted on the following row to fit the pattern and measurement sketch.

The rib edge is more elastic and will contract slightly compared to, for example, stocking stitch. By increasing before the rib edge, you avoid a visible difference in width between the rib edge and the rest of the body.

It’s very easy to cast off too tightly, and by making yarn overs while casting off (and simultaneously casting these off) you avoid a too tight cast off edge.

See DROPS video: How to bind off with yarn overs (yo)

To achieve an even increase (or decrease) you can increase on, for example: every 3rd and 4th row alternately, like so: work 2 rows and increase on the 3rd row, work 3 rows and increase on the 4th. Repeat this until the increase is complete.

See DROPS lesson: Increase or decrease 1 st on every 3rd and 4th row alternately

Should you prefer to work in the round instead of back and forth, you may of course adjust the pattern. You’ll need to add steeks mid-front (usually 5 stitches), and follow the instructions. When you would normally turn and work from the wrong side, simply work across the steek and continue in the round. At the end you’ll cut the piece open, pick up stitches to work bands, and cover the cut edges.

See DROPS video: How to knit steeks and cut open

Should you prefer to work back and forth instead of in the round, you may of course adjust the pattern so you work the pieces separately and then assemble them at the end. Divide the stitches for the body in 2, add 1 edge stitch in each side (for sewing) and work the front and back pieces separately.

See DROPS lesson: Can I adapt a pattern for circular needles into straight needles?

Pattern repeats can vary slightly in the different sizes, in order to get the correct proportions. If you’re not working the exact same size as the garment in the photo, yours might deviate slightly. This has been carefully developed and adjusted so that the complete impression of the garment is the same in all sizes.

Make sure to follow instructions and diagrams for your size!

If you have found a pattern you like which is available in women’s size it’s not very difficult to convert it to men’s size. The biggest difference will be the length of sleeves and body. Start working on the women size that you think would fit across the chest. The additional length will be worked right before you cast off for the armhole/sleeve cap. If the pattern is worked top-down you can add the length right after the armhole or before the first decrease on sleeve.

Regarding additional yarn amount, this will depend on how much length you add, but it is better with a skein too many than too few.

All yarns will have excess fibres (from production) that might come off as lint or shedding. Brushed yarns (ie hairier yarns) have more of these loose, excess fibres, causing more shedding.

Shedding also depends on what is worn under or over the garment, and whether this pulls at the yarn fibres. It’s therefore not possible to guarantee that there will be no shedding

Below are some tips on how to get the best result when working with hairier yarns:

1. When the garment is finished (before you wash it) shake it vigorously so the looser hairs come off. NOTE: do NOT use a lint roller, brush or any method that pulls at the yarn.

2. Place the garment in a plastic bag and put it in your freezer - the temperature will cause the fibres to become less attached to each other, and excess fibres will come off easier.

3. Leave in the freezer for a few hours before taking it out and shaking it again.

4. Wash the garment according to the instructions on the yarn label.

Pilling is a natural process that happens to even the most exclusive of fibers. It's a natural sign of wear and tear that is hard to avoid, and that is most visible in high friction areas of your garment like a sweater's arms and cuffs.

You can make your garment look as new by removing the pilling, using a fabric comb or a pill/lint remover.

Still can't find the answer you need? Then scroll down and leave your question so one of our experts can try to help you. This will be done normally within 5 to 10 working days.
In the meantime, you can read the questions and answers that others have left to this pattern or join the DROPS Workshop on Facebook to get help from fellow knitters/crocheters!

You might also like...

Cloud's Hug

Anna Kowal, Poland

Cloud's Hug

@andsosheknits

Cloud's Hug

Marit Vågan, Norway

Cloud's Hug

Sylwia, Norway

Cloud's Hug

Knitting.lenaa, Norway

Cloud's Hug

Knitting.lenaa, Norway

Cloud's Hug

@littleandstitch, Norway

Post a comment to pattern DROPS 212-13

We would love to hear what you have to say about this pattern!

If you want to leave a question, please make sure you select the correct category in the form below, to speed up the answering process. Required fields are marked *.

Comments / Questions (67)

country flag Juliette wrote:

Bonjour, il y a beaucoup d'aiguilles différentes à acheter et elles ne sont pas toujours disponibles ! Est ce que je peux faire la manche de la taille M sur des aiguilles 5.5 40 cm à la place d'aiguilles double pointes 5.5 ? Ou cela sera trop juste ? Pour le corps (devant et dos) est-ce des aiguilles circulaires 5.5 et 4 en 80 cm suffisent ? Merci

12.03.2024 - 15:32

DROPS Design answered:

Bonjour Juliette, vous pouvez également utiliser juste 1 aiguille circulaire de 80 cm dans chacune des 2 tailles et ainsi tricoter en magic loop au lieu d'utiliser une aiguille circulaire de 40 cm (tant qu'il n'y a pas suffisamment de mailles pour la 80 cm) ou bien les aiguilles doubles pointes. Bon tricot!

12.03.2024 - 15:49

country flag Liv-Berit wrote:

Jeg lurer på overvidde i cm? I de forskjellige str. Slik at jeg kan velge rett str. Lekker genser🫶🏻

24.01.2024 - 11:43

DROPS Design answered:

Hei Liv-Berit, Du finner en målskisse på bunnen av sida, med alle mål i cm for de forskjellige størrelsene. God fornøyelse!

26.01.2024 - 07:42

country flag Galla wrote:

Bonjour à vous Ce modèle ce travaille avec 1 ou 2 fils Brushed Alpaca Silk ? Merci beaucoup

07.12.2023 - 16:10

DROPS Design answered:

Bonjour Mme Galla, on tricote avec juste 1 seul fil Brushed Alpaca Silk, adaptez la taille des aiguilles si besoin pour que l'échantillon soit juste et qu'ainsi vous obteniez les mêmes mesures que dans le schéma, Bon tricot!

08.12.2023 - 08:17

country flag Ewa wrote:

W opisie karczku jest: Dodawać tak samo w sumie 19 razy co 2 okrążenia (dla M). Co 2 okrążenia to znaczy że, przerabiam 2, dodaje w 3. W ten sposób po dodaniu oczek 19 razy, długość robótki wyniosła 24 cm. Jeśli jednak chodziło o dodawanie w co 2 okrążeniu, to powinno być to inaczej napisane. Uważam, że to jest błąd! Co powinnam teraz zrobić, spruć, czy zostawić? Nie wiem jak długość karczku (+5cm) wpłynie na wygląd robótki.

30.11.2023 - 06:49

DROPS Design answered:

Witaj Ewo, co 2 okrążenia oznacza, że w jednym okrążeniu nie dodajesz oczek, a w kolejnym dodajesz, itd. Spójrz na kurs DROPS TUTAJ. Przymierz sweter i zobacz czy podkrój rękawa nie będzie zbyt nisko. Jeśli tak, niestety konieczne będzie prucie. Pozdrawiamy!

30.11.2023 - 09:23

country flag Sine Martinussen wrote:

Ups … Der er jo en række ret mellem hver omgang 😬 Det havde jeg ikke lige set. Nu giver det mening 😃

20.08.2023 - 11:58

country flag Sine Martinussen wrote:

Jeg er nået til A2 på ærmet og har 2 spørgsmål. 1) Er det korrekt forstået at på hveranden række vil der være to omslag efter hinanden da række 1 slutter med et omslag og række 2 starter med et omslag? 2) I gentagelsen af mønstret A2 er der en række ret, skal den også strikkes for hver 4 pind? Eller er det kun ved første runde? Jeg synes ikke jeg kan se en række ret på billederne. DBH Sine

20.08.2023 - 11:48

DROPS Design answered:

Hei Sine. Så flott at du fant det ut selv. Håper du da fikk fortsette å strikker, god fornøyelse videre. mvh DROPS Design

21.08.2023 - 12:56

country flag Sanne wrote:

Beste, 150gr wol voor maat xxl? Is dat correct? MvrGr, Sanne

06.08.2023 - 02:11

DROPS Design answered:

Hi Sanne, you need 175 gr in XXL :)

18.08.2023 - 09:58

country flag Winnie Winkler wrote:

Hej Jeg strikker i str XL. Jeg kan ikke få indtagningerne ved ærmet til at passe. Når jeg har taget ind på hver pind 5 gange, så har jeg kun masker til at tage ind en gang mere, men jeg skal gøre det på hver 2. Pind 4 gange. Så får jeg 9 masker for lidt…

11.07.2023 - 07:37

DROPS Design answered:

Hei Winnie. Når du skal strikke ermene har du 64 masker, så strikker du opp 10 nye masker under ermet = 74 maske. Så strikkes det glattstrikk rundt. På 2.omgang starter fellingen under ermet. Les FELLETIPS til ermen hvordan det felles. Du skal felle på hver omgang 5 ganger og det felles 2 masker på hver omgang / 1 maske på hver side av merketråden, så etter 5 omganger har du 64 masker på pinnen. Nå skal det felles på hver 2. omgang 4 ganger. Altså det strikkes 8 omganger der det felles på hver 2. omgange = 4 felte masker i hver side = 8 felte masker = 64 - 8 = 54 masker på pinnen. mvh DROPS Design

24.07.2023 - 14:13

country flag Hege wrote:

Str M. Har strikker alle fellingene på den ene armen, men står nå fast. Fortsett videre med glattstrikk til ermet måler 11-11-10-8-7-5 cm fra delingen. Nå strikkes det mønster Delingen, er det fra der armen begynner under ermet, eller mener de fra siste felling på armen? Om det er fra der armen begynner under ermet, så stemmer ikke dette da ermet etter fellingen nå måler 14 cm.

07.03.2023 - 13:12

country flag Susanne wrote:

Jeg vil høre om der er et garn alternativ til denne opskrift som ikke er langhåret/lodden, som man kan bruge som alternativ? tak

04.03.2023 - 15:48

DROPS Design answered:

Hej Susanne, jo du kan bruge alle dem som tilhører garngruppe C Garngrupper det er kun Brushed Alpaca Silk og DROPS Air som er langhåret :)

07.03.2023 - 15:49