
Looking for a yarn?


Comments / Questions (23)
![]() Erna wrote:
Erna wrote:
Hvordan kan man bestille garn og mønster 203-3 ?
12.02.2025 - 12:11DROPS Design answered:
Hej Erna, klik på "Bestil" knappen til venstre i opskriften, så kommer du direkte ind på webshoppen til en af vores butikker. Her fylder du antal nøgler og farver i din bestilling :)
12.02.2025 - 12:51
![]() Majken Bäckström wrote:
Majken Bäckström wrote:
Har Drops en app dom jag kan ladda ner?
28.04.2024 - 05:52DROPS Design answered:
Hei Majken. Nei, men våre nettsider er tilpasset mobiltelefoner. mvh DROPS Design
29.04.2024 - 11:01
![]() Minna Peltonen wrote:
Minna Peltonen wrote:
Moi. Tulin kysymään liittyen tohon peittoon. Kysymys 1: Voiko noita värejä vaihdella esim. Ottaa 2 kerää niitä värejä mitä tarvitsee vain 1 kerä? Kun katson tota värilistaa niin siinä on sellaisia värejä, joista en pidä. Kysymys 2: Voiko tehdä enemmän ruutuja kuin 35 yhteensä? Meinaan ajattelin virkata niitä ruutuja vähän enemmän, koska siitä tulisi kiva peitto, jota käyttää talvisin + syksyisin. Ett siinä on pari kysymystä, ennenkun alan tekemään ton peiton.
03.09.2023 - 22:59DROPS Design answered:
Hei! Voit tietysti vaihdella värejä keskenään, eli käyttää enemmän/vähemmän jotain tiettyä väriä. Voit tehdä haluamasi määrä ruutuja.
05.09.2023 - 13:41
![]() Sagrario wrote:
Sagrario wrote:
Hay algún tutorial de cómo unir los grannys de la manera que pide el proyecto? Gracias la manta es preciosa
14.06.2023 - 23:57
![]() Gosia wrote:
Gosia wrote:
Dlaczego na zdjęciu koc wygląda tak jakby kwadraty były łączone ze sobą za pomocą oczek zamykających a inaczej jest to opisane w shemacie? Jak połączyc ze sobą kwadraty żeby koc wyglądał jak ze zdjęcia?
18.05.2023 - 16:59DROPS Design answered:
Witaj Gosiu, na zdjęciu tego dobrze nie widać na czarnym kolorze, ale kwadraty są łączone jak w opisie. Oczywiście możesz je połączyć inaczej np. na szydełku oczkami zamykającymi, ścisłymi, albo zszyć za pomocą igły. Spróbuj z 2 kwadratami i zobacz czy inna opcja nie podoba Ci się bardziej. Pozdrawiamy!
19.05.2023 - 08:48
![]() Kristina wrote:
Kristina wrote:
Hej Jag skulle gärna virka denna pläd men enfärgad och med garnet drops big merino. Kan jag gå hjälp i att konvertera mönstret och räkna ut hur mycket garn jag behöver att köpa?
27.11.2021 - 12:30DROPS Design answered:
Hej Kristina, DROPS Karisma og DROPS Big Merino tilhører ikke samme garngruppe, så hækler du i Big Merino vil firkanterne blive større og der vil gå mere garn. Vi kender desværre ikke garnforbruget i ensfarvet.
29.11.2021 - 14:30
![]() Esther wrote:
Esther wrote:
Ich habe eine Frage zum Farbwechsel. Der Endfaden der letzten Farbe wird mit eingehäkelt. Und was passiert mit dem Fadenende der neuen Farbe. Danke für Ihre Hilfe
25.04.2021 - 16:21DROPS Design answered:
Liebe Esther, Sie können über dieses Faden auch mal häkeln, oder dann am Ende diese Faden - dieses Video zeigt eine andere Technik, die Sie auch in Runden benutzen können. Viel Spaß beim häkeln!
26.04.2021 - 08:01
![]() Lorenza wrote:
Lorenza wrote:
Good day I would like to do this blanket but in a bigger size : roughly cm 130x170. How many more squares should I do and how many more balls of wool should I purchase? Many thanks Lorenza
23.01.2021 - 09:48
![]() REINE MARIE wrote:
REINE MARIE wrote:
Excusez-moi mais avez vous une vidéo car je n'arrive pas comme il faut que les carrés doivent se monter en hauteur là j'ai fais 2en hauteur mais lorsque j'arrive a la fin j ai fais3mailles en l'air mais ou je dois mettre l'autre carré ?excusez moi ;merci de votre reponse
29.06.2020 - 18:53DROPS Design answered:
Bonjour Reine Marie, nous n'avons pas de vidéo pour ce type d'assemblage, après avoir assemblé les 2 premiers carrés (= après la dernière maille serrée autour du dernier coin des 2 carrés), crochetez les 3 ml, puis prenez les 2 carrés suivants, et crochetez 1 ms dans le premier coin de ces 2 carrés, et répétez de *-*. Continuez ainsi et terminez par 1 ms dans le dernier coin des 2 derniers carrés de la bande. Bon crochet!
30.06.2020 - 10:52
![]() REINE MARIE wrote:
REINE MARIE wrote:
Merci DROPS DESIGN ;mais lorsque l'on termine avec les 3ml apres le coin ,faut-il couper le fil ou continuer sur les deux autres carrés , excuse -moi .merci de votre réponse
29.06.2020 - 14:31DROPS Design answered:
Bonjour Reine Marie, les 3 mailles en l'air se font à la transition entre les carrés, après ces 3 ml, crochetez 1 ms autour du coin des 2 carrés suivants et reprenez de *-*. Bon crochet!
29.06.2020 - 15:18
|
|||||||||||||
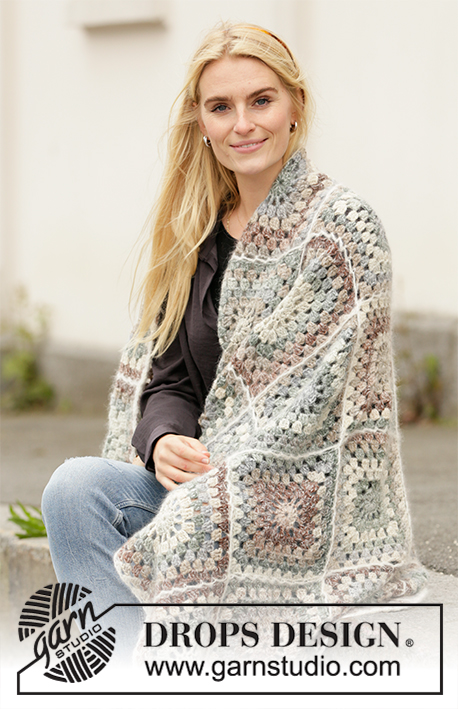
Granny Hugs#grannyhugsblanket |
|||||||||||||
 |
 |
||||||||||||
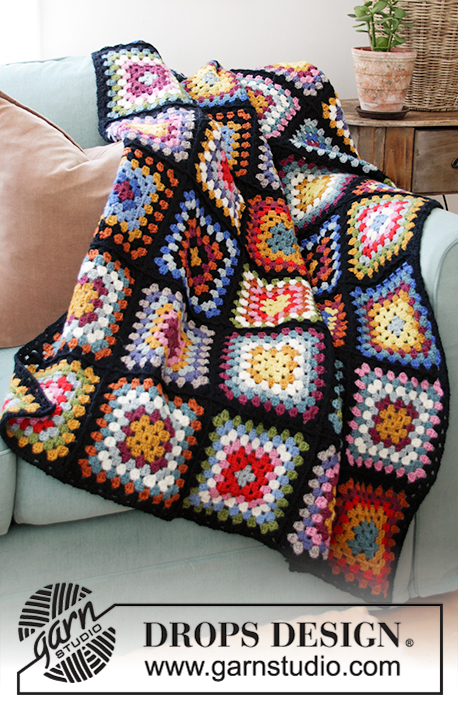
Crocheted blanket with granny squares in DROPS Karisma.
DROPS 203-3 |
|||||||||||||
|
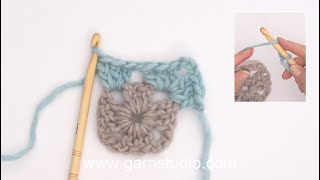
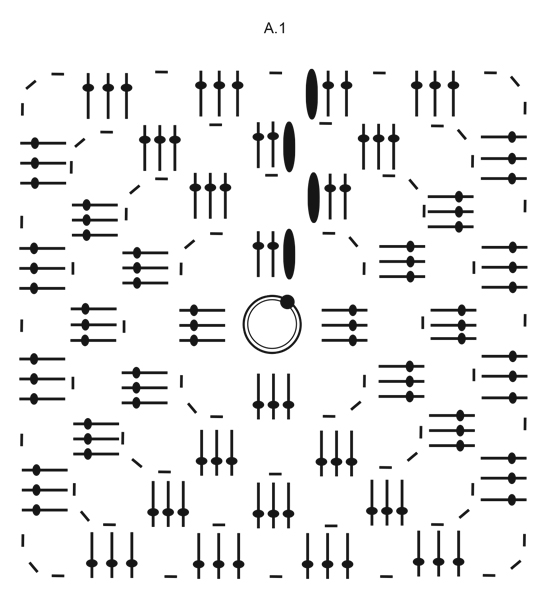
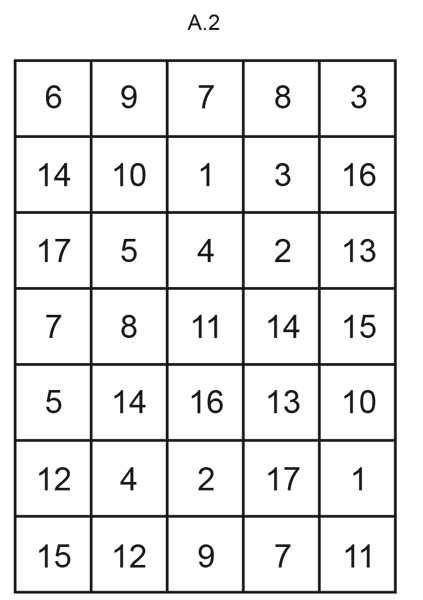
------------------------------------------------------- EXPLANATIONS FOR THE PATTERN: ------------------------------------------------------- GRANNY SQUARE: See diagram A.1. The first 4 rounds are drawn in the diagram, then you continue in the round in the same way (alternately from right and wrong side) until you have worked a total of 8 rounds. COLOR COMBINATIONS: The squares are crocheted in 17 different color combinations as described below. SQUARE 1 (2 items): Cast on + rounds 1 + 2: dark mustard Round 3: dark old rose Round 4: light grey green Round 5: off white Round 6: sea green Round 7: medium pink Round 8: black SQUARE 2 (2 items): Cast on + rounds 1 + 2: lemon Round 3: dark mustard Round 4: off white Round 5: light grey green Round 6: sea green Round 7: dark old rose Round 8: black SQUARE 3 (2 items): Cast on + rounds 1 + 2: medium pink Round 3: dark mustard Round 4: dark old rose Round 5: bright blue Round 6: sea green Round 7: light grey green Round 8: black SQUARE 4 (2 items): Cast on + rounds 1 + 2: dark old rose Round 3: medium pink Round 4: dark mustard Round 5: light grey green Round 6: denim blue Round 7: light beige brown Round 8: black SQUARE 5 (2 items): Cast on + round 1: dark old rose Round 2: bright blue Rounds 3 + 4: light denim blue Round 5: dark mustard Round 6: black Round 7: orange Round 8: black SQUARE 6 (1 item): Cast on + rounds 1 + 2: light beige brown Round 3: dark old rose Round 4: orange Round 5: denim blue Round 6: light grey green Round 7: light olive Round 8: black SQUARE 7 (3 items): Cast on + rounds 1 + 2: lemon Round 3: dark mustard Round 4: dark old rose Round 5: medium pink Round 6: denim blue Round 7: light beige brown Round 8: black SQUARE 8 (2 items): Cast on + rounds 1 + 2: red Round 3: medium pink Round 4: light grey green Round 5: denim blue Round 6: off white Round 7: dark mustard Round 8: black SQUARE 9 (2 items): Cast on + round 1: light grey green Round 2 + 3: red Round 4: medium pink Round 5: off white Round 6: light denim blue Round 7: light olive Round 8: black SQUARE 10 (2 items): Cast on + round 1: light grey green Rounds 2 + 3: lemon Round 4: dark mustard Round 5: dark old pink Round 6: sea green Round 7: bright blue Round 8: black SQUARE 11 (2 items): Cast on + rounds 1 + 2: sea green Rounds 3 + 4: dark mustard Round 5: red Round 6: dark old rose Round 7: orange Round 8: black SQUARE 12 (2 items): Cast on + rounds 1 + 2: dark mustard Round 3: dark old rose Round 4: light grey green Round 5: off white Round 6: sea green Round 7: orange Round 8: black SQUARE 13 (2 items): Cast on + rounds 1 + 2: black Round 3: light denim blue Round 4: bright blue Round 5: lemon Round 6: dark old rose Round 7: orange Round 8: black SQUARE 14 (3 items): Cast on + round 1: dark mustard Round 2: black Round 3: dark old rose Round 4: orange Round 5: black Round 6: light grey green Round 7: bright blue Round 8: black SQUARE 15 (2 items): Cast on + round 1: light denim blue Round 2: off white Round 3: medium pink Round 4: red Round 5: light grey green Round 6: light olive Round 7: dark mustard Round 8: black SQUARE 16 (2 items): Cast on + rounds 1 + 2: lemon Round 3: red Round 4: medium pink Round 5: orange Round 6: off white Round 7: light olive Round 8: black SQUARE 17 (2 items): Cast on + round 1: light grey green Rounds 2 + 3: dark old rose Round 4: medium pink Round 5: off white Round 6: light olive Round 7: sea green Round 8: black ------------------------------------------------------- START THE PIECE HERE: ------------------------------------------------------- BLANKET – SHORT OVERVIEW OF THE PIECE: The blanket is made up of granny squares in 17 different color combinations. Work the right number of squares as described above in each color combination = a total of 35 squares. Then work the squares together before working an edge around the whole blanket. 1 GRANNY SQUARE: Work 4 chain stitches with hook size 4.5 mm = US 7 and the cast-on color of the square – read COLOR COMBINATIONS. Form the chain stitches into a ring with 1 slip stitch in the first chain stitch worked. Then work A.1 in the round with alternately 1 round from the right side and 1 round from the wrong side as shown in A.1. The first 4 rounds are drawn in A.1, then continue in the same way until you have worked a total of 8 rounds. REMEMBER THE CROCHET GAUGE! Cut and fasten the strands. The square measures approx. 20 x 20 cm = 8" x 8". ASSEMBLY: Lay the squares out as shown in A.2 or as desired. There should be 5 squares in width and 7 squares in height. Make sure all the squares are right side up. The squares are first worked together in length, then in width. Work them together with black as follows: Lay 2 squares together, wrong side to wrong side and work through both layers as follows: Work 1 single crochet around the corner, * 4 chain stitches, skip the next 3 double crochets, work 1 single crochet around the next chain stitch*, work from *-* up to and including the next corner (= 8 chain-spaces) and work 3 chain stitches (= transition to the next 2 squares). Repeat on the next 2 squares and then continue until one double-length of squares is completed. Cut and fasten the strand. Then work this double length together with the next length in the same way. When all the lengths have been worked together, work them together in width. Cut and fasten the strands. EDGE: Work an edge with black around the whole blanket in the same way as the last round on the squares; i.e. work as follows: Fasten the strand with 1 slip stitch in the last double crochet before one of the corner-spaces on the blanket and begin the round with 3 chain stitches. Then work 3 double crochets around each chain stitch and 1 chain stitch between each double crochet group. In the corners work 3 double crochets, 3 chain stitches and 3 double crochets. In the transition between 2 squares along all sides work 3 double crochets around the corner of the first square, 1 chain stitch and 3 double crochets around the corner of the next square. When you have worked around the whole blanket finish the round with 1 slip stitch in the 3rd chain stitch from the beginning of the round. Cut and fasten the strand. |
|||||||||||||
Diagram explanations |
|||||||||||||
|
|||||||||||||
|
|||||||||||||
|
|||||||||||||
Have you finished this pattern?Tag your pictures with #dropspattern #grannyhugsblanket or submit them to the #dropsfan gallery. Do you need help with this pattern?You'll find 9 tutorial videos, a Comments/Questions area and more by visiting the pattern on garnstudio.com. © 1982-2025 DROPS Design A/S. We reserve all rights. This document, including all its sub-sections, has copyrights. Read more about what you can do with our patterns at the bottom of each pattern on our site. |
|||||||||||||


With over 40 years in knitting and crochet design, DROPS Design offers one of the most extensive collections of free patterns on the internet - translated to 17 languages. As of today we count 314 catalogs and 11822 patterns - 11812 of which are translated into English (US/in).
We work hard to bring you the best knitting and crochet have to offer, inspiration and advice as well as great quality yarns at incredible prices! Would you like to use our patterns for other than personal use? You can read what you are allowed to do in the Copyright text at the bottom of all our patterns. Happy crafting!
Post a comment to pattern DROPS 203-3
We would love to hear what you have to say about this pattern!
If you want to leave a question, please make sure you select the correct category in the form below, to speed up the answering process. Required fields are marked *.