
Popular categories
Looking for a yarn?


|
||||||||||
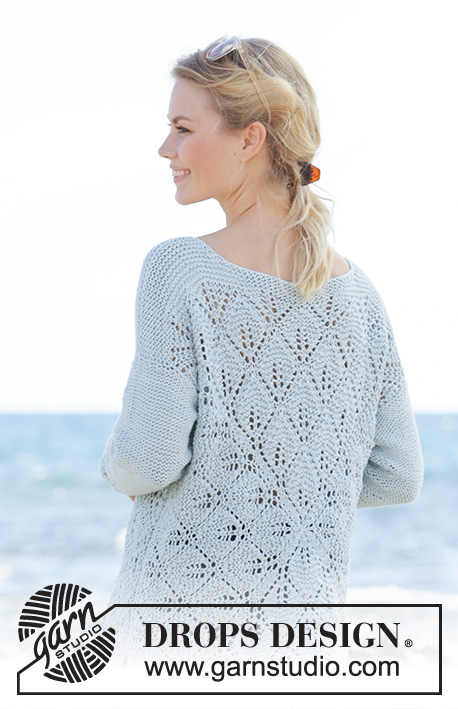
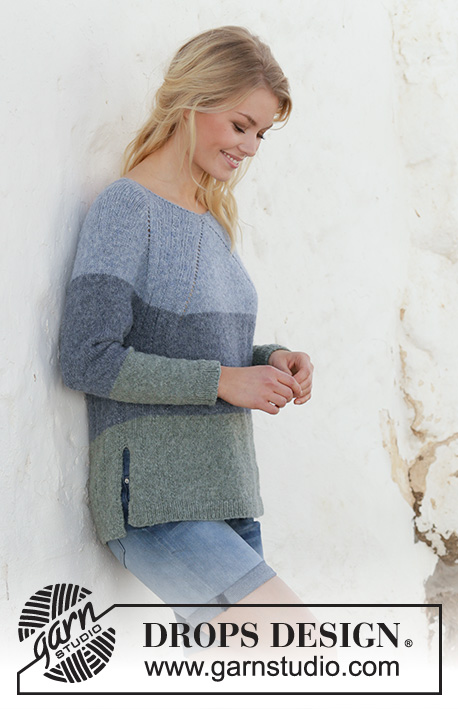
Sweet Nothing Jumper |
||||||||||
 |
 |
|||||||||
Knitted jumper with raglan in DROPS Sky. Piece is knitted top down with stripes and vents in the sides. Size: S - XXXL
DROPS 199-18 |
||||||||||
|
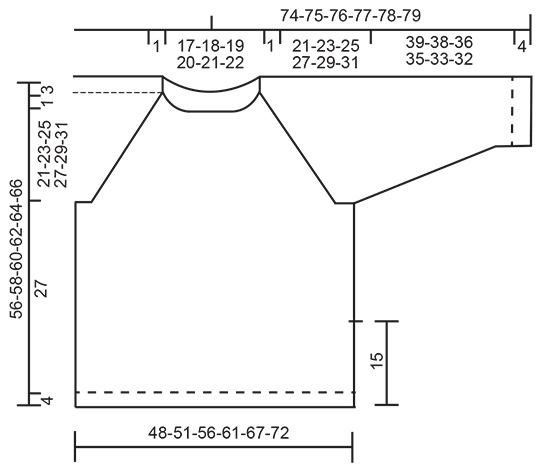
---------------------------------------------------------- EXPLANATION FOR THE PATTERN: ---------------------------------------------------------- GARTER STITCH (worked in the round): 1 ridge vertically = 2 rounds, i.e. knit 1 round and purl 1 round. GARTER STITCH (back and forth): Knit all rows. 1 ridge vertically = knit 2 rows. PATTERN: See diagrams A.1 to A.3. Choose diagram for your size. INCREASE TIP-1 (evenly): To calculate how to increase evenly, use the total number of stitches on row (e.g. 95 stitches), minus edge stitches in garter stitch in each side (= 4 stitches) and divide stitches by number of increases to be done (e.g. 20) = 4.5. In this example increase by making 1 yarn over after alternately every 4th and 5th stitch. On next row work yarn overs twisted to avoid holes. STRIPES BODY: Work as follows: Stripe-1: Work 18-19-19-20-21-21 cm with light jeans blue. Stripe-2: Work 18-18-19-20-20-21 cm with jeans blue. Stripe-3: Work with light sea green until finished measurements (17-18-19-19-20-21 cm). STRIPES SLEEVE: Continue with jeans blue until stripe measures 23 cm in total in all sizes, then continue to work with light sea green until finished measurements. RAGLAN: Increase 1 stitch before/after marker threads on sleeves as follows: Work until first marker thread on sleeve,(marker thread sits here), knit 1, make 1 yarn over, work until 1 stitch before next marker thread, make 1 yarn over, knit 1, (marker thread sits here). Repeat in the other sleeve (= 4 stitches increased on round). On next round knit yarn overs to make holes. Then work the new stitches in stocking stitch. DECREASE TIP (applies to sleeves): Decrease 1 stitch on each side of marker thread as follows: Work until 3 stitches remain before marker thread and knit 2 together, knit 2 (marker thread is between these stitches), slip 1 stitch knitwise, knit 1, pass slipped stitch over stitch worked. ---------------------------------------------------------- START THE PIECE HERE: ---------------------------------------------------------- JUMPER - SHORT OVERVIEW OF THE PIECE: Worked in the round on circular needle, top down. Work body in the round down to vent in the sides, then finish front piece and back piece back and forth on circular needle separately. Work sleeves in the round on a short circular needle/double pointed needles. JUMPER: NECK EDGE: Cast on 92-96-100-104-108-112 stitches on circular needle size 3.5 mm with light jeans blue. Purl 1 round and knit 2 rounds. YOKE: Switch to circular needle size 4.5 mm and work STRIPES BODY - see explanation above, and work pattern as follows: Work * A.1 – choose diagram for you size (= 16-16-16-20-20-20 stitches), A.2 (= 1 stitch), A.3 – choose diagram for your size (= 16-16-16-20-20-20 stitches), insert 1 marker thread here (= back piece/front piece), knit 1, make 1 yarn over, knit 11-13-15-9-11-13, make 1 yarn over, knit 1, insert a marker thread here (= sleeve) *, work from *-* 1 more time on round. 1 stitch for RAGLAN has now been increased – read explanation above, in each side of sleeve and 1 stitch has been increased on each side of middle stitch on front piece and back piece (middle stitch = A.2) = 100-104-108-112-116-120 stitches. REMEMBER THE KNITTING TENSION! Continue in the round with pattern as follows and increase for raglan on sleeves every other round 21-25-26-31-31-30 more times (22-26-27-32-32-31 times in total), AT THE SAME TIME when diagrams have been worked vertically, repeat the last 2 rounds vertically 20-23-27-28-33-36 more times (i.e. increase 1 stitch on each side of A.2 until there are 49-55-63-65-75-81 stitches in stocking stitch between A.1 and A.3 on back piece and on front piece) = 284-316-340-368-392-404 stitches. Then continue with texture over the 18-18-18-22-22-22 stitches in A.1 and A.3 and stocking stitch over the remaining stitches until piece measures 22-24-26-28-30-32 cm measured from cast-on edge and down to mid front. Work next round as follows: Work pattern as before over the first 85-91-99-109-119-125 stitches (= back piece), slip the next 57-67-71-75-77-77 stitches on a stitch holder (= sleeve), cast on 10-10-12-12-14-18 stitches on needle (= in the side under sleeve), work the next 85-91-99-109-119-125 stitches (= front piece), slip the next 57-67-71-75-77-77 stitches on a stitch holder (= sleeve), cast on 10-10-12-12-14-18 new stitches in the side under sleeve. NOW MEASURE PIECE FROM HERE! BODY: = 190-202-222-242-266-286 stitches. Insert a marker thread in the middle of the new stitches cast-on in the side under the sleeves (= 5-5-6-6-7-9 new stitches on each side of marker thread). Work pattern as before over the 18-18-18-22-22-22 stitches in A.1 and A.3, work in garter stitch over the middle 4 stitches in each side (i.e. 2 stitches in garter stitch on each side of marker thread in each side) and work the remaining stitches on round in stocking stitch. When piece measures 16 cm, work until marker thread in one side of piece. Then work back and forth over half the stitches on round for front/back piece, so make a vent in each side. BACK PIECE: = 95-101-111-121-133-143 stitches. Work pattern A.1/A.3, stocking stitch and 2 stitches in garter stitch in each side as before. When piece measures 27 cm, increase 20-20-22-24-26-28 stitches evenly – read INCREASE TIP (evenly) = 115-121-133-145-159-171 stitches. Switch to circular needle size 3.5 mm. Work rib (knit 1/purl 1) with 2 edge stitches in garter stitch in each side. When rib measures 4 cm, cast off with knit over knit and purl over purl. Make sure that the cast-off edge is not too tight. You can use a larger needle size if the cast-off edge is tight. Jumper measures approx. 56-58-60-62-64-66 cm from shoulder and down. FRONT PIECE: Work as back piece. SLEEVE: Slip the 57-67-71-75-77-77 stitches from stitch holder in one side of piece on a short circular needle/double pointed needles size 4.5 mm and pick up 1 stitch in each of the 10-10-12-12-14-18 stitches cast on under sleeve = 67-77-83-87-91-95 stitches. Insert 1 marker thread in the middle of the new stitches under sleeve (= 5-5-6-6-7-9 new stitches on each side of marker thread). Work in stocking stitch in the round. When piece measures 4 cm from division, decrease 2 stitches mid under sleeve - read DECREASE TIP. Decrease as follows in the different sizes: Size S: Decrease every 2 cm 7 times and every 3 cm 6 times. Size M: Decrease every 2 cm 10 times and every 3 cm 4 times. Size L: Decrease every cm 5 times and every 2 cm 12 times. Size XL: Decrease every cm 9 times and every 2 cm 9 times. Size XXL: Decrease every cm 12 times and every 2 cm 7 times. Size XXXL: Decrease every cm 16 times and every 2 cm 4 times. When all decreases are done there are 41-47-49-51-53-55 stitches. Continue until sleeve measures 39-38-36-35-33-32 cm from division (shorter measurements in the larger sizes because of wider neck and longer yoke). Knit 1 round while increasing 9-9-9-11-11-11 stitches evenly = 50-56-58-62-64-66 stitches. Switch to double pointed needles size 3.5 mm and work rib = knit 1/purl 1 for 4 cm. Cast off with knit over knit and purl over purl but to avoid at tight cast-off edge make 1 yarn over after every 6th stitch at the same time cast off (cast off yarn overs as stitches). Sleeve measures approx. 43-42-40-39-37-36 cm from division. Work the other sleeve the same way. |
||||||||||
Diagram explanations |
||||||||||
|
||||||||||

|
||||||||||
|
||||||||||
|
Have you made this or any other of our designs? Tag your pictures in social media with #dropsdesign so we can see them! Do you need help with this pattern?You'll find tutorial videos, a Comments/Questions area and more by visiting the pattern on garnstudio.com. © 1982-2024 DROPS Design A/S. We reserve all rights. This document, including all its sub-sections, has copyrights. Read more about what you can do with our patterns at the bottom of each pattern on our site. |
||||||||||


With over 40 years in knitting and crochet design, DROPS Design offers one of the most extensive collections of free patterns on the internet - translated to 17 languages. As of today we count 304 catalogues and 11422 patterns - 11422 of which are translated into English (UK/cm).
We work hard to bring you the best knitting and crochet have to offer, inspiration and advice as well as great quality yarns at incredible prices! Would you like to use our patterns for other than personal use? You can read what you are allowed to do in the Copyright text at the bottom of all our patterns. Happy crafting!
Comments / Questions (21)
Hallo liebes Team, ich stricke Größe L. Meine Frage: Die Streifenfolge für den Rumpf erfolgt nach 19 cm, die Streifenfolge für den Ärmel erfolgt nach 23 cm, die Ärmelabtrennung erfolgt nach 26 cm. Dann muss ich für 7 cm mit 4 Knäulen arbeiten? Gibt es eine andere Lösung oder habe ich es falsch verstanden? Lieben Gruß Angelika
14.07.2023 - 08:54DROPS Design answered:
Liebe Angelika, nach 19 cm (vom Anfang) stricken Sie die Passe weiter mit jeansblau - dann, nach 26 cm (= 7cm wurden mit jeansblau gestrickt) teilen Sie die Arbeit und stricken Sie Rumpf und Ärmel separat weiter - 12 cm noch mit jeansblau dann mit hell seegrün bis zur Ende, für die Ärmel stricken Sie mit jeansblau weiter bis die Ärmel 23 cm (noch 16 cm nach der Verteilung + 7 cm vor der Verteilung = 23 cm) misst, dann stricken Sie mit hell seegrün bis zur Ende. Viel Spaß beim stricken!
27.07.2023 - 10:51Me encanta esta prenda, pero cuando veo el patrón, no sé cómo hacer los cuatro primeros agujeros que están en el centro del delantero y en el centro de la espalda. Aparecen en las fotos, pero no en el patrón. O sencillamente estoy haciendo algo mal, ¿no?
06.04.2023 - 07:48DROPS Design answered:
Hola Raquel, los primeros agujeros en el centro son las hebras trabajadas a cada lado del punto central, de A.2 . Las hebras trabajadas en el patrón se trabajan después de derecho para que queden los agujeros.
06.04.2023 - 23:03Bonjour ! Je suis en train de faire le pull mais je ne comprends pas tout. J'ai déjà tricoté les 26 fois le raglan (Taille M). Dois-je continuer d'augmenter pour le raglan ? Ou pas ? Car il me reste encore des rangs à faire pour atteindre les 55 mailles pour les milieux. J'espère avoir été claire dans mes questions et que vous saurez me répondre... Cordialement, Lenablg.
18.08.2021 - 12:16DROPS Design answered:
Bonjour Lena, quand les diagrammes sont terminés, continuer à augmenter comme pour la dernière augmentation de part et d'autre de A.2 (= après A.1 et avant A.3 sur le devant et le dos) jusqu'à ce qu'il y ait 55 cm (en M) entre A.1 et A.3 - continuez à augmenter tous les 2 tours aussi pour les manches (26 augmentations de chaque côté des manches au total). Bon tricot!
18.08.2021 - 14:27I didn't find any reference to short rows or something like that to raise neckline, however the diagram seems to have it... If it hasn't, any idea how to manage raising back neck at the same time I'm working on raglan increases? Thank you very much for your help!
06.05.2021 - 15:12DROPS Design answered:
Dear Laura, no there is not any raise in the back-neckline on this piece. If would be difficult to raise it withouth disturbing the pttern, but íou can add a few short rows, starting from the middle of the neck, and go back and forth for a couple of times. Happy Knitting!
06.05.2021 - 15:21Dear Madame I have printed Patt No. Drops 199-18Sweet Nothing Jumper. We don,t stock your wool in South Africa and am using Elle Denim Look. Would you please be so kind to explain the pattern more clearly for me? just love the pattern.\r\nThanking you in advance
08.03.2021 - 18:15DROPS Design answered:
Dear Mrs Geydien, our yarns are available all around the world thanks to the DROPS stores shipping worldwide - see the list here. To help you understanding the patterns you will find a list of videos and lessons at the bottom of the page. Feel free to ask any question here or contact the store where you bought the yarn for any individual assistance. Happy knitting!
09.03.2021 - 08:00Jeg har samme problem med deling til krop og ærmer.. Strikker str L og har 340 masker.. Der skal deles i 99+71+99+71 masker som giver rette antal.. Men glatstrik i for og bagstykke er 63 masker plus 18 masker struktur i mønsteret i hver side = 89 masker Hvis jeg strikker 99 i for og bagstykke skrider det ift mønsteret?
18.02.2021 - 20:44Jeg har startet forfra 2 gange. Når jeg skal skille krop og ærmer, har 81 masker til ærme og ikke 71 som beskrevet i opskriften. Jeg strikker str L. Jeg kan ikke se hvad det er jeg gør forkert. Kan I hjælpe mig?
13.04.2020 - 07:18DROPS Design answered:
Hei Helle. Litt usikker på hvor det går galt hos deg, men i oppskriften står det, i str L: Neste omgang strikkes slik: Strikk mønster som før over de første 99 maskene (= bakstykke), sett de neste 71 maskene på en tråd (= erme), legg opp 12 masker på pinnen (= i siden under ermet), strikk de neste 99 maskene (= forstykke), sett de neste 71 maskene på en tråd (= erme), legg opp 12 masker på pinnen (= i siden under ermet). Du setter selv de 71 maskene på en tråd, så da er jeg usikker på hvor du får de 81 maskene ifra. mvh DROPS design
27.04.2020 - 13:36Il campione 10x10 è con i ferri 4.50 oppure 3.50? Grazie mille
19.12.2019 - 22:07DROPS Design answered:
Buonasera Manuela, il campione solitamente si lavora con i ferri con cui si lavora la maggior parte del capo, in questo caso misura 4,5 mm . Si ricordi che comunque il n° di ferri è indicativo, l'importante è ottenere il campione indicato. Buon lavoro!
19.12.2019 - 22:35És la primera ves que hago un sueter empezando por arriba y en este modelo me confunde los puntos del raglan con el diagrama,no se cual és el medio de la Espada,,,,,,,disculpes,,,,,
27.11.2019 - 16:15DROPS Design answered:
Hola Roser. El canesú de esté patrón no es fácil. A.2 (= 1 punto) es el punto central del delantero y de la espalda. Tienes que trabajar muy atentamente según el patrón. Utiliza los marcapuntos!
30.11.2019 - 20:41In order to get the pattern, must a person print it to get it or is there a way to save it for later?
27.06.2019 - 20:14DROPS Design answered:
Dear Mrs Adams, you can either print the pattern clicking on the icon with the printer/Pattern (and choose a virtual printer to save it as a .PDF) or add it to your favourites by clicking on the icon with a heart/Add to favourites. Happy knitting!
28.06.2019 - 06:28