
Popular categories
Looking for a yarn?


Comments / Questions (30)
![]() Dörthe Otto wrote:
Dörthe Otto wrote:
Und noch eine Frage........ Ich arbeite das erste Mal nach Anleitung, vielleicht denke ich zu kompliziert 🙃 Beginne ich mit den Zunahmen in den Zunahmereihen erst ab A 2? Also berechne ich die Zunahme über die Maschenanzahl nur aus A2 oder aus A2 und A3? Oder ist es egal und ich berechne die Zunahme aus den Gesamtmaschen abzüglich Blendmaschen? Ich hoffe, ich hab es verständlich formuliert..... Lieben Dank!
26.06.2023 - 09:47DROPS Design answered:
Liebe Frau Otto, die Zunahmen werden über alle Maschen ausser die Blenden-Maschen kalkuliert - siehe ZUNAHMETIPP-1 (gleichmäßig verteilt): am Anfang der schriftlichen Anleitung und auch diese Lektion. Viel Spaß beim stricken!
26.06.2023 - 13:14
![]() Dörthe Otto wrote:
Dörthe Otto wrote:
Hallo, wenn ich die Erhöhung stricke, mache ich diese kraus rechts wie das Bündchen oder glatt rechts, wie das Rumpfteil? Vielen Dank, ich freue mich auf Antwort und auf's Weiterstricken!
22.06.2023 - 13:57DROPS Design answered:
Liebe Frau Otto, die Erhöhung wird krausrechts gestrickt. Viel Spaß beim stricken!
22.06.2023 - 14:22
![]() Gun-Britt Mattsson wrote:
Gun-Britt Mattsson wrote:
197-15 Rad 11 i A1, A2,, A3 Jag förstår inte hur jag ska sticka. Rad 3 förstod jag.
29.12.2022 - 17:16DROPS Design answered:
Hej Gun-Britt, du starter med A.1, fortsætter med A.2 hvor du da vil få 4 rm+de 2 som stickas ihop (totalt 5 m mellan varje omslag) varvet ut :)
04.01.2023 - 13:41
![]() Hanna Sarah wrote:
Hanna Sarah wrote:
Ich stricke diese Jacke mit NS 3,5, dafür eine Größe größer als ich eigentlich trage. Kann ich dabei die Zunahmen in der Anleitung so übernehmen oder wird die Jacke dann zu schnell zu breit? Es ist mein erster Versuch mit einer Passe, sonst habe ich immer mit Raglanlinien gestrickt... LG, Sarah
12.09.2022 - 21:57DROPS Design answered:
Liebe Sarah, leider können wir nicht jede Anleitung nach jeder Anfrage anpassen, aber sicher können Sie sich von einem ähnlichen Modell - mit Rundpasse - (die richtige Maschenprobe können Sie dazu filtern) inspirieren lassen. Viel Spaß beim stricken!
13.09.2022 - 09:44
![]() Steffi Güldner wrote:
Steffi Güldner wrote:
Vielen Dank für die Hilfe . LG
11.08.2022 - 14:40
![]() Steffi Güldner wrote:
Steffi Güldner wrote:
Hallo, Es ist bestimmt ganz simpel und ich habe einen Denkfehler. Im Diagramm A1, Reihe 3 komme ich nicht auf 8 Maschen.Es bleiben 7.Das letzte Kästchen zählt ja nicht \r\nVielen Dank für die Hilfe. \r\nLG Steffi
09.08.2022 - 21:45DROPS Design answered:
Liebe Frau Güldner, die letzte Masche A.1 stricken Sie mit der 1. Maschen A.2 zusammen (= diese Abnahme ist jetzt die letzte Masche A.1 und der Umschlag ist die 1. Masche A.2, dann stricken Sie die letzte Masche A.2 mit der 1. Masche vom nächsten A.2 / A.3 genau so. Viel Spaß beim stricken!
10.08.2022 - 08:48
![]() Marie Claude wrote:
Marie Claude wrote:
Existe t'il les explications vidéos pour adultes merci de votre réponse
06.03.2022 - 20:56DROPS Design answered:
Bonjour Marie-Claude, il n'existe pas de vidéo spécifique pour ce modèle, toutefois, vous trouverez ici des vidéos des techniques utilisées dans ce modèle ainsi que des leçons relatives à ce modèle en bas de page. N'hésitez pas à utiliser cet espace pour poser vos questions. Bon tricot!
07.03.2022 - 09:41
![]() Leena Liuttu-Hietala wrote:
Leena Liuttu-Hietala wrote:
Miten suosittelette neuleen viimeistelyyn: höyrytys, kostutus & kuivaus tasona vaiko pesu koneessa hienopesuohjelmalla...vaiko ei mitään?
24.08.2021 - 12:44DROPS Design answered:
Kostutus on kaikkein hellävaraisin tapa, koska kaikki langat eivät välttämättä kestä höyrytystä. Mikäli haluat höyryttää neuletta kevyesti, tee tämä kostean liinan läpi.
25.08.2021 - 17:01
![]() Nicole wrote:
Nicole wrote:
Re-bonjour, un grand merci pour votre retour, c'est beaucoup plus clair ainsi. Merci , merci nicole
03.08.2021 - 16:17
![]() Nicole wrote:
Nicole wrote:
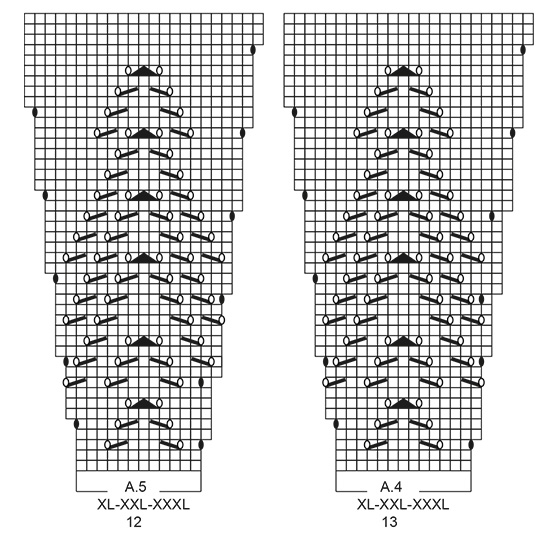
Bonjour, Faut-il tricoter les diagrammes A1, A2, A3 sur le même rang? (Tricoter ensuite sur l'endroit ainsi: 5 mailles de bordure devant au point mousse, A.1 (= 8 mailles), répéter A.2 (= 6 mailles) au-dessus des 102-108-114-120-126-132 mailles suivantes (= 17-18-19-20-21-22 fois en largeur), A.3 (= 7 mailles) et terminer par 5 mailles de bordure devant au point mousse. ) D'avance merci, nicole
03.08.2021 - 15:51DROPS Design answered:
Bonjour Nicole, tout à fait, A.1 correspond au début du motif, juste après la bordure devant (= vu sur l'endroit), vous répétez ensuite A.2 et terminez le motif par A.3, juste avant la bordure devant (vu sur l'endroit). Retrouvez les explications dans cette leçon. Bon tricot!
03.08.2021 - 15:54
|
||||||||||||||||||||||||||||
Agnes#agnesjacket |
||||||||||||||||||||||||||||
 |
 |
|||||||||||||||||||||||||||
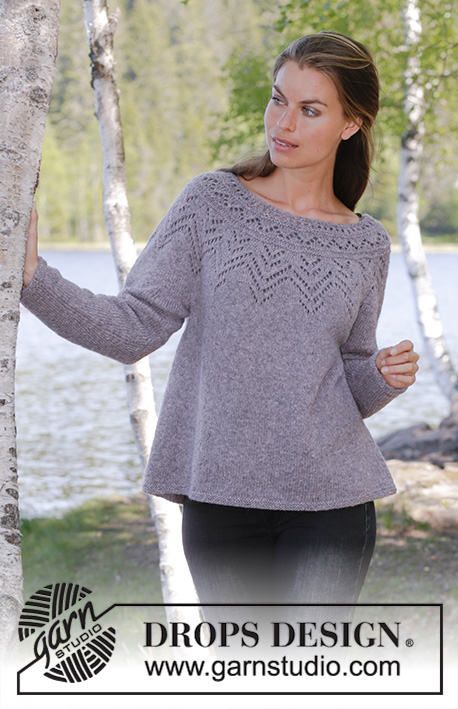
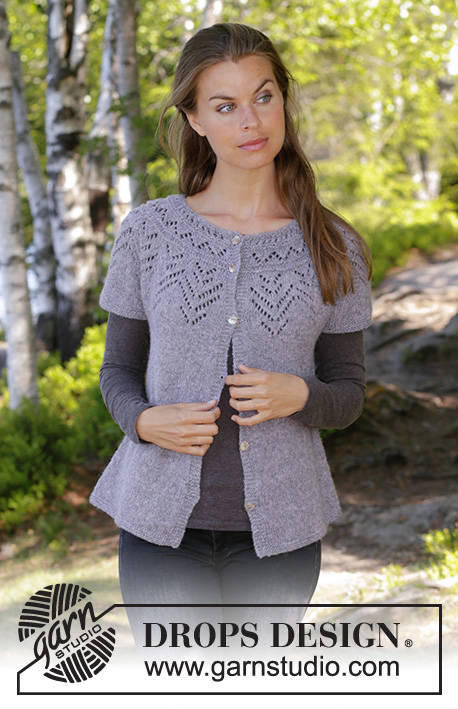
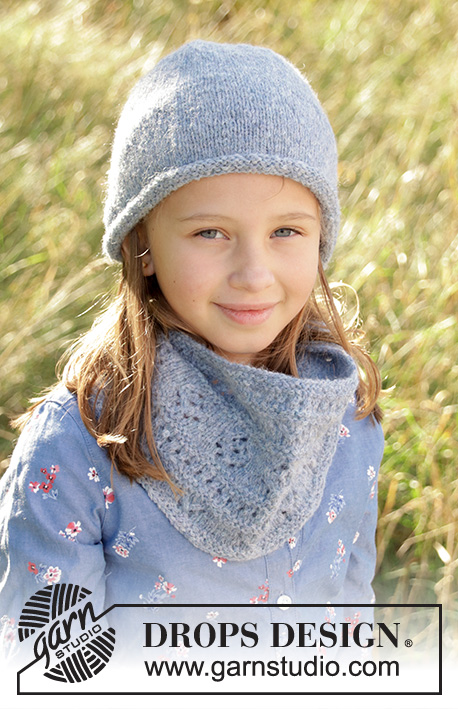
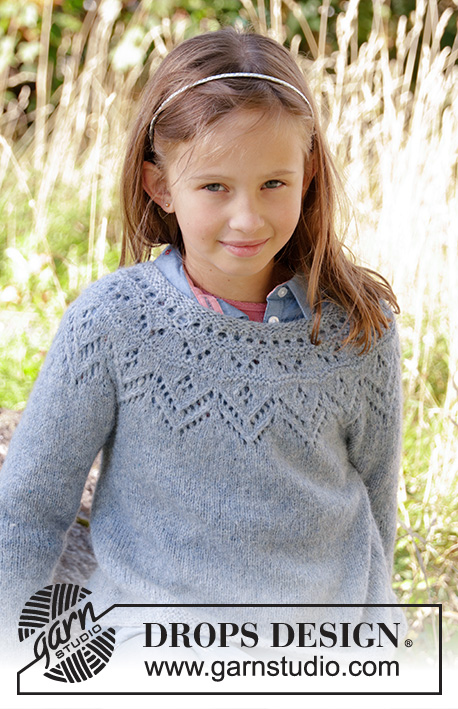
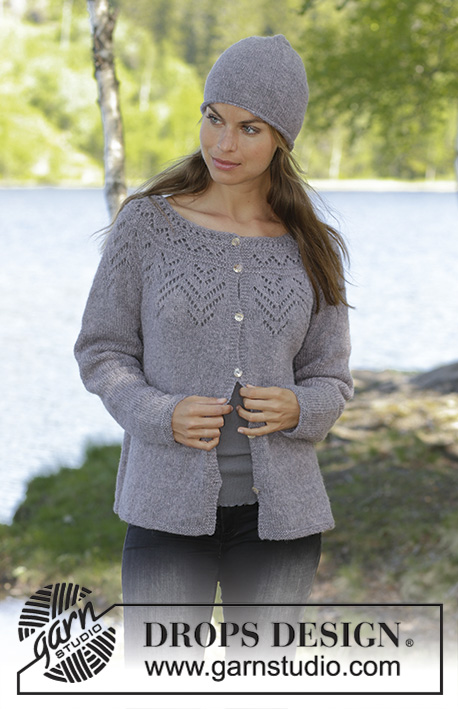
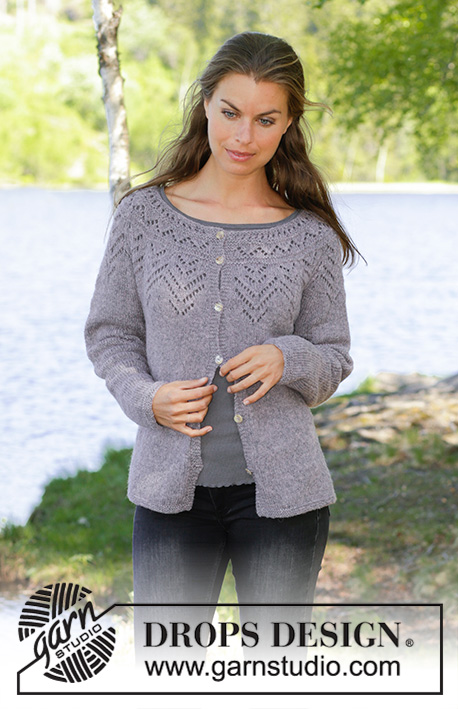
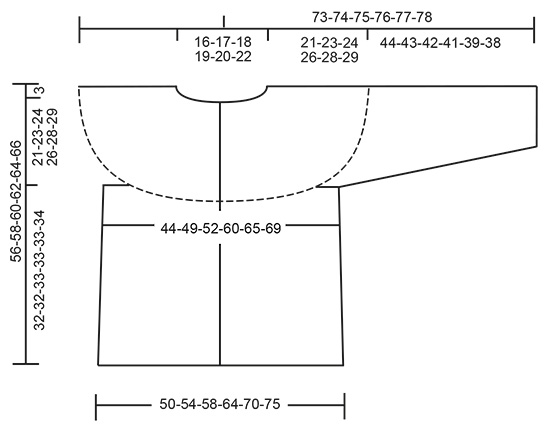
Knitted jacket with round yoke in DROPS Sky. Piece is knitted top down with lace pattern. Size: S - XXXL Knitted hat in DROPS Sky with rolling edge.
DROPS 197-15 |
||||||||||||||||||||||||||||
|
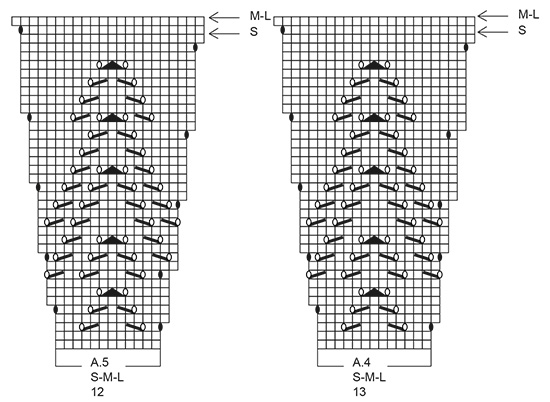
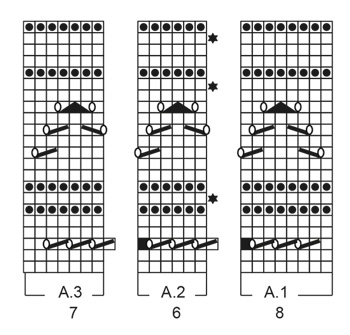
EXPLANATION FOR PATTERN: ---------------------------------------------------------- GARTER STITCH (back and forth): 1 ridge = knit 2 rows. GARTER STITCH (worked in the round): 1 ridge = 2 rounds. Knit 1 round and purl 1 round. PATTERN: See diagrams A.1 to A.5. Choose diagram for your size. Diagrams show all rows in pattern seen from the right side. ELEVATION (applies to back of neck): Work the elevation in garter stitch. Insert 1 marker thread after 63-66-69-72-75-78 stitches (= approx. mid back). Begin from right side and knit 7-8-8-9-9-10 stitches past marker thread, turn, tighten yarn and knit 14-16-16-18-18-20 stitches. Turn, tighten yarn and knit 21-24-24-27-27-30 stitches, turn, tighten yarn and knit 28-32-32-36-36-40 stitches. Turn, tighten yarn and knit 35-40-40-45-45-50 stitches, turn, tighten yarn and knit 42-48-48-54-54-60 stitches. Turn, tighten yarn and knit 49-56-56-63-63-70 stitches, turn, tighten yarn and knit the rest of row. INCREASE TIP-1 (evenly): To calculate how to increase evenly, use the total number of stitches on row (e.g. 102 stitches), minus band (= 10 stitches in total = 92 stitches) and divide stitches by number of increases to be done (e.g. 25) = 3.68. In this example increase by making 1 yarn over after approx. every 4th stitch. On next row work yarn overs twisted to avoid holes. INCREASE TIP-2 (applies to sides of body): All increases are done from the right side. Work until 2 stitches remain before marker thread, 1 yarn over, knit 4 (marker thread is in the middle of these stitches), 1 yarn over. On next row work yarn over twisted to avoid holes Then work the new stitches in stocking stitch. DECREASE TIP-1 (applies to sleeves): Decrease 1 stitch on each side of marker thread as follows: Work until 3 stitches remain before marker thread and knit 2 together, knit 2 (marker thread is between these stitches), slip 1 stitch knitwise, knit 1, pass slipped stitch over stitch worked. BUTTONHOLES: Decrease for buttonholes on right band (when garment is worn). Decrease from right side when 3 stitches remain on row as follows: Make 1 yarn over, knit the next 2 stitches together, knit last stitch. On next row knit yarn over to make holes. Decrease first buttonhole when piece measures approx. 1½-2 cm. Decrease for second buttonhole when piece measures 7 cm. Then decrease the next 4-4-5-5-6-6 approx. 8½-8½-7½-7½-7-7 cm apart. DECREASE TIP-2 (applies to hat): Decrease 1 stitch after every marker thread as follows: Slip 1 stitch knitwise, knit 1, pass slipped stitch over stitch worked (= 1 stitch decreased = 6 stitches decreased in total). ---------------------------------------------------------- BEGIN PIECE HERE: ---------------------------------------------------------- JACKET - SHORT SUMMARY OF GARMENT: Worked back and forth, top down on circular needle to armhole, then finish body and sleeves separately. Continue body back and forth. Sleeves are worked in the round on double pointed needles. YOKE: Cast on 102-106-110-118-122-128 stitches (including 5 band stitches in each side of piece) on circular needle size 3.5 mm with Sky. Work 2 ridges in GARTER STITCH - read explanation above. Knit 1 row from right side and increase 25-27-29-27-29-29 stitches evenly - read INCREASE TIP-1 = 127-133-139-145-151-157 stitches. Knit 1 row from wrong side. Switch to circular needle size 4 mm. For better fit work an elevation at the back of neck so that yoke is somewhat higher on back piece. This elevation can be skipped, to make the neck the same at the front and back - read ELEVATION. Decrease for BUTTONHOLES on right band - read explanation above. Then work pattern as follows from right side: Work 5 band stitches in garter stitch, A.1 (= 8 stitches), A.2 (= 6 stitches) over the next 102-108-114-120-126-132 stitches (= 17-18-19-20-21-22 times in width), A.3 (= 7 stitches) and finish with 5 band stitches in garter stitch. On every row with star (= increase row) increase as follows: REMEMBER THE KNITTING TENSION! 1ST INCREASE: Increase 24-24-24-24-30-30 stitches evenly = 151-157-163-169-181-187 stitches. Then repeat A.2 21-22-23-24-26-27 times in width. 2ND INCREASE: Increase 18-18-24-24-24-30 stitches evenly = 169-175-187-193-205-217 stitches. Then repeat A.2 24-25-27-28-30-32 times in width. 3RD INCREASE: Increase 12-18-18-24-24-24 stitches evenly = 181-193-205-217-229-241 stitches. Then repeat A.2 26-28-30-32-34-36 times in width. When A.1 to A.3 have been worked 1 time vertically, piece measures approx. 8 cm from cast-on edge. Then work as follows from right side: Work 5 band stitches in garter stitch, 1 stitch in stocking stitch, A.4 (= 13 stitches), work A.5 (= 12 stitches) over the next 156-168-180-192-204-216 stitches (= 13-14-15-16-17-18 times in width), 1 stitch in stocking stitch and finish with 5 band stitches in garter stitch. When A.4 and A.5 have been worked 1 time vertically, there are 307-343-365-404-427-450 stitches on needle. Piece measures approx. 21-22-22-24-24-24 cm. Continue back and forth in stocking stitch until piece measures 21-23-24-26-28-29 cm. Now divide the piece for sleeves and body as follows: Work 5 band stitches in garter stitch, stocking stitch over the next 42-47-50-57-62-66 stitches, slip the next 64-72-78-82-84-88 stitches on a stitch holder for sleeve and cast on 8-8-10-10-12-12 stitches under sleeve, work stocking stitch over the next 85-95-99-116-125-132 stitches, slip the next 64-72-78-82-84-88 stitches on a stitch holder for sleeve and cast on 8-8-10-10-12-12 stitches under sleeve, work 42-47-50-57-62-66 stitches in stocking stitch and finish with 5 band stitches in garter stitch = 195-215-229-260-283-298 stitches. BODY: Insert 1 marker thread in the middle of the 8-8-10-10-12-12 stitches under each sleeve. Work in stocking stitch with 5 band stitches in garter stitch in each side. When piece measures 2 cm from where body was divided for sleeves, increase 1 stitch on each side of every marker thread - read INCREASE TIP-2! Increase like this every 3½-4½-4-6-5-3½ cm 6-5-6-4-5-7 times in total = 219-235-253-276-303-326 stitches. Continue in stocking stitch until piece measures 30-30-31-31-31-32 cm from where body was divided from sleeves. Switch to circular needle size 3.5 mm and work in garter stitch until piece measures 32-32-33-33-33-34 cm from where body was divided from sleeves. Cast off by knitting. Piece measures 56-58-60-62-64-66 cm from shoulder. SLEEVE: Slip the 64-72-78-82-84-88 stitches from stitch holder in one side of piece on double pointed needles size 4 mm and pick up 1 stitch in each of the 8-8-10-10-12-12 stitches under sleeve = 72-80-88-92-96-100 stitches. Insert 1 marker thread in the middle of the 8-8-10-10-12-12 stitches under sleeve. Work in stocking stitch in the round. When piece measures 3 cm, decrease 1 stitch on each side of marker thread - read DECREASE TIP-1. Decrease like this every 2½-2-1½-1½-1½-1½ cm 13-16-19-19-20-21 times in total = 46-48-50-54-56-58 stitches. When sleeve measures 42-41-40-39-37-36 cm from where sleeve was divide from body, switch to double pointed needles size 3.5 mm and work 3 ridges in GARTER STITCH in the round - read explanation above. Then loosely cast off by knitting. Sleeve measures approx. 65-66-66-67-67-67 cm in total from cast-on edge. Work the other sleeve the same way. ASSEMBLY: Sew on buttons on left band. ---------------------------------------------------------- HAT - SHORT SUMMARY OF PIECE: Worked in the round on circular needle, switch to double pointed needles when decreasing. HAT: Cast on 108-112 stitches with Sky on circular needle size 3.5 mm. Work 4 rounds in stocking stitch. Work next round as follows: * Knit 1, purl 1 *, repeat from *-* the entire round. Now work in stocking stitch over all stitches until finished measurements. REMEMBER THE KNITTING TENSION! When piece measures 20-22 cm, decrease 0-4 stitches evenly (i.e. knit every 27th and 28th stitch in size M/L together) = 108 stitches. Insert 6 markers in the piece, 18 stitches apart. On next round, decrease 1 stitch at every marker thread – read DECREASE TIP-2. Decrease like this on every other round 8 times in total and then on every round 6 times in total = 24 stitches. On next round knit all stitches twisted together 2 by 2 = 12 stitches. Cut the yarn and pull it through the remaining stitches, tighten together and fasten. Piece measures approx. 27-29 cm from top and down. |
||||||||||||||||||||||||||||
Diagram explanations |
||||||||||||||||||||||||||||
|
||||||||||||||||||||||||||||
|
||||||||||||||||||||||||||||
|
||||||||||||||||||||||||||||
|
||||||||||||||||||||||||||||
|
||||||||||||||||||||||||||||
Have you finished this pattern?Tag your pictures with #dropspattern #agnesjacket or submit them to the #dropsfan gallery. Do you need help with this pattern?You'll find 32 tutorial videos, a Comments/Questions area and more by visiting the pattern on garnstudio.com. © 1982-2025 DROPS Design A/S. We reserve all rights. This document, including all its sub-sections, has copyrights. Read more about what you can do with our patterns at the bottom of each pattern on our site. |
||||||||||||||||||||||||||||


With over 40 years in knitting and crochet design, DROPS Design offers one of the most extensive collections of free patterns on the internet - translated to 17 languages. As of today we count 314 catalogues and 11822 patterns translated into English (UK/cm).
We work hard to bring you the best knitting and crochet have to offer, inspiration and advice as well as great quality yarns at incredible prices! Would you like to use our patterns for other than personal use? You can read what you are allowed to do in the Copyright text at the bottom of all our patterns. Happy crafting!
Post a comment to pattern DROPS 197-15
We would love to hear what you have to say about this pattern!
If you want to leave a question, please make sure you select the correct category in the form below, to speed up the answering process. Required fields are marked *.