
Popular categories
Looking for a yarn?


Comments / Questions (46)
![]() Natalia wrote:
Natalia wrote:
I have done this pattern twice, I love the final result, one thing I would highlight is to use a smaller needle to do the final 2cm of garter stitch at the body because if you keep the same needle it will roll in.
15.06.2025 - 15:17
![]() Bryndís Gestsdóttir wrote:
Bryndís Gestsdóttir wrote:
Hæ. Hvernig get ég prentað út uppskriftina á sem bestan hátt? Þetta kemur allt í belg og biðu
30.07.2024 - 18:30DROPS Design answered:
Blessuð Bryndís. Í uppskriftinni fyrir ofan LEIÐBEININGAR UM MYNSTUR stendur íslenska-prenta-athugasemdir. Þú velur prenta og prentar út portrait. Þetta virkaði allavega hjá mér. Gangi þér vel.
31.07.2024 - 21:31
![]() Denise Dubuc wrote:
Denise Dubuc wrote:
Ma petite fille qui a 81/2ans a un tour de tête de 56cm….eh oui. Si je suis les indications pour 9/10 est-ce que l’encolure sera assez grande?
15.07.2024 - 02:15DROPS Design answered:
Bonjour Mme Dubuc, si votre tension est juste alors oui, mais veillez à ne pas trop serrer votre rang de montage pour qu'il reste bien souple et élastique. Bon tricot!
02.08.2024 - 15:00
![]() Katarina S wrote:
Katarina S wrote:
Hej, jag stickar Agnes t barn och har rivit upp oket minst 4 ggr,. Jag får inte hålen att komma på rätt ställe över varandra. Jag förstår inte vad jag gör för fel. Räknar och tycker att jag räknar rätt antal maskor. Men jag ser inte att det blivit fel förrän efter flera varv, när mönstret träder fram. Hur k an jag räkna så att jag vet att omtag etc ha bar på rätt ställe? Krångligt mönster. Jag är mkt van att sticka mönster stickning med flera färger, då. Hjälp!
03.04.2024 - 22:45DROPS Design answered:
Hei Katarina. Sett maskemarkører mellom hvert diagram. Da har du god kontroll på at det blir riktig. Og så må du være obs når det skal gjøres økninger samtidig som det strikkes hullmønster, så ikke et økningskast blir til et "hullmønster". mvh DROPS Design
08.04.2024 - 13:52
![]() Karen wrote:
Karen wrote:
Could you please show me how to "knit from wrong side" in this sweater pattern. Thank you
01.03.2024 - 19:28DROPS Design answered:
Dear Karen, this pattern is worked in the round, so you always work on the right side. You can adapt this pattern for working back and forth as indicated here: https://www.garnstudio.com/lesson.php?id=13&cid=19. Happy knitting!
03.03.2024 - 18:53
![]() Encarna wrote:
Encarna wrote:
Hola creo q en el gráfico del calado hay una equivocación,en la fila 21a23creo q faltan por lo menos cuatro filas por qué eso de las dos hebras juntas entre pasar un punto sin hacer y montar y hacer dos juntos no se puede hacer tendría q haber algún punto del derecho en el centro,pero si lo haces ya no te coincide el dibujo. A la espera lo revise y me conteste si estoy equivocada o no
19.11.2023 - 20:42DROPS Design answered:
Hola Encarna, no hay ningún problema en el diagrama. El símbolo de lazada implica que se trabaja siempre entre 2 puntos. Por lo tanto, no hay dos lazadas seguidas nunca; si hay dos símbolos de lazada seguidos siempre va a haber un punto de derecho o revés entre medio. No hay ningún problema si se trabajan disminuciones simples o puntos juntos de derecho antes o después de las hebras. Si tienes más dudas, ¿puedes indicar la fila exacta y la talla que estás trabajando (ya que el diagrama es distinto para las diferentes tallas) y los símbolos que no te cuadran? Así podemos confirmarte y aclararte tus dudas.
26.11.2023 - 22:58
![]() Ann McGinn wrote:
Ann McGinn wrote:
Your response is unhelpful. What is the equivalent of 200 g in terms of TOTAL YARDAGE required for the largest size. I am an experienced knitter, and your initial materials guide makes no sense to me. Please advise.
28.03.2023 - 16:46DROPS Design answered:
Dear Mrs McGinn, the required materials is always given in grams - you can then just divide the total required for the size by the weight of the ball, ie for 200 g DROPS Sky/5O g = 4 balls DROPS Sky are required here. Read more about the yarn here and find how to order this yarn from US here. Happy knitting!
29.03.2023 - 09:32
![]() Ann McGinn wrote:
Ann McGinn wrote:
The pattern instructions do not include how many balls of 200 g yard are required for this pattern, Please advise.
28.03.2023 - 00:06DROPS Design answered:
Hi Ann, You need 150-150-200-200-200 g yarn (depending on the size you are working). These amounts are under Materials at the top of the pattern. Happy knitting!
28.03.2023 - 06:51
![]() Florence Gough wrote:
Florence Gough wrote:
I have bought your lovely yarn to make the Agnes pattern. Unfortunately I am finding it quite hard and wonder whether you can suggest a simpler pattern that may suit an girl of 13. Are all patterns knitted on circular needles? Many thanks
26.02.2023 - 08:59DROPS Design answered:
Dear Florence, you can check here all of our sweater patterns for children worked with Group B yarns (like Sky): https://www.garnstudio.com/search.php?action=search&c=children-jumpers&yg=2&lang=en Most of our patterns are worked in circular needles, for more confort when knitting, but some may be adjusted to knit with straight needles; you can check the following lesson for more information: https://www.garnstudio.com/lesson.php?id=13&cid=19. Happy knitting!
26.02.2023 - 20:32
![]() Peyré wrote:
Peyré wrote:
Bonjour, Pourquoi le texte des corrections apportées est le même que celui des explications ? Merci de votre aide
16.02.2023 - 22:56DROPS Design answered:
Bonjour Mme Peyré, la correction ne s'applique que si vous avez imprimé les explications avant cette date, sinon, les explications en ligne sont effectivement déjà corrigées (pour plus de simplicité). Bon tricot!
17.02.2023 - 11:50
|
||||||||||||||||||||||
Agnes Sweater#agnessweater |
||||||||||||||||||||||
 |
 |
|||||||||||||||||||||
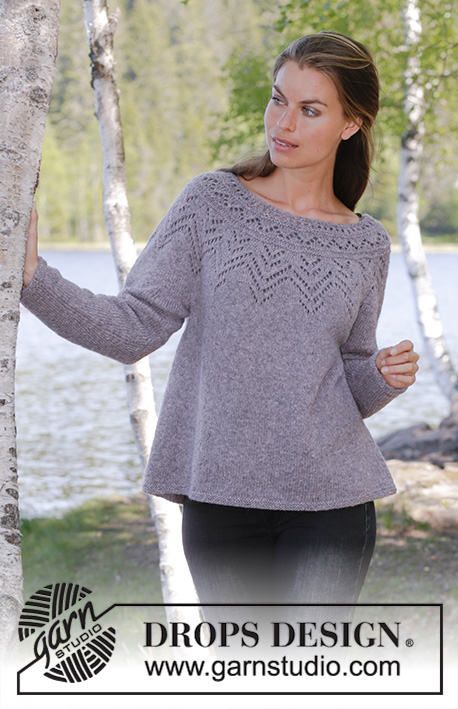
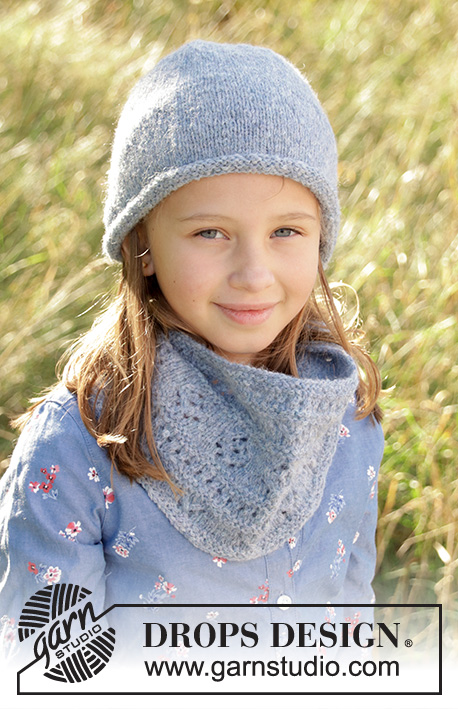
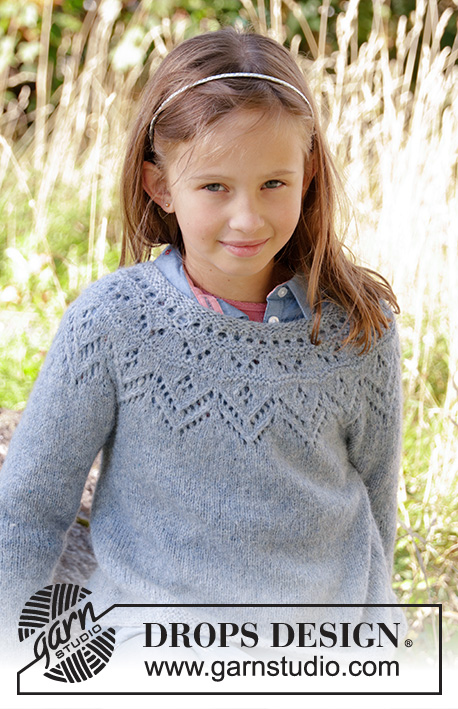
Knitted jumper for kids in DROPS Sky. Piece is knitted top down with round yoke, lace pattern, stocking stitch and garter stitch. Size 3-12 years
DROPS Children 34-10 |
||||||||||||||||||||||
|
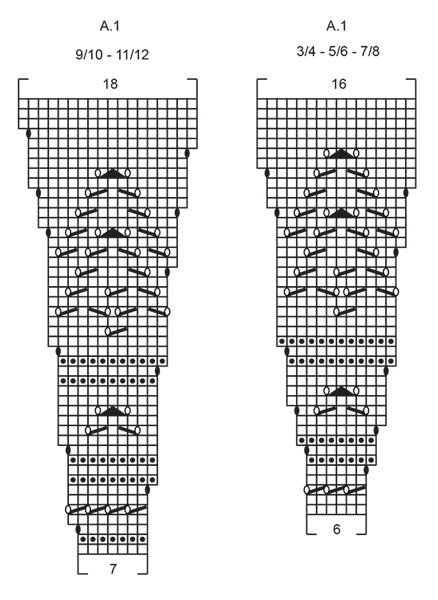
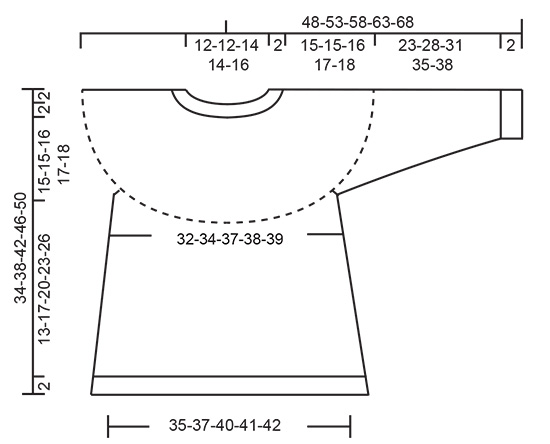
---------------------------------------------------------- EXPLANATION FOR THE PATTERN: ---------------------------------------------------------- GARTER STITCH (worked in the round): 1 ridge = 2 rounds. Knit 1 round and purl 1 round. PATTERN: See diagram A.1. Choose diagram for your size. Diagrams show all rounds in pattern seen from the right side. INCREASE TIP-1 (evenly): To calculate how to increase evenly, use the total number of stitches on row (e.g. 72 stitches) and divide stitches by number of increases to be done (e.g. 17) = 4.2. In this example increase by making 1 yarn over after every 4th stitch. On next round work yarn over twisted to avoid hole. INCREASE TIP-2 (applies to sides of body): Work until 1 stitch remains before marker thread, 1 yarn over, knit 2 (marker thread is in the middle of these stitches), 1 yarn over = 2 stitches increased. On next round knit yarn over twisted to avoid holes. Then work the new stitches in stocking stitch. DECREASE TIP (applies to sleeves): Decrease 1 stitch on each side of marker thread as follows: Work until 3 stitches remain before marker thread, knit 2 together, knit 2 stitches (marker thread is between these stitches), slip 1 stitch knitwise, knit 1, pass slipped stitch over stitch worked = 2 stitches decreased. ---------------------------------------------------------- START THE PIECE HERE: ---------------------------------------------------------- JUMPER - SHORT OVERVIEW OF THE PIECE: Worked in the round on circular needle, top down. Divide for body and sleeves, work body in the round on circular needle. Work sleeves in the round on double pointed needles/a short circular needle. YOKE: Cast on 76-80-80-84-84 stitches on circular needle size 4 mm with Sky. Work 2 ridges in GARTER STITCH - see explanation above. Knit 1 round while increasing 2-4-10-14-21 stitches evenly on round - READ INCREASE TIP! = 78-84-90-98-105 stitches. Purl 1 round. Insert a marker in this round and measure from here. On next round work according to diagram A.1 (choose diagram for correct size) 13-14-15-14-15 times on round. REMEMBER THE KNITTING TENSION! When digram A.1 has been worked vertically, there are 208-224-240-252-270 stitches on round. On next round increase 4-4-2-2-4 stitches evenly on round = 212-228-242-254-274 stitches. Then work in stocking stitch until piece measures approx. 15-15-16-17-18 cm from marker. Work next round as follows: Knit 62-66-70-75-75 stitches (= back piece), slip the next 44-48-51-53-62 stitches on a stitch holder (= sleeve), cast on 6 new stitches under the sleeve, knit 62-66-70-74-75 (= front piece), slip the next 44-48-51-53-62 stitches on a new stitch holder (= the other sleeve) and cast on 6 new stitches under sleeve. BODY: There are now 136-144-152-160-162 stitches on round. NOW MEASURE PIECE FROM HERE! Insert 1 marker thread in the middle of the 6 new stitches cast on. Work in stocking stitch in the round. When piece measures 3 cm, increase 1 stitch on each side of each marker (= 4 stitches increased) - read INCREASE TIP-2! Repeat increase every 3-4½-5½-6½-7½ cm 3 times in total = 148-156-164-172-174 stitches on round. Then work as before until piece measures approx. 15-17-20-23-26 cm (or to desired length, there is approx. 2 cm until finished measurements). Work in garter stitch for 2 cm. Loosely cast off. Cut and fasten the yarn. SLEEVE: Slip stitches from on stitch holder back on a short circular needle/double pointed needles size 4 mm (= 44-48-51-53-62 stitches), pick up 1 stitch in each of the 6 stitches cast on on body (= 50-54-57-59-68 stitches). Insert 1 marker thread in the middle of these 6 stitches. Work in stocking stitch in the round until sleeve measures 3 cm. Now decrease 1 stitch on each side of marker thread - read DECREASE TIP! Continue in stocking stitch and repeat decrease every 4-4-4-4-3½ cm until decrease has been done 5-6-7-8-10 times in total = 40-42-43-43-48 stitches on needle. Work in stocking stitch until sleeve measures 23-28-31-35-38 cm in total. Work in garter stitch for 2 cm. Loosely cast off. Cut and fasten the yarn. Work the other sleeve the same way. |
||||||||||||||||||||||
Diagram explanations |
||||||||||||||||||||||
|
||||||||||||||||||||||
|
||||||||||||||||||||||
|
||||||||||||||||||||||
Have you finished this pattern?Tag your pictures with #dropspattern #agnessweater or submit them to the #dropsfan gallery. Do you need help with this pattern?You'll find 22 tutorial videos, a Comments/Questions area and more by visiting the pattern on garnstudio.com. © 1982-2025 DROPS Design A/S. We reserve all rights. This document, including all its sub-sections, has copyrights. Read more about what you can do with our patterns at the bottom of each pattern on our site. |
||||||||||||||||||||||


With over 40 years in knitting and crochet design, DROPS Design offers one of the most extensive collections of free patterns on the internet - translated to 17 languages. As of today we count 314 catalogues and 11822 patterns translated into English (UK/cm).
We work hard to bring you the best knitting and crochet have to offer, inspiration and advice as well as great quality yarns at incredible prices! Would you like to use our patterns for other than personal use? You can read what you are allowed to do in the Copyright text at the bottom of all our patterns. Happy crafting!
Post a comment to pattern DROPS Children 34-10
We would love to hear what you have to say about this pattern!
If you want to leave a question, please make sure you select the correct category in the form below, to speed up the answering process. Required fields are marked *.