
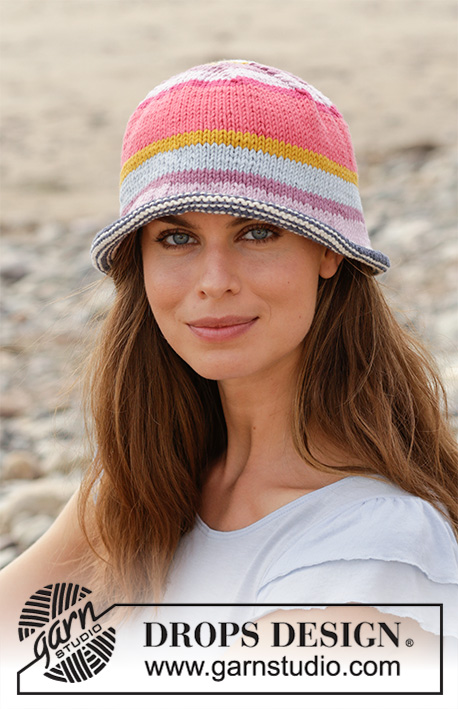
Popular categories
Looking for a yarn?


Comments / Questions (29)
![]() Carol wrote:
Carol wrote:
Det verkar som alla ställer samma fråga och tydligen inte förstår hur manska virka \"genom både främre och bakre maskbåge och desutom genom maskledet som är synligt på avigsidan.\" \r\nBorde inte ni lägga upp en video på vad detta är? Det skulle uppskattas väldigt mycket.
13.08.2024 - 16:32
![]() Liliane wrote:
Liliane wrote:
I have just finished the top part and have made the row in the front loop but I thought the side facing me is the right side, cause now I have the distinct edge on the wrong side ?
29.07.2024 - 04:14DROPS Design answered:
Dear Liliane, you first work 1 round in the front loop of stitches, then work 1 round around each stitch + in the back loop of the stitches (those you worked only front loop before) so this round will make a small bump. Happy crocheting!
30.07.2024 - 08:12
![]() Eeva wrote:
Eeva wrote:
Hei! Tein hatun kärkiosan ja nyt siirryn yläosan reunukseen. Kun virkkaan seuraavaa pylväskerrosta ottaen koukulle edellisen kerroksen silmukasta etuosan se "raita" jää taakse eli nurjalle puolelle. Onko sen tarkoitus jäädä hatun sisään ja vain tukea reunaa vai virkkaanko silmukan takaosaan jolloin "raita" jää näkyviin? Ystävälllisesti, Eeva
12.06.2024 - 19:59DROPS Design answered:
Hei, tämä pylväskerros virkataan silmukoiden etuosaan. Seuraavan kerroksen pylväät virkataan edellisen kerroksen molempiin silmukkakaariin sekä työn nurjalla puolella näkyviin silmukkakaariin. Hatun yläosaan jää näkyvä raita.
18.06.2024 - 13:06
![]() Estrella wrote:
Estrella wrote:
"Trabajar 1 vuelta más de puntos altos, pero ahora trabajar cada punto alto a través del punto alto de la vuelta anterior (a través del bucle del frente y del bucle posterior) y, adicionalmente, a través del bucle del punto visible en el lado revés de la pieza" Qué quiere decir "el bucle del punto visible en el lado revés de la pieza "?
22.10.2023 - 01:55DROPS Design answered:
Hola Estrella, tienes que trabajar en el 3º bucle en el punto que se forma por detrás del punto. Debería sobresalir ligeramente como un pliegue por el lado revés de la labor.
23.10.2023 - 00:24
![]() Liisa PF wrote:
Liisa PF wrote:
Hei! Kysymys 1: Kun lasken piirrosten A1, A2, A3 silmukat yhteen saan 94 pylvässilmukkaa (10+36+48). Ohjeessa lukee, että pitäisi olla 104 pylvästä? Mistä tulee 10 pylvästä lisää? Kysymys 2: Mitä tarkoittaa "työn nurjan puolen silmukkakaari" kohdassa "virkkaa kaikki pylväät sekä edellisen kerroksen pylvääseen että työnnurjan puolen kerroksen silmukkakaareen? Löytyisikö tästä kuvaa / videota?
17.10.2023 - 09:08
![]() Susan wrote:
Susan wrote:
Hallo, ich hab eine Frage zum Rand oben um den Hut, in der Anleitung heißt es „ Noch 1 Runde mit Stäbchen häkeln, jedoch nun jedes Stäbchen in beide Maschenglieder des Stäbchens der Vor-Runde und zusätzlich in das Maschenglied, das auf der Rückseite der Arbeit sichtbar ist, einstechen.“ In welches Maschenglied auf der Rückseite muss ich noch einstechen? In das hintere Maschenglied von der Vorreihe, bei der ich in das vordere Maschenglied eingestochen habe? Vielen Dank
29.06.2023 - 15:21DROPS Design answered:
Liebe Susan, bei der vorrigen Runde haben Sie nur in das vordere Maschenglied gehäkelt jetzt häkeln Sie 1 Stäbchen in die beiden Maschenglieder von dieser vorrigen Runde (= dh wie "normal") aber auch in das hintere Maschenglied, das bei der vorrigen Runde nicht gehäkelt wurde), so bekommen Sie eine kleine "Biese". Viel Spaß beim häkeln!
29.06.2023 - 15:37
![]() Karin Sellberg wrote:
Karin Sellberg wrote:
Hej! Jag virkar sweet fedora by drops design nr 190-35.Nu har jag helt kört fast och behöver er hjälp!Det stårVirka 1 varv till med stolpar, men nu virkas varje stolpe både genom stolpen från föregående varv (genom både främre och bakre maskbågen) och dessutom genom maskledet som är synligt på avigsidan av arbetet. Detta ger en lite markerad kant runt översta delen på hatten. \r\n\r\nHur gör jag och vad är maskledet? Jag får inte ihop det....
18.06.2023 - 11:07
![]() Annika Prisell wrote:
Annika Prisell wrote:
Hej! Kommer detta mönster att bli på en video där du visar hur man virkar denna underbara hatt
25.08.2022 - 20:05DROPS Design answered:
Hei Annika. Vi har ingen planer om å lage en video til denne hatten, men noterer ned ditt ønske på vår liste :) Om du er usikker på noen av teknikkene som er brukt i denne hatten er det flere hjelpevideoer som du kan ta en titt på (se under diagrammene). Om du allerede har begynt å hekle denne hatten, men står fast, send oss et spørsmål med beskrivelse av hva du ikke forstår (og str. du hekler), så skal vi hjelpe deg så godt vi kan. mvh DROPS Design
29.08.2022 - 10:30
![]() Porcher wrote:
Porcher wrote:
Bonjour je voudrais faire le modèle drops design 190-35 le chapeau Fedora mais je ne comprends pas le départ ;dessus du chapeau en commençant a la flèche au milieu A1, crocheter 4 ml 1mc dans la 4eme maille en l air ,crocheter 14ml,1mc dans la 4eme ml,mais si je regarde le diamgramme la fleche se trouve au mlieu, tour suiant 1mc dans la 1ere des 10mlalors que au dessus il dise 14ml je ne comprends pas c 'est pour une commande et j aimerais bien le faire merci pour votre réponse nathalie
25.07.2021 - 15:50DROPS Design answered:
Bonjour Mme Porcher, vous commencez par la flèche et le premier rang de mailles en l'air (= à gauche dans A.1) puis vous allez crocheter la chaînette (A.1, où on va faire les brides de chaque côté plus tard) et vous terminez par le rond de mailles en l'air (à droite dans A.1) - votre base est terminée, crochetez maintenant 1 m dans la 1ère des 10 ml (= le v dans le diagramme) puis 3 ml (= 1ère bride) et continuez ainsi: brides en haut de A.1, A.2 autour de la boucle, brides sous la chaînette de A.1, A.3 autour de la boucle, 1 mc dans la 3ème ml de A.1. Bon crochet!
26.07.2021 - 09:01
![]() CRISTINA CARDOZO wrote:
CRISTINA CARDOZO wrote:
Estoy realizando el sombrero, pregunto que puedo hacer para que me quede mas rigido cuando lo termine? Gracias y saludos cordiales
22.06.2021 - 22:14DROPS Design answered:
Hola Cristina, puedes colocar un alambre de acero delgado a lo largo de la orilla del ala. Trabajar 1 punto bajo en cada punto alto en toda la vuelta, trabajando, AL MISMO TIEMPO, alrededor del alambre de acero. Esto se hace para que el sombrero quede más rígido a lo largo de la orilla. Ajustar la longitud del alambre de acuerdo a las medidas deseadas del ala. Retorcer los extremos del alambre de acero juntamente y esconderlos en los puntos. Cortar y asegurar el hilo. Buen trabajo!
23.06.2021 - 12:56
|
||||||||||||||||||||||||||||||||||
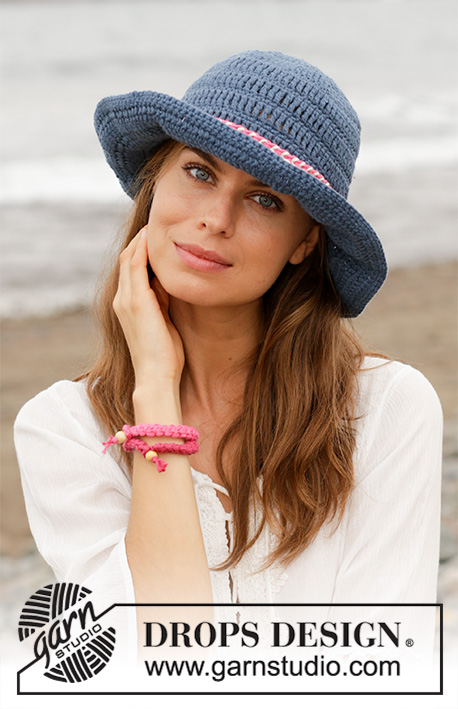
Sweet Fedora#sweetfedorahat |
||||||||||||||||||||||||||||||||||
 |
 |
|||||||||||||||||||||||||||||||||
Crocheted hat with edge in multi-colored pattern. Piece is crocheted in DROPS Paris.
DROPS 190-35 |
||||||||||||||||||||||||||||||||||
|
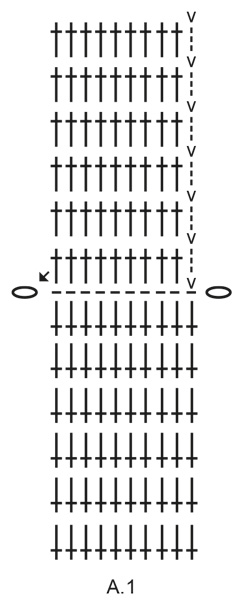
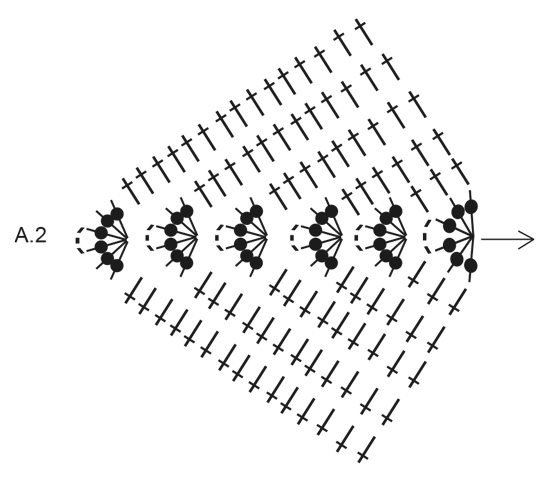
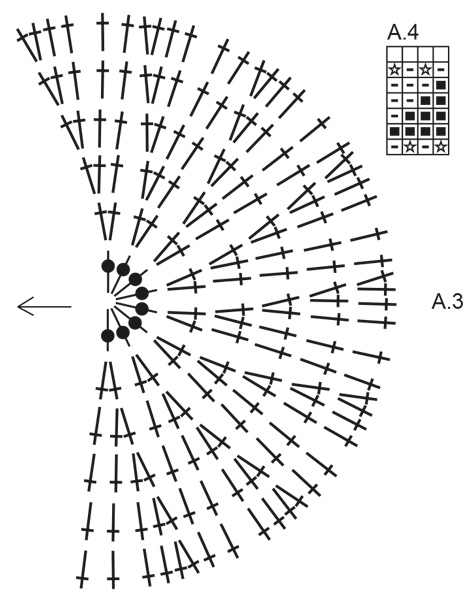
INFORMATION FOR PATTERN: CROCHET INFO: Replace first double crochet on round with 3 chain stitches, finish round with 1 slip stitch in third chain stitch at beginning of round. Replace first single crochet on round with 1 chain stitch, finish round with 1 slip stitch in first chain stitch at beginning of round. COLOR PATTERN: See diagram A.4. Diagram shows colors in pattern. 1 square = 1 single crochet. COLOR CHANGE TIP: When changing color work as follows: Work last single crochet with first color but wait with last pull through, switch to next color and work last pull through with the new color, then work next single crochet. This way there will be a nice transition when changing color. When working with two colors place strand for the color not worked over stitches from previous round, work around the strand so that it is hidden and follows when working. ---------------------------------------------------------- HAT: Work in the round top down. Begin with a flat, oval top, then work down the hat (crown) before working an edge in multi-colored pattern and then the brim. TOP OF HAT: Read CROCHET INFO! Begin at the arrow in the middle of A.1 and work on hook size 3 mm / C with white as follows: 4 chain stitches, form a ring with 1 slip stitch in the first chain stitch worked, work 14 chain stitches, work 1 slip stitch in 4th chain stitch from hook. You now have a chain stitch row with a loop in each end. Work next round as follows: 1 slip stitch in the first of the 10 chain stitch on row, 3 chain stitch (= 1 double crochet), 1 double crochet in each of the next 9 chain stitches, work A.2 around loop (begin with 1st row in diagram), work 1 double crochet in each of the 10 chain stitch (i.e. on opposite side of where 10 double crochets were worked first), work A.3 around loop in the other side and finish with 1 slip stitch in 3rd chain stitch at beginning for round. Continue the pattern like this until 6 rounds have been worked in total. A.1 to A.3 are now done and there are 104 double crochets on round in both sizes. Then work an edge at the top around the hat as explained below. EGDE AT THE TOP AROUND HAT: Work 1 round double crochets with 1 double crochet in every double crochet and 4 double crochet in the chain space in the middle of A.2 (work 1 double crochet in both the first and the last chain stitch and 2 double crochets in the middle chain stitch), but on this round work only in front loop of stitch (stitch loop closest to you) = 108 double crochets on round. Insert 1 marker thread between 2 double crochets in the middle of A.2 (= mid front of hat) and move the marker thread upwards when working. Work 1 more round with double crochets but now work every double crochet through both the double crochet from previous round (through both front and back loop) and in addition through stitch loop visible on the wrong side of piece. This gives a more distinct edge around the top part of hat. Then work the crown as explained below: CROWN: Work double crochets in the round with 1 double crochet in every double crochet (work through both stitch loops). AT THE SAME TIME on 1st round increase 1 double crochet mid front by working 2 double crochets in last double crochet before marker thread. Increase like this 4-8 times in total in S/M: On every other round, and in L/XL: On every round = 112-116 double crochets. NOTE: When increasing work 2 double crochets alternately in first double crochet after marker thread and last double crochet before marker thread. When piece measures 6-7 cm from edge at the top, work COLOR PATTERN – see explanation above (= 28-29 repetitions of 4 stitches) and read COLOR CHANGE TIP. NOTE: On 2nd and 7th round work in back loop of stitch from previous round. AT THE SAME TIME on last round in A.4 increase 0-4 single crochets evenly (increase 1 single crochet by working 2 single crochets in 1 stitch) = 112-120 single crochets. When A.4 is done, work the brim with white as explained below. BRIM: Remember CROCHET INFO! ROUND 1: * Work 1 double crochet in the first 7-7 double crochets, 2 double crochets in next double crochet *, repeat from *-* the entire round = 126-135 double crochets. ROUND 2: Work 1 double crochet in every double crochet. ROUND 3: * Work 1 double crochet in the first 8-8 double crochets, 2 double crochets in next double crochet *, repeat from *-* the entire round = 140-150 double crochets. ROUND 4: * Work 1 double crochet in the first 9-9 double crochets, 2 double crochets in next double crochet *, repeat from *-* the entire round = 154-165 double crochets. ROUND 5: Work 1 double crochet in every double crochet. ROUND 6: Work 1 single crochet in every double crochet = 154-165 single crochets. Fasten off. Brim measures approx. 5 cm / 2". |
||||||||||||||||||||||||||||||||||
Diagram explanations |
||||||||||||||||||||||||||||||||||
|
||||||||||||||||||||||||||||||||||
|
||||||||||||||||||||||||||||||||||
|
||||||||||||||||||||||||||||||||||
|
||||||||||||||||||||||||||||||||||
Have you finished this pattern?Tag your pictures with #dropspattern #sweetfedorahat or submit them to the #dropsfan gallery. Do you need help with this pattern?You'll find 13 tutorial videos, a Comments/Questions area and more by visiting the pattern on garnstudio.com. © 1982-2025 DROPS Design A/S. We reserve all rights. This document, including all its sub-sections, has copyrights. Read more about what you can do with our patterns at the bottom of each pattern on our site. |
||||||||||||||||||||||||||||||||||


With over 40 years in knitting and crochet design, DROPS Design offers one of the most extensive collections of free patterns on the internet - translated to 17 languages. As of today we count 314 catalogs and 11822 patterns - 11812 of which are translated into English (US/in).
We work hard to bring you the best knitting and crochet have to offer, inspiration and advice as well as great quality yarns at incredible prices! Would you like to use our patterns for other than personal use? You can read what you are allowed to do in the Copyright text at the bottom of all our patterns. Happy crafting!
Post a comment to pattern DROPS 190-35
We would love to hear what you have to say about this pattern!
If you want to leave a question, please make sure you select the correct category in the form below, to speed up the answering process. Required fields are marked *.