
Popular categories
Looking for a yarn?


Comments / Questions (29)
![]() Cheryl Bonner wrote:
Cheryl Bonner wrote:
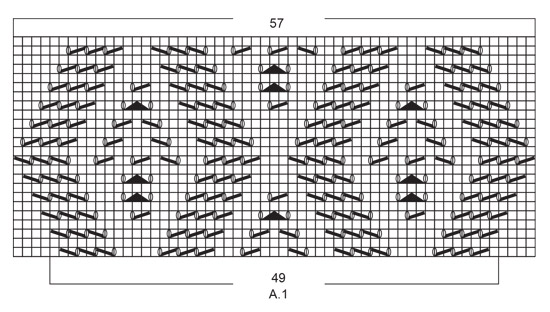
How to do the sts. in diagram A1 not understanding please explain the pattern id diamonds in lace
21.05.2024 - 03:34DROPS Design answered:
Hi Cheryl, Each square in the diagram has the explanation for its symbol above the size chart. Taking row 1 in A.1 as an example (diagrams are read from bottom right to left and upwards when working in the round): K5, K2 tog, 1 YO, K2 tog, 1 YO, K2 tog, 1 YOK5, 1 YO, (slip 1 knitwise, K1, pass slipped stitch over), 1 YO, (slip 1 knitwise, K1, pass slipped stitch over), 1 YO, (slip 1 knitwise, K1, pass slipped stitch over), K3 etc. Hope this helps and happy knitting!
21.05.2024 - 06:35
![]() Yriana wrote:
Yriana wrote:
Ich glaube ich habe da etwas missverstanden: die Arbeit wird von Anfang an in der Runde gestrickt, d.h. es gibt keine Hin- und Rückreihen zur Formung des Ausschnitts, ist das korrekt? Danke!
10.04.2024 - 14:20DROPS Design answered:
Liebe Yriana, ja genau - und die Diagramme lesen Sie jede Runde rechts nach links. Viel Spaß beim Stricken!
10.04.2024 - 15:38
![]() Yriana wrote:
Yriana wrote:
Hallo, werden die Randmaschen immer rechts gestrickt, am Anfang und am Ende der Reihe? Dankeschön!
10.04.2024 - 14:12DROPS Design answered:
Liebe Yriana, die ganze Arbeit wird in der Runde von oben nach unten gestrickt, so sind es kaine Randmaschen. Viel Spaß beim Stricken!
10.04.2024 - 15:37
![]() Pauline wrote:
Pauline wrote:
Bonjour. Après avoir augmenté 41 mailles (taille XL), faut il faire un rang endroit afin de tricoter torse les jetés ? Car si je pars sur le diagramme , je vais avoir des trous là où j'ai fait mes augmentations. Merci
28.07.2023 - 14:20DROPS Design answered:
Bonjour Pauline, vous pouvez mais les augmentations avec des jetés vont être tricotées torse au tour suivant, donc on ne devrait pas les voir. Bon tricot!
28.07.2023 - 15:29
![]() Sharlene Currin wrote:
Sharlene Currin wrote:
I have started this pattern and had to pull it out 6 times - by the time I get to row 9 every time I realize it is not correct. I really need help. The instructions for the first raglan row are very clear & it is fine but then as I increase every other row the stitches are different & I cannot get the design right. I get stuck knowing where to start A2 when there are more than 12 stitches to knit first. How do I know where to start each diagram row when there are more stitches on the needle?
30.07.2022 - 15:06DROPS Design answered:
Dear Sharlene, A.2 is always worked in the front only, over the same 27 stitches where you worked A.2 in the first raglan row. The increases should not affect the diagrams; the increased stitches are worked in stocking stitch between the raglan stitches and the diagrams. Happy knitting!
31.07.2022 - 17:50
![]() Susanne Berglund wrote:
Susanne Berglund wrote:
Ska man alltid sticka 2 r, omslag, 3 r, Mönster A1 (49 maskor)3 r, omslag, 2 r på bakstycket. Eller ska man utöka mönstret allt eftersom det ökas med raglan?
01.03.2022 - 13:29DROPS Design answered:
Hei Susanne. Bakstykket strikkes slik (i str. XL) : 2 masker rett, lag 1 kast om pinnen, strikk 3 masker rett, strikk de midterste 49 maskene i A.1 (dvs hopp over de ytterste 4 maskene i hver side av diagrammet), strikk 3 masker rett. Første økning til RAGLAN på bakstykket er nå ferdig (= 4 masker økt på Bakstykket). Fortsett mønsteret slik på bakstykket og øk til raglan på hver 2.omgang totalt 31 ganger. mvh DROPS Design
07.03.2022 - 11:46
![]() Gabriele Belz wrote:
Gabriele Belz wrote:
Vielen Dank für die schnelle Antwort dann kann ich meine Nadeln wieder zum Glühen bringen. Es hat mich nur etwas verwirrt weil in der Anleitung -in jeder Runde - steht. Liebe Grüße und eine gute Zeit, Gabriele
10.06.2021 - 10:14
![]() Gabriele wrote:
Gabriele wrote:
Hallöchen liebes Drops-Team! Ich verstehe das mit den Raglanzunahmen nicht so richtig! Nehme ich tatsächlich in jeder Runde zu,oder nur in jeder 2.,in der ich dann den vorherge- gangenen Umschlag rechts stricke? Ich möchte mich für euere Hilfe im Vorraus vielmals bedanken!!! Liebe Grüße, Gabriele
09.06.2021 - 23:34DROPS Design answered:
Liebe Gabriele, die Raglanzunahmen stricken Sie in jeder 2. Runde (= 1 Runde mit insgesamt 8 Umschläge, 1 Runde ohne Zunahmen = die Umschläge werden rechts gestrickt, um Löcher zu bilden). Viel Spaß beim stricken!
10.06.2021 - 08:23
![]() Robi wrote:
Robi wrote:
Buonasera, domanda da inesperta,non ho ben chiara una cosa:il centro del lavoro è sul lato tra manica e dietro???
28.05.2021 - 00:41DROPS Design answered:
Buongiorno Robi, l'inizio del giro è sotto la manica. Buon lavoro!
29.05.2021 - 14:29
![]() Robi wrote:
Robi wrote:
Buonasera,potrei fare le maniche più lunghe?
25.05.2021 - 21:57DROPS Design answered:
Buonasera Robi, si, certo, può apportare le modifiche che desidera alla parte delle maniche. Buon lavoro!
25.05.2021 - 23:30
|
||||||||||||||||
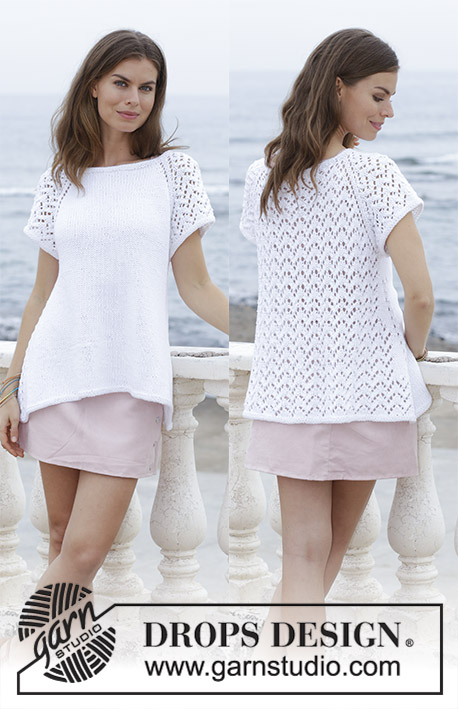
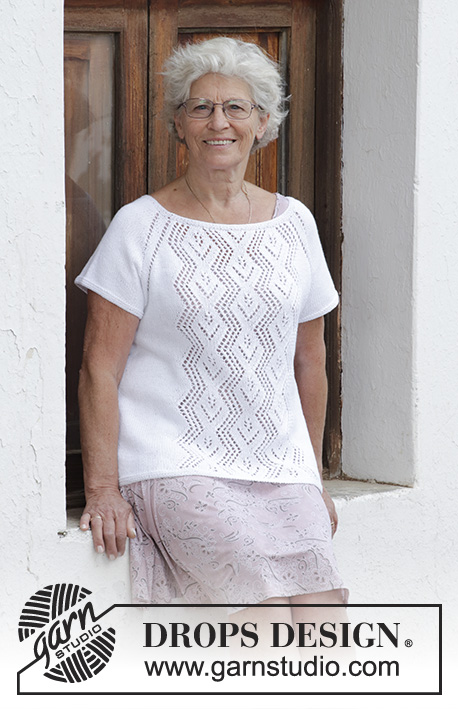
Diamonds in Lace#diamondsinlacetop |
||||||||||||||||
 |
 |
|||||||||||||||
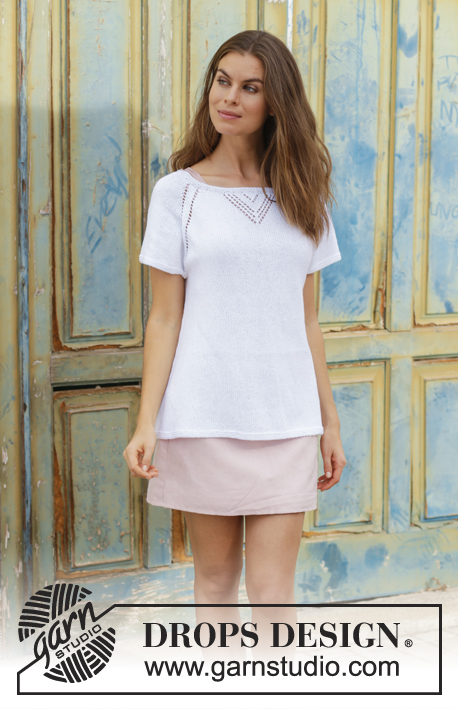
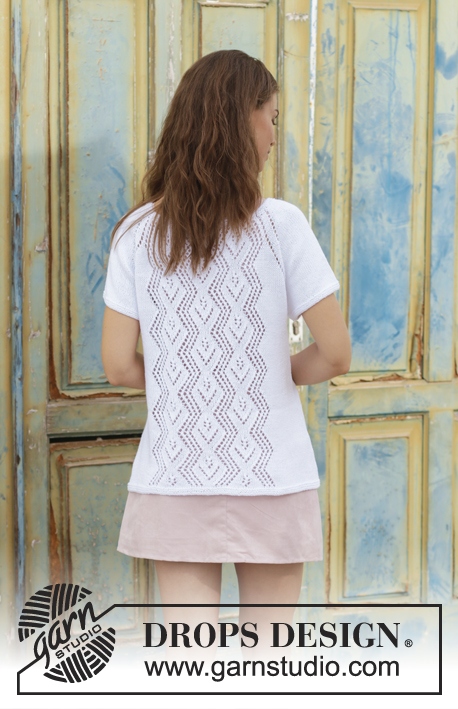
Top with lace pattern, raglan and A-shape, knitted top down. Size: S - XXXL Piece is knitted in DROPS Safran.
DROPS 187-30 |
||||||||||||||||
|
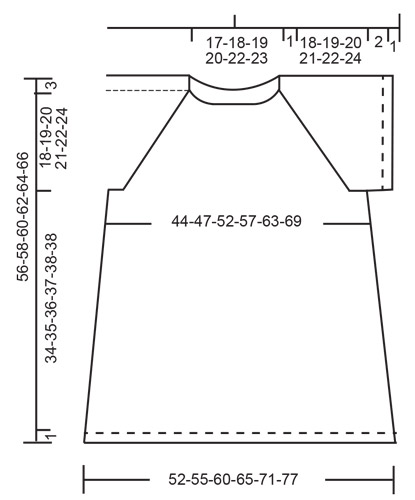
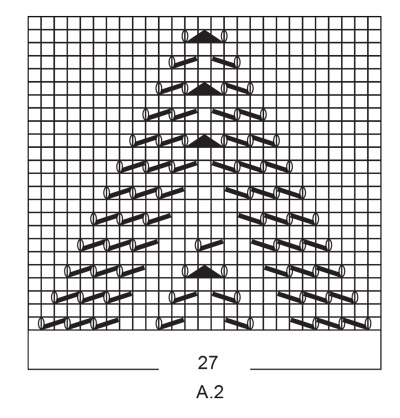
INFORMATION FOR PATTERN: GARTER STITCH (worked in the round): 1 ridge = 2 rounds. Knit 1 round and purl 1 round. INCREASE TIP (evenly): To calculate how to increase evenly, use number of stitches on row (e.g. 110 stitches) and divide number of stitches by number of increases to be done (e.g. 44) = 2.5. In this example increase by making a yarn over after alternately approx. every 2nd and 3rd stitch. On next round work yarn overs twisted to avoid holes. PATTERN: See diagrams A.1 and A.2. Diagrams show all rows in pattern seen from the right side. RAGLAN: Increase in every transition between body and sleeves (= 8 stitches increased on round). Work until 2 stitches remain before marker thread, make 1 yarn over, knit 4 (marker thread is in the middle of these 4 stitches), make 1 yarn over (= 2 stitches increased). On next round knit the yarn overs to make holes. Then knit the new stitches. INCREASE TIP (applies to sides of body): Work until 2 stitches remain before marker thread, make 1 yarn over, knit 4 (marker thread is in the middle of these 4 stitches), make 1 yarn over. Repeat in the other side (= 4 stitches increased on round). On next round knit yarns over twisted to avoid holes. ---------------------------------------------------------- TOP: Worked in the round on circular needle, top down. Sleeves are worked in the round on double pointed needles. YOKE: Cast on 110-115-120-125-130-137 stitches on circular needle size 3 mm with Safran. Work 3 ridges in GARTER STITCH - see explanation above. Knit 1 round while increasing 44-39-38-41-56-65 stitches evenly - read INCREASE TIP (evenly spaced) = 154-154-158-166-186-202 stitches. Switch to circular needle size 3.5 mm. Insert 4 marker threads in piece without working as follows: Insert a marker thread at beginning of round (= in transition between sleeve and back piece), insert next marker thread after 53-53-55-59-69-77 stitches, (= back piece), insert next marker thread after another 24 stitches (= sleeve), insert next marker thread after another 53-53-55-59-69-77 stitches (= front piece), 24 stitches (= sleeve) now remain after last marker thread. Round begins in transition between sleeve and back piece. Now work pattern as follows: Knit 2, make 1 yarn over, knit 0-0-1-3-8-12, work the middle 49 stitches in A.1 (i.e. skip the outermost 4 stitches in each side of diagram), knit 0-0-1-3-8-12 (= back piece), make 1 yarn over, knit 4 (marker thread is in the middle of these 4 stitches), make 1 yarn over, knit 20 (= sleeve), make 1 yarn over, knit 4 (marker thread is in the middle of these stitches), make 1 yarn over, knit 11-11-12-14-19-23, A.2 (= 27 stitches), knit 11-11-12-14-19-23, make 1 yarn over, knit 4 (marker thread is in the middle of these 4 stitches), make 1 yarn over, knit 20 (= sleeve), make 1 yarn over, knit 2. REMEMBER THE KNITTING TENSION. First increase for RAGLAN - explanation above, is now done (= 8 stitches increased on round). Continue pattern like this and increase every other round 20-24-28-31-33-36 times in total (including first increase explained above) = 314-346-382-414-450-490 stitches. NOTE! For every increase for raglan there is room for one more stitch of pattern A.1 towards raglan lines on back piece. When enough stitches have been increased to work all stitches in diagram A.1, 16-20-24-27-29-32 increases remain for raglan – knit these stitches. Repeat diagram A.1 vertically until finished measurements. Work A.2 one time vertically, then work in stocking stitch over stitches in A.2. When all increases are done, the piece should measure 15-17-20-22-23-25 cm from cast-on edge mid front. Continue without increase for raglan until piece measures 19-20-21-22-23-25 cm from cast-on edge mid front (if the knitting tension is correct vertically this measurement is already achieved in size XL, XXL, and XXXL). Work next row as follows: Work first 93-101-111-121-135-149 stitches (= back piece), slip the next 64-72-80-86-90-96 stitches on a stitch holder (= sleeve), cast on 8-8-8-10-10-10 new stitches in the side under sleeve, work the next 93-101-111-121-135-149 stitches (= front piece), slip the next 64-72-80-86-90-96 stitches on a stitch holder (= sleeve), cast on 8-8-8-10-10-10 new stitches in the side under sleeve. NOW MEASURE PIECE FROM HERE! BODY: = 202-218-238-262-290-318 stitches. Insert a marker thread in each side, i.e. in the middle of the 8-8-8-10-10-10 new stitches cast on in each side under sleeves (= 101-109-119-131-145-159 stitches on both back and front piece). Continue in the round with pattern A.1 on back piece as before and work in stocking stitch over the remaining stitches on round. When piece measures 4 cm, increase 2 stitches in each side - read INCREASE TIP. Increase like this approx. every 3-3-3-4-4-4 cm 9 times in total = 238-254-274-298-326-354 stitches. When piece measures approx. 34-35-36-37-38-38 cm from division, switch to circular needle size 3 mm. Work 3 ridges. Cast off. To avoid at tight cast-off edge cast off with a larger sized needle. Top measures approx. 56-58-60-62-64-66 cm from shoulder and down. SLEEVE: Slip the 64-72-80-86-90-96 stitches from stitch holder in one side of piece on double pointed needles size 3.5 mm and pick in addition up 1 stitch in each of the 8-8-8-10-10-10 new stitches cast on under sleeve = 72-80-88-96-100-106 stitches. Insert 1 marker thread in the middle of the 8-8-8-10-10-10 new stitches under sleeve. Begin round here and work in stocking stitch in the round. When sleeve measures 2 cm from division, switch to double pointed needles size 3 mm. Work 3 ridges. Cast off. To avoid at tight cast-off edge cast off with a larger sized needle. Work the other sleeve the same way. |
||||||||||||||||
Diagram explanations |
||||||||||||||||
|
||||||||||||||||
|
||||||||||||||||
|
||||||||||||||||
|
||||||||||||||||
Have you finished this pattern?Tag your pictures with #dropspattern #diamondsinlacetop or submit them to the #dropsfan gallery. Do you need help with this pattern?You'll find 25 tutorial videos, a Comments/Questions area and more by visiting the pattern on garnstudio.com. © 1982-2025 DROPS Design A/S. We reserve all rights. This document, including all its sub-sections, has copyrights. Read more about what you can do with our patterns at the bottom of each pattern on our site. |
||||||||||||||||


With over 40 years in knitting and crochet design, DROPS Design offers one of the most extensive collections of free patterns on the internet - translated to 17 languages. As of today we count 314 catalogues and 11822 patterns translated into English (UK/cm).
We work hard to bring you the best knitting and crochet have to offer, inspiration and advice as well as great quality yarns at incredible prices! Would you like to use our patterns for other than personal use? You can read what you are allowed to do in the Copyright text at the bottom of all our patterns. Happy crafting!
Post a comment to pattern DROPS 187-30
We would love to hear what you have to say about this pattern!
If you want to leave a question, please make sure you select the correct category in the form below, to speed up the answering process. Required fields are marked *.