
Looking for a yarn?


Comments / Questions (39)
![]() Sandra wrote:
Sandra wrote:
Hoe moet ik verder haken als het vierkant af is, ik begrijp niet zo goed hoe ik dan moet overstappen naar A2a
18.04.2024 - 22:43DROPS Design answered:
Dag Sandra,
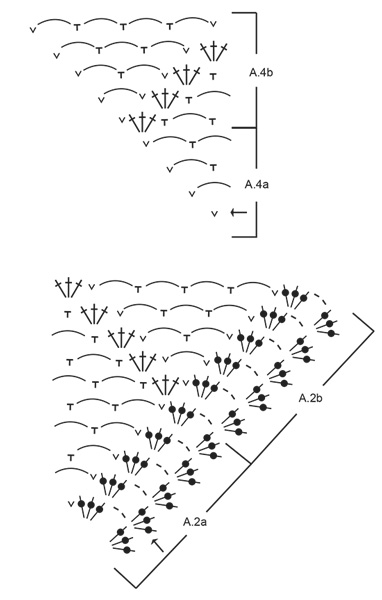
Als je alle toeren van A.1 hebt gehaakt, dan begin je met A.2a, A.3, A.4a, dus deze patronen haak je achter elkaar elkaar in de breedte gezien. Je begint in A.2a bij de pijl (De eerste toer laat de steken van de vorige toer, dus in dit geval van A.1 zien.)
22.04.2024 - 21:41
![]() Regina Jongenelen wrote:
Regina Jongenelen wrote:
Ja dat heb ik gedaan maar weet niet hoe ik verder moet in de rondte over de armgat
23.02.2023 - 08:41
![]() Regina Jongenelen wrote:
Regina Jongenelen wrote:
Hoi Heb een vraag zijn er nog filmpjes om verder te kunnen ik weet niet hoe ik de arm gat moet maken
20.02.2023 - 16:09DROPS Design answered:
Dag Regina,
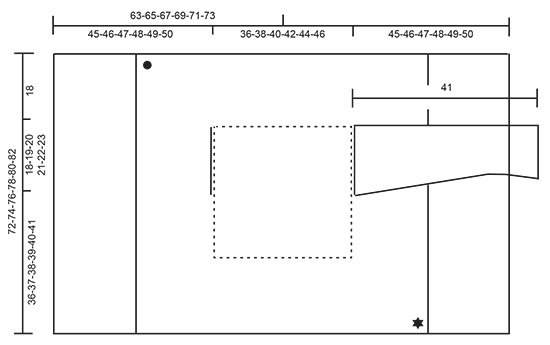
Helaas is er niet specifiek een filmpje voor het armsgat van dit patroon. Kun je aangeven waar je precies tegenaan loopt? Dan kunnen we je misschien verder helpen. Heb je de maattekening onderaan het patroon bekeken? Daar kun je zien waar de mouw aan het pand komt. Wellicht helpt dat om te begrijpen wat de bedoeling is...
22.02.2023 - 13:14
![]() Ingrid wrote:
Ingrid wrote:
Hi, thank you I have been loving the pattern so far and I have completed the square for the back, A3 once and A2a/ A2b & A4a /A4b all once but am now stuck where it says once you have completed A3 once in height and A2b& A4b twice work 2 more repeats of A.3 in width along each side of the square. ( i dont understand what i am meant to do here) Do i only work A3 back and forth or do i continue in the pattern in the round using A.3, A2a & A.2b? Please help, thank you.
06.10.2022 - 22:27DROPS Design answered:
Dear Ingrid, you just need to work A.3 on its own, back and forth. Happy crochetting!
07.10.2022 - 00:18
![]() Heike Gloria wrote:
Heike Gloria wrote:
Ich habe die Diagramme A2a, A3, A4a, dann A2b, weiter in A3 und A4b bis Ende des Diagramms gehäkelt. Es sind somit 12 Quadrate entstanden. Verstehe nicht wie es weitergeht. Mit A2b ist ok, aber wie weiter? Es passt nicht mit dem Diagramm zusammen. Nach A2b mit A3 weiter, aber in welcher Zeile?
10.08.2022 - 16:02DROPS Design answered:
Liebe Heike, das Muster häkeln Sie weiter einfach wie zuvor, damit die Quadrate wie zuvor forsetzen. Viel Spaß beim häkeln!
11.08.2022 - 10:27
![]() Heike Gloria wrote:
Heike Gloria wrote:
Ich habe die Diagramme A2a, A3, A4a, dann A2b, weiter in A3 und A4b bis Ende des Diagramms gehäkelt. Es sind somit 12 Quadrate entstanden. Verstehe nicht wie es weitergeht. Mit A2b ist ok, aber wie weiter? Es passt nicht zusammen.
10.08.2022 - 16:00DROPS Design answered:
Liebe Heike, nachdem Sie A.2b 1x in der Höhe gehäkelt haben, dann häkeln Sie weiter wie zuvor, mit *A.2b in jeder Ecke, dann A.3 wiederholen bis die nächste Ecke, A.4b bis zur Ecke*. Viel Spaß beim häkeln!
11.08.2022 - 10:14
![]() Marlies Peters wrote:
Marlies Peters wrote:
Goedendag, Er staat dat je 800 gram garen nodig hebt, klopt dit of moet dit 800 meter zijn? Met vriendelijke groet Marlies Peters
27.05.2022 - 18:16DROPS Design answered:
Dag Marlies,
De hoeveelheden worden altijd in grammen aangegeven en de hoeveelheid zou ook moeten kloppen. Je hebt dus 16 bollen nodig voor 800 gram.
28.05.2022 - 08:22
![]() Stefanie Stark wrote:
Stefanie Stark wrote:
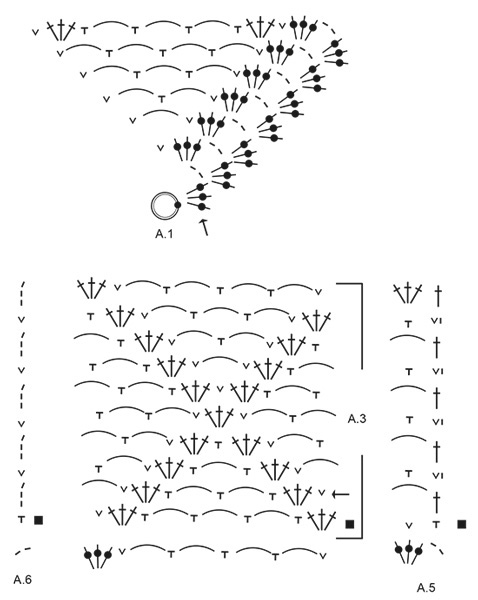
Wo finde ich das Diagramm A3?
06.09.2021 - 13:30DROPS Design answered:
Liebe Stefanie. Das Diagramm A.3 liegt zwischen A.5 und A.6.
06.09.2021 - 13:55
![]() Katrien Vandezande wrote:
Katrien Vandezande wrote:
Als ik voor het rugpand alle toeren van A2b, A3 en A4b in de hoogte haak tot ik aan 42 op 42 cm kom, moet ik dan ook aan de pijl beginnen bij A3 of pas in de 2de helft van A3 (de 5de rij vanaf de pijl)? Alvast bedankt voor de moeite.
13.02.2021 - 19:23DROPS Design answered:
Dag Katrien,
Ja, dat klopt, telkens als je opnieuw in de hoogte begint met A.3, begin je weer bij de pijl en niet halverwege het telpatroon.
16.02.2021 - 15:21
![]() Carolina Mancera wrote:
Carolina Mancera wrote:
Hola. Creo que si pusierais video/tutorial paso a paso de cada labor, seria de gran ayuda a la hora de llevar a cabo las labores tan hermosas que teneis aquí expuestas. Las labores son preciosas, pero sus instrucciones son escasas y dificiles al menos para mi. Tengo interés en varios modelos pero me es imposible de llevar a cabo. Mi enhorabuena por el trabajo. Daros las gracias de antemano. att
04.07.2020 - 22:15
|
|||||||||||||||||||||||||||||||||||||
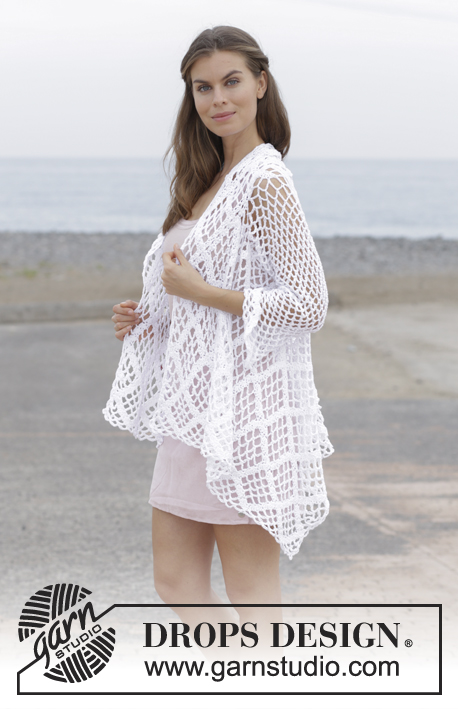
White Shore#whiteshorejacket |
|||||||||||||||||||||||||||||||||||||
 |
 |
||||||||||||||||||||||||||||||||||||
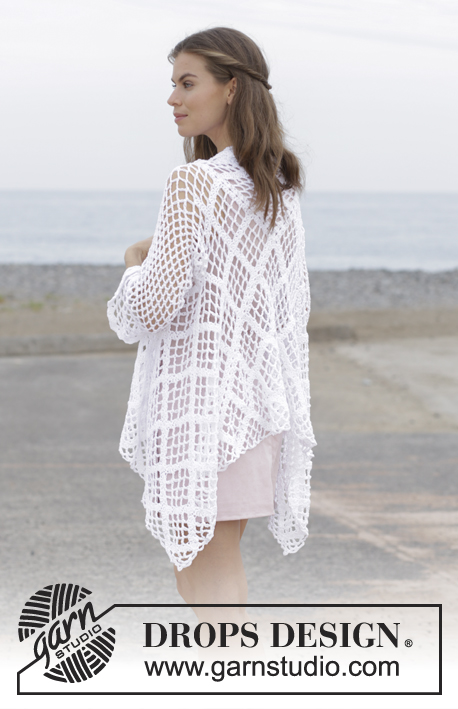
Crochet jacket with lace pattern, worked in a square from mid back outwards. Sizes S - XXXL. The piece is worked in DROPS Belle.
DROPS 187-7 |
|||||||||||||||||||||||||||||||||||||
|
INFORMATION FOR THE PATTERN: PATTERN: See diagrams A.1 to A.6. CROCHET INFORMATION: At the beginning of each round with double crochets replace first double crochet with 3 chain stitches. The round finishes with 1 slip stitch in the 3rd chain stitch at the beginning of the round, then work slip stitches to the first chain-space on the round. DECREASE TIP (for sleeves): Work 1 single crochet around the next chain-space, but wait with the last pull through, work the next single crochet around the next chain-space (do not work the 6 chain stitches between the single crochets ), on the last pull through, pull the strand through all 3 loops on the hook. CROCHET TIP (for sleeves): After the last single crochet on the round, continue to the next round with 1 single crochet around the next chain-space (= the first chain-space on the next round). NOTE: Mark the beginning of the round with a marker thread between the last chain stitch on the round and the first single crochet on the next round; allow the marker thread to follow your work upwards. NOTE: Make sure the marker thread stays in the same place. ---------------------------------------------------------- JACKET: The piece is first crocheted in the round from mid back and outwards in a square, then continue back and forth on the front pieces in each side. The sleeves are crocheted in the round from the armholes down. SQUARE: Work 5 chain stitches with hook size 4.5 mm/US 7 and Belle and form them into a ring with 1 slip stitch in the first chain stitch. Work pattern in the round from the round marked with an arrow in diagram A.1 a total of 4 repeats on the round – read CROCHET INFORMATION. REMEMBER THE CROCHET GAUGE! When A.1 has been completed, the piece measures approx. 14 x 14 cm / 5½" x 5½". Continue working in the round from the round with an arrow in each diagram as follows: * A.2a, A.3, A.4a *, work from *-* a total of 4 times in the round on each round. When A.2a and A.4a have been completed in height, work A.2b over A.2a and A.4b over A.4a. Repeat all rounds in A.2b, A.3 and A.4b in height, but for each time you finish A.3 once in height and A.2b and A.4b twice in height, work 2 more repeats of A.3 in width along each side of the square. When the piece measures 36-38-40-42-44-46 x 36-38-40-42-44-46 cm / 14¼"-15"-15¾"-16½"-17¼"-18" x 14¼"-15"-15¾"-16½"-17¼"-18" – adjust so that the last round worked is either round 2 or 4 in A.2b and A.4b, work the armholes as follows: Work pattern as before along the first side of the square (= towards the neck), work (3 double crochets, 2 chain stitches, 3 double crochets) around the chain-space in the corner, work 29-30-32-34-35-37 loose chain stitches, skip half the stitches/ chain-spaces along the next side of the square (= armhole) and work 1 single crochet around the next chain-space (= middle chain-space on the side), continue the pattern as before along the rest of this side and along the whole of the next side (= down along the body), work pattern as before as far as the middle chain-space along the next side, work 1 single crochet around the next chain-space (= the middle chain-space on the side), work 29-30-32-34-35-37 loose chain stitches, skip the remaining stitches/ chain-spaces along the side and finish with 1 slip stitch in the 3rd chain stitch at the start of the round, then work slip stitches as far as the chain-space in the corner. Continue with pattern in the round as before, but over the new chain stitches worked for the armholes, work double crochets and single crochets around these chain stitches instead of in them. When the piece measures approx. 72-74-76-78-80-82 x 72-74-76-78-80-82 cm / 28⅜"-29⅛"-30"-30¾"-31½"-32¼" x 28⅜"-29⅛"-30"-30¾"-31½"-32¼", the square is finished – adjust to after a complete repeat of A.2b, A.3b and A.4b in height. Cut the strand. Then finish working the front pieces separately back and forth. RIGHT FRONT PIECE: Start from the right side in the corner with a black star – see sketch, and work the same pattern back and forth as follows: Start on the row marked with a black square and work A.5 (= 1 single crochet around the chain-space in the corner and 1 single crochet in the 2nd double crochet), work A.3 as before along the whole side, finish with A.6 (= 1 single crochet around the chain-space in the next corner). Turn and continue back and forth like this until the front piece measures 63-65-67-69-71-73 cm / 24¾"-25½"-26⅜"-27⅛"-28"-28¾" from the center of the square – adjust so that you finish after the last row in A.3. Cut and fasten the strand. LEFT FRONT PIECE: Left front piece is worked in the same way as the right front piece, but start from the right side by the corner marked with a black spot – see sketch. SLEEVE: The sleeves are worked in the round from the crochet square and down. Fasten the strand mid under the sleeve by working 1 single crochet. ROUND 1: Work * 6 chain stitches, 1 single crochet around the chain-space /row of chain stitches worked for the armhole *, work from *-* a total of 19-20-21-22-23-24 times around the armhole (= 19-20-21-22-23-24 chain-spaces). Read CROCHET TIP (for sleeves). Continue by working 6 chain stitches and 1 single crochet around each chain-space. When the piece measures 4 cm / 1½", decrease 1 chain-space before the marker thread – read DECREASE TIP! Decrease like this alternately on every other side of the marker thread, approx. every 8-8-7-6-6-6 cm / 3"-3"-2¾"-2¼"-2¼"-2¼" a total of 4-4-5-6-6-6 times = 15-16-16-16-17-18 chain-spaces. When the piece measures 39 cm / 15¼" in all sizes, finish the round with 1 slip stitch in the first single crochet on round mid under sleeve. Now work an edge around the bottom of the sleeve as follows: Work 3 chain stitches at the beginning of the round, (3 double crochets, 2 chain stitches, 3 double crochets) around each of the chain-spaces, finish the round with 1 slip stitch in the 3rd chain stitch at the beginning of the round. Cut and fasten the strand. Work the other sleeve in the same way. CROCHET EDGE: Now work a finishing edge around the whole jacket as follows: Fasten the strand with 1 single crochet in the outermost stitch in the top corner on the right front piece. ROUND 1: Work * 6 chain stitches, 1 single crochet around the next chain-space /in the middle one of the 3 double crochets in the double crochet group between chain-spaces in the pattern *, work from *-* to end of round, but work an extra chain-space around the chain-space in each corner and when working along the sides of the front pieces, skip approx. 2 cm / ¾". Finish the round with 1 slip stitch in the first stitch on the round. |
|||||||||||||||||||||||||||||||||||||
Diagram explanations |
|||||||||||||||||||||||||||||||||||||
|
|||||||||||||||||||||||||||||||||||||
|
|||||||||||||||||||||||||||||||||||||
|
|||||||||||||||||||||||||||||||||||||
|
|||||||||||||||||||||||||||||||||||||
Have you finished this pattern?Tag your pictures with #dropspattern #whiteshorejacket or submit them to the #dropsfan gallery. Do you need help with this pattern?You'll find 10 tutorial videos, a Comments/Questions area and more by visiting the pattern on garnstudio.com. © 1982-2025 DROPS Design A/S. We reserve all rights. This document, including all its sub-sections, has copyrights. Read more about what you can do with our patterns at the bottom of each pattern on our site. |
|||||||||||||||||||||||||||||||||||||


With over 40 years in knitting and crochet design, DROPS Design offers one of the most extensive collections of free patterns on the internet - translated to 17 languages. As of today we count 314 catalogs and 11821 patterns - 11811 of which are translated into English (US/in).
We work hard to bring you the best knitting and crochet have to offer, inspiration and advice as well as great quality yarns at incredible prices! Would you like to use our patterns for other than personal use? You can read what you are allowed to do in the Copyright text at the bottom of all our patterns. Happy crafting!
Post a comment to pattern DROPS 187-7
We would love to hear what you have to say about this pattern!
If you want to leave a question, please make sure you select the correct category in the form below, to speed up the answering process. Required fields are marked *.