
Looking for a yarn?


Comments / Questions (17)
![]() Martine TOMASI wrote:
Martine TOMASI wrote:
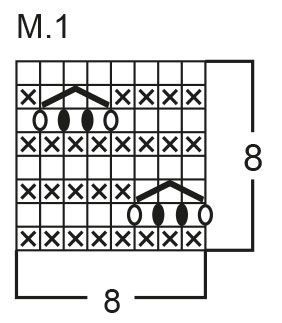
J'ai refait plusieurs fois mon échantillon au point fantaisie : cela ne correspond pas à la photo ni au modèle dans dropsfan gallery .... Je ne comprends pas. Trop de rangs entre les mailles allongées. Pourquoi ?
21.02.2025 - 21:20DROPS Design answered:
Bonjour Mme Tomasi, le diagramme M.1 se tricote sur 8 rangs, vous devez avoir 2 côtes mousse (4 rangs endroit) entre chacun des rangs ajourés/mailles allongés. cette vidéo devrait pouvoir vous aider, même si les points ajourés ne sont pas exactement aux mêmes endroit du diagramme, la technique et le résultat sont les mêmes. Bon tricot!
24.02.2025 - 08:02
![]() Gina wrote:
Gina wrote:
Sorry ik moest belgie aanduiden :) Hallo, kan je deze ook breien met gewone naalden ipv rondbreinaalden ? zoja hoeveel steken of hoe berekenen hoeveel steken er moeten worden opgezet. dankuwel
12.02.2025 - 13:05
![]() Gina wrote:
Gina wrote:
Hallo, kan je deze ook breien met gewone naalden ipv rondbreinaalden ? zoja hoeveel steken of hoe berekenen hoeveel steken er moeten worden opgezet. dankuwel
12.02.2025 - 13:02
![]() Ellen wrote:
Ellen wrote:
Om jag förstår mönstret rät så stickar man alla varv aviga. Resultatet blir ju rätstickning med hålmönster. Varför har man valt detta istället för att sticka alla varv räta? Både omslag och att släppa dessa borde ju fungera när man stickar räta maskor också?
19.01.2024 - 21:38DROPS Design answered:
Hei Ellen. Du strikker rett fra vrangen, Arbeidet strikkes frem og tilbake og iflg. diagrammet strikker man vrang fra retten og rett fra vrangen, slik at det bare blir vrangmasker når man ser arbeidet fra retten. mvh DROPS Design
29.01.2024 - 09:34
![]() Narina wrote:
Narina wrote:
Dear support team, I cannot figure out how to make the P stitch "roof sign" In the 3rd row of the diagramme. Could you pls explain? Thank you
25.03.2023 - 12:18DROPS Design answered:
Dear Narina, it is a purl stitch, while you release (slide off the needle) the yarnover(s) you did in the previous row. See also the video tuorial here: Mondjuk az eddigiek fényében kérdés, hogy meddig jut el. https://www.garnstudio.com/video.php?id=413&lang=en Hope this helps. Happy Crafting!
26.03.2023 - 10:07
![]() Salles Céline wrote:
Salles Céline wrote:
Bonjour, Comment faire pour répéter le motif de 8 mailles avec 1 maille lisiere de chaque côté avec 70 mailles? 70-2 mailles cela fait 68 et ce n’est pas divisible par 8. Merci de m’éclairer 😊
17.02.2022 - 20:42DROPS Design answered:
Bonjour Mme Salles, tricotez ainsi: 1 m lisière, répétez 8 fois les 8 mailles de M.1, tricotez maintenant les 4 premières mailles du diagramme, et terminez par 1 m lisière = 1+ 8x8 + 4 +1=70 mailles. Bon tricot!
18.02.2022 - 07:58
![]() Renate Schies wrote:
Renate Schies wrote:
Hallo, müsste der Anschlag nicht 9x8+2 = 74 Maschen sein (da ja der Rapport über 8 Maschen geht)?
07.07.2021 - 15:28DROPS Design answered:
Liebe Frau Schies, Anschlag ist 70-78 Maschen und es wird dann so gestrickt: 1 Randmasche, die 8 M in M.1 wiederholen bis 5 Maschen übrig sind (= 8-9 Mal), die ersten 4 Maschen in M. 1 stricken und mit 1 Randmasche enden. Viel Spaß beim stricken!
07.07.2021 - 16:21
![]() Christina Cersosimo wrote:
Christina Cersosimo wrote:
Could you ask the designer to add an additional larger size? The dimensions for the Medium/Large won't fit me and I love the design.
10.05.2021 - 21:39DROPS Design answered:
Dear Christina, please understand that we cannot modify our patterns for each individual request, besides, this is a modell that is many years old. However, you can try a couple of things. You can try knitting with a somewhat larger gauge, using a larger needle (like 4-4.5 mm instead of the suggested 3,5 mm, and/ or you can use a bit thicker yarn (like our Safran yarn) and larger needle. Happy Knitting!
10.05.2021 - 22:47
![]() Astrid Huntink wrote:
Astrid Huntink wrote:
Ik snap niet hoe je een begin maakt met de spie
01.05.2020 - 18:29
![]() Astrid Huntink wrote:
Astrid Huntink wrote:
Is er een voorbeeld van de spie breien?
20.04.2020 - 17:50DROPS Design answered:
Dag Astrid,
Nee, helaas is hier geen voorbeeld van. Laat even weten waar je precies tegenaan loopt zodat we je beter kunnen helpen.
29.04.2020 - 09:43
|
||||||||||||||||
Imprints#imprintssweater |
||||||||||||||||
 |
 |
|||||||||||||||
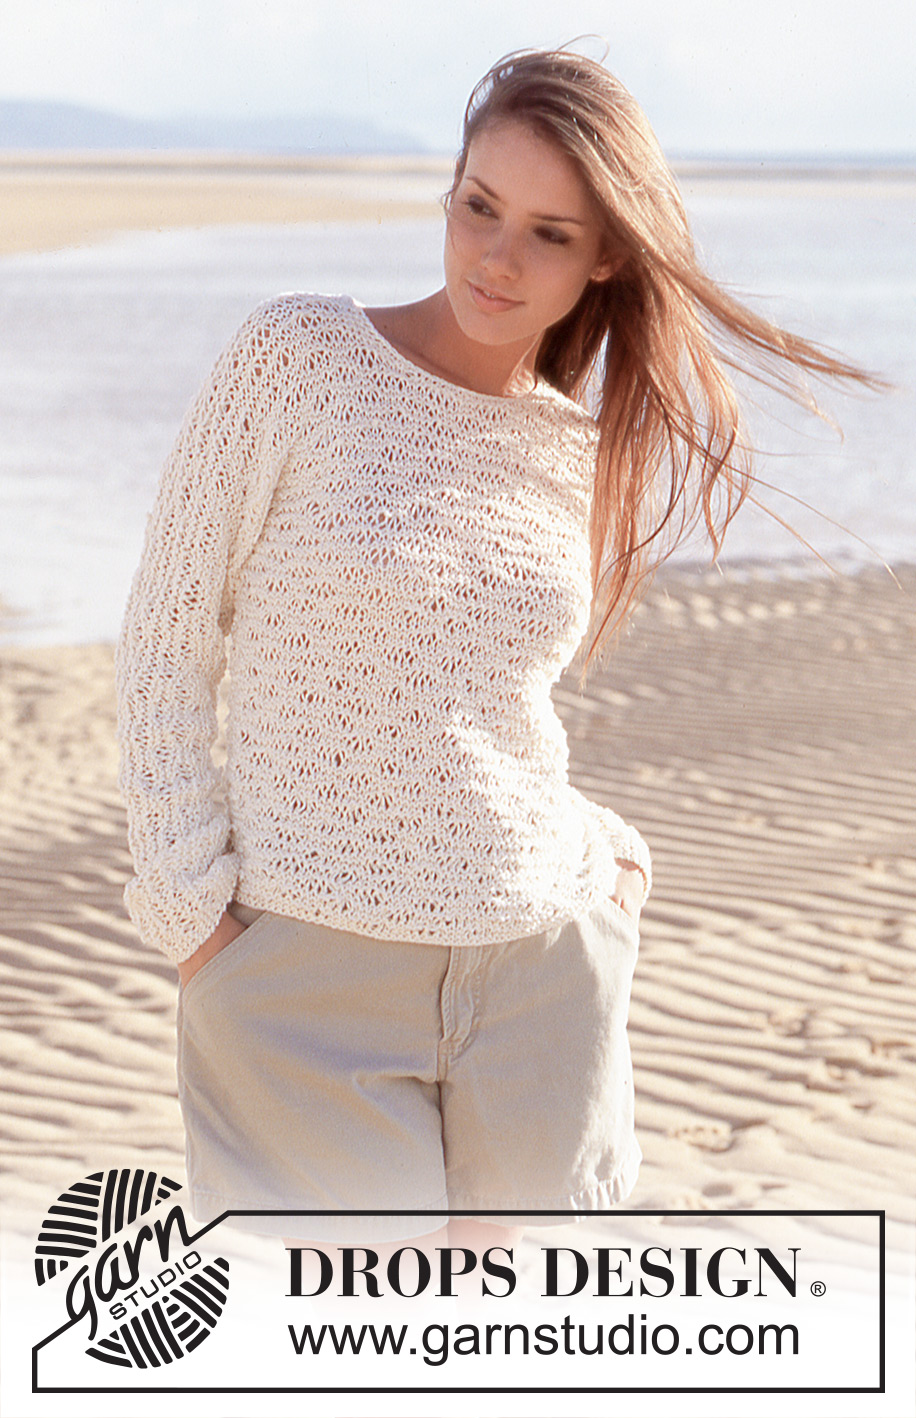
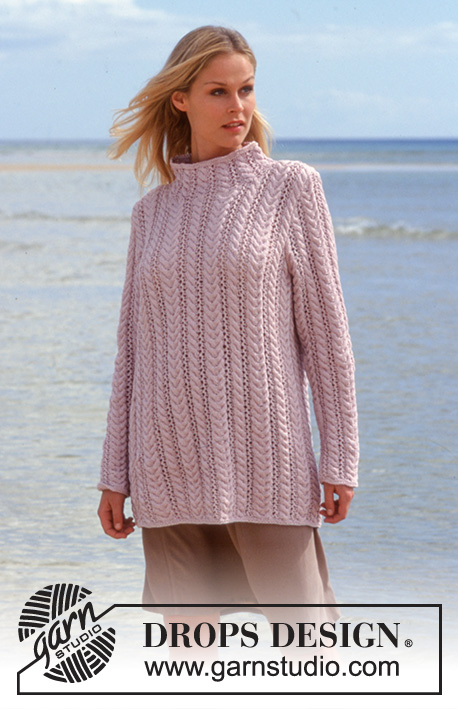
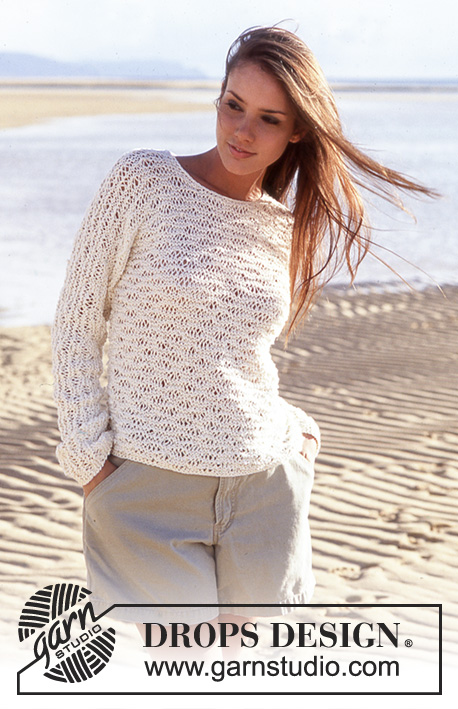
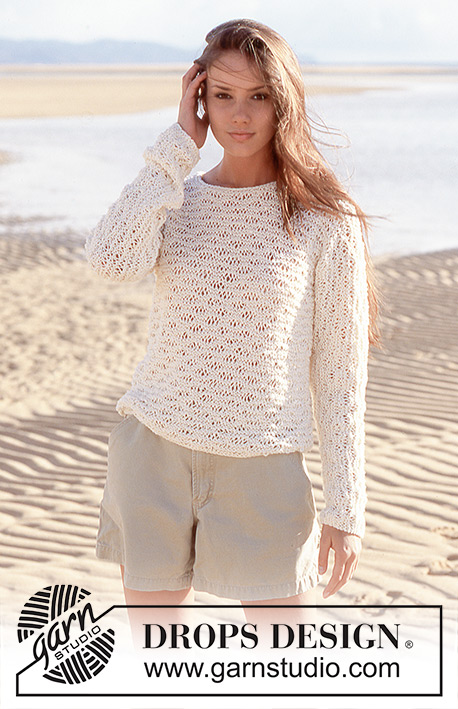
DROPS Sweater in Bomull-Lin
DROPS 64-4 |
||||||||||||||||
|
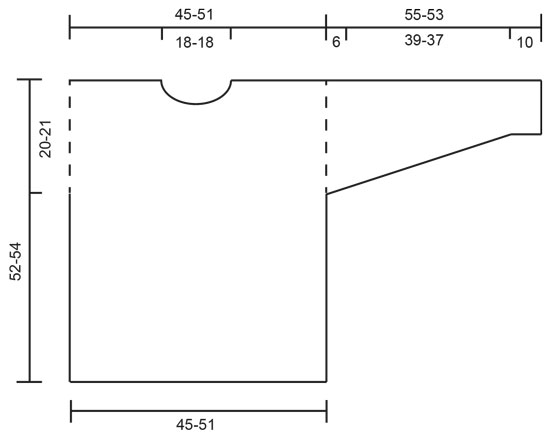
Gauge: 15 sts x 27 rows on larger needles in Pattern = 10 x 10 cm [4" x 4"]. Pattern: See chart (1 chart = 1 repeat). The pattern is seen from the right side. Garter st, when knitting flat: Knit all sts, all rows. Garter st, when knitting in the round: *Rnd 1, knit. Rnd 2, purl.* Repeat from * - *. Tip for increasing: All increases for the «wedge» occur on the right side of the work. To inc 1 st, knit 2 sts into the same st. Tip for decreasing: All decreases of «wedge»-sts occur on the right side of the work. To dec 1 st: K 2 tog. Note: The sweater is knit flat all in one piece, starting at the front bottom edge and ending at the back bottom edge. Front: Loosely cast on 70-78 sts on larger circular needles. Knit 2 rows garter st, then Pattern 1, keeping 1 st at each side in garter st throughout. When the work measures 32-33 cm [12-⅝" - 13"] place a marker inside the edge st at each side. Sts will be cast on at each side for sleeves and sts are increased between the sleeve and body (= «wedge»). Read the entire next section before you continue! Casting on for sleeves and increasing for the «wedge» are done at the same time. Increasing for sleeves: Loosely cast on new sts at each side at the end of every row: 5 sts 1-3 times, 6 sts 9-7 times, 15 sts 1-1 time = 74-72 new sts cast on at each side. The new sts are knit into the pattern as you go along. When all sts have been cast on, knit the 2 edge sts at each side (which will be the bottom edge of sleeve) in garter st throughout. Increasing for «wedge»: Inc 1 st on the sleeve side of each marker every 4 rows 3 times, then every other row 4 times - knit the increased sts in garter st until all 7 sts have been increased - now these 7 sts+ the edge st on the sleeve side of the marker (= 8 sts) are knit into the pattern. After all increases are complete and all new sts have been cast on there are 232-236 sts on the needles. When the work measures approx. 44-46 cm [17.25" - 18-⅛"] from the bottom edge, bind off the center 14-14 sts for the neck. Bind off at each neck edge every other row: 2 sts 2 times, 1 st 3 times = 102-104 sts remain on each sleeve. Back: When the work measures approx. 53-55 cm [20⅞" - 21-⅝"], cast on 28 sts between the shoulders for the neck. Measure the work from here. Knit Pattern 1 over all sts until the work measures approx. 11-12 cm [4.25" - 4.75"]. Place 1 marker in the work after 82-80 sts and 1 marker after 150-156 sts (there are 68-76 sts between 82-80 sts at each side of the markers). Sts will now be bound off at each side for sleeves and sts are decreased in the «wedge». Read the entire next section before you continue! Binding off for sleeves and decreasing for the «wedge» are done at the same time. Binding off sleeve sts: Bind off at the beginning of each row: 15 sts 1-1 time, 6 sts 9-7 times, 5 sts 1-3 times = 74-72 bound-off sts on each side. Decreasing «wedge» sts: The 7 increased sts which are to be decreased for the «wedge» are knit in garter stitch while decreasing is in progress in order not to shift the pattern. Dec 1 st on the sleeve side of the marker every other row 4 times and then every 4th row 3 times = 7 decreased sts. When all binding off and decs have been completed there are 70-78 sts on the needles and the work measures approx. 19-20 cm [7.5" - 7-⅞"] (from the back neck sts). Continue knitting the pattern, keeping 1 st at each side in garter stitch throughout. When the work measures approx. 50-52 cm [19.75" - 20.5"] (adjust for an equal number of vertical repeats in the back as in the front), knit 2 rows garter st, bind off. Assembly: Sew side and sleeve seam in one using the edge sts as a seam allowance. Pick up approx. 65-70 sts around the neck on smaller double pointed needles. Join and knit 2 rows garter st, bind off. |
||||||||||||||||
Diagram explanations |
||||||||||||||||
|
||||||||||||||||
|
||||||||||||||||
|
||||||||||||||||
Have you finished this pattern?Tag your pictures with #dropspattern #imprintssweater or submit them to the #dropsfan gallery. Do you need help with this pattern?You'll find 21 tutorial videos, a Comments/Questions area and more by visiting the pattern on garnstudio.com. © 1982-2025 DROPS Design A/S. We reserve all rights. This document, including all its sub-sections, has copyrights. Read more about what you can do with our patterns at the bottom of each pattern on our site. |
||||||||||||||||


With over 40 years in knitting and crochet design, DROPS Design offers one of the most extensive collections of free patterns on the internet - translated to 17 languages. As of today we count 314 catalogs and 11822 patterns - 11812 of which are translated into English (US/in).
We work hard to bring you the best knitting and crochet have to offer, inspiration and advice as well as great quality yarns at incredible prices! Would you like to use our patterns for other than personal use? You can read what you are allowed to do in the Copyright text at the bottom of all our patterns. Happy crafting!
Post a comment to pattern DROPS 64-4
We would love to hear what you have to say about this pattern!
If you want to leave a question, please make sure you select the correct category in the form below, to speed up the answering process. Required fields are marked *.