
Looking for a yarn?


Comments / Questions (7)
![]() Kari wrote:
Kari wrote:
Hei igjen:-) Tusen takk for at du ramset opp oppskriften, da skjønte jeg det, hurra! Beklager alle spørsmålene! Mvh Kari
24.02.2022 - 11:13
![]() Kari wrote:
Kari wrote:
Hei igjen! Tusen takk for svar. Ser at det stemmer at 2,5 er pinnestørrelsen. Har økt på begge sider i første farge i første rad med staver slik det står i oppskriften. Har heklet veldig stramt siden den ble så stor da jeg heklet løst, kanskje det er derfor den har blitt så rar:-) Får teste en gang til, hvis den har blitt sånn som på bildet når dere testet den ut så må det jo stemme i oppskriften. Mvh Kari
24.02.2022 - 07:27
![]() Kari Sletteberg wrote:
Kari Sletteberg wrote:
Svar til deres svar: Det er det jeg har gjort, men det blir absolutt ikke pent, kan problemet være at det er for få masker i første farge i utgangspunktet? Det resulterer i at økningen øverst blir en egen liten høyde som ikke blender med resten. Er det noe sted jeg kan sende bilder? Har dere testet ut denne oppskriften? Mvh Kari
14.02.2022 - 10:09DROPS Design answered:
Hei Kari. I ditt 1.innlegg skriver du at økningene ikke skjer før i farge 2. Nei, det skjer i 1.rad med staver, altså med 1. farge. Men så skriver du i ditt 3. innlegg at du øker i 1. rad. Hva er riktig, når øker du? Du skriver også i ditt 1. innlegg at det er oppgitt heklenål 3, i oppskriften er det kun oppgitt 2,5 mm. Av de 2 andre Spørsmålene er det ingen som oppgir feil heklenår str. Stemmer heklefastheten din? Hekler du på begge sidene av luftmaskeraden og øker kun i den ene siden? Vi har heklet bikinien + 2 tester for å dobbeltsjekke nå, våre stemmer. Dessverre ingen mulighet å sende bilder, men ta kontakt med din butikk og la de se på arbeidet ditt.
21.02.2022 - 07:22
![]() Kari Sletteberg wrote:
Kari Sletteberg wrote:
Glemte å skrive spørsmålet: Hadde det ikke vært mest naturlig å øke stavmaskene etter rekken med luftmasker sånn at ikke arbeidet trekker seg sammen, eller har jeg forstått oppskriften feil og i tilfelle hva gjør jeg feil?
09.02.2022 - 13:50DROPS Design answered:
Hei Kari. Se vårt svar på ditt første innlegg :) mvh DROPS Design
14.02.2022 - 08:56
![]() Kari Sletteberg wrote:
Kari Sletteberg wrote:
Bikinien har bare 21 masker i første farge og hekles på hver side. Økning skjer ikke før i farge 2. Da blir det så mange masker at den innerste delen som er mye kortere trekker arbeidet sammen. I tillegg var det oppgitt pinne 3, men måtte bruke 2,5 som oppgitt i kommentaren til en bruker under oppskriften. Kan sende bilder hvis jeg får en e-postadresse av dere. Mvh Kari
08.02.2022 - 10:48DROPS Design answered:
Hei Kari. Jo, du øker i "toppen" på hver rad. Du hekler 1 stav i hver stav på hver side av luftmaske-raden og hekler 2 staver, 1 luftmaske 2 staver om luftmasken på toppen på hver rad. Så på neste rad hekler du også 2 staver, 1 luftmaske 2 staver i luftmasken fra forrige rad (=øker). Da får du en fin bue på "toppen". mvh DROPS Design
14.02.2022 - 08:53
![]() Maurine wrote:
Maurine wrote:
Bonjour, Pour la taille, il faut choisir en fonction du bonnet ? S = A, M = B, etc ? Merci.
18.04.2021 - 14:52DROPS Design answered:
Bonjour Maurine, regardez le schéma des mesures, il pourra fort probablement vous orienter. Bon crochet!
19.04.2021 - 08:28
![]() Heidi Cecilie Brandshaug Løken wrote:
Heidi Cecilie Brandshaug Løken wrote:
Hekler str M. Cupen blir 20 cm bred nederst. Hva gjør jeg feil? Den er jo så lang og smal på bildet.
22.07.2017 - 11:25DROPS Design answered:
Hej Heidi, hækler du i DROPS Safran, så hækler du lidt løsere end hvad vi gør ifølge opskriften. Om du gør det så vælg en nål som er et halvt nummer mindre, da kommer det sikkert til at stemme. God fornøjelse!
09.08.2017 - 15:19
|
|
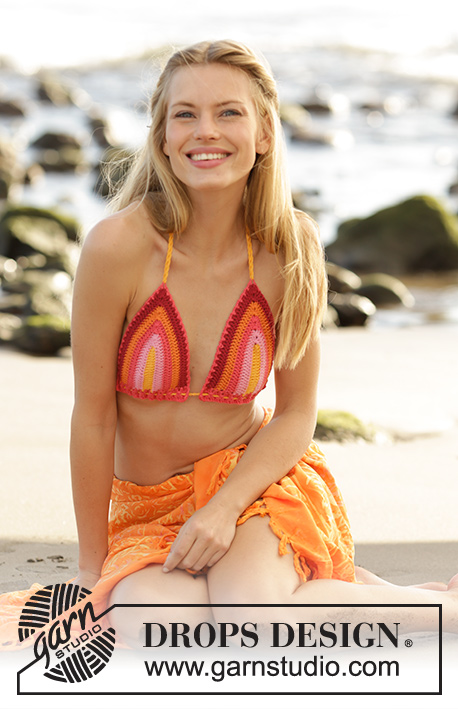
Samantha#samanthabikini |
|
 |
 |
Bikini top with stripes, crocheted in DROPS Safran. Sizes XS - XXXL.
DROPS 178-73 |
|
|
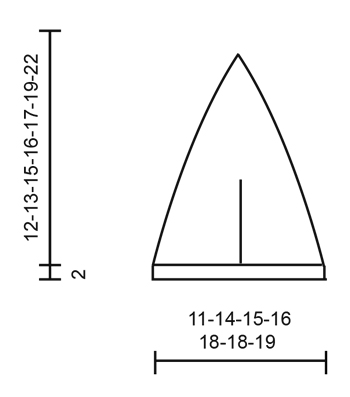
CROCHET INFO: On the first row of the piece, work the first double crochet in the 5th chain stitch from the hook (= 2 double crochets). At the beginning of each row of double crochets, replace the first double crochet with 3 chain stitches. STRIPES: NOTE: The stripes are different in the different sizes. (The model in the picture is size XS). See the color suggestions for the different sizes. CAST ON + ROW 1: Strong yellow. ROWS 2-3: medium pink. ROWS 4-5: raspberry. ROWS 6-7: orange. Continue working as follows in the different sizes: SIZE XS: ROWS 8-9: rust. SIZE S: ROWS 8-9: raspberry. ROWS 10-11: rust. SIZE M: ROWS 8-9: raspberry. ROW 10: orange. ROWS 11-12: rust. SIZE L: ROWS 8-9: raspberry. ROWS 10-11: orange. ROWS 12-13: rust. SIZES XL and XXL: ROWS 8-9: raspberry. ROWS 10-11: orange. ROW 12: raspberry. ROWS 13-14: rust. SIZE XXXL: ROWS 8-9: raspberry. ROWS 10-11: orange. ROWS 12-13: raspberry. ROWS 14-15: rust. ---------------------------------------------------------- BIKINI TOP: First you work 2 loose cups. Then the cups are threaded onto a twisted cord. CUP: Work 21-21-24-27-27-32-38 chain stitches with strong yellow and hook size C/2.5 mm – READ STRIPES! Work back and forth as follows (row 1 = right side): Work 1 double crochet in the 5th chain stich from the hook (= 2 double crochets) – READ CROCHET INFO, then work 1 double crochet in each of the next 15-15-18-21-21-26-32 chain stitches, work (2 double crochets, 1 chain stitch, 2 double crochets) in the last chain stitch on the row, rotate the piece, skip the last chain stitch (i.e. the chain stitch you have just worked) and continue with 1 double crochet in each of the remaining 17-17-20-23-23-28-34 chain stitches on the other side of the chain-stitch row = 38-38-44-50-50-60-72 double crochets + 1 chain stitch. Turn the piece and continue back and forth with 1 double crochet in each double crochet on each side of the chain-stitch row and work (2 double crochets, 1 chain stitch, 2 double crochets) around the chain stitch at the top of each row. REMEMBER THE CROCHET GAUGE! Continue in this way until you have worked a total of 9-11-12-13-14-14-15 rows of double crochets, but on the last row adjust the number of stitches so that you have 35-39-44-49-51-56-64 double crochets on each side of the chain stitch at the top (= a total of 70-78-88-98-102-112-128 double crochets). The piece measures approx. 11-14-15-16-18-18-19 cm / 4½"-5½"-6"-6¼"-7"-7"-7½" along the bottom edge of the cup. Cut the strand. BOTTOM EDGE OF CUP: Work an edge back and forth along the bottom of the cup with raspberry. The first row is worked around the side of the outermost double crochet as follows: ROW 1: Fasten the strand with 1 single crochet, work 3 chain stitches (= 1 double crochet), work 1 more double crochet around the same double crochet. Work * 1 chain stitch, 2 double crochets around the next double crochet *, repeat from *-* 16-20-22-24-26-26-28 more times along the bottom edge of the cup. ROW 2: Work 3 chain stitches (= 1 double crochet), work * 1 chain stitch, skip 2 double crochets, work 2 double crochets around the next chain stitch *, repeat from *-* 16-20-22-24-26-26-28 more times, work 1 chain stitch and finish with 1 double crochet in the last stitch. ROW 3: Work 3 chain stitches (= 1 double crochet), work * 1 chain stitch, 2 double crochets around the next chain stitch *, repeat from *-* 17-21-23-25-27-27-29 more times. Do not cut the strand! EDGE: Work * 2 chain stitches, 1 single crochet *, repeat from *-* 2 times along the side of the edge at the bottom of the cup. Continue with * 2 chain stitches, skip 1 double crochet, 1 single crochet in the next double crochet *, repeat from *-* up to the chain stitch at the top of the cup, work (1 single crochet, 2 chain stitches, 1 single crochet) around this chain stitch and continue downwards in the same way as on the first side. Finish with 1 single crochet around the last double crochet on last row of the edge at the bottom of the cup. Cut and fasten the strand. Work 1 more cup in the same way. TWISTED CORD: Cut 3 strands of 3 metres/3.5yds with strong yellow. Twist them together until they begin to resist, fold the cord double and it will continue to twist on its own. Tie a knot in each end and cut the strands so that the ends are of even length. Thread the cord up and down between the double crochet groups in the bottom edge of each of the 2 cups. The bikini is fastened at the back. Cut 3 strands of 1.2 metres/1.5yds with strong yellow. Twist them together until they begin to resist, fold the cord double and it will continue to twist on its own. Tie a knot at each end and cut the strands so that the ends are even. Thread the cord through the edge at the top of one cup and tie a larger knot on the cord. Work another twisted cord in the same way and fasten to the top of the other cup. The cords are tied behind the neck. |
|
|
|
Have you finished this pattern?Tag your pictures with #dropspattern #samanthabikini or submit them to the #dropsfan gallery. Do you need help with this pattern?You'll find 8 tutorial videos, a Comments/Questions area and more by visiting the pattern on garnstudio.com. © 1982-2025 DROPS Design A/S. We reserve all rights. This document, including all its sub-sections, has copyrights. Read more about what you can do with our patterns at the bottom of each pattern on our site. |
|


With over 40 years in knitting and crochet design, DROPS Design offers one of the most extensive collections of free patterns on the internet - translated to 17 languages. As of today we count 314 catalogs and 11822 patterns - 11812 of which are translated into English (US/in).
We work hard to bring you the best knitting and crochet have to offer, inspiration and advice as well as great quality yarns at incredible prices! Would you like to use our patterns for other than personal use? You can read what you are allowed to do in the Copyright text at the bottom of all our patterns. Happy crafting!
Post a comment to pattern DROPS 178-73
We would love to hear what you have to say about this pattern!
If you want to leave a question, please make sure you select the correct category in the form below, to speed up the answering process. Required fields are marked *.