Samantha by DROPS Design

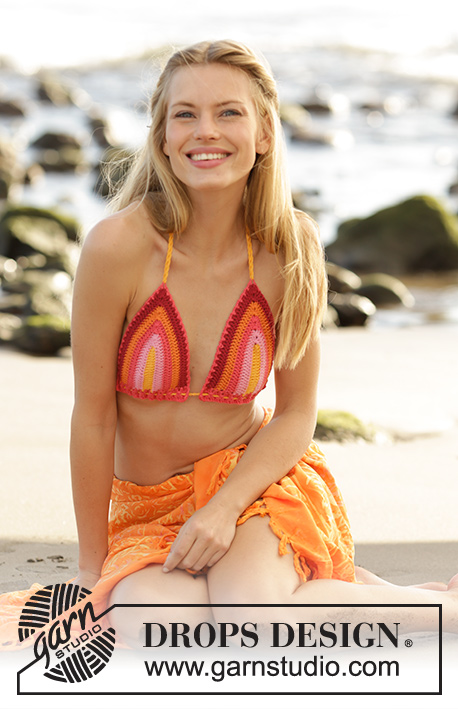
Pruhovaná bikiny podprsenka - top háčkovaná z příze DROPS Safran. Velikost XS - XXXL.

Tagy: bikini
DROPS 178-73
DROPS Design: model č. e-250
Skupina přízí A
-----------------------------------------------------------
Velikost: XS - S - M - L - XL - XXL - XXXL

Materiál:
DROPS SAFRAN firmy Garnstudio (spadá do skupiny přízí A)
po 50 g od každé z následujících barev:
č. 11, žlutá
č. 02, růžová
č. 13, korálová
č. 28, oranžová
č. 20, vínová
POZN.: na jednobarevnou podprsenku by byla spotřeba asi 50-50-50-50-50-100-100 g příze Safran.

DROPS HÁČEK č.2,5 – nebo velikosti potřebné k uháčkování zkušebního vzorku o rozměrech 28 dlouhých sloupků a 16 řad = 10 cm na šířku a 10 cm na výšku.

-------------------------------------------------------

Náhradní příze – Podívejte se, jak změnit přízi
Skupina přízí A až F – Neměňte návod, změňte přízi
Spotřeba příze při použití náhradní příze – Využijte náš převodník

-------------------------------------------------------


100% bavlna
od 43.00 Kč /50g
DROPS Safran uni colour DROPS Safran uni colour 43.00 Kč /50g
Ganella
Objednat
needles Jehlice a háčky Objednat
Přízi na tento model můžete mít už za 215Kč. Více zde.

Návod

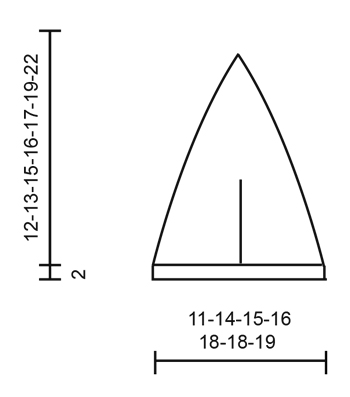
INFO:
V počáteční, první řadě uháčkujeme 1. dlouhý sloupek do 5. řetízkového oka od háčku (= 2 dlouhé sloupky).
První dlouhý sloupek na začátku každé řady dlouhých sloupků nahrazujeme 3 řetízkovými oky.


SLED PRUHŮ:
POZN.: sled pruhů se liší podle velikostí. (Vyfocený model je velikost XS). Podívejte se na návrhy barevných kombinací pro jednotlivé velikosti.
ZAČÁTEK + 1. ŘADA: žlutá.
2.-3. ŘADA: růžová.
4.-5. ŘADA: korálová.
6.-7. ŘADA: oranžová.

Pro jednotlivé velikosti pokračujeme takto:
VELIKOST XS:
8.-9. ŘADA: vínová.

VELIKOST S:
8.-9. ŘADA: korálová.
10.-11. ŘADA: vínová.

VELIKOST M:
8.-9. ŘADA: korálová.
10. ŘADA: oranžová.
11.-12. ŘADA: vínová.

VELIKOST L:
8.-9. ŘADA: korálová.
10.-11. ŘADA: oranžová.
12.-13. ŘADA: vínová.

VELIKOST XL a XXL:
8.-9. ŘADA: korálová.
10.-11. ŘADA: oranžová.
12. ŘADA: korálová.
13.-14. ŘADA: vínová.

VELIKOST XXXL:
8.-9. ŘADA: korálová.
10.-11. ŘADA: oranžová.
12.-13. ŘADA: korálová.
14.-15. ŘADA: vínová.
----------------------------------------------------------

BIKINY - PODPRSENKA:
Nejprve uháčkujeme 2 volné košíčky. Pak je spojíme kroucenou šňůrkou.

KOŠÍČEK:
Háčkem č.2,5 uháčkujeme žlutou přízí 21-21-24-27-27-32-38 řetízkových ok – viz SLED PRUHŮ! Pleteme v řadách, takto (1. řada = lícová): 1 dlouhý sloupek do 5. řetízkového oka od háčku (= 2 dlouhé sloupky) – viz INFO, po 1 dlouhém sloupku do každého z následujících 15-15-18-21-21-26-32 řetízkových ok, pak uháčkujeme (2 dlouhé sloupky, 1 řetízkové oko, 2 dlouhé sloupky) do posledního řetízkového oka v řadě, díl pootočíme, přeskočíme poslední řetízkové oko (tj. to řetízkové oko, které jsme právě uháčkovali) a do každého ze zbývajících 17-17-20-23-23-28-34 řetízkových ok na druhé straně řetízku uháčkujeme po 1 dlouhém sloupku = 38-38-44-50-50-60-72 dlouhých sloupků + 1 řetízkové oko. Práci otočíme a pokračujeme v řadách 1 dlouhým sloupkem do každého dlouhého sloupku na obou stranách řetízku, kolem řetízkového oka na vrcholku každé řady háčkujeme (2 dlouhé sloupky, 1 řetízkové oko, 2 dlouhé sloupky). Takto pokračujeme až do chvíle, kdy máme uháčkovaných celkem 9-11-12-13-14-14-15 řad dlouhých sloupků, jen v poslední řadě upravíme počet ok tak, abychom na každé straně řetízku měli 35-39-44-49-51-56-64 dlouhých sloupků (= celkem 70-78-88-98-102-112-128 dlouhých sloupků). Díl měří asi 11-14-15-16-18-18-19 cm – měřeno podél dolního okraje košíčku. Přízi odstřihneme.

DOLNÍ OKRAJ KOŠÍČKU:
Podél dolního okraje košíčku uháčkujeme korálovou přízí v řadách lem. 1. řadu háčkujeme kolem boku vnějšího (krajního) dlouhého sloupku, takto:

1. ŘADA: pomocí 1 krátkého sloupku napojíme přízi, uháčkujeme 3 řetízková oka (= 1 dlouhý sloupek), pak ještě 1 dlouhý sloupek kolem téhož dlouhého sloupku, potom háčkujeme *1 řetízkové oko, 2 dlouhé sloupky kolem následujícího dlouhého sloupku*, *-* opakujeme ještě 16-20-22-24-26-26-28x podél dolního okraje košíčku.
2. ŘADA: 3 řetízková oka (= 1 dlouhý sloupek), *1 řetízkové oko, 2 dlouhé sloupky vynecháme, 2 dlouhé sloupky kolem následujícího řetízkového oka*, *-* opakujeme ještě 16-20-22-24-26-26-28x, pak uháčkujeme 1 řetízkové oko a končíme 1 dlouhým sloupkem do posledního oka.
3. ŘADA: 3 řetízková oka (= 1 dlouhý sloupek), pak *1 řetízkové oko, 2 dlouhé sloupky kolem dalšího řetízkového oka*, *-* opakujeme ještě 17-21-23-25-27-27-29x. Přízi nestříháme!

LEM:
Háčkujeme *2 řetízková oka, 1 krátký sloupek*, *-* opakujeme 2x podél strany dolního lemu košíčku, pak *2 řetízková oka, 1 dlouhý sloupek vynecháme, 1 krátký sloupek do následujícího dlouhého sloupku*, *-* opakujeme až nahoru k řetízkovému oku na vrcholku košíčku, kolem tohoto řetízkového oka uháčkujeme (1 krátký sloupek, 2 řetízková oka, 1 krátký sloupek) a pokračujeme dolů podél druhé strany stejným způsobem. Končíme 1 krátkým sloupkem kolem posledního dlouhého sloupku v poslední řadě dolního lemu košíčku. Přízi odstřihneme a zapošijeme.

Stejným způsobem uháčkujeme ještě druhý košíček.

VÁZAČKA – KROUCENÁ ŠŇŮRKA:
Ustřihneme si 3 vlákna žluté příze, každé o délce 3 metry. Vlákna stáčíme pevně dohromady - jakmile se začnou samovolně kroutit, přeložíme je napolovic a necháme zkroutit znovu. Na každém konci uvážeme uzel a konce zastřihneme. Šňůru pak protáhneme mezi skupinkami dlouhých sloupků v dolním lemu obou košíčků. Podprsenku zavazujeme na zádech.

Ustřihneme si 3 vlákna žluté příze, každé o délce 1,2 metru. Vlákna stáčíme pevně dohromady - jakmile se začnou samovolně kroutit, přeložíme je napolovic a necháme zkroutit znovu. Na každém konci uvážeme uzel a konce zastřihneme. Šňůru pak protáhneme vrcholkem jednoho košíčku a svážeme větším uzlem.
Stejným způsobem vyrobíme druhou vázačku a připevníme ji ke druhému košíčku – zavazujeme za krkem.

Schéma

diagram measurements

Potřebujete poradit s tímto návodem?

Děkujeme, že jste si vybrali návod DROPS Design. Zakládáme si na tom, že dáváme k dispozici návody ověřené a snadno srozumitelné. Všechny návody jsou přeložené z norského originálu a tak si můžete kdykoli srovnat rozměry a počty s původním návodem (DROPS 178-73) .

Máte s návodem potíže? Níže najdete seznam odkazů, které vám pomohou dokončit vaše dílo co nejdříve - nebo se třeba přiučit něco nového.

signature-image signature

Máte s návodem potíže? Níže najdete seznam odkazů, které vám pomohou dokončit vaše dílo co nejdříve - nebo se třeba přiučit něco nového.

Máme takopodrobné rozpisy různých technik a postupů krok za krokem - najdete je zde.

1) Why is the knitting/crochet tension so important?

Knitting tension is what determines the final measurements of your work, and is usually measured per 10 x 10 cm. It is provided like so: number of stitches in width x number of rows in height - eg: 19 stitches x 26 rows = 10 x 10 cm.

The knitting tension is very individual; some people knit/crochet loosely while others work tightly. You adjust the knitting tension with the needle size, which is why the suggested needle size only serve as a guide! You need to adjust this (up or down) to ensure that YOUR knitting tension matches the knitting tension provided in the pattern. If you work with a different knitting tension than provided you will have a different yarn consumption, and your work will have different measurements than what the pattern suggests.

The knitting tension also determines which yarns can replace each other. As long as you achieve the same knitting tension you can replace one yarn with another.

See DROPS lesson: How to measure your tension/gauge

See DROPS video: How to make a gauge tension swatch

nahoru

2) What are the yarn groups?

All our yarns are categorised into yarn groups (from A to F) according to thickness and knitting tension – group A contains the thinnest yarns and group F the thickest. This makes it easier for you to find alternative yarns to our patterns, should you wish to switch yarn. All yarns within the same group have a similar knitting tension and can easily replace each other. However, different yarn qualities have different structures and properties which will give the finished work a unique look and feel.

Click here for an overview of the yarns in each yarn group

nahoru

3) Can I use a different yarn than what the pattern suggests?

The important thing when changing from one yarn to another is that the knitting/crochet tension remains the same. This is so that the measurements of the finished piece will be the same as on the sketch provided. It is easier to achieve the same knitting tension using yarns from the same yarn group. It is also possible to work with multiple strands of a thinner yarn to achieve the knitting tension of a thicker one. Please try our yarn converter. We recommend you to always work a test swatch.

Please NOTE: when changing yarn the garment might have a different look and feel to the garment in the photo, due to individual properties and qualities of each yarn.

See DROPS lesson: Can I use a different yarn than the one mentioned in the pattern?

nahoru

4) How do I use the yarn converter?

At the top of all our patterns you’ll find a link to our yarn converter, which is a helpful tool should you wish to use a different yarn than suggested. By filling in the yarn quality you wish to replace, the amount (in your size) and number of strands, the converter will present good alternative yarns with the same knitting tension. Additionally it will tell you how much you’ll require in the new qualities and whether you’ll need to work with multiple strands. Most skeins are 50g (some are 25g or 100g).

If the pattern is worked with multiple colours, every colour will have to be converted separately. Similarly, if the pattern is worked with several strands of different yarns (for example 1 strand Alpaca and 1 strand Kid-Silk) you will have to find alternatives for each, individually.

Click here to see our yarn converter

nahoru

5) Why do I get the wrong knitting tension with the suggested needle size?

The needle size provided in the pattern serves only as a guide, the important thing is to follow the knitting tension. And since knitting tension is very individual, you will have to adjust the needle size to ensure that YOUR tension is the same as in the pattern – maybe you’ll have to adjust 1, or even 2 needle sizes, up or down to achieve the correct tension. For this, we recommend that you work test swatches.

Should you work with a different knitting tension than the one provided, the measurements of the finished garment might deviate from the measurement sketch.

See DROPS lesson: How to measure your tension/gauge

See DROPS video: How to make a gauge tension swatch

nahoru

6) Why is the pattern worked top-down?

Working a garment top-down provides more flexibility and room for personal adjustment. For example it is easier to try the garment on while working, as well as making adjustments to length of yoke and shoulder caps.

The instructions are carefully explaining every step, in the correct order. Diagrams are adjusted to the knitting direction and are worked as usual.

nahoru

7) Why are the sleeves shorter in larger sizes?

The total width of the garment (from wrist-to-wrist) will be larger in the larger sizes, despite the actual sleeves being shorter. The larger sizes have longer sleeve caps and wider shoulders, so there will be a good fit in all sizes.

nahoru

8) What is a repeat?

Diagrams are often repeated on the round or in height. 1 repeat is the diagram the way it appears in the pattern. If it says to work 5 repeats of A.1 in the round, then you work A.1 a total of 5 times after/next to each other in the round. If it says to work 2 repeats of A.1 vertically/in height you work the entire diagram once, then begin again at the start and work the entire diagram one more time.

nahoru

9) How do I work according to a knitting diagram?

The diagram depicts all rows/rounds, and every stitch seen from the right side. It is read from bottom to top, from right to left. 1 square = 1 stitch.

When working back and forth, every other row is worked from the right side and every other row is worked from the wrong side. When working from the wrong side, the diagram will have to be worked reversed: from left to right, knit stitches are purled, purl stitches are knit etc.

When working in the round every round is worked from the right side and the diagram are worked from right to left on all rounds.

See DROPS lesson: How to read knitting diagrams

nahoru

10) How do I work according to a crochet diagram?

The diagram depicts all rows/rounds, and every stitch seen from the right side. It is worked from bottom to top, from right to left.

When working back and forth every other row is worked from the right side: from right to left and every other row is worked from the wrong side: from left to right.

When working in the round, every row in the diagram are worked from the right side, from right to left.

When working a circular diagram you start in the middle and work your way outwards, counter clockwise, row by row.

The rows usually start with a given number of chain stitches (equivalent to the height of the following stitch), this will either be depicted in the diagram or explained in the pattern.

See DROPS lesson: How to read crochet diagrams

nahoru

11) How do I work several diagrams simultaneously on the same row/round?

Instructions for working several diagrams after each other on the same row/round, will often be written like so: “work A.1, A.2, A.3 a total of 0-0-2-3-4 times". This means you work A.1 once, then A.2 is worked once, and A.3 is repeated (in width) the number of times provided for your size – in this case like so: S = 0 times, M = 0 times, L=2 times, XL= 3 times and XXL = 4 times.

The diagrams are worked as usual: begin with the first row in A.1, then work the first row in A.2 etc.

See DROPS lesson: How to read knitting diagrams

See DROPS lesson: How to read crochet diagrams

nahoru

12) Why does the piece start with more chain stitches than it’s worked with?

Chain stitches are slightly narrower than other stitches and to avoid working the cast-on edge too tight, we simply chain more stitches to begin with. The stitch count will be adjusted on the following row to fit the pattern and measurement sketch.

nahoru

13) Why increase before the rib edge when the piece is worked top-down?

The rib edge is more elastic and will contract slightly compared to, for example, stocking stitch. By increasing before the rib edge, you avoid a visible difference in width between the rib edge and the rest of the body.

nahoru

14) Why increase in the cast-off edge?

It’s very easy to cast off too tightly, and by making yarn overs while casting off (and simultaneously casting these off) you avoid a too tight cast off edge.

See DROPS video: How to bind off with yarn overs (yo)

nahoru

15) How do I increase/decrease on every 3rd and 4th row/round alternately?

To achieve an even increase (or decrease) you can increase on, for example: every 3rd and 4th row alternately, like so: work 2 rows and increase on the 3rd row, work 3 rows and increase on the 4th. Repeat this until the increase is complete.

See DROPS lesson: Increase or decrease 1 st on every 3rd and 4th row alternately

nahoru

16) Why is the pattern slightly different than what I see in the photo?

Pattern repeats can vary slightly in the different sizes, in order to get the correct proportions. If you’re not working the exact same size as the garment in the photo, yours might deviate slightly. This has been carefully developed and adjusted so that the complete impression of the garment is the same in all sizes.

Make sure to follow instructions and diagrams for your size!

nahoru

17) How can I work a jacket in the round instead of back and forth?

Should you prefer to work in the round instead of back and forth, you may of course adjust the pattern. You’ll need to add steeks mid-front (usually 5 stitches), and follow the instructions. When you would normally turn and work from the wrong side, simply work across the steek and continue in the round. At the end you’ll cut the piece open, pick up stitches to work bands, and cover the cut edges.

See DROPS video: How to knit steeks and cut open

nahoru

18) Can I work a jumper back and forth instead of in the round?

Should you prefer to work back and forth instead of in the round, you may of course adjust the pattern so you work the pieces separately and then assemble them at the end. Divide the stitches for the body in 2, add 1 edge stitch in each side (for sewing) and work the front and back pieces separately.

See DROPS lesson: Can I adapt a pattern for circular needles into straight needles?

nahoru

19) Why do you show discontinued yarns in the patterns?

Since different yarns have different qualities and textures we have chosen to keep the original yarn in our patterns. However, you can easily find options among our available qualities by using our yarn converter, or simply pick a yarn from the same yarn group.

It is possible that some retailers still have discontinued yarns in stock, or that someone has a few skeins at home that they would like to find patterns for.

The yarn converter will provide both alternative yarn as well as required amount in the new quality.

nahoru

20) How do I make a women’s size garment into a men’s size one?

If you have found a pattern you like which is available in women’s size it’s not very difficult to convert it to men’s size. The biggest difference will be the length of sleeves and body. Start working on the women size that you think would fit across the chest. The additional length will be worked right before you cast off for the armhole/sleeve cap. If the pattern is worked top-down you can add the length right after the armhole or before the first decrease on sleeve.

Regarding additional yarn amount, this will depend on how much length you add, but it is better with a skein too many than too few.

nahoru

21) How do I prevent a hairy garment from shedding?

All yarns will have excess fibres (from production) that might come off as lint or shedding. Brushed yarns (ie hairier yarns) have more of these loose, excess fibres, causing more shedding.

Shedding also depends on what is worn under or over the garment, and whether this pulls at the yarn fibres. It’s therefore not possible to guarantee that there will be no shedding

Below are some tips on how to get the best result when working with hairier yarns:

1. When the garment is finished (before you wash it) shake it vigorously so the looser hairs come off. NOTE: do NOT use a lint roller, brush or any method that pulls at the yarn.

2. Place the garment in a plastic bag and put it in your freezer - the temperature will cause the fibres to become less attached to each other, and excess fibres will come off easier.

3. Leave in the freezer for a few hours before taking it out and shaking it again.

4. Wash the garment according to the instructions on the yarn label.

nahoru

22) Where on the garment is the length measured?

The measurement sketch/schematic drawing provides information regarding the full length of the garment. If it’s a jumper or a jacket the length is measured from the highest point on the shoulder closest to the neckline, and straight down to the bottom of the garment. It is NOT measured from the tip of shoulder. Similarly, the length of yoke is measured from the highest point on the shoulder and down to where yoke is split into body and sleeves.

On a jacket measures are never taken along bands, unless specifically stated. Always measure inside band stitches when measuring the length.

See DROPS lesson: How to read a schematic drawing

nahoru

23) How do I know how many balls of yarn I need?

The required amount of yarn is provided in grams, eg: 450 g. To calculate how many balls you’ll need you first need to know how many grams are in 1 ball (25g, 50g or 100g). This information is available if you click on the individual yarn quality on our pages. Divide the amount required with the amount of each ball. For example, if each ball is 50g (the most common amount), the calculation will be as follows: 450 / 50 = 9 balls.

nahoru

Pořídili jste si přízi DROPS na tento model? Pak máte taky právo žádat po svém prodejci, u něhož jste nakoupili, pomoc a rady. Seznam DROPS obchodů najdete tady!
Pořád se nemůžete dobrat odpovědi, kterou hledáte? Pak posuňte stránku dolů a napište nám svůj dotaz, naši specialisté se vám pokusí poradit. Obvykle to zvládneme během 5 až 10 pracovních dnů.. Mezitím si můžete pročíst otázky a odpovědi, které k tomuto modelu položili ostatní, nebo navštívit skupinu DROPS Workshop na Facebooku, kde vám může poradit některá spřízněná duše!

Komentáře / Otázky (7)

country flag Kari wrote:

Hei igjen:-) Tusen takk for at du ramset opp oppskriften, da skjønte jeg det, hurra! Beklager alle spørsmålene! Mvh Kari

24.02.2022 - 11:13

country flag Kari wrote:

Hei igjen! Tusen takk for svar. Ser at det stemmer at 2,5 er pinnestørrelsen. Har økt på begge sider i første farge i første rad med staver slik det står i oppskriften. Har heklet veldig stramt siden den ble så stor da jeg heklet løst, kanskje det er derfor den har blitt så rar:-) Får teste en gang til, hvis den har blitt sånn som på bildet når dere testet den ut så må det jo stemme i oppskriften. Mvh Kari

24.02.2022 - 07:27

country flag Kari Sletteberg wrote:

Svar til deres svar: Det er det jeg har gjort, men det blir absolutt ikke pent, kan problemet være at det er for få masker i første farge i utgangspunktet? Det resulterer i at økningen øverst blir en egen liten høyde som ikke blender med resten. Er det noe sted jeg kan sende bilder? Har dere testet ut denne oppskriften? Mvh Kari

14.02.2022 - 10:09

DROPS Design answered:

Hei Kari. I ditt 1.innlegg skriver du at økningene ikke skjer før i farge 2. Nei, det skjer i 1.rad med staver, altså med 1. farge. Men så skriver du i ditt 3. innlegg at du øker i 1. rad. Hva er riktig, når øker du? Du skriver også i ditt 1. innlegg at det er oppgitt heklenål 3, i oppskriften er det kun oppgitt 2,5 mm. Av de 2 andre Spørsmålene er det ingen som oppgir feil heklenår str. Stemmer heklefastheten din? Hekler du på begge sidene av luftmaskeraden og øker kun i den ene siden? Vi har heklet bikinien + 2 tester for å dobbeltsjekke nå, våre stemmer. Dessverre ingen mulighet å sende bilder, men ta kontakt med din butikk og la de se på arbeidet ditt.

21.02.2022 kl. 07:22

country flag Kari Sletteberg wrote:

Glemte å skrive spørsmålet: Hadde det ikke vært mest naturlig å øke stavmaskene etter rekken med luftmasker sånn at ikke arbeidet trekker seg sammen, eller har jeg forstått oppskriften feil og i tilfelle hva gjør jeg feil?

09.02.2022 - 13:50

DROPS Design answered:

Hei Kari. Se vårt svar på ditt første innlegg :) mvh DROPS Design

14.02.2022 kl. 08:56

country flag Kari Sletteberg wrote:

Bikinien har bare 21 masker i første farge og hekles på hver side. Økning skjer ikke før i farge 2. Da blir det så mange masker at den innerste delen som er mye kortere trekker arbeidet sammen. I tillegg var det oppgitt pinne 3, men måtte bruke 2,5 som oppgitt i kommentaren til en bruker under oppskriften. Kan sende bilder hvis jeg får en e-postadresse av dere. Mvh Kari

08.02.2022 - 10:48

DROPS Design answered:

Hei Kari. Jo, du øker i "toppen" på hver rad. Du hekler 1 stav i hver stav på hver side av luftmaske-raden og hekler 2 staver, 1 luftmaske 2 staver om luftmasken på toppen på hver rad. Så på neste rad hekler du også 2 staver, 1 luftmaske 2 staver i luftmasken fra forrige rad (=øker). Da får du en fin bue på "toppen". mvh DROPS Design

14.02.2022 kl. 08:53

country flag Maurine wrote:

Bonjour, Pour la taille, il faut choisir en fonction du bonnet ? S = A, M = B, etc ? Merci.

18.04.2021 - 14:52

DROPS Design answered:

Bonjour Maurine, regardez le schéma des mesures, il pourra fort probablement vous orienter. Bon crochet!

19.04.2021 kl. 08:28

country flag Heidi Cecilie Brandshaug Løken wrote:

Hekler str M. Cupen blir 20 cm bred nederst. Hva gjør jeg feil? Den er jo så lang og smal på bildet.

22.07.2017 - 11:25

DROPS Design answered:

Hej Heidi, hækler du i DROPS Safran, så hækler du lidt løsere end hvad vi gør ifølge opskriften. Om du gør det så vælg en nål som er et halvt nummer mindre, da kommer det sikkert til at stemme. God fornøjelse!

09.08.2017 kl. 15:19

Přidejte komentář k návodu DROPS 178-73

Rádi bychom věděli, co si o tomto modelu myslíte!

Pokud se chcete na něco zeptat, dbejte prosím na to, abyste ve formuláři níže vybrali správnou kategorii - díky tomu se dříve dozvíte, co potřebujete vědět. Povinná pole jsou označena *.