
Popular categories
Looking for a yarn?


Comments / Questions (20)
![]() Alegría wrote:
Alegría wrote:
Estoy trabajando la muestra con una aguja de 2.5mm, sí que consigo obtener 26 puntos altos equivalentes a 10cm pero de alto, 16 hileras me dan 13cm de alto (para una muestra 10*10 tengo 26 puntos altos*12 hileras). Cómo consigo la tensión correcta vertical? Debo cambiar a una aguja más pequeña o apretar más? Porque si es así la tela queda bastante rígida y no tiene tan buena caída, saludos.
04.06.2024 - 02:18DROPS Design answered:
Hola Alegría, lo importante es que la tensión en ancho (los pts) sean correctos, para poder seguir el patrón. La tensión en alto puede ser que varíe según cómo trabajes los pts altos. No tienes que cambiar nada; como la mayoría de indicaciones son en cm lo único tendrás que trabajar más filas que las que se trabajaban en el patrón, pero puedes mantener las medidas en cm.
09.06.2024 - 23:19
![]() Maria Jose Rocha wrote:
Maria Jose Rocha wrote:
Agradecia que me explicasse melhor como fazer este modelo. Obrigada
31.05.2024 - 11:59DROPS Design answered:
Bom dia, Aconselhamo-a a ver na página do modelo, o separador vídeos, com vários tutoriais em vídeo que explicam as técnicas e os pontos usados.
31.05.2024 - 12:17
![]() Kathrin Weinberg wrote:
Kathrin Weinberg wrote:
Ich komme nicht auf die Masse, Habe als garn safran und haekelnadel 2,5 da ist die oberste kante 26 cm nachdem ich die erste reihe mit festen maschen gehaekelt habe. Habe es mit der nadel 1,5 probiert da komme ich auf 23 cm. Mach ich irgendwas falsch
05.04.2023 - 21:03DROPS Design answered:
Liebe Frau Weinberg, stimmt Ihre Maschenprobe? Haben Sie die 26 Stäbchen x 16 Reihen = 10 x 10 cm? Sonnst ändern Sie die Häkelnadelgrösse. Beachten Sie auch, am Anfang hat man mehr Luftmaschen als man festen Maschen braucht, so wird die Luftmaschenkette am Anfang nicht zu eng. Viel Spaß beim häkeln!
11.04.2023 - 11:29
![]() Josefina Sarrion LLorens wrote:
Josefina Sarrion LLorens wrote:
Hago una talla XXL, una hilera a dos aumentos laterales y 4 a un aumento lateral 5 veces , quedan los 122 pts pero aún no termine la última tanda de hileras y mide más de 20 cm. Uso drops you 9 y aguja 2,5. He deshecho ya varias veces
09.08.2022 - 23:56DROPS Design answered:
Hola Josefina, ¿cuánta diferencia tiene? Son 20 cm aprox., pero puede medir 19 o 21, dependiendo de la tensión y la talla. ¿Estás trabajando con la tensión correcta? Muchas veces, las medidas no coinciden por trabajar con una tensión vertical diferente a la establecida arriba o por que no se mantenga la tensión del tejido. Comprueba también que el ancho de la prenda sea el adecuado; puede que obtengas el ancho deseado con menos aumentos o cm trabajados por tu tensión del tejido. En ese caso, continua trabajando, teniendo en cuenta que tu tensión es diferente a la del patrón.
14.08.2022 - 21:51
![]() Josefina Sarrion LLorens wrote:
Josefina Sarrion LLorens wrote:
No consigo empezar ,sigo las instrucciones ,si pongo 66 cada me quedan 53, y si pongo 67 me quedan 55. No entiendo qué hago mal,
13.07.2022 - 12:09
![]() Clara wrote:
Clara wrote:
Si ho lavorato le 16 righe a maglie alte, quindi mi scusi posso proseguire il lavoro con uncinetto n 2?
01.05.2021 - 12:28DROPS Design answered:
Buonasera Clara, deve lavorare con l'uncinetto che le permette di ottenere il campione indicato, quindi in questo caso con la misura di uncinetto che le permette di ottenere 16 righe in 10 cm. Buon lavoro!
02.05.2021 - 20:10
![]() Clara wrote:
Clara wrote:
Buongiorno, volevo un consiglio riguardo al campione che ho fatto con uncinetto n.2, in larghezza mi viene di 10 cm quindi corretto,mentre in altezza mi viene 13 cm più alto,cosa mi consigliate di fare? Grazie mille...
01.05.2021 - 08:24DROPS Design answered:
Buongiorno Clara, ha lavorato il campione a maglie alte? 16 righe in altezza nel suo campione corrispondono a 23 cm? Buon lavoro!
01.05.2021 - 11:16
![]() Camilla wrote:
Camilla wrote:
C'è un video che mostra come realizzare questo punto? = lavorare 1 maglia bassa in ognuna delle prime 3 maglie, ma aspettare con l’ultimo gettato e passaggio attraverso ognuna di queste maglie alte doppie, lavorare 1 maglia alta doppia nella maglia successiva e far passare il filo attraverso tutti e 5 gli occhielli sull’uncinetto Grazie
20.10.2020 - 11:30DROPS Design answered:
Buongiorno Camilla. Abbiamo corretto il testo: deve lavorare 1 maglia alta doppia (e non 1 maglia bassa) in ognuna delle prime 3 maglie. Nel video che alleghiamo, trova la spiegazione riferita a maglie alte; per le maglie alte doppie è analogo: non deve lavorare l'ultimo passaggio della maglia. Buon lavoro!
20.10.2020 - 11:49
![]() Annika wrote:
Annika wrote:
Wie schließe ich das Oberteil im Rücken? Das erschließt sich mir nicht aus der Anleitung.
07.07.2020 - 11:47DROPS Design answered:
Liebe Annika, nähen Sie 2 Knöpfe - siehe untere Skizze und FERTIGSTELLEN. Viel Spaß beim stricken!
07.07.2020 - 12:58
![]() Marta wrote:
Marta wrote:
Olá Tudo bem? Gostaria de saber se tem uma foto das costas e essa manequim qual o tamanho que ela usa? Muito Obrigada!
24.06.2020 - 17:43
|
|||||||||||||||||||||||||||||||||||||
Infinite Summer#infinitesummertop |
|||||||||||||||||||||||||||||||||||||
 |
 |
||||||||||||||||||||||||||||||||||||
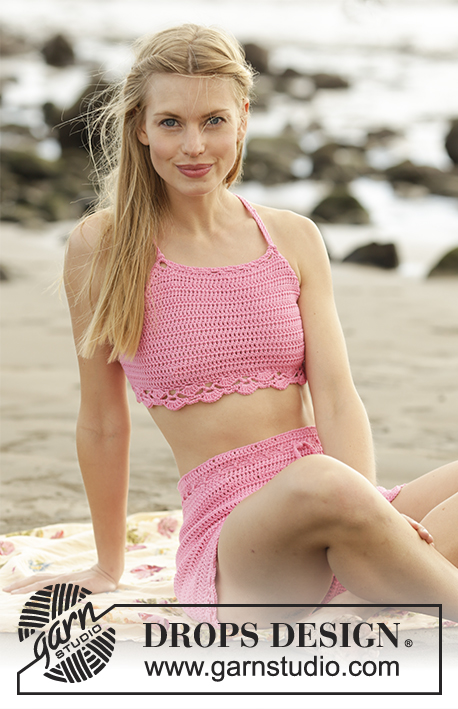
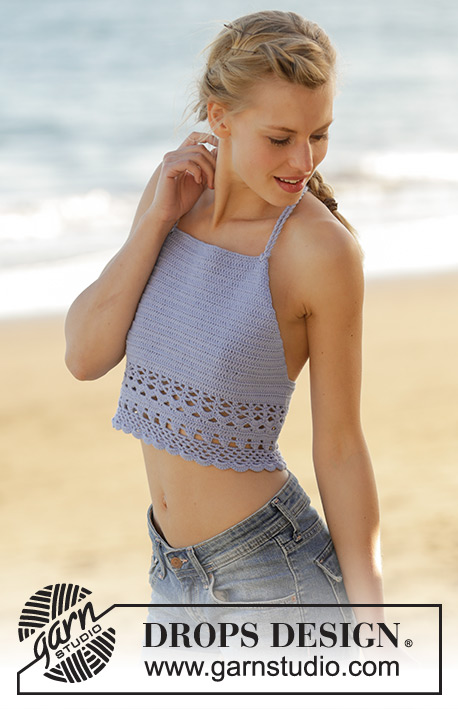
Top with lace pattern, worked top down in DROPS Safran. Sizes S - XXXL.
DROPS 178-69 |
|||||||||||||||||||||||||||||||||||||
|
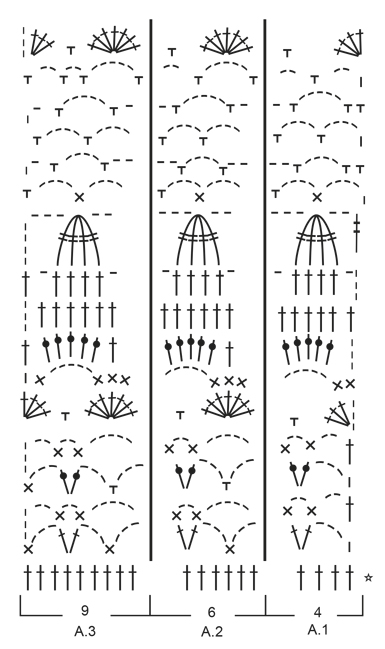
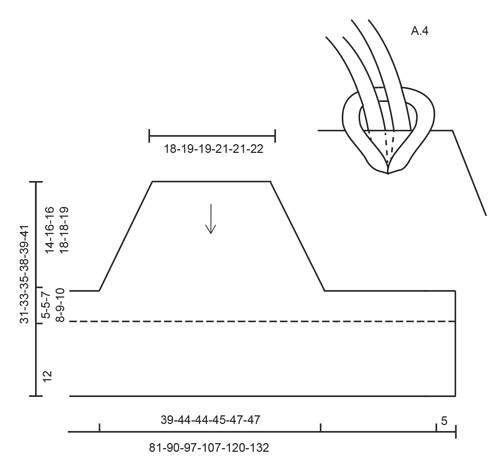
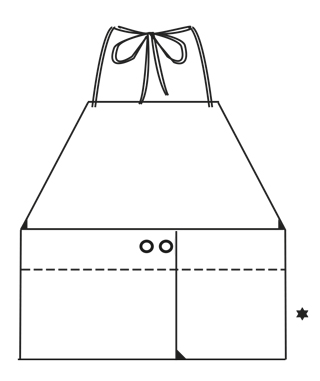
PATTERN: See diagrams A.1 to A.4. Diagram A.4 shows the assembly. CROCHET INFO: At the beginning of each row with single crochets, replace the first single crochet with 1 chain stitch. At the beginning of each row with double crochets, replace the first double crochet with 3 chain stitches. At the beginning of each row with treble crochets, replace the first treble crochet with 4 chain stitches. INCREASE TIP: Increase 1 double crochet in each side (= 2 double crochets increased on the row) as follows: 2 double crochets in the first double crochet, 1 double crochet in each double crochet until there is 1 double crochet left, work 2 double crochets in the last double crochet (= 2 double crochets increased) Increase 2 double crochets in each side (= 4 double crochets increased on the row) as follows: 3 double crochets in the first double crochet, 1 double crochet in each double crochet until there is 1 double crochet left, work 3 double crochets in the last double crochet (= 4 double crochets increased) ---------------------------------------------------------- TOP: The top is worked back and forth in one piece and from the top down. UPPER: Work 56-61-61-66-66-71 chain stitches (including 1 chain stitch to turn) with hook size 2.5 mm/C and Safran. Work 1 single crochet in the 2nd chain stitch from the hook (= 2 single crochets), work 1 single crochet in each of the next 4 chain stitches, * skip 1 chain stitch, work 1 single crochet in each of the next 4 chain stitches *, repeat from *-* 9-10-10-11-11-12 more times = 46-50-50-54-54-58 single crochets. REMEMBER THE CROCHET GAUGE! Continue by working double crochets back and forth and increase in each side of the piece as follows: Work 4 rows where you increase 1 double crochet in each side of the piece (= 2 double crochets increased on the row) – READ INCREASE TIP and CROCHET INFO = 54-58-58-62-62-66 double crochets. Now increase as follows: * Work 1 row where you increase 2 double crochets in each side, work 2-2-2-5-4-12 rows where you increase 1 double crochet in each side *, repeat from *-* 5-6-6-3-4-1 more times = 102-114-114-118-122-122 double crochets on the row. The piece measures approx. 14-16-16-18-18-19 cm / 5"-6¼"-6¼"-7"-7"-7½". Cut the strand. Turn the piece and work the lower part of the top as follows: LOWER: Work 68-73-86-99-117-137 chain stitches, 1 double crochet in each of the 102-114-114-118-122-122 double crochets from the upper part, finish with 70-75-87-101-119-139 chain stitches (including 3 chain stitches to turn). Turn and work as follows: Work 1 double crochet in the 4th chain stitch from the hook (= 2 double crochets), 1 double crochet in the next 1-1-4-2-0-0 chain stitches, * skip 1 chain stitch, 1 double crochet in each of the next 4 chain stitches *, repeat from *-* 12-13-15-18-22-26 more times, work 1 double crochet in each of the next 102-114-114-118-122-122 double crochets, * skip 1 chain stitch, 1 double crochet in each of the next 4 chain stitches *, repeat from *-* 12-13-16-18-22-26 more times = 212-232-252-278-310-342 double crochets. Continue working back and forth with 1 double crochet in each double crochet until the piece measures approx.4-4-6-7-8-9 cm / 1½"-1½"-2¼"-2¾"-3"-3½". Then work 1 row where you adjust the number of stitches to 211-235-253-277-313-343 double crochets. Now work pattern according to the diagram, starting from the right side as follows: (First row starting from the right side): A.1 over the first 4 double crochets, A.2 over the next 198-222-240-264-300-330 double crochets (= 33-37-40-44-50-55 repeats of 6 stitches), finish with A.3 over the last 9 double crochets. Continue in this way until the diagram has been completed in height. Cut and fasten the strand. ASSEMBLY: Sew 2 buttons on to the top of the right back piece. Place the first button approx. 1½ cm / ½" in from the edge and the next approx. 4½ cm / 1¾" in from the edge – see illustration with star. These are buttoned between two double crochets. The overlap is approx. 5 cm / 2". TWISTED CORD: Cut 4 strands Safran of 4 metres. Twist them together until they resist, fold the cord double and it will continue to twist. Tie a knot in each end approx. 4 cm / 1½" from the end. Fasten the cord in the first row of double crochets in the corner of the front piece – fasten as shown in A.4. Make another cord in the same way and fasten it to the other side of the front piece. The cords are tied at the back of the neck. |
|||||||||||||||||||||||||||||||||||||
Diagram explanations |
|||||||||||||||||||||||||||||||||||||
|
|||||||||||||||||||||||||||||||||||||
|
|||||||||||||||||||||||||||||||||||||
|
|||||||||||||||||||||||||||||||||||||
|
|||||||||||||||||||||||||||||||||||||
Have you finished this pattern?Tag your pictures with #dropspattern #infinitesummertop or submit them to the #dropsfan gallery. Do you need help with this pattern?You'll find 11 tutorial videos, a Comments/Questions area and more by visiting the pattern on garnstudio.com. © 1982-2025 DROPS Design A/S. We reserve all rights. This document, including all its sub-sections, has copyrights. Read more about what you can do with our patterns at the bottom of each pattern on our site. |
|||||||||||||||||||||||||||||||||||||


With over 40 years in knitting and crochet design, DROPS Design offers one of the most extensive collections of free patterns on the internet - translated to 17 languages. As of today we count 314 catalogs and 11822 patterns - 11812 of which are translated into English (US/in).
We work hard to bring you the best knitting and crochet have to offer, inspiration and advice as well as great quality yarns at incredible prices! Would you like to use our patterns for other than personal use? You can read what you are allowed to do in the Copyright text at the bottom of all our patterns. Happy crafting!
Post a comment to pattern DROPS 178-69
We would love to hear what you have to say about this pattern!
If you want to leave a question, please make sure you select the correct category in the form below, to speed up the answering process. Required fields are marked *.