
Looking for a yarn?


Comments / Questions (22)
![]() Charity wrote:
Charity wrote:
Inc 16-16-24-24-30-30 sts evenly on next to last round What exactly does evenly mean? I will be casting on 104 stitches so where do I make the increases?
08.07.2023 - 17:03DROPS Design answered:
Dear Charity, you increase on the ridges. Each ridge is composed of 2 rows in garter stitch which, when worked in the round, are 1 knit round and 1 purl round. You increase on the knit round of the second ridge. As for the increases, you have 104 stitches and need to increase 16 stitches for your size. 104/16= 6.5, so you will increase after every 6th or 7th stitch alternately. Happy knitting!
10.07.2023 - 17:01
![]() Tina wrote:
Tina wrote:
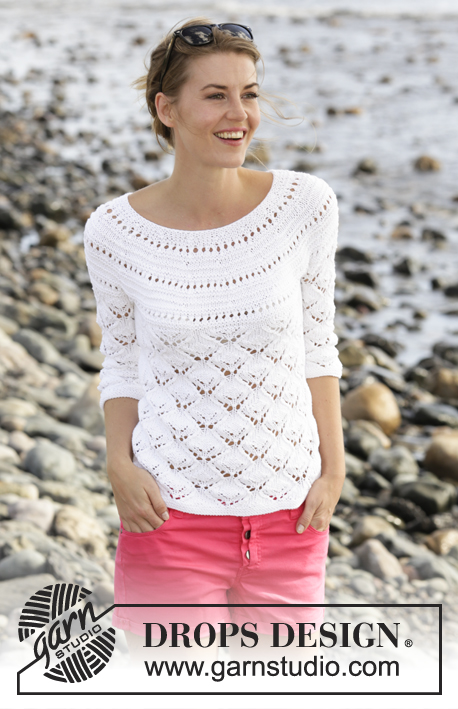
Hi, I thought this would make a great dress instead of a tunic, by simply making it longer? Then I compared this pattern with Vanilla Summer (Drops 159 -6) which IS a DRESS, and the length for both pieces are the same! Also the amount of Paris yarn is exactly the same. Why is this one considered a tunic please? On the model it does look like a tunic, but I'm confused because the measurements are the same as the Vanilla dress, which looks like a dress on the model!
07.04.2022 - 16:49DROPS Design answered:
Dear Tina, the term tunic is sometimes used to describe a short dress. This is why the measurements are similar but they are called differently; in the end both of them are dresses. To work a longer garment, you could simply work straight or work a few increases on the sides if you want it slightly wider at the bottom, before working the bottom edge. Happy knitting!
07.04.2022 - 21:15
![]() Magdalena wrote:
Magdalena wrote:
Witam nie bardzo wiem jak mam rozumieć pewna część wzoru Chodzi mi dokładnie o dół tylowia Nie wiem jak wyliczyc ,kiedy mam zacząć to rozcięcie Proszę o pomoc
01.04.2022 - 16:30DROPS Design answered:
Witaj Magdaleno, troszkę przeformułowałam to zdania: „Na wys. 43-45-44-46-46-48 cm od markera do mierzenia (tzn. tego umieszczonego na wysokości, gdzie były zdejmowane oczka na rękawy na druty pomocnicze), kończyć tył i przód osobno w tę i z powrotem (tzn. podzielić robótkę w miejscu markerów na bokach, na pęknięcia na dole sukienki)”. Mam nadzieję, że teraz łatwiej będzie zrozumieć. Pozdrawiamy!
04.04.2022 - 15:06
![]() Kate Frego wrote:
Kate Frego wrote:
What are the relevant body measurements for S-M-L-XL in Sunrise Glow 170-14? (Inches please)
28.02.2021 - 01:01DROPS Design answered:
Dear Kate, you can find the measurements of the finished piece on the schematic drawing at the bottom of the page. Happy Knitting!
28.02.2021 - 11:06
![]() Debora wrote:
Debora wrote:
Buongiorno, vorrei fare questa tunica con filato Drops Muskat, più sottile, anzichè il Paris. Vesto una taglia M, avete un suggerimento che mi permetta di adattare il filato più sottile alla spiegazione? Il campione con Muskat è di 21 maglie in 10 cm.Grazie mille
29.04.2019 - 14:13DROPS Design answered:
Buongiorno Debora, purtroppo non possiamo fornire un aiuto così personalizzato, ma presso il suo rivenditore DROPS di fiducia potrà trovare tutta l'assistenza di cui ha bisogno. Buon lavoro!
29.04.2019 - 15:00
![]() Lise wrote:
Lise wrote:
Je suis de taille LARGE. Dans votre tuto des tailles, vous donnez un exemple de taille large, ce qui donne des hanches de 108 cm et poitrine 96. Parfait pour moi. Dans le modèle W-584 ci-dessus la taille large donne 128 cm pour les hanches et 104 cm pour la poitrine ! Je ne comprends pas un tel écart... svp m’éclaIrer, je ne sais plus quelle taille choisir... merci.
03.04.2019 - 15:06DROPS Design answered:
Bonjour Lise, la coupe de chaque modèle peut différer en étant plus ou moins près du corps, en taille L on a ici 52 cm x 2 = 104 cm de tour de poitrine, et la base du top (qui mesure 78 cm de hauteur totale) est de 69 cm x 2 = 138 cm. Mesurez un modèle similaire que vous avez et dont vous aimez la forme pour trouver la taille idéale. Bon tricot!
03.04.2019 - 16:15
![]() Nicola Summers wrote:
Nicola Summers wrote:
With regard to the sleeves and body, instead of casting on 8 stitches to the sleeve and then sewing up the hole between the sleeve and body at the end would it be OK to pick up 8 stitches from the cast off edge on the body piece instead? I\'m fairly new to knitting tops and have always ended up with holes when sewing up seams.
22.11.2018 - 10:09DROPS Design answered:
Dear Mrs Summers, you can also pick up 1 stitch in each of the 8 sts cast on on body over sleeve instead of casting on new sts. This video is showing how to close the opening under arm (in that case the 8 sts cast on on body and the 8 sts cast on on sleeve). Happy knitting!
22.11.2018 - 11:09
![]() Tone Thorsen wrote:
Tone Thorsen wrote:
Att Sunrice Glow. Øketips -2 må vel gi m i n d R e masker? Ikke flere som dere forklarer
28.01.2018 - 13:04DROPS Design answered:
Hei Tone. Nei, øketips-2 gir en forklaring på at det økes med kast 4 ganger pr omgang det skal økes. ØKETIPS-2: Strikk til det gjenstår 2 m før merke, 1 kast (= 1 ØKT MASKE), 4 m rett (merke sitter midt mellom m), 1 kast (=1 ØKT MASKE TIL). På neste omgang strikkes de 4 kastene vridd rett for å unngå hull. God Fornøyelse!
30.01.2018 - 10:50
![]() Diana Hart wrote:
Diana Hart wrote:
I am not quite understanding the hem pattern , does it mean for the small size the first and last 4 stitches are garter stitch then next and next to last 4 are stocking stitch and the stitches in between are A2? If I wanted to do this garment without the split, would I need to adjust stitches to a multiple of 11 and then just work A2 all round? Thank you for your help. Keep the patterns coming they are the best.
30.08.2017 - 13:39DROPS Design answered:
Dear Mrs Hart, that's right, when working then back and forth for vents on sides, you are working with 4 sts in garter st at the beg and at the end of row. If you don't want any vents, you can then adjust the number of sts as you suggest and work A.11 all the round. Happy knitting!
30.08.2017 - 14:58
![]() Tammy wrote:
Tammy wrote:
You have very nice patterns i would like to make but they make no scent and hard to understand. Patterns i've made were able to understand, I wish these were understandable.
18.06.2017 - 00:51DROPS Design answered:
Dear Tammy, you will find some videos adapted to each pattern under tab "Videos" and at the very bottom of the page. Should you have any question please feel free to ask here, for any individual assistance remember your DROPS store will help you, even per mail or telephone. Happy knnitting!
19.06.2017 - 09:14
|
||||||||||||||||||||||
Sunrise Glow#sunriseglowtunic |
||||||||||||||||||||||
|
|
||||||||||||||||||||||
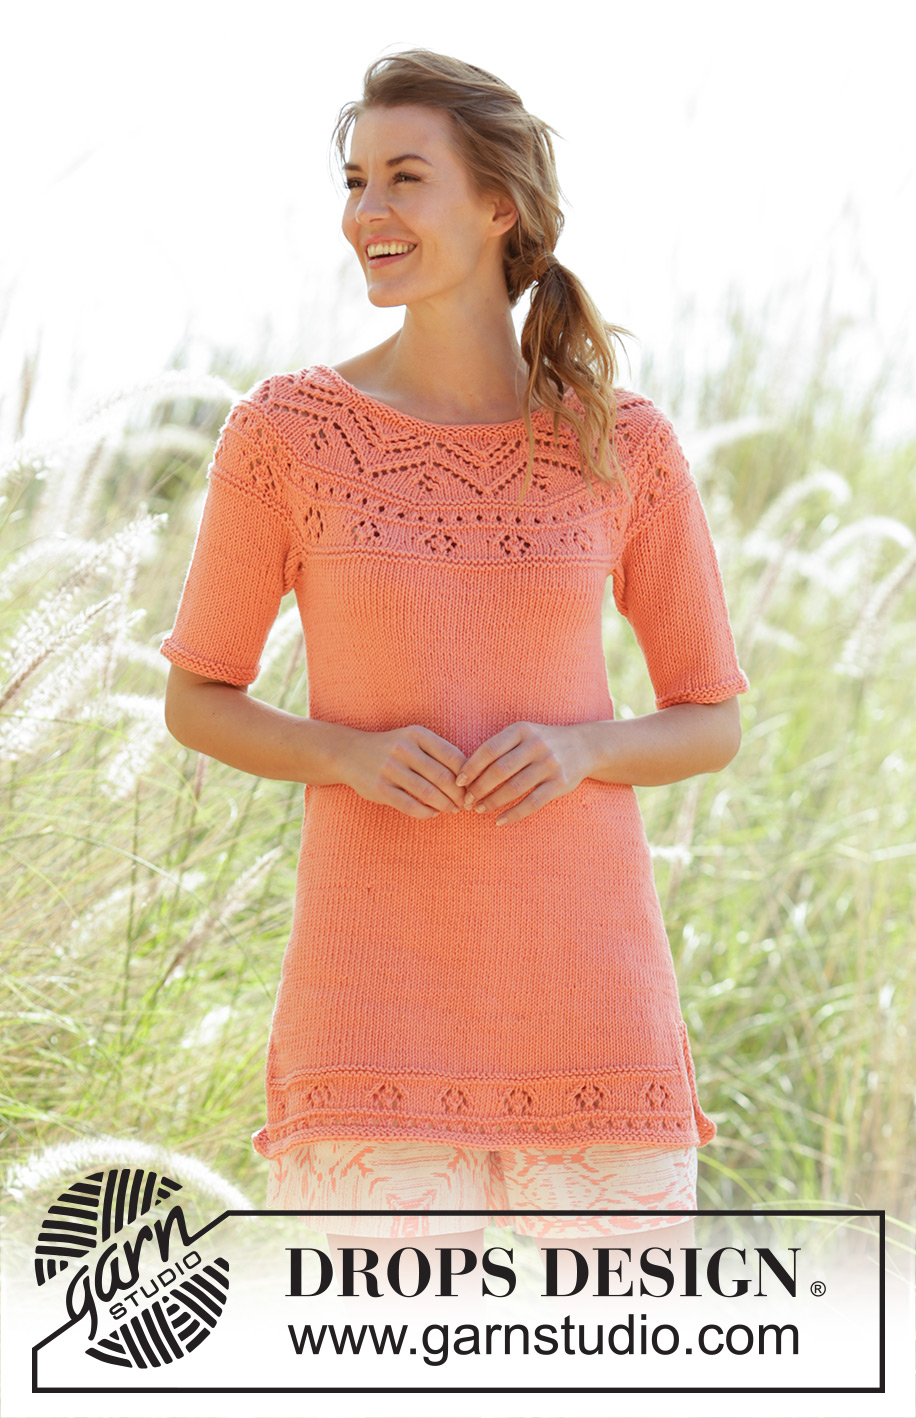
Knitted DROPS tunic with lace pattern, vents in the side and round yoke in ”Paris”. Worked top down. Size: S - XXXL.
DROPS 170-14 |
||||||||||||||||||||||
|
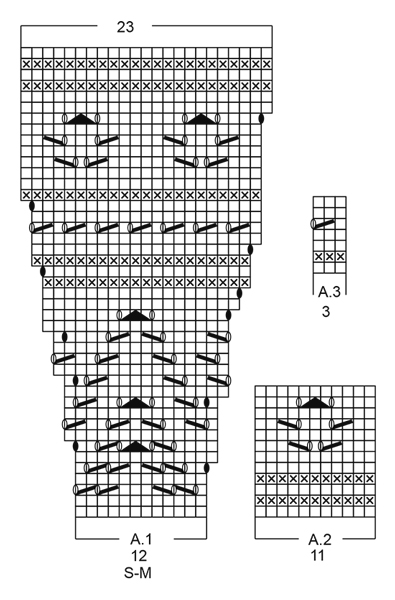
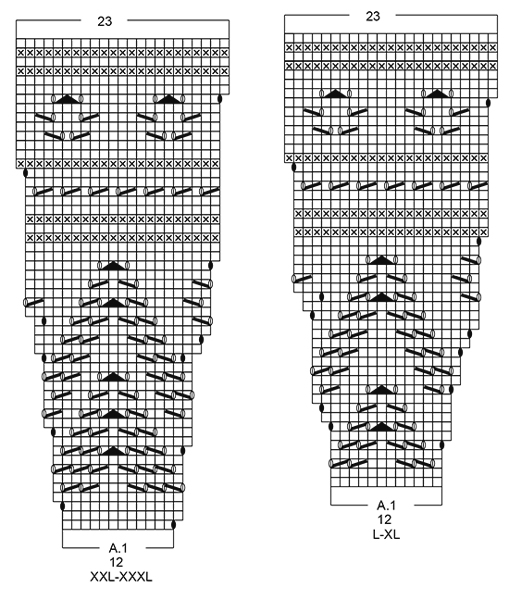
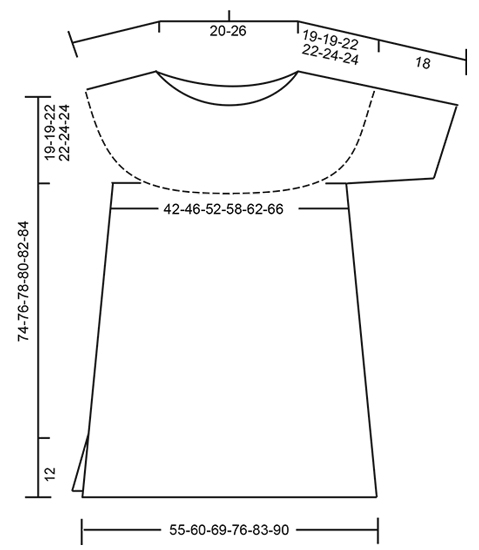
PATTERN: See diagrams A.1 to A.3. The diagrams show all rows in pattern seen from RS. GARTER ST (worked in the round): 1 ridge = 2 rounds. * K 1 round and P 1 round *, repeat from *-*. GARTER ST (back and forth): K all rows. 1 ridge = K2 rows. INCREASE TIP-1: Inc 1 st by making 1 YO, on next round work YO twisted to avoid holes. INCREASE TIP-2: Work until 2 st remains before marker, 1 YO, K 4 (marker is between sts), 1 YO. On next round K YO twisted to avoid holes. DECREASE TIP: Dec as follows before marker: Work until 3 sts remain before marker, K 2 tog, K 1. Dec as follows after marker: K 1, slip 1 st as if to K, K 1, psso ---------------------------------------------------------- YOKE: Worked top down in the round on circular needle. Cast on 92-104-108-120-126-138 sts on circular needle size 4 mm / US 6 with Paris. Work 2 ridges in GARTER ST - see explanation above and inc 16-16-24-24-30-30 sts evenly on next to last round (= round with K) - READ INCREASE TIP-1 = 108-120-132-144-156-168 sts. Switch to circular needle size 5 mm / US 8. Work A.1 (= 12 sts) 9-10-11-12-13-14 times in total in width. REMEMBER THE KNITTING GAUGE When A.1 has been worked 1 time vertically, there are 207-230-253-276-299-322 sts on needle. Piece measures approx. 19-19-22-22-24-24 cm / 7½"-7½"-8 3/4"-8 3/4"-9½"-9½". K 1 round and inc 1-0-1-0-1-0 sts evenly = 208-230-254-276-300-322 sts. Work next round as follows: K 32-36-41-45-49-53 (= half back piece), slip the next 40-44-46-48-52-56 sts on a stitch holder for sleeve, cast on 8 new sts under sleeve (insert 1 marker in the middle of these 8 sts), K 64-71-81-90-98-105 (= front piece), slip the next 40-44-46-48-52-56 sts on a stitch holder for sleeve, cast on 8 new sts under sleeve (insert 1 marker in the middle of these 8 sts), K 32-35-40-45-49-52 = 144-158-178-196-212-226 sts. BODY: Now work piece in stockinette st. Insert 1 marker in piece, NOW MEASURE PIECE FROM HERE. When piece measures 3 cm / 1'', inc 1 st on each side of each marker in the sides (= 4 sts inc) - READ INCREASE TIP-2, repeat inc every 4-4-3-2½-2-2 cm / 1½"-1½"-1"-7/8"-3/4"-3/4" 9-9-12-14-16-18 more times = 184-198-230-256-280-302 sts. When piece measures 43-45-44-46-46-48 cm / 17"-17 3/4"-17 1/4"-18"-18"-19", work front and back piece back and forth, finished separately (i.e. divide the piece at the markers). BACK PIECE: = 92-99-115-128-140-151 sts. Work in stockinette st with 4 sts in garter st in each side. When piece measures 47-49-48-50-50-52 cm / 18½"-19 1/4"-19"-19 3/4"-19 3/4"-20½" from marker - adjust so that next row is from WS, inc 1-1-0-0-0-0 sts = 93-100-115-128-140-151 sts. Work next row as follows from RS: 4 sts in garter st, work 4-2-4-5-0-0 sts as first st in A.2, repeat A.2 (= 11 sts) until 8-6-8-9-4-4 sts remain (= 7-8-9-10-12-13 times in width), work 4-2-4-5-0-0 sts as last st in A.2, finish with 4 sts in garter st. When A.2 has been worked 1 time vertically, work next row as follows from RS: 4 sts in garter st, repeat A.3 (= 3 sts) until 5 sts remain AT THE SAME TIME inc 0-2-2-1-1-2 sts evenly on first row, work first st in A.3, finish with 4 sts in garter st = 93-102-117-129-141-153 sts. When A.3 has been worked 1 time vertically, switch to circular needle size 4 mm / US 6. Work 2 ridges in GARTER ST back and forth - see explanation above! bind off. FRONT PIECE: Work as on back piece. SLEEVE: Work sleeves in the round on double pointed needles. Slip the 40-44-46-48-52-56 sts from stitch holder back on double pointed needles size 5 mm / US 8. Cast on 8 new sts under sleeve, insert a marker in the middle of these 8 sts = 48-52-54-56-60-64 sts. Insert 1 marker in piece, NOW MEASURE PIECE FROM HERE. Work in stockinette st. When piece measures 4 cm / 1½'', dec 1 st on each side of marker (= 2 sts dec) - READ DECREASE TIP! Repeat dec when piece measures 10 cm / 4'' = 44-48-50-52-56-60 sts. When piece measures 17 cm / 6 3/4'', switch to double pointed needles size 4 mm / US 6. Work 2 ridges. Bind off. Work the other sleeve the same way. ASSEMBLY: Sew the opening under the sleeve. |
||||||||||||||||||||||
Diagram explanations |
||||||||||||||||||||||
|
||||||||||||||||||||||
|
||||||||||||||||||||||
|
||||||||||||||||||||||
|
||||||||||||||||||||||
Have you finished this pattern?Tag your pictures with #dropspattern #sunriseglowtunic or submit them to the #dropsfan gallery. Do you need help with this pattern?You'll find 25 tutorial videos, a Comments/Questions area and more by visiting the pattern on garnstudio.com. © 1982-2025 DROPS Design A/S. We reserve all rights. This document, including all its sub-sections, has copyrights. Read more about what you can do with our patterns at the bottom of each pattern on our site. |
||||||||||||||||||||||


With over 40 years in knitting and crochet design, DROPS Design offers one of the most extensive collections of free patterns on the internet - translated to 17 languages. As of today we count 314 catalogs and 11821 patterns - 11811 of which are translated into English (US/in).
We work hard to bring you the best knitting and crochet have to offer, inspiration and advice as well as great quality yarns at incredible prices! Would you like to use our patterns for other than personal use? You can read what you are allowed to do in the Copyright text at the bottom of all our patterns. Happy crafting!
Post a comment to pattern DROPS 170-14
We would love to hear what you have to say about this pattern!
If you want to leave a question, please make sure you select the correct category in the form below, to speed up the answering process. Required fields are marked *.