
Looking for a yarn?


Comments / Questions (68)
![]() Karen Lyons wrote:
Karen Lyons wrote:
Sweet Martine Poncho pattern says that the pattern has been corrected... I can not find a version that does not contain that notation/link.... Is the pattern on the website the "corrected version" ? Thank you
17.03.2023 - 02:12DROPS Design answered:
Dear Mrs Lyons, yes the correction applies only if you printed the pattern before the corrections. Happy crocheting!
17.03.2023 - 08:54
![]() Ewa Mikander wrote:
Ewa Mikander wrote:
Jag har virkat i 45 år och aldrig stött på ett så obegripligt mönster. Varför krångla till det med diagram?
20.02.2022 - 08:14
![]() Sirpa Kankainen wrote:
Sirpa Kankainen wrote:
Mikä on yhden neliön koko (sivun pituus) esim. koossa XXL?
28.10.2021 - 16:45
![]() Coco wrote:
Coco wrote:
Bonsoir je suis entrain de faire se poncho et jaurais besoin dun conseil, au tour 2 en naturel, je vais commencer A4 , 1B,1Ml 1B, est ce quil faut sauter une maille pour la maille en lair, jai du mal à comprendre. Merci de votre réponse. Bonne soirée. Coco
07.06.2021 - 21:09DROPS Design answered:
Bonjour Coco, à la fin du tour 1, crochetez la maille coulée en naturel pour un joli changement de couleur, puis crochetez 3 mailles en l'air pour commencer (cf INFO CROCHET) puis crochetez A.4 (= 1 maille en l'air, sautez 1 bride, 1 bride dans la bride suivante) répétez de (à) et crochetez de **à** au milieu devant/dos. Bon crochet!
08.06.2021 - 08:45
![]() Valeria wrote:
Valeria wrote:
Salve ho provato ad assistere il video del poncho bege ma non c'è volume,cosa devo fare per vedere il video integrale
19.03.2021 - 15:50DROPS Design answered:
Buonasera Valeria, i nostri video non hanno audio perchè vengono visti da persone di tutti i paesi. Sotto ogni video può trovare una spiegazione nella lingua che preferisce. Buon lavoro!
19.03.2021 - 23:10
![]() Cheryl Wentx wrote:
Cheryl Wentx wrote:
I find this pattern impossible to follow-love the poncho + would definitely make it if a written,understandable pattern was available
10.10.2020 - 18:15DROPS Design answered:
Dear Mrs Wentx, The DROPS patterns are knitted and crocheted by thousands and thousands of people around the world. We understand however that in certain countries, with different knitting/crochet traditions than Scandinavia, our patterns might be written in a way that differs from what some are used to. But of course we want everyone to understand our patterns, so that’s why we have created an extensive library of tutorial videos as well as step by step lessons that explain how to follow the techniques we use and how to read the diagrams in our patterns. Give them a try!
12.10.2020 - 09:15
![]() Conchi Hernández wrote:
Conchi Hernández wrote:
Good afternoon, I would like to ask if there is any video where you can see the completion of the complete work. I'm not an expert and I have a hard time following the patterns. I would greatly appreciate your help because I am very interested in developing this project that you have called Pretty Boho Poncho. Sorry if the message is not entirely correct, my level of English is very basic. Cheers, Conchi Hernández
01.05.2020 - 18:17DROPS Design answered:
Dear Mrs Hernández, you will find a video showing how to crochet a square to this poncho and this lesson shows how to read crochet diagrams. For any further individual assistance, you are welcome to contact your DROPS store, even per mail or telephone. Happy crocheting!
04.05.2020 - 11:01
![]() Louise Ebbeck wrote:
Louise Ebbeck wrote:
On the first round after the squares you state to increase on every corner but then from round 2, only increase on the front and back tips.ok. so what do I do on the 2 sides? Ive undone my work twice already because the sides curl and pucker without any increase. I have been crocheting for years but these instructions are confusing. I know how to do the increases..I just want specific instructions on how to go around the other two side points.
17.04.2020 - 01:04DROPS Design answered:
Dear Mrs Ebbeck, follow the description of ROUND 1, you should incerase only in the squares with a round in A.5. After this round has been worked, simply work as shown in A.4 working the increase in the middle tip on front and on back piece. Happy crocheting!
17.04.2020 - 09:04
![]() Maria Mroz wrote:
Maria Mroz wrote:
Hello, What kind of crochet hook size should I use in USA size? I don't have 4mm. Also is there a whole video on how to make this? I am having trouble following the pattern. Thank you. Maria
18.02.2020 - 19:23DROPS Design answered:
Dear Mrs Mroz, edit the language of the pattern clicking on the scroll down menu under picture and choose "English (US/in) to get the pattern in US-English including US-crochet terminology. you will find here how to read crochet diagrams and how to crochet a square here. Happy crocheting!
19.02.2020 - 09:03
![]() Marilyn Boyle wrote:
Marilyn Boyle wrote:
Disregard my question. I've discovered that I connected the squares incorrectly, have corrected so that there are only 2 points, not 4. Would be helpful to have it specified in the pattern how to do it correctly, instead of just 'sew squares together'.
06.08.2019 - 22:18
|
|||||||||||||||||||||||||||||||||||||||||||
Sweet Martine#sweetmartineponcho |
|||||||||||||||||||||||||||||||||||||||||||
 |
 |
||||||||||||||||||||||||||||||||||||||||||
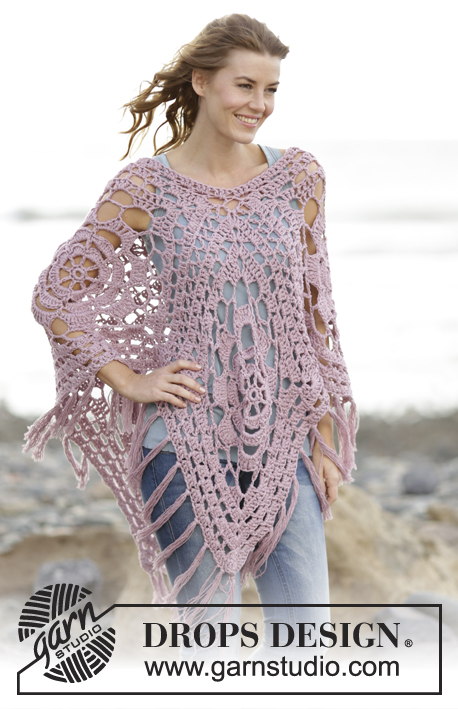
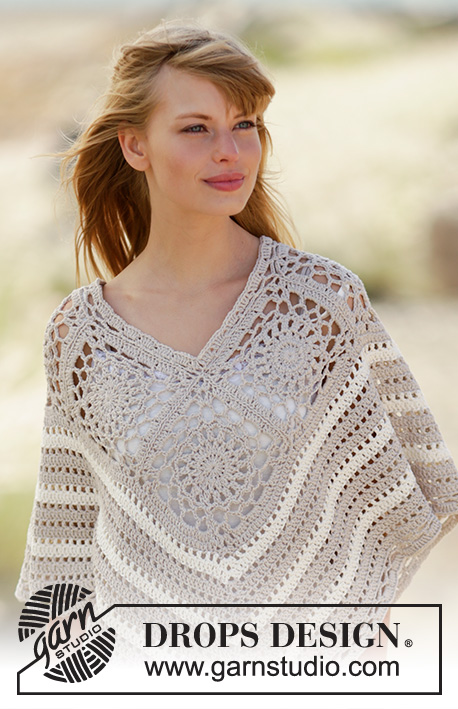
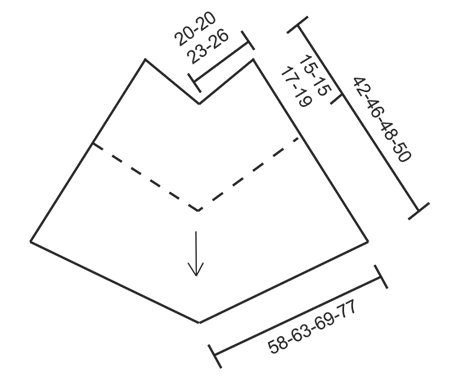
Crochet DROPS poncho with squares and lace pattern in ”Cotton Light”. The piece is worked top down. Size: S - XXXL.
DROPS 167-21 |
|||||||||||||||||||||||||||||||||||||||||||
|
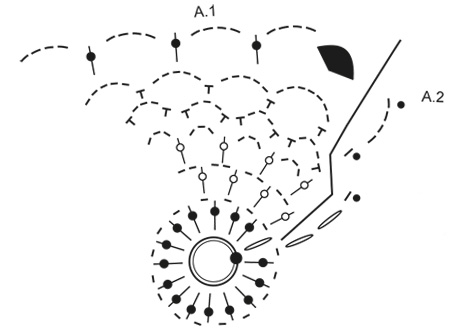
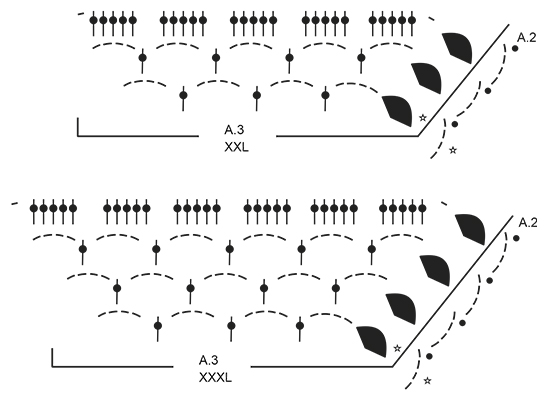
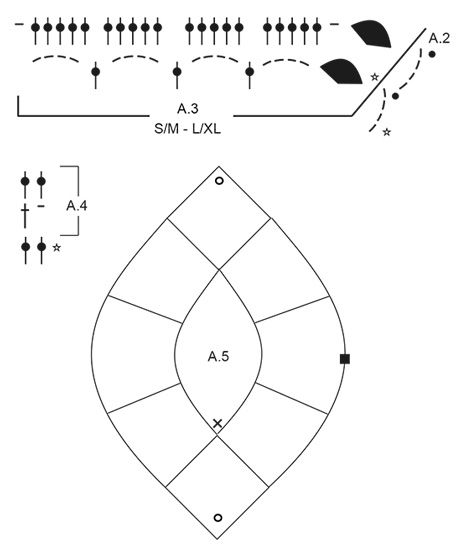
PATTERN: See diagrams A.1 to A.5. On diagram A.1 work first round in the entire round, then repeat A.1 and A.3 4 times in total on round. Diagram A.2 shows how every round beg and ends. A.5 shows how squares are assembled. CROCHET INFO: Beg every round with dc with 3 ch and finish with 1 sl st in 3rd ch. STRIPES: Work 0-4-4-4 rounds with light beige, then work * 2 rounds with off white, work 4 round with light beige *, repeat from *-* 3 times in total. INCREASE: On 1st round in A.4 (i.e. round with dc and ch) inc as follows: Work ch 1, around ch-space at the tip work as follows: 2 dc around ch-space, ch 3, 2 dc around same ch-space. On 2nd round in A.4 (i.e. round with dc) inc as follows: Work 1 dc around ch, around ch-space at the tip work as follows: 2 dc around ch-space, ch 3, 2 dc around same ch-space. ---------------------------------------------------------- PONCHO: The piece is worked from the neck down. First work squares as follows: SQUARE: Work 4 ch on hook size 4 mm / G/6 with light beige and form a ring with 1 sl st in first ch. Work A.1. Diagram A.2 shows how every round beg and ends. When first round of A.1 is worked, repeat A.1 4 times in total on round. When A.1 has been worked 1 time vertically, there are 16 ch-spaces and 4 corners. Work A.3 over A.1, i.e. repeat A.3 4 times in total on round (see diagram for correct size). NOTE: First round in A.3 is not worked, it only shows how next round is worked around sts. Diagram A.2 shows how every round beg and ends. When A.3 has been worked 1 time vertically, there are 80-80-100-120 dc and 4 corners. Fasten off. Square measures approx. 15-15-17-19 x 15-15-17-19 cm / 6"-6"-6 3/4"-7½" x 6"-6"-6 3/4"-7½". REMEMBER THE CROCHET GAUGE! Work 8 squares. ASSEMBLY: Sew squares tog edge to edge (see A.5) i.e. sew in outer loops of edge sts. These make up the upper part of poncho. Now work in the round from bottom edge of squares as follows: FROM SQUARES AND DOWN: ROUND 1: Beg in the side of square (see A.5), in the middle of the 1st square (i.e. 10-10-12-15 dc before corner). Work 3 ch – READ CROCHET INFO, work 1 dc in each of the first 10-10-12-15 dc, * over the 2 corners sewn tog work as follows: 1 dc in each of the next 2 dc, 2 dc around each of the next 2 corners, 1 dc in each of the next 2 dc *, then work 1 dc in every dc until next corner sewn tog (= over the next 20-20-25-30 dc), repeat from *-* over the next 2 corners sewn tog, 1 dc in each of the next 20-20-25-30 dc, over the next corner inc (see A.5) as follows: Work 1 dc around ch, around ch-space at the tip work as follows: 2 dc around ch-space, ch 3, 2 dc around same ch-space, 1 dc around next ch. Work 1 dc in every dc and from *-* over the next 8 corners sewn tog and the next 100-100-125-150 dc (i.e. 20-20-25-30 dc between each of the 2 corners sewn tog). Around next corner inc as follows: Work 1 dc around ch, around ch-space at the tip work as follows: 2 dc around ch-space, ch 3, 2 dc around same ch-space. Work 1 dc in every dc and from *-* the entire round, finish with 1 sl st in 3rd ch = 276-276-326-376 dc. ROUND 2: Work with off white - READ STRIPES. Work A.4 until 3 dc remain before ch-space in the tip, adjust to finish with 1 dc in last dc, work INCREASE – see explanation above. Repeat A.4 until next tip, work increase, work A.4 the rest of round. On every round inc 8 dc, i.e. inc 2 dc on each side of mid front/back. Repeat stripes and A.4 until finished measurements. When stripes have been worked, piece measures approx. 36-40-42-44 cm / 14 1/4"-15 3/4"-16½"-17 1/4" from the neck. EDGE AT THE BOTTOM: ROUND 1: Work with light beige. Work ch 1, work 1 sc in first dc, work * ch 5, skip 4 dc, 1 sc in next dc *, repeat from *-* until mid front/back, ** adjust so that last sc is worked around ch-space mid front/back, ch 5, 1 sc around same ch-space **, repeat from *-* until mid front/back, repeat from **-** around ch-space mid front/back, repeat from *-* the rest of round, finish with 1 sl st in first ch at beg of round. ROUND 2: Work ch 3, 1 sl st around first ch-space, 2 ch (= 1 hdc), work * ch 4, 1 hdc around next ch-space *, repeat from *-* until ch-space mid front/back, ** ch 4, around ch-space mid front/back work 1 hdc + 4 ch + 1 hdc **, repeat from *-* until mid front/back, repeat from **-** around ch-space mid front/back, repeat from *-* the rest of round, finish with 1 sl st in 2nd ch (= hdc) at beg of round. ROUND 3: Work 3 ch (= 1 dc), work 5 dc around every ch-space, around ch-space mid front/back work: ch 1, 2 dc around ch-space, ch 3, 2 dc around same ch-space, ch 1, finish round with 1 sl st in 3rd ch at beg of round. Fasten off. NECK EDGE: Beg mid front - see diagram and work with light beige on hook size 4 mm / G/6. Work as follows from RS: ROUND 1: Work 1 sc around ch-space in the middle (tip for the middle square), ** work ch 5, skip corner (i.e. 3 ch + 2 dc), 1 sc around ch, * ch 5, skip 5 dc, 1 sc between 2 dc *, repeat from *-* 2-2-3-4 more times, ch 5, skip 5 dc, 1 sc around ch, ch 5, 1 sc in seam between squares **, repeat from **-** around the entire neck, finish with 1 sl st in first sc. ROUND 2: Work ch 2, 1 sl st around first ch-space, 2 ch (= 1 hdc), * ch 4, 1 hdc around next ch-space *, repeat from *-* until 1 ch-space remains before mid back, work 1 hdc around the next 2 ch-spaces, repeat from *-* until 1 ch-space remains, work 1 hdc around last ch-space, finish with 1 sl st in 2nd ch (= 1 hdc) at beg of round. ROUND 3: Work 3 ch (= 1 dc), work 2 dc around first ch-space, work 5 dc around every ch-space until 1 ch-space remains before mid back, work 3 dc around each of the next 2 ch-spaces, work 5 dc around every ch-space until 1 ch-space remains, work 3 dc around last ch-space, finish with 1 sl st in first dc. Fasten off. |
|||||||||||||||||||||||||||||||||||||||||||
Diagram explanations |
|||||||||||||||||||||||||||||||||||||||||||
|
|||||||||||||||||||||||||||||||||||||||||||
|
|||||||||||||||||||||||||||||||||||||||||||
|
|||||||||||||||||||||||||||||||||||||||||||
|
|||||||||||||||||||||||||||||||||||||||||||
|
|||||||||||||||||||||||||||||||||||||||||||
Have you finished this pattern?Tag your pictures with #dropspattern #sweetmartineponcho or submit them to the #dropsfan gallery. Do you need help with this pattern?You'll find 11 tutorial videos, a Comments/Questions area and more by visiting the pattern on garnstudio.com. © 1982-2025 DROPS Design A/S. We reserve all rights. This document, including all its sub-sections, has copyrights. Read more about what you can do with our patterns at the bottom of each pattern on our site. |
|||||||||||||||||||||||||||||||||||||||||||


With over 40 years in knitting and crochet design, DROPS Design offers one of the most extensive collections of free patterns on the internet - translated to 17 languages. As of today we count 314 catalogs and 11821 patterns - 11811 of which are translated into English (US/in).
We work hard to bring you the best knitting and crochet have to offer, inspiration and advice as well as great quality yarns at incredible prices! Would you like to use our patterns for other than personal use? You can read what you are allowed to do in the Copyright text at the bottom of all our patterns. Happy crafting!
Post a comment to pattern DROPS 167-21
We would love to hear what you have to say about this pattern!
If you want to leave a question, please make sure you select the correct category in the form below, to speed up the answering process. Required fields are marked *.