
Looking for a yarn?


Comments / Questions (24)
![]() Maddalena Morgantini wrote:
Maddalena Morgantini wrote:
Buongiorno, il modello fotografato ha uno scollo molto ampio, mentre lo schema riporta un diametro di soli 20 cm. Com'è possibile?
03.11.2024 - 11:46DROPS Design answered:
Buonasera Maddalena, i 20 cm sono metà del collo: alla fine del lavoro potrà portare il capo in forma come desidera. Buon lavoro!
03.11.2024 - 23:08
![]() Angelika Schaeuffelen wrote:
Angelika Schaeuffelen wrote:
Liebes Team, ich habe eine Frage zu DROPS 167-13 ModellNr. as-057: Kann ich das Vorder- und Rückenteil auch zusammen in Runden stricken, also weiterstricken, ohne die Arbeit nach dem Rumpfteil zu teilen? Vielen Dank und liebe Grüße, Angelika
21.04.2023 - 17:58DROPS Design answered:
Liebe Angelika, ja sicher, wenn Sie keinen Schiltz an den Seiten möchten, können Sie den Rumpfteil in der Runde bis zur Ende stricken. Viel Spaß beim stricken!
24.04.2023 - 09:25
![]() CYNTHIA NAGLE wrote:
CYNTHIA NAGLE wrote:
Do you read charts for left to right or right to left
13.02.2020 - 04:36DROPS Design answered:
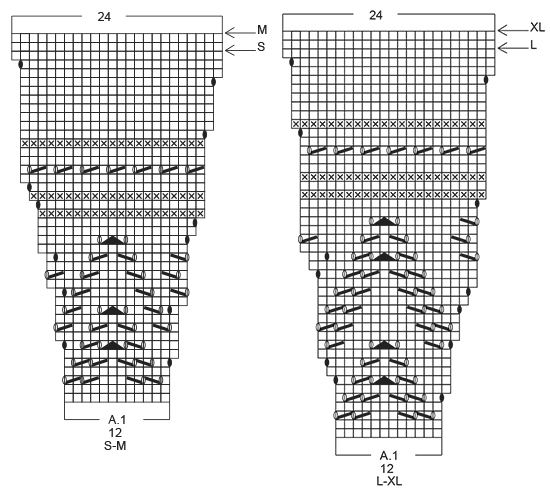
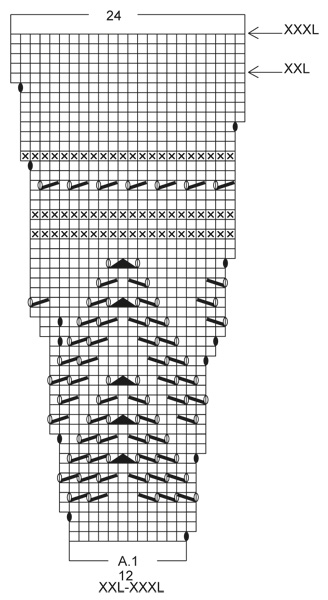
Hi Cynthia, Charts are read from bottom right to left and upwards. Happy knitting!
13.02.2020 - 10:24
![]() Svanfríður wrote:
Svanfríður wrote:
Mér gekk vel að prjóna eftir þessari uppskrift. Prjónaði XL en hefði dugað L. Hálsmálið varð aðeins of vítt, tók það aðeins saman með fasta pinna hekli. Setti smá silfur þráð í hluta af mynstrinu og klóm það vel út. Takk fyrir fría uppskrift. Svanfríður
15.10.2019 - 23:41
![]() MH wrote:
MH wrote:
Terminé à l'instant, très agréable à tricoter, sans problème de lecture de diagramme ou explications. Merci pour ce modèle.
08.09.2019 - 16:47
![]() Sandrine wrote:
Sandrine wrote:
Salve, è la prima volta che mi cimento con i ferri circolari ed avrei una domanda: nello schema i ferri di ritorno come si lavorano sui ferri circolari? Grazie
11.12.2018 - 11:09DROPS Design answered:
Buongiorno Sandrine. Quando lavora in tondo, lavora sempre sul diritto del lavoro. Lavora i ferri di ritorno come fossero ferri di andata. Se c'è un diagramma lo legge da destra verso sinistra. P.es la riga 2 del diagramma A.1 viene lavorata a diritto. Buon lavoro!
11.12.2018 - 11:40
![]() Paola wrote:
Paola wrote:
Ho avviato con i ferri circolari n 4 le 92 maglie ma mi viene molto piccolo? Per caso devo raddoppiare per lavorare in tondo?
13.09.2018 - 14:00DROPS Design answered:
Buongiorno Paola, non deve raddoppiare il numero di maglie quando lavora in tondo, il numero di maglie da avviare è corretto. Ha provato a lavorare il campione prima di iniziare? Corrisponde a quello indicato? In caso affermativo può procedere, altrimenti deve cambiare numero di ferri fino a quando ottiene la misura indicata. Tenga onoltre presente che il lavoro parte dal collo. Buon lavoro!
13.09.2018 - 14:25
![]() Lorella wrote:
Lorella wrote:
Se lo sprone si lavora avanti e indietro, quando devo passare alla lavorazione in tondo? Grazie!
04.09.2018 - 19:25DROPS Design answered:
Buonasera Lorella, abbiamo corretto il testo, anche lo sprone si lavora in tondo. Buon lavoro!
04.09.2018 - 20:44
![]() Lorella Imperatore wrote:
Lorella Imperatore wrote:
Se lo sprone si lavora avanti e indietro, quando devo iniziare la lavorazione in tondo?\r\nGrazie! !
04.09.2018 - 19:22
![]() Eva Roberg wrote:
Eva Roberg wrote:
Hei. Strikker denne flotte genseren i L, på slutten av bolen der det står: \"Strikk rett til det gjenstår 4 m før merke, 8 m rille, strikk rett til det gjenstår 4 m før neste merke, 8 m rille, strikk rett ut omg. ...... \" \r\nEr det splitt i sidene på genseren? Skal da for -og bakstykke strikkes hver for seg ca 30 cm?? Høres ikke rett ut? Mvh Eva Roberg
09.07.2018 - 14:08DROPS Design answered:
Hej Eva, husker du at måle fra mærket? Splitten skal måle 12 cm. Se også målene i måleskitsen nederst i opskriften. God fornøjelse!
10.07.2018 - 09:43
|
||||||||||||||||||||||
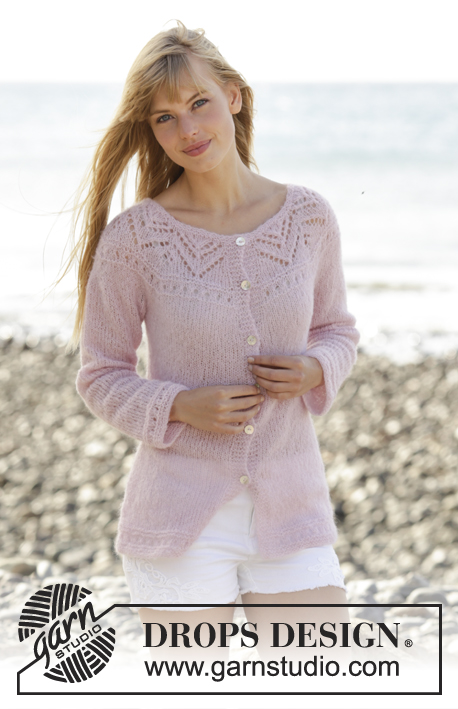
Pink Connection#pinkconnectionsweater |
||||||||||||||||||||||
|
|
||||||||||||||||||||||
Knitted DROPS jumper with lace pattern, round yoke and vent in the side ”Brushed Alpaca Silk”. Worked top down. Size: S - XXXL.
DROPS 167-13 |
||||||||||||||||||||||
|
PATTERN: See diagram A.1 and A.2 (choose diagram for correct size). GARTER ST (worked in the round): 1 ridge = 2 rounds. * K 1 round and P 1 round *, repeat from *-*. GARTER ST (back and forth): K all rows. 1 ridge = K2 rows. INCREASE TIP: Inc 1 st by making 1 YO, on next round work YO twisted to avoid holes. DECREASE TIP: Dec as follows before marker: Work until 4 sts remain before marker, K 2 tog, K 2. Dec as follows after marker: K 2, slip 1 st as if to K, K 1, psso ---------------------------------------------------------- YOKE: The piece is worked top down in the round. Cast on 92-104-108-120-126-138 sts on circular needle size 4 mm / US 6 with Brushed Alpaca Silk. Work 2 ridges in GARTER ST - see explanation above and inc 16-16-24-24-30-30 sts evenly on next to last round (= round with K) - READ INCREASE TIP = 108-120-132-144-156-168 sts. Switch to circular needle size 5 mm / US 8. Work A.1 (= 12 sts) 9-10-11-12-13-14 times in total in width. REMEMBER THE KNITTING GAUGE When A.1 has been worked 1 time vertically, there are 216-240-264-288-312-336 sts on needle. Piece measures approx. 19-20-21-22-23-24 cm / 7½''-8''-8¼''-8¾''-9''-9½''. K 1 round and inc 12-4-4-4-4-4 sts evenly = 228-244-268-292-316-340 sts. Work next round as follows: K 32-34-39-43-47-52 (= half back piece), slip the next 50-54-56-60-64-66 sts on a stitch holder for sleeve, cast on 8 new sts under sleeve (insert 1 marker in the middle of these 8 sts), K 64-68-78-86-94-104 (= front piece), slip the next 50-54-56-60-64-66 sts on a stitch holder for sleeve, cast on 8 new sts under sleeve (insert 1 marker in the middle of these 8 sts), K 32-34-39-43-47-52 = 144-152-172-188-204-224 sts. BODY: Insert 1 marker in piece, NOW MEASURE PIECE FROM HERE. Now work piece in stockinette st. When piece measures 4 cm / 1½'', dec 1 st on each side of each marker in the sides (= 4 sts dec) - READ DECREASE TIP, repeat dec every 6-12-6-7-7-18 cm / 2 3/8"-4 3/4"-2 3/8"-2 3/4"-2 3/4"-7" 2-1-2-2-2-1 more time = 132-144-160-176-192-216 sts. When piece measures 20-21-22-23-24-25 cm / 8''-8¼''-8¾''-9''-9½''-9¾'', inc 1 st on each side of each marker in the sides (= 4 sts inc), repeat inc every 3 cm / 1'' 2 more times = 144-156-172-188-204-228 sts. When piece measures 27-28-29-30-31-32 cm / 10½"-11"-11½"-11 3/4"-12 1/4"-12½" from marker, work as follows: K until 4 sts remain before marker, 8 sts in garter st, K until 4 sts remain before next marker, 8 sts in garter st, K the rest of round. When 1 ridge has been worked over the 4 sts on each side of each marker, finish front and back piece back and forth separately (i.e. divide piece at the markers). BACK PIECE: = 72-78-86-94-102-114 sts. Continue pattern with 4 sts in GARTER ST - see explanation above - in each side of piece. When piece measures 34-35-36-37-38-40 cm / 13½"-13 3/4"-14 1/4"-14½"-15"-15 3/4" from marker, work as follows from RS: 4 sts in garter st, repeat A.2 until 5 sts remain AT THE SAME TIME inc 0-0-1-2-0-0 sts evenly on first row, finish with 1 st in stockinette st and 4 sts in garter st = 72-78-87-96-102-114 sts. Bind off when A.2 has been worked 1 time vertically. Piece measures approx. 58-60-62-64-66-68 cm / 22¾''-23 5/8''-24 3/8''-25¼''-26''-26¾'' in total. FRONT PIECE: Work as on back piece. SLEEVE: Work sleeves in the round on double pointed needles. Slip the 50-54-56-60-64-66 sts from stitch holder back on double pointed needles size 5 mm / US 8. Cast on 8 new sts under sleeve, insert a marker in the middle of these 8 sts = 58-62-64-68-72-74 sts. Insert 1 marker in piece, NOW MEASURE PIECE FROM HERE. Work in stockinette st. When piece measures 3 cm / 1'' from marker, dec 1 st on each side of marker, repeat dec every 3-3-3-2½-2-2 cm / 1 1/8"-1 1/8"-1 1/8"-7/8"-3/4"-3/4" 10-10-10-12-13-14 more times = 36-40-42-42-44-44 sts on needle. When piece measures 41-41-40-39-39-38 cm / 16"-16"-15 3/4"-15 1/4"-15 1/4"-15" (NOTE: Shorter measurements in the larger sizes because of wider shoulder), adjust no of sts to 36-39-42-42-45-45 in total on next round. Then work A.2 12-13-14-14-15-15 times in total on round. Bind off when A.2 has been worked 1 time vertically. Work the other sleeve the same way. ASSEMBLY: Sew the opening under the sleeve. |
||||||||||||||||||||||
Diagram explanations |
||||||||||||||||||||||
|
||||||||||||||||||||||
|
||||||||||||||||||||||
|
||||||||||||||||||||||

|
||||||||||||||||||||||
Have you finished this pattern?Tag your pictures with #dropspattern #pinkconnectionsweater or submit them to the #dropsfan gallery. Do you need help with this pattern?You'll find 22 tutorial videos, a Comments/Questions area and more by visiting the pattern on garnstudio.com. © 1982-2025 DROPS Design A/S. We reserve all rights. This document, including all its sub-sections, has copyrights. Read more about what you can do with our patterns at the bottom of each pattern on our site. |
||||||||||||||||||||||


With over 40 years in knitting and crochet design, DROPS Design offers one of the most extensive collections of free patterns on the internet - translated to 17 languages. As of today we count 314 catalogs and 11822 patterns - 11812 of which are translated into English (US/in).
We work hard to bring you the best knitting and crochet have to offer, inspiration and advice as well as great quality yarns at incredible prices! Would you like to use our patterns for other than personal use? You can read what you are allowed to do in the Copyright text at the bottom of all our patterns. Happy crafting!
Post a comment to pattern DROPS 167-13
We would love to hear what you have to say about this pattern!
If you want to leave a question, please make sure you select the correct category in the form below, to speed up the answering process. Required fields are marked *.