DROPS Brushed Alpaca Silk uni colour 77% Alpaca, 23% Silk |
3.95 $ /25g |
Order |
Clicking the ORDER button will redirect you to Wool Warehouse Direct Ltd website
The yarn cost is calculated from the pattern’s smallest size and the yarn’s cheapest product type. Looking for an even better price? You might find it on the DROPS Deals!
-------------------------------------------------------
Alternative Yarn – See how to change yarns here
Yarn Groups A to F – Use the same pattern and change the yarn here
Yarn usage using an alternative yarn – Use our yarn converter here
-------------------------------------------------------
DROPS Brushed Alpaca Silk uni colour 77% Alpaca, 23% Silk 3.95 $ /25g Order |
Clicking the ORDER button will redirect you to Wool Warehouse Direct Ltd website
The yarn cost is calculated from the pattern’s smallest size and the yarn’s cheapest product type. Looking for an even better price? You might find it on the DROPS Deals!
This pattern has been corrected. Click here to see the correction/s.
All measurements in charts are in cm.
= K from RS, P from WS | |
= P from RS, K from WS | |
= K 2 tog | |
= slip 1 st as if to K, K 1, psso | |
= 1 YO between 2 sts, DO NOT K YO twisted on next round, it should make hole | |
= 1 YO between 2 sts, K YO twisted on next round, it should not make hole | |
= slip 2 sts as if to K tog, K 1, psso |
Each of our patterns has specific tutorial videos to help you.
These step-by-step tutorials might also help you:
Why is the knitting/crochet tension so important?
Knitting tension is what determines the final measurements of your work, and is usually measured per 10 x 10 cm. It is provided like so: number of stitches in width x number of rows in height - eg: 19 stitches x 26 rows = 10 x 10 cm.
The knitting tension is very individual; some people knit/crochet loosely while others work tightly. You adjust the knitting tension with the needle size, which is why the suggested needle size only serve as a guide! You need to adjust this (up or down) to ensure that YOUR knitting tension matches the knitting tension provided in the pattern. If you work with a different knitting tension than provided you will have a different yarn consumption, and your work will have different measurements than what the pattern suggests.
The knitting tension also determines which yarns can replace each other. As long as you achieve the same knitting tension you can replace one yarn with another.
See DROPS lesson: How to measure your tension/gauge
See DROPS video: How to make a gauge tension swatch
How do I know how many balls of yarn I need?
The required amount of yarn is provided in grams, eg: 450 g. To calculate how many balls you’ll need you first need to know how many grams are in 1 ball (25g, 50g or 100g). This information is available if you click on the individual yarn quality on our pages. Divide the amount required with the amount of each ball. For example, if each ball is 50g (the most common amount), the calculation will be as follows: 450 / 50 = 9 balls.
Can I use a different yarn than what the pattern suggests?
The important thing when changing from one yarn to another is that the knitting/crochet tension remains the same. This is so that the measurements of the finished piece will be the same as on the sketch provided. It is easier to achieve the same knitting tension using yarns from the same yarn group. It is also possible to work with multiple strands of a thinner yarn to achieve the knitting tension of a thicker one. Please try our yarn converter. We recommend you to always work a test swatch.
Please NOTE: when changing yarn the garment might have a different look and feel to the garment in the photo, due to individual properties and qualities of each yarn.
See DROPS lesson: Can I use a different yarn than the one mentioned in the pattern?
What are the yarn groups?
All our yarns are categorised into yarn groups (from A to F) according to thickness and knitting tension – group A contains the thinnest yarns and group F the thickest. This makes it easier for you to find alternative yarns to our patterns, should you wish to switch yarn. All yarns within the same group have a similar knitting tension and can easily replace each other. However, different yarn qualities have different structures and properties which will give the finished work a unique look and feel.
How do I use the yarn converter?
At the top of all our patterns you’ll find a link to our yarn converter, which is a helpful tool should you wish to use a different yarn than suggested. By filling in the yarn quality you wish to replace, the amount (in your size) and number of strands, the converter will present good alternative yarns with the same knitting tension. Additionally it will tell you how much you’ll require in the new qualities and whether you’ll need to work with multiple strands. Most skeins are 50g (some are 25g or 100g).
If the pattern is worked with multiple colours, every colour will have to be converted separately. Similarly, if the pattern is worked with several strands of different yarns (for example 1 strand Alpaca and 1 strand Kid-Silk) you will have to find alternatives for each, individually.
Why do you show discontinued yarns in the patterns?
Since different yarns have different qualities and textures we have chosen to keep the original yarn in our patterns. However, you can easily find options among our available qualities by using our yarn converter, or simply pick a yarn from the same yarn group.
It is possible that some retailers still have discontinued yarns in stock, or that someone has a few skeins at home that they would like to find patterns for.
The yarn converter will provide both alternative yarn as well as required amount in the new quality.
What size should I knit?
If you think it's hard to decide what size to make, it can be a good idea to measure a garment you own already and like the size of. Then you can pick the size by comparing those measures with the ones available in the pattern's size chart.
You'll find the size chart at the bottom of the pattern.
See DROPS lesson: How to read size chart
Why do I get the wrong knitting tension with the suggested needle size?
The needle size provided in the pattern serves only as a guide, the important thing is to follow the knitting tension. And since knitting tension is very individual, you will have to adjust the needle size to ensure that YOUR tension is the same as in the pattern – maybe you’ll have to adjust 1, or even 2 needle sizes, up or down to achieve the correct tension. For this, we recommend that you work test swatches.
Should you work with a different knitting tension than the one provided, the measurements of the finished garment might deviate from the measurement sketch.
See DROPS lesson: How to measure your tension/gauge
See DROPS video: How to make a gauge tension swatch
Why is the pattern worked top-down?
Working a garment top-down provides more flexibility and room for personal adjustment. For example it is easier to try the garment on while working, as well as making adjustments to length of yoke and shoulder caps.
The instructions are carefully explaining every step, in the correct order. Diagrams are adjusted to the knitting direction and are worked as usual.
How do I work according to a knitting diagram?
The diagram depicts all rows/rounds, and every stitch seen from the right side. It is read from bottom to top, from right to left. 1 square = 1 stitch.
When working back and forth, every other row is worked from the right side and every other row is worked from the wrong side. When working from the wrong side, the diagram will have to be worked reversed: from left to right, knit stitches are purled, purl stitches are knit etc.
When working in the round every round is worked from the right side and the diagram are worked from right to left on all rounds.
See DROPS lesson: How to read knitting diagrams
How do I work according to a crochet diagram?
The diagram depicts all rows/rounds, and every stitch seen from the right side. It is worked from bottom to top, from right to left.
When working back and forth every other row is worked from the right side: from right to left and every other row is worked from the wrong side: from left to right.
When working in the round, every row in the diagram are worked from the right side, from right to left.
When working a circular diagram you start in the middle and work your way outwards, counter clockwise, row by row.
The rows usually start with a given number of chain stitches (equivalent to the height of the following stitch), this will either be depicted in the diagram or explained in the pattern.
See DROPS lesson: How to read crochet diagrams
How do I work several diagrams simultaneously on the same row/round?
Instructions for working several diagrams after each other on the same row/round, will often be written like so: “work A.1, A.2, A.3 a total of 0-0-2-3-4 times". This means you work A.1 once, then A.2 is worked once, and A.3 is repeated (in width) the number of times provided for your size – in this case like so: S = 0 times, M = 0 times, L=2 times, XL= 3 times and XXL = 4 times.
The diagrams are worked as usual: begin with the first row in A.1, then work the first row in A.2 etc.
See DROPS lesson: How to read knitting diagrams
See DROPS lesson: How to read crochet diagrams
Why are the sleeves shorter in larger sizes?
The total width of the garment (from wrist-to-wrist) will be larger in the larger sizes, despite the actual sleeves being shorter. The larger sizes have longer sleeve caps and wider shoulders, so there will be a good fit in all sizes.
Where on the garment is the length measured?
The measurement sketch/schematic drawing provides information regarding the full length of the garment. If it’s a jumper or a jacket the length is measured from the highest point on the shoulder (usually closest to the neckline), and straight down to the bottom of the garment. It is NOT measured from the tip of shoulder. Similarly, the length of yoke is measured from the highest point on the shoulder and down to where yoke is split into body and sleeves.
See DROPS lesson: How to read a schematic drawing
What is a repeat?
Diagrams are often repeated on the round or in height. 1 repeat is the diagram the way it appears in the pattern. If it says to work 5 repeats of A.1 in the round, then you work A.1 a total of 5 times after/next to each other in the round. If it says to work 2 repeats of A.1 vertically/in height you work the entire diagram once, then begin again at the start and work the entire diagram one more time.
Why does the piece start with more chain stitches than it’s worked with?
Chain stitches are slightly narrower than other stitches and to avoid working the cast-on edge too tight, we simply chain more stitches to begin with. The stitch count will be adjusted on the following row to fit the pattern and measurement sketch.
Why increase before the rib edge when the piece is worked top-down?
The rib edge is more elastic and will contract slightly compared to, for example, stocking stitch. By increasing before the rib edge, you avoid a visible difference in width between the rib edge and the rest of the body.
Why increase in the cast-off edge?
It’s very easy to cast off too tightly, and by making yarn overs while casting off (and simultaneously casting these off) you avoid a too tight cast off edge.
See DROPS video: How to bind off with yarn overs (yo)
How do I increase/decrease on every 3rd and 4th row/round alternately?
To achieve an even increase (or decrease) you can increase on, for example: every 3rd and 4th row alternately, like so: work 2 rows and increase on the 3rd row, work 3 rows and increase on the 4th. Repeat this until the increase is complete.
See DROPS lesson: Increase or decrease 1 st on every 3rd and 4th row alternately
How can I work a jacket in the round instead of back and forth?
Should you prefer to work in the round instead of back and forth, you may of course adjust the pattern. You’ll need to add steeks mid-front (usually 5 stitches), and follow the instructions. When you would normally turn and work from the wrong side, simply work across the steek and continue in the round. At the end you’ll cut the piece open, pick up stitches to work bands, and cover the cut edges.
See DROPS video: How to knit steeks and cut open
Can I work a jumper back and forth instead of in the round?
Should you prefer to work back and forth instead of in the round, you may of course adjust the pattern so you work the pieces separately and then assemble them at the end. Divide the stitches for the body in 2, add 1 edge stitch in each side (for sewing) and work the front and back pieces separately.
See DROPS lesson: Can I adapt a pattern for circular needles into straight needles?
Why is the pattern slightly different than what I see in the photo?
Pattern repeats can vary slightly in the different sizes, in order to get the correct proportions. If you’re not working the exact same size as the garment in the photo, yours might deviate slightly. This has been carefully developed and adjusted so that the complete impression of the garment is the same in all sizes.
Make sure to follow instructions and diagrams for your size!
How do I make a women’s size garment into a men’s size one?
If you have found a pattern you like which is available in women’s size it’s not very difficult to convert it to men’s size. The biggest difference will be the length of sleeves and body. Start working on the women size that you think would fit across the chest. The additional length will be worked right before you cast off for the armhole/sleeve cap. If the pattern is worked top-down you can add the length right after the armhole or before the first decrease on sleeve.
Regarding additional yarn amount, this will depend on how much length you add, but it is better with a skein too many than too few.
How do I prevent a hairy garment from shedding?
All yarns will have excess fibres (from production) that might come off as lint or shedding. Brushed yarns (ie hairier yarns) have more of these loose, excess fibres, causing more shedding.
Shedding also depends on what is worn under or over the garment, and whether this pulls at the yarn fibres. It’s therefore not possible to guarantee that there will be no shedding
Below are some tips on how to get the best result when working with hairier yarns:
1. When the garment is finished (before you wash it) shake it vigorously so the looser hairs come off. NOTE: do NOT use a lint roller, brush or any method that pulls at the yarn.
2. Place the garment in a plastic bag and put it in your freezer - the temperature will cause the fibres to become less attached to each other, and excess fibres will come off easier.
3. Leave in the freezer for a few hours before taking it out and shaking it again.
4. Wash the garment according to the instructions on the yarn label.
Why does my garment pill?
Pilling is a natural process that happens to even the most exclusive of fibers. It's a natural sign of wear and tear that is hard to avoid, and that is most visible in high friction areas of your garment like a sweater's arms and cuffs.
You can make your garment look as new by removing the pilling, using a fabric comb or a pill/lint remover.
Pink Connection |
||||||||||||||||||||||
|
||||||||||||||||||||||
Knitted DROPS jumper with lace pattern, round yoke and vent in the side ”Brushed Alpaca Silk”. Worked top down. Size: S - XXXL.
DROPS 167-13 |
||||||||||||||||||||||
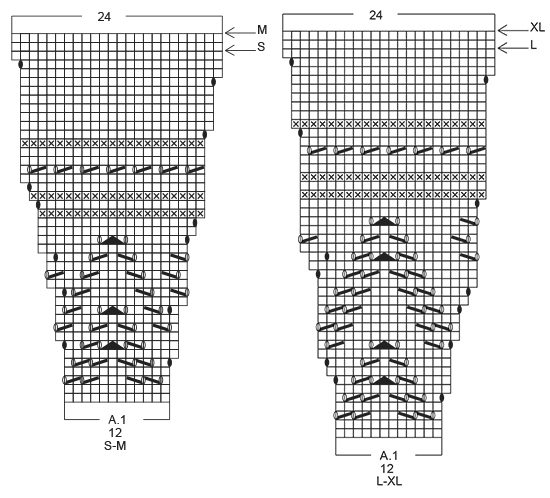
PATTERN: See diagram A.1 and A.2 (choose diagram for correct size). GARTER ST (worked in the round): 1 ridge = 2 rounds. * K 1 round and P 1 round *, repeat from *-*. GARTER ST (back and forth): K all rows. 1 ridge = K2 rows. INCREASE TIP: Inc 1 st by making 1 YO, on next round work YO twisted to avoid holes. DECREASE TIP: Dec as follows before marker: Work until 4 sts remain before marker, K 2 tog, K 2. Dec as follows after marker: K 2, slip 1 st as if to K, K 1, psso ---------------------------------------------------------- YOKE: The piece is worked top down in the round. Cast on 92-104-108-120-126-138 sts on circular needle size 4 mm / US 6 with Brushed Alpaca Silk. Work 2 ridges in GARTER ST - see explanation above and inc 16-16-24-24-30-30 sts evenly on next to last round (= round with K) - READ INCREASE TIP = 108-120-132-144-156-168 sts. Switch to circular needle size 5 mm / US 8. Work A.1 (= 12 sts) 9-10-11-12-13-14 times in total in width. REMEMBER THE KNITTING GAUGE When A.1 has been worked 1 time vertically, there are 216-240-264-288-312-336 sts on needle. Piece measures approx. 19-20-21-22-23-24 cm / 7½''-8''-8¼''-8¾''-9''-9½''. K 1 round and inc 12-4-4-4-4-4 sts evenly = 228-244-268-292-316-340 sts. Work next round as follows: K 32-34-39-43-47-52 (= half back piece), slip the next 50-54-56-60-64-66 sts on a stitch holder for sleeve, cast on 8 new sts under sleeve (insert 1 marker in the middle of these 8 sts), K 64-68-78-86-94-104 (= front piece), slip the next 50-54-56-60-64-66 sts on a stitch holder for sleeve, cast on 8 new sts under sleeve (insert 1 marker in the middle of these 8 sts), K 32-34-39-43-47-52 = 144-152-172-188-204-224 sts. BODY: Insert 1 marker in piece, NOW MEASURE PIECE FROM HERE. Now work piece in stockinette st. When piece measures 4 cm / 1½'', dec 1 st on each side of each marker in the sides (= 4 sts dec) - READ DECREASE TIP, repeat dec every 6-12-6-7-7-18 cm / 2 3/8"-4 3/4"-2 3/8"-2 3/4"-2 3/4"-7" 2-1-2-2-2-1 more time = 132-144-160-176-192-216 sts. When piece measures 20-21-22-23-24-25 cm / 8''-8¼''-8¾''-9''-9½''-9¾'', inc 1 st on each side of each marker in the sides (= 4 sts inc), repeat inc every 3 cm / 1'' 2 more times = 144-156-172-188-204-228 sts. When piece measures 27-28-29-30-31-32 cm / 10½"-11"-11½"-11 3/4"-12 1/4"-12½" from marker, work as follows: K until 4 sts remain before marker, 8 sts in garter st, K until 4 sts remain before next marker, 8 sts in garter st, K the rest of round. When 1 ridge has been worked over the 4 sts on each side of each marker, finish front and back piece back and forth separately (i.e. divide piece at the markers). BACK PIECE: = 72-78-86-94-102-114 sts. Continue pattern with 4 sts in GARTER ST - see explanation above - in each side of piece. When piece measures 34-35-36-37-38-40 cm / 13½"-13 3/4"-14 1/4"-14½"-15"-15 3/4" from marker, work as follows from RS: 4 sts in garter st, repeat A.2 until 5 sts remain AT THE SAME TIME inc 0-0-1-2-0-0 sts evenly on first row, finish with 1 st in stockinette st and 4 sts in garter st = 72-78-87-96-102-114 sts. Bind off when A.2 has been worked 1 time vertically. Piece measures approx. 58-60-62-64-66-68 cm / 22¾''-23 5/8''-24 3/8''-25¼''-26''-26¾'' in total. FRONT PIECE: Work as on back piece. SLEEVE: Work sleeves in the round on double pointed needles. Slip the 50-54-56-60-64-66 sts from stitch holder back on double pointed needles size 5 mm / US 8. Cast on 8 new sts under sleeve, insert a marker in the middle of these 8 sts = 58-62-64-68-72-74 sts. Insert 1 marker in piece, NOW MEASURE PIECE FROM HERE. Work in stockinette st. When piece measures 3 cm / 1'' from marker, dec 1 st on each side of marker, repeat dec every 3-3-3-2½-2-2 cm / 1 1/8"-1 1/8"-1 1/8"-7/8"-3/4"-3/4" 10-10-10-12-13-14 more times = 36-40-42-42-44-44 sts on needle. When piece measures 41-41-40-39-39-38 cm / 16"-16"-15 3/4"-15 1/4"-15 1/4"-15" (NOTE: Shorter measurements in the larger sizes because of wider shoulder), adjust no of sts to 36-39-42-42-45-45 in total on next round. Then work A.2 12-13-14-14-15-15 times in total on round. Bind off when A.2 has been worked 1 time vertically. Work the other sleeve the same way. ASSEMBLY: Sew the opening under the sleeve. |
||||||||||||||||||||||
Diagram explanations |
||||||||||||||||||||||
|
||||||||||||||||||||||
Have you made this or any other of our designs? Tag your pictures in social media with #dropsdesign so we can see them! Do you need help with this pattern?You'll find tutorial videos, a Comments/Questions area and more by visiting the pattern on garnstudio.com. © 1982-2024 DROPS Design A/S. We reserve all rights. This document, including all its sub-sections, has copyrights. Read more about what you can do with our patterns at the bottom of each pattern on our site. |
With over 40 years in knitting and crochet design, DROPS Design offers one of the most extensive collections of free patterns on the internet - translated to 17 languages. As of today we count 304 catalogs and 11422 patterns - 11417 of which are translated into English (US/in).
We work hard to bring you the best knitting and crochet have to offer, inspiration and advice as well as great quality yarns at incredible prices! Would you like to use our patterns for other than personal use? You can read what you are allowed to do in the Copyright text at the bottom of all our patterns. Happy crafting!
Comments / Questions (23)
Noellie wrote:
Bonjour, Je souhaite commencer ce modèle, mais je bloque sur la 3eme ligne du diagramme car je n'arrive pas à comprendre pourquoi après la première jeté, les deux mailles suivantes ne sont pas tricotées ensembles comme c'est le cas avant les deux jetés situées en fin de ligne? Les deux façons de faire étant différentes, cela ne risque t'il pas d'affecter la symétrie de l'empiécement ? Par avance merci de votre réponse
23.04.2018 - 22:45DROPS Design answered:
Bonjour Noellie, au début du motif ajouré, on diminue avec 1 surjet simple (= on glisse 1 m à l'end, on tricote 1 m end, et on passe la m glissée par-dessus la m tricotée), ceci 2-3 fois en fonction de la taille (avec 1 jeté auparavant pour créer le point ajouré) et à la fin du diagramme, on tricote 2 m ens à l'end, 1 jeté. C'est ainsi que la symétrie va se faire. Bon tricot!
24.04.2018 - 09:04Ledien Dominique wrote:
Bonjour, je désire tricoter ce joli pull avec le fil DROP AIR. Lorsque je regarde d'autres modèles avec AIR il faut entre 300 et 350g de laine et pour ce modèle il ne faut que 150g (pour la même taille) quelle quantité dois-je prendre ? Merci de votre réponse.
12.11.2017 - 13:13DROPS Design answered:
Bonjour Mme Ledien, ce modèle se tricote ici en Brushed Alpaca Silk (= 140 m pour 25 g), alors que Air fait 140 m pour 50 gm. Il va vous falloir recalculer la quantité nécessaire pour votre taille en métrage - vous trouverez comment ici. Bon tricot!
13.11.2017 - 09:49Kirsi wrote:
Hei, haluaisin neuloa puseron 2-kertaisella langalla. Tuleeko koosta sopiva jos teen yhtä kokoa pienemmän?
09.03.2017 - 19:45DROPS Design answered:
Hei! Aina kun korvaat ohjeen alkuperäisen langan jollakin toisella langalla/lankayhdistelmällä,sinun tulee olla erityisen tarkkana neuletiheyden kanssa. Jos neulot puseron kaksinkertaisella langalla, puserosta tulee väljempi ja neulepinnasta tulee tiheämpi. Eli tarkista ensin tiheys ja vertaa sitten mitat ohjeen puseron mittoihin.
14.03.2017 - 16:41Daniela Perrone wrote:
Grazie per la cortese risposta. Devo aver frainteso lo schema però perché nelle spiegazioni del diagramma leggo che un quadretto bianco ad esempio corrisponde ad una maglia dir sul diritto e una rov sul rovescio. Quindi una riga sono due ferri...? Io ho fatto così ma ora mi trovo alla misura di diagramma finito e sono invece solo a metà... Confrontando con la foto credo fosse invece fa lavorare una riga diagramma= un ferro....
05.02.2017 - 02:02DROPS Design answered:
Buongiorno Daniela. Ogni riga del diagramma corrisponde ad un ferro. Quindi p.es. 10 righe di diagramma,sono 10 ferri. Buon lavoro !
05.02.2017 - 09:07Daniela Perrone wrote:
Buongiorno. non capisco cosa significa DIMINUIRE PER LE ASOLE, oltre tutto inserito in una parte delle descrizioni dove si continua ad aumentare per lo sprone. E i segnapunti dove e quando vanno inseriti? (sono al mio primo top down..)
04.02.2017 - 11:40DROPS Design answered:
Buongiorno Daniela. Abbiamo corretto il testo, non ci asole da aprire. I segnapunti vanno inseriti quando le maglie per le maniche vengono trasferiti su un ferma maglie e vengono avviate le 8 maglie del sotto manica. Il segna punti viene inserito al centro di queste 8 maglie. Buon lavoro!
04.02.2017 - 12:49Carole DEMULDER wrote:
Bonjour Pour un tour de poitrine de 95 cm quelle taille faut il prendre, svp
22.04.2016 - 10:21DROPS Design answered:
Bonjour Mme Demulder, vous trouverez à la fin des explications un schéma avec toutes les mesures pour chaque taille. Elles sont prises à plat, d'un côté à l'autre. Comparez ces mesures avec un vêtement similaire que vous avez et dont vous aimez la taille pour trouver la taille qui vous convient. Voir également ici. Bon tricot!
22.04.2016 - 10:47Elisabeth wrote:
Bonjour, j'aime bien ce modèle, encolure, empiècement, forme, mais je préfèrerais le tricoter en fil catégorie A. Que me conseillez vous? Comment transposer le tutto?
10.03.2016 - 11:00DROPS Design answered:
Bonjour Eliabeth, vous pouvez ajuster en vous basant sur un modèle à empiècement rond réalisé dans un fil du groupe A - voir ici. Bon tricot!
10.03.2016 - 11:56Halka wrote:
Fehler im Schema: A.1 Größe S-M An der rechten Seite von Reihe 21 (Reihenanfang, letzte Reihe vor der Krausrippe) fehlt ein Zeichen für die Zunahme - Umschlag, in der nächsten Reihe verschränkt stricken
03.02.2016 - 18:09DROPS Design answered:
Ja, Sie haben Recht, hier fehlt ein Zeichen, ich leite es an die Designerinnen weiter, damit das korrigiert wird, danke für den Hinweis!
07.02.2016 - 13:12Daggi wrote:
Sehr weiblich und schön kuschelig. Ein süßes Modell!
20.01.2016 - 12:12Renate wrote:
Ein sehr schönes Modell,gibt es eine Anleitung?
12.01.2016 - 17:07