
Popular categories
Looking for a yarn?


Comments / Questions (3)
![]() Diena Kros wrote:
Diena Kros wrote:
Hoe zet en brei je makkelijker de mouwen er tussen vind dit best lastig om op de rondbrei naald te krijgen trekt vreselijk. En krijg grote gaten daardoor
28.01.2021 - 13:20DROPS Design answered:
Dag Diena,
Als je de mouwen en het lijf net hebt samengevoegd, kan het inderdaad nogal trekken, met name bij de oksels. Na een paar naalden wordt dit al een stuk beter. Wat ook helpt is de 'magic loop' techniek gebruiken op de lastige stukken. Zie deze video.
31.01.2021 - 20:04
![]() Marianne wrote:
Marianne wrote:
Forstår ikke forklaringen på bærestykke. Hvor feller man for å få det smalere oppover? 2. Linje " diag A1 (1.p = vrangen)(=12-12-13-13-15-15)23-254-25-27-25-27 rapporter i bredden til det gjenstår 6m,strikk 1.madke i A1 o.s.v GIR INGEN MENINg! Ferdig med armer og bærestykkeoppskriften gjør at alt stopper opp. Kan det forklares enklere???
01.03.2020 - 23:18DROPS Design answered:
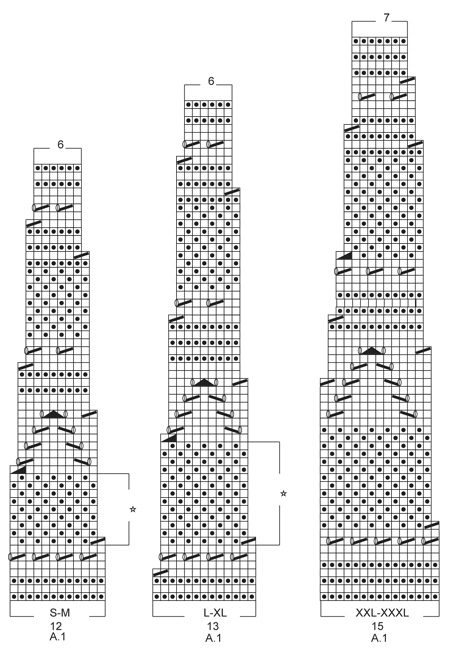
Hei Marianne, Du strikker stolpen - 5 masker rille, deretter diagram A.1, (den første pinnen er fra vrangen). A.1 er strikket flere ganger i bredden (antall er avhengig av størrelsen du strikker) fram til du har 6 masker igjen på raden, deretter første masken i A.1 og avslutter med 5 masker rille til stolpen. Hvis den første masken i A.1 er å strikke 2 rett sammen, endre man dette til å strikke 1 rett, slik at det er likt det andre forstykket. Dette mønsteret fortsettes oppover. Håper dette hjelper og god fornøyelse!
02.03.2020 - 10:16Alica007 wrote:
Hi, I have a question regarding diagram A1, how do I knit wrong side? Do I knit it as it comes, or every other row on diagram is ws. I don't know whether diagram A1 shows only rows as seen from right side. Kind regards, Alica
17.12.2016 - 19:44DROPS Design answered:
Hi Alica007. The diagram shows all the rows, so you don't knit it as it comes, but every other row on diagram is ws. IMPORTANT! 1st row = WS (see the explanation to the pattern). It means that 1st, 3rd, 5th row, etc. is WS, and 2nd, 4th, 6th row, etc is RS. Happy knitting!
18.12.2016 - 20:04
|
|||||||||||||||||||||||||
Lovely & Blue Cardigan |
|||||||||||||||||||||||||
|
|
|||||||||||||||||||||||||
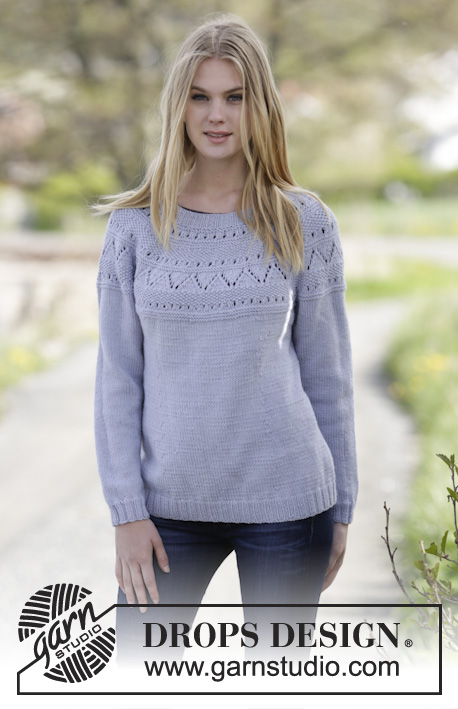
Knitted DROPS jacket with lace pattern, round yoke and seed st in ”Merino Extra Fine”. Size: S - XXXL.
DROPS Extra 0-1151 |
|||||||||||||||||||||||||
|
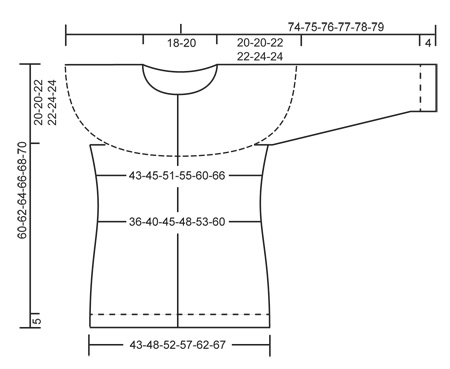
GARTER ST (back and forth): K all rows. 1 ridge = K2 rows. DECREASE TIP: Always dec from RS. Dec 1 st after 1st and 3rd marker as follows: K 2 tog. Dec 1 st before 2nd and 4th marker as follows: Work until 2 sts remain before marker, slip 1 st as if to K, K 1, psso. INCREASE TIP-1: Always inc from RS. Inc 1 st after 1st and 3rd marker as follows: Make 1 YO. Inc 1 st before 2nd and 4th marker as follows: Make 1 YO. On next round P YO twisted to avoid holes. INCREASE TIP-2: Work until 1 st remains before marker, 1 YO, K 2, 1 YO = 2 sts inc. On next round K YO twisted to avoid holes. PATTERN: See diagram A.1. The diagram shows all rows in pattern seen from RS. See diagram for correct size. BUTTONHOLES: Dec for buttonholes on right band from RS. 1 buttonhole = K tog 3rd and 4th st from mid front, then make 1 YO. Dec for buttonholes when piece measures: SIZE S: 3, 13, 22, 31, 40, 49 and 59 cm SIZE M: 5, 15, 24, 33, 42, 51 and 61 cm SIZE L: 7, 15, 23, 31, 39, 47, 55 and 63 cm SIZE XL: 8, 16, 24, 32, 40, 48, 56 and 65 cm SIZE XXL: 5, 12, 19, 26, 33, 41, 49, 58 and 67 cm SIZE XXXL: 5, 13, 21, 29, 37, 45, 53, 61 and 69 cm ---------------------------------------------------------- BODY: Worked back and forth on circular needle. Cast on 192-212-232-252-272-292 sts (includes 5 band sts in each side) on circular needle size 3 mm / US 2.5 with Merino Extra Fine. Work 5 band sts in GARTER ST - see explanation above - rib = K 2/P 2 until 7 sts remain, K 2, 5 band sts in garter st. When piece measures 5 cm / 2'', switch to circular needle size 4 mm / US 6 and work in stockinette st with 5 band sts in garter st in each side of piece while AT THE SAME TIME on first row dec 2 sts evenly = 190-210-230-250-270-290 sts. Work band sts in each side in garter st until finished measurements. REMEMBER THE KNITTING GAUGE Dec for BUTTONHOLES on right band - see explanation above. When piece measures 7 cm / 2¾'', insert 4 markers in the piece from RS as follows: 5 band sts in garter st, K 20-20-25-25-30-30, insert 1st marker, K 50-60-60-70-70-80, insert 2nd marker, K 40-40-50-50-60-60, insert 3rd marker, K 50-60-60-70-70-80, insert 4th marker, K 20-20-25-25-30-30, finish with 5 sts in garter st (= band sts). Move the markers upwards when working. On next row from RS, dec 1 st at every marker – Read DECREASE TIP = 4 sts dec on needle. NOTE: No of sts mid front and mid back is the same, dec in side sts. Repeat dec every 8th-8th-8th-6th-6th-8th row 6-7-7-9-8-6 more times = 162-178-198-210-234-262 sts. Continue in stockinette st until piece measures 30 cm / 11 3/4''. On next row from RS, inc 1 st at every marker – Read INCREASE TIP-1 = 4 sts inc on needle. NOTE: No of sts mid front and mid back is the same, inc in side sts. Repeat inc every 4th-6th-4th-4th-4th-6th row 6-4-6-7-6-5 more times = 190-198-226-242-262-286 sts. Continue in stockinette st and in garter st over band sts until piece measures 40-42-42-44-44-46 cm / 15 3/4"-16½"-16½"-17 1/4"-17 1/4"-18". Then work 1 ridge over all sts (first row from RS) AT THE SAME TIME on first row dec 3-7-2-0-0-2 sts evenly = 187-191-224-242-262-284 sts. Then bind off for armholes on next row from RS as follows: 5 band sts in garter st, K 38-39-47-52-57-62 sts, bind off the next 12 sts, K 77-79-96-104-114-126 sts, bind off the next 12 sts, K 38-39-47-52-57-62 sts, finish with 5 band sts in garter st = 163-167-200-218-238-260 sts. Put piece aside and knit the sleeves. SLEEVE: Worked in the round on double pointed needles. Cast on 48-52-52-56-56-60 sts on double pointed needles size 3 mm / US 2.5 with Merino Extra Fine. Work rib = K 2/P 2. When piece measures 4 cm / 1½'', switch to double pointed needles size 4 mm / US 6. Continue in stockinette st and dec 2-4-2-4-4-6 sts evenly on first round = 46-48-50-52-52-54 sts. Insert 1 marker at the beg of the round. When piece measures 14-14-14-12-10-8 cm / 5½"-5½"-5½"-4 3/4"-4"-3", inc 1 st on each side of marker - READ INCREASE TIP-2, repeat inc every 2 cm / 3/4'' 13-14-14-15-16-17 more times = 74-78-80-84-86-90 sts. When piece measures 45-45-45-44-44-44 cm / 17 3/4"-17 3/4"-17 3/4"-17 1/4"-17 1/4"-17 1/4" (shorter measurements in the larger sizes because of longer yoke), bind off 12 sts mid under sleeve (i.e. Bind off 6 sts on each side of marker) = 62-66-68-72-74-78 sts. Put piece aside and make another sleeve. YOKE: Slip sleeves on to same circular needle as body where armholes were bound off (do not work the sts when slipping them on to the same needle) = 287-299-336-362-386-416 sts. Work 5 band sts in garter st, diagram A.1 (1st row = WS) (= 12-12-13-13-15-15 sts) 23-24-25-27-25-27 repetitions in width until 6 sts remain, work first st in A.1 (so that pattern is the same in each side towards mid front, if first st is 2 K tog, K last st) and finish with 5 band sts in garter st. Continue the pattern like this until 5 rows remain in diagram = 149-155-161-173-186-200 sts. Continue pattern as before AT THE SAME TIME on last row from RS dec 33-35-33-41-50-56 sts evenly = 116-120-128-132-136-144 sts. Switch to circular needle size 3 mm / US 2.5. Work as follows from RS: 5 band sts in garter st, rib (= K 2/P 2) until 7 sts remain, K 2, finish with 5 band sts in garter st. Bind off with garter st over garter st, K over K and P over P when rib measures 4 cm / 1½''. ASSEMBLY: Sew the opening under the sleeve. Sew on buttons on left band. |
|||||||||||||||||||||||||
Diagram explanations |
|||||||||||||||||||||||||
|
|||||||||||||||||||||||||
|
|||||||||||||||||||||||||
|
|||||||||||||||||||||||||
Have you finished this pattern?Tag your pictures with #dropspattern or submit them to the #dropsfan gallery. Do you need help with this pattern?You'll find 28 tutorial videos, a Comments/Questions area and more by visiting the pattern on garnstudio.com. © 1982-2025 DROPS Design A/S. We reserve all rights. This document, including all its sub-sections, has copyrights. Read more about what you can do with our patterns at the bottom of each pattern on our site. |
|||||||||||||||||||||||||


With over 40 years in knitting and crochet design, DROPS Design offers one of the most extensive collections of free patterns on the internet - translated to 17 languages. As of today we count 314 catalogs and 11822 patterns - 11812 of which are translated into English (US/in).
We work hard to bring you the best knitting and crochet have to offer, inspiration and advice as well as great quality yarns at incredible prices! Would you like to use our patterns for other than personal use? You can read what you are allowed to do in the Copyright text at the bottom of all our patterns. Happy crafting!
Post a comment to pattern DROPS Extra 0-1151
We would love to hear what you have to say about this pattern!
If you want to leave a question, please make sure you select the correct category in the form below, to speed up the answering process. Required fields are marked *.