
Looking for a yarn?


Comments / Questions (18)
![]() Christine Harper wrote:
Christine Harper wrote:
DROPS Precious Piper pattern has finally defeated me. I have watched the videos, reread the pattern countless times but still cannot do the \'elevation in the neck with short rows\'. It would be helpful if the instructions referred to LH or RH needle too.\r\nI cant work out if I am knitting the sides up to form a shallow dip at the back kneck OR a higher collar at the back ! The pattern picture and diagram don\'t show either.\r\nVERY GRATEFUL for a way ahead please !!
28.06.2025 - 15:20
![]() Ana Ramirez wrote:
Ana Ramirez wrote:
Hei det gjelder knappene. Jeg forstår at den første knapphul strikkes i 4 cm. Og at arbeidet strikkes nedenfra og opp. Også på hvilke side skal man strikke disse.? På candy bar jacket er det omvendt side.
21.05.2025 - 14:56DROPS Design answered:
Hej Ana, Knaphullerne skal strikke på højre forstykke, billedet er spejlvendt :)
23.05.2025 - 07:52
![]() Sabine wrote:
Sabine wrote:
Ahh, die Frage hatte bereits jemand gestellt. Also \"dabei in der nächsten R\" kann man ersetzen durch \"danach in der nächsten Hinreihe\".
24.01.2025 - 13:33
![]() Sabine wrote:
Sabine wrote:
Gilt diese Aussage (s. u.) für die nächste HIN-Reihe NACH den 4-6 cm Arbeit, oder wann sind die Abnahmen zu machen? "Zu Rundnadel Nr. 4 wechseln und für die Rundpasse alle M (4) 4-5-5-6-6 cm kraus re hin- und zurückstr, dabei in der nächsten R (30) 32-38-40-42-42 M gleichmäßig verteilt abnehmen
24.01.2025 - 12:46DROPS Design answered:
Liebe Sabine, ja genau, nehmen Sie regelmäßig verteilt ab, wenn die Arbeit 4-6 cm misst, dh bei der 1. Hinreihe mit der Rundnadeln Nr 4. Viel Spaß beim Stricken!
24.01.2025 - 13:58
![]() Jane Low wrote:
Jane Low wrote:
Completion of the yoke 61 stitches. I don’t understand the last few rows. If I am knitting 14 stitches across and return then 18 stitches across and return do I then do the other front the same then pick up all the stitches and knit across and bind off? Having 61 stitches and knitting 18+ 18 + 22 isn’t 61 stitches so where are the other three? I am lost with the last paragraph of instruction.
09.04.2024 - 03:53DROPS Design answered:
Hi Jane, You do not change the number of stitches while working short rows, you just work at the back of the neck to make this a little higher than the front: First work until there are 14 stitches left on the row and turn (without completing the row). Work back until there are14 stitches left on next row, then turn and work until there are 18 stitches left before turning. Continue like this for the correct number of rows and to the correct number of stitches each time before turning. Then work to the end of the next row and work 3 complete rows before binding off. Happy knitting!
09.04.2024 - 06:45
![]() Véronique wrote:
Véronique wrote:
Bonjour, Est-ce que tout l empiècement est tricoté avec une aiguille n° 4 ? Ce n’est pas très clair dans les explications et ce n’est pas précisé dans les avant-propos. Merci de votre retour. Bien cordialement.
19.01.2024 - 11:34DROPS Design answered:
Bonjour Véronique, vous tricotez le début de l'empiècement avec la même aiguille que lorsque vous avez arrêté le dos/les devants et les manches, autrement dit une aiguille 5 et diminuez pour le raglan. Vous ne changerez pour l'aiguille circulaire 4 que lorsque ces diminutions ont été faites, et vous tricotez alors toutes les mailles au point mousse (plus en jersey avec les mailles de bordure devant au point mousse) en diminuant comme indiqué. Bon tricot!
19.01.2024 - 16:02
![]() Lena Brønsholt wrote:
Lena Brønsholt wrote:
Der står i opskriften, at efter at ærmerne er sat på, så står der: “Fortsæt i GLATSTRIK”!? Men det ligner bare på foto, at der er strikket RETSTIK?! Hvad skal skal man strikke i bærestykket? Mvh. Lena Brønsholt
21.10.2023 - 17:23DROPS Design answered:
Hej Lena, ærmerne er strikket i glatstrik og bærestykket i retstrik :)
24.10.2023 - 08:53
![]() Mona Møller wrote:
Mona Møller wrote:
Hej Jeg er rigtig glad for at strikke Drops Children 26-12 opskriften med drops Air garn. Jeg kunne godt tænke mig at strikke den i damestørrelse/voksenstørrelse. Mon der findes en opskrift jeg kan bruge?
21.10.2021 - 11:25DROPS Design answered:
Hej Mona. Denna opskrift (150-6) kan du sticka i DROPS Air. Mvh DROPS Design
21.10.2021 - 12:06
![]() Simona Šottníková wrote:
Simona Šottníková wrote:
Robím sveter precious children. Teraz mám previesť rukávy k trupu na jednu ihlicu. Ako ďalej hackovat, keď mám vlastne tri diely (dva rukávy a trup) a každý má svoje vlastné klbko? Vopred ďakujem za radu 😳
25.01.2021 - 11:56DROPS Design answered:
Dobrý den, Simono! Nejsnazží způsob, jak díly spojit, je připlést je: budete plést trup a ve chvíli, kdy dojdete k prvnímu průramku, budete pokračovat pletením ok prvního rukávu - tou samou přízí (= klubíčko, kterým pletete trup). Když připletete rukáv, pokračujete pletením další část trupu, pak opět rukáv a zbytek trupu. Klubka od rukávů prostě odstřihnete :-) (nechte si delší konec na začištění a zapošití). Hodně zdaru! Hana
25.01.2021 - 16:47
![]() Marion Richter wrote:
Marion Richter wrote:
Was bedeutet "dabei in der nächsten R " sollen erst die (4) cm kraus rechts gestrickt werden und dann abnehmen oder sofort abnehnem wenn alle Maschen auf der der Nadel sind??? Zu Rundnadel Nr. 4 wechseln und für die Rundpasse alle M (4) 4-5-5-6-6 cm kraus re hin- und zurückstr, dabei in der nächsten R (30) 32-38-40-42-42 M gleichmäßig verteilt abnehmen (jedoch nicht bei den Blenden-M abnehmen)
15.10.2020 - 15:38DROPS Design answered:
Liebe Frau Richter, nach der Abnahmen für den Raglan stricken Sie jetzt mit den Nadeln Nr4 4 cm (in die 1. Grösse) kraus rechts in die 1. Grösse, bei der nächsten Reihe (nach diesen 4 cm krausrechts), nehmen Sie 30 Maschen regelmäßig verteilt ab und stricken jetzt kraus rechts weiter. Hier wird es erklärt, wie man regelmäßig verteilt abnimmt. Viel Spaß beim stricken!
15.10.2020 - 16:45
|
|
Precious Piper#preciouspipercardigan |
|
 |
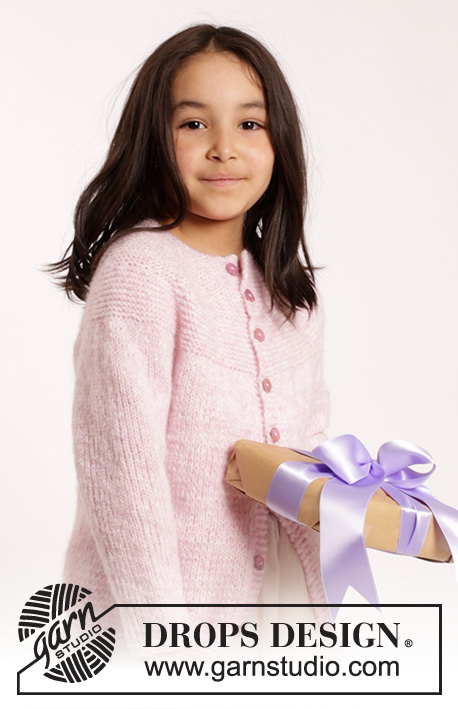 |
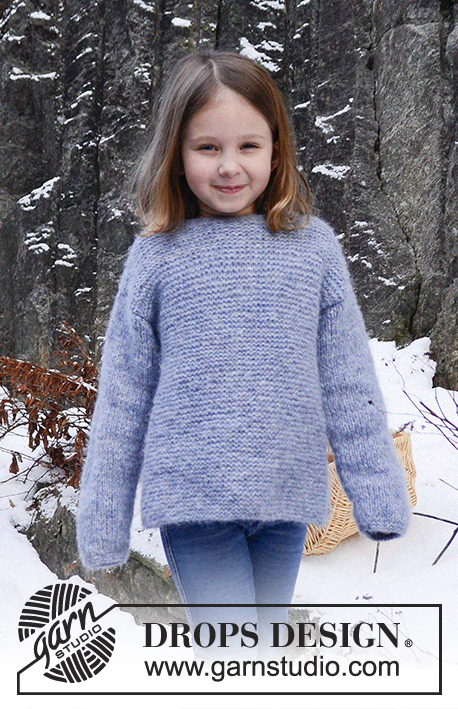
Knitted cardigan in stockinette st and garter st with round yoke in DROPS Air or DROPS Paris. Size children 1 - 10 years.
DROPS Children 26-12 |
|
|
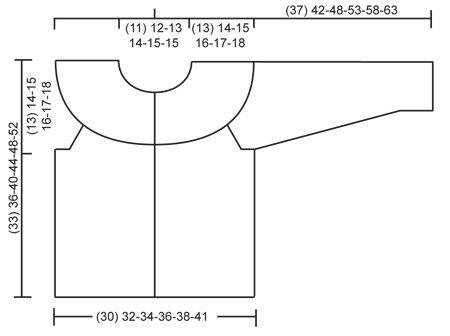
GARTER ST (back and forth): K all rows. 1 ridge = K2 rows. GARTER ST (worked in the round): * K 1 round and P 1 round *, repeat from *-*. 1 ridge = 2 rounds. BUTTONHOLES: Dec for buttonholes on right band. 1 buttonhole = K tog third and fourth st from edge and make 1 YO. On next row K the YO. Dec for buttonholes when piece measures: SIZE 12/18 MONTHS: 4, 10, 16, 22, 27 and 32 cm / 1½",4",6¼",8¾",10½",12½". SIZE 2 YEARS: 4, 11, 18, 25, 30 and 35 cm / 1½",4½",7",9¾",11¾",13¾". SIZE 3/4 YEARS: 4, 10, 16, 22, 28, 34 and 39 cm / 1½",4",6¼",8¾",11",13½",15¼". SIZE 5/6 YEARS: 4, 11, 18, 25, 32, 38 and 43 cm / 1½",4½",7",9¾",12½",15",17" SIZE 7/8 YEARS: 5, 11, 17, 23, 29, 35, 41 and 47 cm / 2",4½",6¾",9",11½",13¾",16",18½". SIZE 9/10 YEARS: 4, 11, 18, 25, 32, 39, 45 and 51 cm / 1½",4½",7",9¾",12½",15¼",17¾",20". RAGLAN: Dec for raglan in every transition between sleeves and body. All dec are done from RS! Beg 2 sts before marker, K 2 tog, slip 1 st as if to K, K 1, psso (= 2 sts dec). ---------------------------------------------------------- JACKET: BODY: Worked back and forth on circular needle from mid front. Cast on (111) 119-123-131-139-147 sts on circular needle size 4 mm / US 6 with Air or Paris and work 2 ridges in GARTER ST - see explanation above. Switch to circular needle size 5 mm / US 8 and work in stockinette st with 5 sts in garter st in each side (= bands). Remember BUTTONHOLES on right band - see explanation above. REMEMBER THE KNITTING GAUGE When piece measures (20) 22-25-28-31-34 cm / (8") 8¾"-9¾"-11"-12¼"-13½", work next row from RS as follows: Work (27) 29-30-32-34-36 sts as before (= right front piece), bind off 6 sts for armhole, work (45) 49-51-55-59-63 sts as before (= back piece), bind off 6 sts for armhole and work the last (27) 29-30-32-34-36 sts (= left front piece). SLEEVE: Worked in the round on double pointed needles. Cast on (27) 29-31-31-33-33 sts on double pointed needle size 4 mm / US 6 with Air or Paris. Work 2 ridges in GARTER ST - see explanation above. Switch to double pointed needles size 5 mm / US 8 and work in stockinette st. When piece measures (4) 4-6-7-8-10 cm / (1½") 1½"-2½"-2¾"-3"-4", inc 2 sts mid under sleeve. Repeat inc every 2 cm / ¾" a total of (7) 9-9-11-12-13 times = (41) 47-49-53-57-59 sts. When piece measures (18) 22-26-30-33-37 cm / (7") 8¾"-10¼"-11¾"-13"-14½", bind off 6 sts mid under sleeve = (35) 41-43-47-51-53 sts remain on needle. Put piece aside and make another sleeve. YOKE: Slip sleeves on to same circular needle as body where armholes were bound off = (169) 189-197-213-229-241 sts. Insert 1 marker in every transition between sleeves and body = 4 markers. Continue in stockinette st with 5 band sts in garter st in each side (1st row = P from WS). On next row from RS dec for RAGLAN - see explanation above, in every transition between body and sleeves (= 8 sts dec). Repeat dec on every row from RS (2) 3-3-4-4-5 times in total = (153) 165-173-181-197-201 sts remain on needle. Insert 1 marker – NOW MEASURE PIECE FROM HERE. Switch to circular needle size 4 mm / US 6 and work in garter st back and forth over all sts for (4) 4-5-5-6-6 cm / (1½") 1½"-2"-2"-2½"-2½". On next row, dec (30) 32-38-40-42-42 sts evenly (do not dec over bands) = (123) 133-135-141-155-159 sts. Continue in garter st until piece measures (8) 8-9-9-10-10 cm / (3") 3"-3½"-3½"-4"-4". On next row, dec (36) 38-38-40-46-48 sts evenly (do not dec over bands) = (87) 95-97-101-109-111 sts. Continue in garter st until piece measures (11) 11-12-12-13-13 cm / (4½") 4½"-4¾"-4¾"-5"-5". Dec (40) 42-42-44-48-50 sts evenly = (47) 53-55-57-61-61 sts remain on needle. Continue to work an elevation in the neck with short rows as follows (1st row = from RS): K until (10) 11-12-13-14-14 sts remain on needle, turn and K back until (10) 11-12-13-14-14 sts remain in the other side. Turn and K until (14) 15-16-17-18-18 sts remain on needle, turn and K back until (14) 15-16-17-18-18 sts remain in the other side. Turn and K until (18) 19-20-21-22-22 sts remain on needle, turn and K back until (18) 19-20-21-22-22 sts remain in the other side. Turn piece and K the rest of row, then K 1 row from WS, K 1 row from RS and K 1 row from WS. Then bind off with K from RS. Piece measures approx. (33) 36-40-44-48-52 cm / (13") 14¼"-15¾"-17¼"-19"-20½" up to shoulder. ASSEMBLY: Sew the openings under the sleeves. Sew the buttons on to left front piece. |
|
|
|
Have you finished this pattern?Tag your pictures with #dropspattern #preciouspipercardigan or submit them to the #dropsfan gallery. Do you need help with this pattern?You'll find 22 tutorial videos, a Comments/Questions area and more by visiting the pattern on garnstudio.com. © 1982-2025 DROPS Design A/S. We reserve all rights. This document, including all its sub-sections, has copyrights. Read more about what you can do with our patterns at the bottom of each pattern on our site. |
|


With over 40 years in knitting and crochet design, DROPS Design offers one of the most extensive collections of free patterns on the internet - translated to 17 languages. As of today we count 314 catalogs and 11821 patterns - 11811 of which are translated into English (US/in).
We work hard to bring you the best knitting and crochet have to offer, inspiration and advice as well as great quality yarns at incredible prices! Would you like to use our patterns for other than personal use? You can read what you are allowed to do in the Copyright text at the bottom of all our patterns. Happy crafting!
Post a comment to pattern DROPS Children 26-12
We would love to hear what you have to say about this pattern!
If you want to leave a question, please make sure you select the correct category in the form below, to speed up the answering process. Required fields are marked *.