
Popular categories
Looking for a yarn?


Comments / Questions (232)
![]() Fia wrote:
Fia wrote:
Jag stickar efter XL, och det står att "när a4 har skickats en gång på höjden, stickas slätstickning över alla maskor. När arbetet mäter 21 cm..." Nu är det bara det att när jag har stickat a4, så mäter arbetet 24 cm. Vad gör jag för fel?
16.06.2025 - 10:47DROPS Design answered:
Hei Fia. Stemmer strikkefastheten din i høyden? Og måler du fra riktig sted? Når du har 222 masker på pinnen settes det en merketråd som det da skal måles fra. mvh DROPS Design
23.06.2025 - 09:03
![]() Anne-Helene wrote:
Anne-Helene wrote:
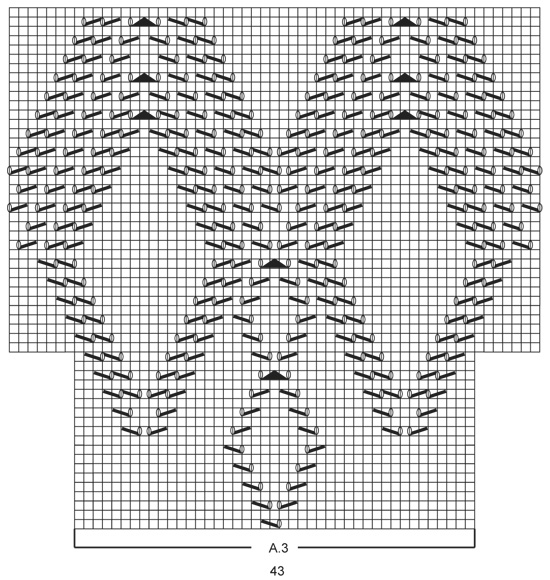
« Tricoter les augmentations en jersey jusqu'à ce qu'elles puissent être tricotées en point fantaisie comme dans A.3. » Je ne comprends pas cette phrase, pouvez-vous expliquer ce qu’il faut faire ?
09.06.2025 - 17:16DROPS Design answered:
Bonjour Anne-Hélène, A.3 commence sur 43 mailles mais après quelques rangs vous tricoterez A.3 sur davantage de mailles, en attendant, tricotez les nouvelles mailles en jersey (tant que vous n'avez pas suffisamment de mailles pour tricoter (1 jeté, 1 diminution), tricotez les augmentations en jersey pour éviter de changer le nombre de mailles). Bon tricot!
10.06.2025 - 10:59
![]() Anja wrote:
Anja wrote:
Hallo, wird bei der Raglanzunahme über die rechts verschränkt Masche in der nächsten Reihe normal rechts gestrickt?
16.05.2025 - 22:19DROPS Design answered:
Liebe Anja, ja genau, diese rechts verschränkte Masche wurde so gestrickt, damit kein Loch entsteht, so wird sie später nur ganz normal gestrickt. Viel Spaß beim Stricken!
19.05.2025 - 07:25
![]() Annette wrote:
Annette wrote:
Lege ich die Ärmel bei Größe S still, sobald ich mit den Raglanzunahmen fertig bin?
18.04.2025 - 11:27DROPS Design answered:
Liebe Annette, die Arbeit soll ca 14 cm (in der vorderen Mitte) messen, wenn sie kürzer ist, dann stricken Sie bis 14 cm (ohne weitere Zunahmen), dann teilen Sie die Arbeit auf. Viel Spaß beim Stricken!
22.04.2025 - 11:23
![]() Sanne Hein wrote:
Sanne Hein wrote:
Hej ❤️ Findes der forslag til, hvordan jeg kan gøre halsen mindre? Som jeg ser det, vil det være svært, at bære kjolen med BH uden stropperne kan ses. Kh Sanne
27.02.2025 - 18:56DROPS Design answered:
Hej Sanne, Vi kan ikke skrive opskriften om, så det er kun et forslag hvis du selv kan gennemføre det :) Hvis du feks slår færre antal masker op (8 m pr udtagningsomgang - dvs feks 24 masker mindre), starter raglanudtagningen og når du har taget ud 8 m 3 gange = 24m, så har du det antal masker hvor du skal starte med mønsteret, så fortsætter du ifølge opskriften.
06.03.2025 - 11:34
![]() Xènia Morraja I Brau wrote:
Xènia Morraja I Brau wrote:
Hola, hay alguna actualización de los diagramas (A3 y A4)? Lo pregunto porque no me esta saliendo el dibujo plano. ( Me salen mas agujeros que en la foto inicial).
21.02.2025 - 23:33DROPS Design answered:
Hola Xènia, si el dibujo no te sale plano puede ser que tu tensión del tejido no sea la correcta. ¿Cómo te salen más agujeros que en la foto? ¿Son los agujeros más grandes o el diseño es diferente?
23.02.2025 - 23:40
![]() Xenia wrote:
Xenia wrote:
Hola, como puedo hacer los agujeros marcados de los diagramas?
06.02.2025 - 08:52DROPS Design answered:
Hola Xenia, ¿a qué te refieres con los agujeros? Las hebras son los óvalos entre puntos y se trabajan como 1 hebra entre 2 puntos, que se trabaja de derecho o revés en la siguiente fila, para que no queden agujeros. Si te refieres a los huecos en el diagrama A.6, trabajas el primer punto de la siguiente repetición, de esta fila (que como ves sobresale un poco) al inicio del diagrama.
09.02.2025 - 22:50
![]() Annette wrote:
Annette wrote:
Hallo liebes Dropsteam, ich verstehe das mit den Markierern nicht. Was bedeutet in die Masche setzen? Ich kenne es nur so, dass der Markierer zwischen zwei Maschen auf die Stricknadel gesetzt wird. Viele Grüße Annette
04.02.2025 - 17:11DROPS Design answered:
Liebe Annette, hier will man 1 Masche markieren, so wird man die Markierungen in dieser Masche einsetzen, als Beispiel zeigen wir in diesem Video wie man eine Masche (mit einem Markierungsfaden im Video) markiert. Viel Spaß beim Stricken!
05.02.2025 - 07:45
![]() Kayden wrote:
Kayden wrote:
Hello! None of the images on the site are loading for me, so I can't see the diagrams to be able to work the pattern. Are the diagrams available anywhere else, or could I perhaps get a PDF of the pattern with the diagrams emailed to me? It looks like a very lovely pattern from what I've seen on Ravelry. Thank you!
15.12.2024 - 05:58DROPS Design answered:
Dear Kayden, you can download your favourite patterns by clicking on the "Print" icon and then selecting "Save as PDF" in your printer settings. Sometimes images may not load correctly because there is a lot of traffic in the webpage at that moment; please try later or with a different browser and the problem should be solved. Happy knitting!
15.12.2024 - 20:36
![]() Tiina wrote:
Tiina wrote:
Hei! Miten minun kuuluu aloittaa A6 rivi nro 35? Jos neulon kaksi ensimmäistä oikein + 2yhteen+langankierto, kuten ohjeen ymmärrän, kuvio siirtyy minulla väärään kohtaan.
21.08.2024 - 16:59DROPS Design answered:
Hei, neulo aluksi 3 oikeaa silmukkaa, tee sitten kavennus + langankierto, neulo 1 silmukka oikein, tee kavennus + langankierto, tee kavennus + langankierto jne. Viimeinen kavennus + langankierto tehdään mallikerran viimeisen silmukan ja seuraavan mallikerran ensimmäisen silmukan kohdalla.
21.08.2024 - 17:26
|
|||||||||||||||||||
Summer Feeling#summerfeelingdress |
|||||||||||||||||||
 |
 |
||||||||||||||||||
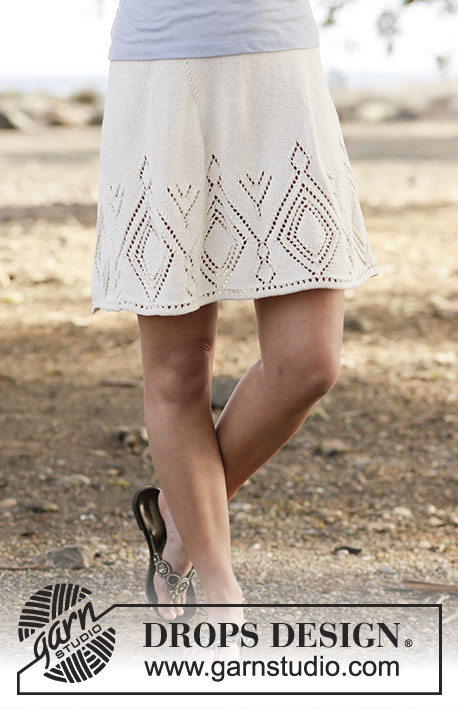
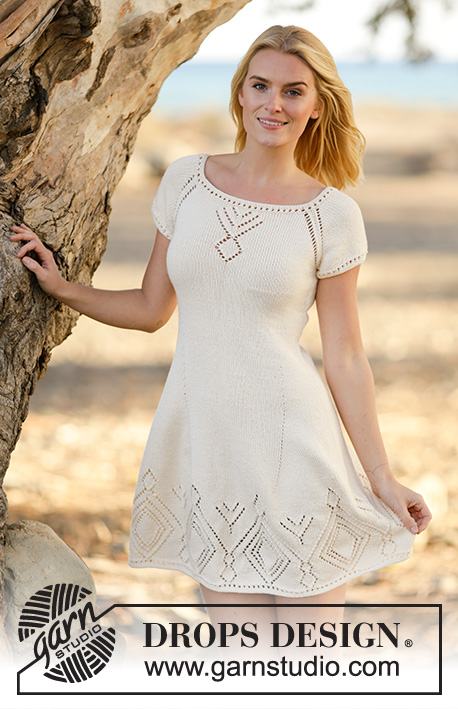
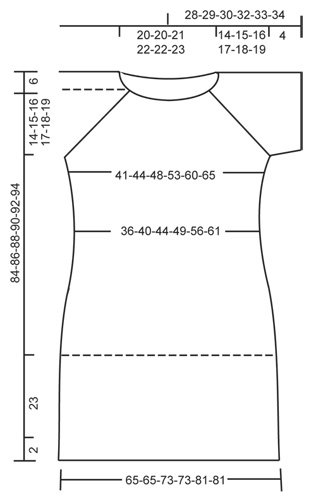
Knitted DROPS dress with lace pattern and raglan in ”Muskat” or "Belle". Worked top down. Size: S - XXXL.
DROPS 160-1 |
|||||||||||||||||||
|
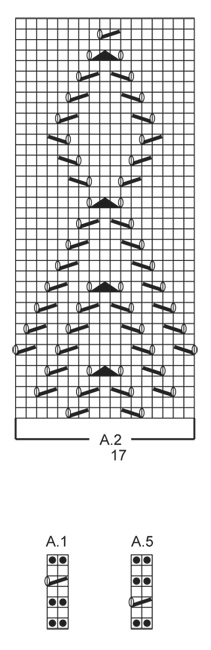
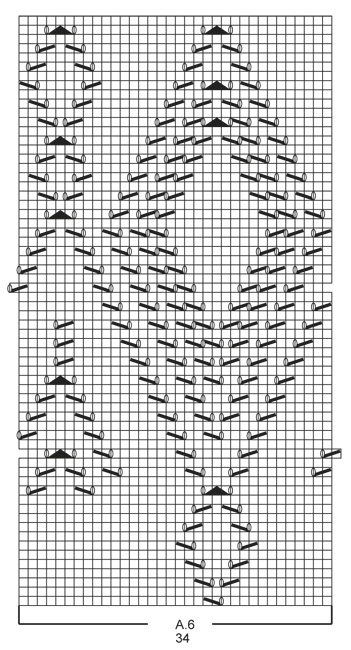
PATTERN: See diagrams A.1 to A.6. DECREASE TIP: Dec 1 st before marker as follows: Work until 2 sts remain before marker, slip 1 st as if to K, K 1, psso. Dec 1 st after marker as follows: K 2 tog. RAGLAN: Inc differently for raglan in the different sizes: SIZE S-M: Inc 1 sts on each side of each marker (= 8 sts inc in total) as follows: 1 YO, K 1 twisted, K 1 (= st with marker), K 1 twisted, 1 YO. NOTE: The inc on each sides of 1st marker (= in the last st on round) is worked as follows: at beginning of round, K 1 twisted, 1 YO. At the end of round: 1 YO, K 1 twisted, K.1 (= st with marker) Do not work YOs twisted on next round, they should make holes, repeat inc every other round 17-19 more times. SIZE L-XL-XXL-XXXL: Inc 2 sts on each side of each marker (= 16 sts inc in total each round) as follows: 1 YO, K1, 1 YO, K 1 twisted, K 1(= st with marker), K 1 twisted, 1 YO, K 1, 1 YO (first and last YO is worked twisted on next round, it should not make a hole but, the 2 midle YO should be K as normal and make a hole). Repeat inc on every other round 1-1-1-3 more times. NOTE: The inc on eich side of 1st marker(= in the last st on round) is worked as follows: at beginning of round, K 1 twisted, 1 YO, K 1, 1 YO. At the end of round: 1 YO, K 1, 1 YO, K 1 twisted, K.1 (= st with marker) Then inc like as follows: Inc 1 sts at each side of each marker (= 8 sts inc in total) as follows: 1 YO, K 1 twisted, K 1(= st with marker), K 1 twisted, 1 YO. Do not K YOs twisted on next round, they should make holes. Repeat inc every other round 19-20-22-21 more times in total. INCREASE TIP: Inc 1 st by making a YO. On next round K YO twisted to avoid holes. ---------------------------------------------------------- YOKE: Worked in the round on circular needle, top down. Cast on 134-134-140-144-144-148 sts on circular needle size 3.5 mm / US 4 with Muskat or "Belle". Work A.1 (= 2 sts) over all sts. When A.1 has been worked 1 time vertically, switch to circular needle size 4 mm / US 6. On next round K all sts and inc 16-20-14-22-42-46 sts evenly = 150-154-154-166-186-194 sts. On next round insert 4 markers in the midle st of each raglan as follows: Insert 1st in last st on round, K 45-47-49-55-65-71 sts (= front piece), K 1 sts and insert 2nd marker in this st, K 28-28-26-26-26-24 sts (= sleeve), K 1 sts and insert 3rd marker in this st, K 45-47-49-55-65-71 sts (= back piece), K 1 st and insert 4th marker in this st, K 28-28-26-26-26-24 sts (= sleeve). K 1 sts (1st marker is placed in this st). REMEMBER THE KNITTING GAUGE Then work as follows - AT THE SAME TIME inc for RAGLAN - see explanation above. Work half the raglan inc for 1st marker (see explanation above) K 13-14-14-17-22-25 K 14-15-16-19-24-27 sts, A.2 (= 17 sts), K until 1-1-2-2-2-2 st remains before 2nd marker, work RAGLAN - see explanation above, K until 1-1-2-2-2-2 sts remain before 3rd marker, work raglan, K 0-1-1-4-9-12 sts, A.3 (= 43 sts), K until 1-1-2-2-2-2 st remains before 4th marker, work raglan, K until 1-1-2-2-2-2 sts remain before 1st marker, work raglan. Work the inc sts in stockinette st until they can be worked in pattern as shown in A.3. When A.2 has been worked 1 time vertically, work in stockinette st over all these sts. When A.3 has been worked 1 time vertically, work A.4 (= 57 sts) over A.3. After all inc are done there are 294-314-338-358-394-426 sts on needle. Piece measures approx. 14-15-16-17-18-19 cm / 5½"-6"-6¼"-6¾"-7"-7½". Continue with pattern and stockinette st as before AT THE SAME TIME work as follows: Work the first 81-87-95-103-117-129 sts (= front piece), slip the next 66-70-74-76-80-84 sts on a stitch holder for sleeve, cast on 6-6-6-8-8-8 sts under sleeve (insert a marker in the middle of the new sts), work the next 81-87-95-103-117-129 sts (= back piece), slip the next 66-70-74-76-80-84 sts on a stitch holder for sleeve, cast on 6-6-6-8-8-8 sts under sleeve (insert a marker in the middle of the new sts) = 174-186-202-222-250-274 sts remain on needle. Insert 1 marker in piece, NOW MEASURE PIECE FROM HERE. Continue to work A.4 and stockinette st over the remaining sts. When piece measures 3 cm / 1", dec 1 st on each side of each markers in the sides (= 4 sts dec) - READ DECREASE TIP! Repeat dec every 2½-4-4-4-4-4 cm / ⅞"-1½"-1½"-1½"-1½"-1½" 5-3-3-3-3-3 more times = 150-170-186-206-234-258 sts. When A.4 has been worked 1 time vertically, work in stockinette st over all sts. When piece measures 18-19-20-21-22-23 cm / 7"-7½"-8"-8¼"-8¾"-9" insert 4 markers as follows: Work 15-17-19-21-25-27 sts, insert 1st marker, work 45-51-55-61-67-75 sts, insert 2nd marker, work 30-34-38-42-50-54 sts, insert 3rd marker, work 45-51-55-61-67-75 sts, insert 4th marker, work the remaining 15-17-19-21-25-27 sts. 1st and 2nd marker are on front piece, and 3rd and 4th marker are on back piece. Move the markers upwards when working. On next round inc 1 st before 1st and 3rd marker and 1 st after 2nd and 4th marker (= 4 sts inc) - READ INCREASE TIP. NOTE: No of sts mid front and mid back is the same, inc in side sts. Repeat inc every 6th round 1 more time, then every 4th round 6-5-6-5-6-10 times, then every other round 22-18-22-18-18-8 times = 270-270-306-306-338-338 sts. On next round, inc 2-2-0-0-2-2 sts evenly = 272-272-306-306-340-340 sts. Work in stockinette st until piece measures 45-46-47-48-49-50 cm / 17¾"-18"-18½"-19"-19¼"-19¾" (or desired length, approx. 25 cm / 9¾" remain). Then work A.6 (= 34 sts) 8-8-9-9-10-10 times in total in width. When A.6 has been worked 1 time vertically, switch to circular needle size 3.5 mm / US 4. Work A.5 over all sts. Bind off. SLEEVE: Worked in the round on double pointed needles. Slip sts from stitch holder back on double pointed needles size 4 mm / US 6 and cast on 6-6-6-8-8-8 sts under sleeve = 72-76-80-84-88-92 sts. Work in stockinette st for 2 cm / ¾", on next round dec 8 sts evenly = 64-68-72-76-80-84 sts. Switch to double pointed needles size 3.5 mm / US 4. Work A.5 over all sts. Bind off. Work the other sleeve the same way. |
|||||||||||||||||||
Diagram explanations |
|||||||||||||||||||
|
|||||||||||||||||||
|
|||||||||||||||||||
|
|||||||||||||||||||

|
|||||||||||||||||||
|
|||||||||||||||||||
|
|||||||||||||||||||
Have you finished this pattern?Tag your pictures with #dropspattern #summerfeelingdress or submit them to the #dropsfan gallery. Do you need help with this pattern?You'll find 24 tutorial videos, a Comments/Questions area and more by visiting the pattern on garnstudio.com. © 1982-2025 DROPS Design A/S. We reserve all rights. This document, including all its sub-sections, has copyrights. Read more about what you can do with our patterns at the bottom of each pattern on our site. |
|||||||||||||||||||


With over 40 years in knitting and crochet design, DROPS Design offers one of the most extensive collections of free patterns on the internet - translated to 17 languages. As of today we count 314 catalogs and 11822 patterns - 11812 of which are translated into English (US/in).
We work hard to bring you the best knitting and crochet have to offer, inspiration and advice as well as great quality yarns at incredible prices! Would you like to use our patterns for other than personal use? You can read what you are allowed to do in the Copyright text at the bottom of all our patterns. Happy crafting!
Post a comment to pattern DROPS 160-1
We would love to hear what you have to say about this pattern!
If you want to leave a question, please make sure you select the correct category in the form below, to speed up the answering process. Required fields are marked *.