
Looking for a yarn?


Comments / Questions (13)
![]() Carmen-Gabriela wrote:
Carmen-Gabriela wrote:
Hallo:) Wie strickt man den Zier-Lochstreifen Raglan von unten nach oben beim Träger zum VT/RT? Ich lese leider nichts von Umschlägen bei den Abnahmen. (Evtl. doppelte Abn + 1 Umschl.?) Es sieht so klasse zu den Rippen aus:)
01.04.2020 - 17:52DROPS Design answered:
Liebe Carmen-Gabriela, es sind keine Löcher bei den Trägern/bei der Passe, es wird beidseitig von jeder Markierung wie unter ABNAHMETIPP abgenommen. Viel Spaß beim stricken!
02.04.2020 - 07:45
![]() Melanie Visser wrote:
Melanie Visser wrote:
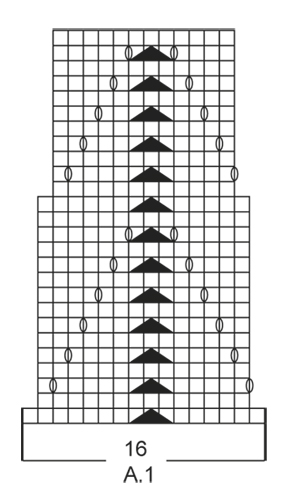
Having difficulty reading the graph. The O is on a line should it be in the box. Does that O mean you work the yo using the 2 stitches and then move to knitting 4 stitches the triangle configuration. Then 4 knit 4 stitches then yo then knit 1 stitch the yo again then Knit 4 stitches then triangle etc. The end of row of knit this way didn’t work out. Is this the way it should be read.
14.03.2020 - 22:54DROPS Design answered:
Dear Melanie, the first row of the pattern is K6, *K2TOG PSSO, K7* and repeat *-*. In the third row: *YO, K5, SKIP 1, K2TOG, PSSO, K5, YO, K1.* And repeat *-*. And so forth. Thus, the "O" means you have to do a yarn over between 2 stitches. and the triangle means you have to slip 1 stitch, knit 2 stitch together and then pass teh slipped stitch over the knitted together stitches. I hope this helps. Happy Knitting!
15.03.2020 - 14:55
![]() Marzhina wrote:
Marzhina wrote:
Bonjour, Je ne parle pas de A1 mais du haut de la tunique, une fois 4 marqueurs places, je dois diminuer une m. de chaque cote des marqueurs (diminution des bretelles). Je dois sur les rg end. du point mousse diminuer en faisant: avant le marqueur 2 m. ens. et apres le marqueur 2 m. torse ens. Cependant, je n'obtiens pas la jolie finition de la photo (a savoir une diagonale formee par les diminutions). Dois je apres la formation des bretelles reprendre le travail en jersey? Merci
11.06.2019 - 12:34DROPS Design answered:
Bonjour Marzhina et merci pour ces précisions. Pour diminuer pour les bretelles, tricotez jusqu'au marqueur, tricotez 2 m ens à l'end, glissez le marqueur et tricotez 2 m ens torse à l'endroit. Au tour suivant, tricotez ces mailles à l'envers (= point mousse) et répétez ces diminutions tous les 2 tours (= tous les tours en mailles endroit du point mousse tricoté en rond), la petite diagonale va se former d'elle même. Bon tricot!
11.06.2019 - 13:04
![]() Marzhina wrote:
Marzhina wrote:
Tres joli modele. Je suis malheureusement bloquee au niveau des diminutions apres les bretelles. Meme en suivant les indications, cela ne donne pas le joli motif du modele. Quelqu un pourrait-il m expliquer comment obtenir le motif du modele?
10.06.2019 - 17:16DROPS Design answered:
Bonjour Marzhina, parlez-vous du diagramme A.1? Les diminutions sont incluses dans A.1, vous diminuez par ex 2 m au 1er rang de A.1 (= 2 m diminuées non compensées par des jetés), puis vous tricotez le point ajouré et répétez la diminution au 15ème rang de A.1. Bon tricot!
11.06.2019 - 11:54
![]() Danielle RODIER wrote:
Danielle RODIER wrote:
à propos de la tunique du n°160-18 j'arrive en haut de la tunique au niveau des bretelles l'explication me semble erronée, pourriez vous m'aider à terminer cette superbe tunique? Merci
14.02.2019 - 15:56DROPS Design answered:
Bonjour Mme Rodier, pour le haut de la tunique, vous montez les mailles des bretelles, et placez 4 marqueurs (à la transition des bretelles et du dos/devant). Continuez au point mousse en diminuant 1 m de chaque côté de chaque marqueur tous les 2 tours (= tous les tours en mailles endroit), comme pour un raglan., et rabattrez ensuite toutes les mailles. Bon tricot!
15.02.2019 - 08:34
![]() Gitte Hansson Jensen wrote:
Gitte Hansson Jensen wrote:
Hej...jeg er i tvivl om ærmekanten...skal der slet ikke gøres mere ved den, enten strik/hækle en kant..? Hilsen Gitte Hansson Jensen
30.04.2018 - 23:53DROPS Design answered:
Hej Gitte, nej det er ikke meningen. Men du må selvfølgelig gerne :)
04.05.2018 - 12:11BZ wrote:
I believe there is a mistake in the very last section of instructions. After the cast on for the straps, the placement of the marker numbers are not correct. They should be exactly the same as the cast on numbers but they are not. (ie. you cast on 74 but the marker placement says 72 and you haven't done anything yet). thank you
07.03.2017 - 14:49DROPS Design answered:
Dear Bz, pattern is fine, you are inserting a marker in the 1st of the sts on front/back piece + another marker in the last st on front/back piece, so that you will have: K75, K1 adding a marker in this st, K 70, K1 adding a marker in this st, K75, K1 adding a marker in this st, K70, K1 adding a marker in this st. Happy knitting!
07.03.2017 - 15:59
![]() Gro wrote:
Gro wrote:
Hva er det jeg ikke skjønner med diagram a når det står totalt 16 masker? Jeg får det kun til å være 15 masker...?
27.07.2015 - 10:35DROPS Design answered:
Hej Gro. Förste raekke er 16 masker. Trekanten i midten gaar over 3 masker og du har 6 masker til höjre og 7 til venstre = 16.
27.07.2015 - 15:32
![]() Gro Cathrine Aasgrav wrote:
Gro Cathrine Aasgrav wrote:
Hva er det jeg ikke skjønner med diagram a når det står totalt 16 masker? Jeg kan kun få det til å være 15 masker...?
27.07.2015 - 10:32
![]() Mita wrote:
Mita wrote:
Ideale zomertuniek
31.12.2014 - 12:17
|
||||||||||
Ayla#aylatunic |
||||||||||
 |
 |
|||||||||
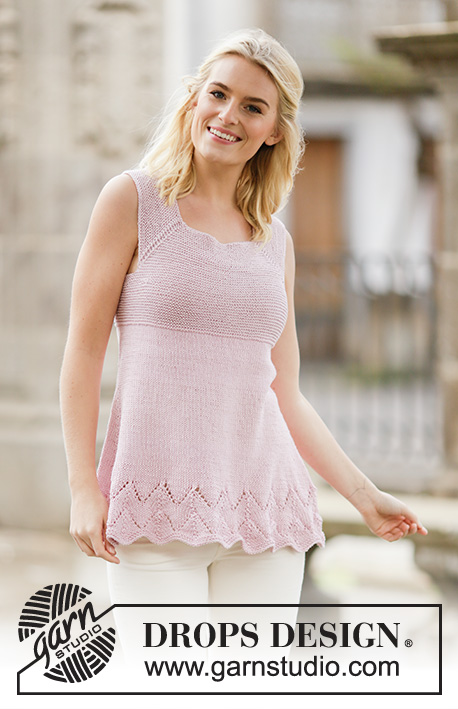
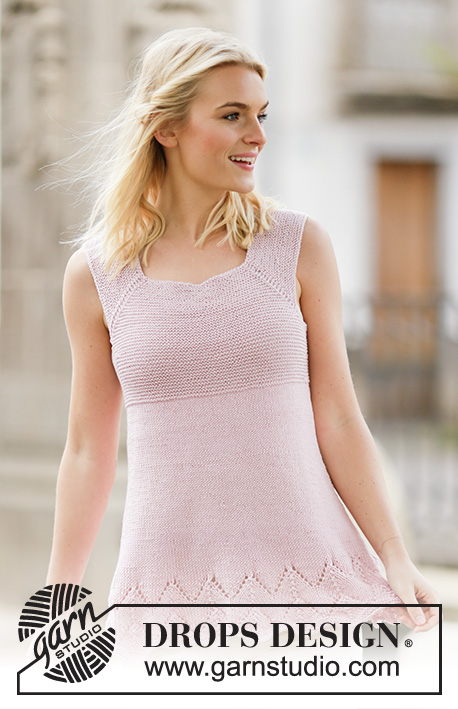
Knitted DROPS tunic in garter st with lace pattern in ”Muskat”. Size: S - XXXL.
DROPS 160-18 |
||||||||||
|
GARTER ST (worked in the round): * K 1 round and P 1 round *, repeat from *-*. 1 ridge = 2 rounds. PATTERN: See diagram A.1. DECREASE TIP: Dec as follows when 2 sts remain before marker: K 2 tog. Dec as follows after marker: K 2 twisted tog (i.e. work in back loop of st instead of front). INCREASE TIP (applies to side inc): Work until 1 st remains before marker, make 1 YO, K 2 sts (marker is between these sts), make 1 YO. On next round K YOs twisted to avoid holes (i.e. work in back loop of st instead of front). ---------------------------------------------------------- TUNIC: Worked in the round on circular needle. The garment is the same depth around the neck both on back and front piece. Cast on 288-304-336-368-400-448 sts on circular needle size 3 mm / US 2.5 with Muskat. Work 2 ridges in GARTER ST - see explanation above. Switch to circular needle size 3.5 mm / US 4. Work A.1 (= 16 sts) 18-19-21-23-25-28 times in total in width. When A.1 has been worked 1 time vertically, there are 216-228-252-276-300-336 sts on needle. Piece now measures approx. 10 cm / 4''. Then work piece in stockinette st. Insert a marker in each side (= 108-114-126-138-150-168 sts between each marker). When piece measures 11-14-13-11-16-13 cm / 4½"-5½"-5"-4½"-6 1/4"-5", dec 1 st on each side of each marker (= 4 sts dec) – see DECREASE TIP. Repeat dec every 2-2-2-2-1½-1½ cm / 3/4"-3/4"-3/4"-3/4"-½"-½" 12-11-12-14-15-18 more times = 164-180-200-216-236-260 sts. REMEMBER THE KNITTING GAUGE When piece measures 37-38-39-40-41-42 cm / 14½''-15''-15¼''-15¾''-16 1/8''-16½'', switch to circular needle size 3 mm / US 2.5 and continue in garter st. Continue with garter st in the round - AT THE SAME TIME when piece measures 40-41-42-43-44-45 cm / 15¾''-16 1/8''-16½''-17''-17¼''-17¾'', inc 1 st on each side of markers (= 4 sts inc) – see INCREASE TIP. Repeat inc when piece measures 45-46-47-48-49-50 cm / 17¾''-18''-18½''-19''-19¼''-19¾'' = 172-188-208-224-244-268 sts. Work next round as follows: bind off the first 7-10-12-15-19-22 sts, (= after marker = armhole), K 72-74-80-82-84-90, bind off the next 14-20-24-30-38-44 sts, marker is in the middle of these sts (= under second armhole) and K 72-74-80-82-84-90, bind off the last 7-10-12-15-19-22 sts = 144-148-160-164-168-180 sts. Fasten off. Work next round as follows: Cast on 75-79-84-88-93-97 sts for shoulder strap (over the bind off sts), P the next 72-74-80-82-84-90 (= front piece), cast on 75-79-84-88-93-97 sts for shoulder strap and P the last 72-74-80-82-84-90 (= back piece) = 294-306-328-340-354-374 sts. K 1 round - AT THE SAME TIME insert 4 markers in the piece as follows: K 75-79-84-88-93-97 (= shoulder strap), insert 1 marker in next st, K 70-72-78-80-82-88, insert 1 marker in next st (= front piece), K 75-79-84-88-93-97 (= shoulder strap), insert 1 marker in next st, K 70-72-78-80-82-88, insert 1 marker in last st (= back piece). P 1 round. On next round dec 1 st on each side of each marker (= 8 sts dec) - see DECREASE TIP. Repeat dec on every other round 18-18-20-20-20-22 times in total = 150-162-168-180-194-198 sts. Bind off. |
||||||||||
Diagram explanations |
||||||||||
|
||||||||||
|
||||||||||

|
||||||||||
Have you finished this pattern?Tag your pictures with #dropspattern #aylatunic or submit them to the #dropsfan gallery. Do you need help with this pattern?You'll find 21 tutorial videos, a Comments/Questions area and more by visiting the pattern on garnstudio.com. © 1982-2025 DROPS Design A/S. We reserve all rights. This document, including all its sub-sections, has copyrights. Read more about what you can do with our patterns at the bottom of each pattern on our site. |
||||||||||


With over 40 years in knitting and crochet design, DROPS Design offers one of the most extensive collections of free patterns on the internet - translated to 17 languages. As of today we count 314 catalogs and 11821 patterns - 11811 of which are translated into English (US/in).
We work hard to bring you the best knitting and crochet have to offer, inspiration and advice as well as great quality yarns at incredible prices! Would you like to use our patterns for other than personal use? You can read what you are allowed to do in the Copyright text at the bottom of all our patterns. Happy crafting!
Post a comment to pattern DROPS 160-18
We would love to hear what you have to say about this pattern!
If you want to leave a question, please make sure you select the correct category in the form below, to speed up the answering process. Required fields are marked *.