
Looking for a yarn?


Comments / Questions (189)
![]() Ruby wrote:
Ruby wrote:
Knitting the hood on circular needles. The the bamboo pattern says "in the round". Should the ends be joined together and the hood is tubular ?
27.03.2025 - 15:48DROPS Design answered:
Hi Ruby, The hood is worked back and forth. We suggest the use of a circular needle even though you are working back and forth, as there are so many stitches. The Bamboo pattern at the top of the page is described both in the round and back and forth. Happy knitting!
28.03.2025 - 05:44
![]() Ra wrote:
Ra wrote:
Hola! Cuando comienza el raglán dice aumentar 4 veces LD y LR y después 20 veces LD. Habría que hacer aumentos tipo lazada en el LD y también en la vuelta del revés quedando 16 aumentos en dos vueltas? Luego las otras 29 vueltas serían tipo lazada? Es un poco confuso, me pueden ayudar?
13.01.2025 - 21:47DROPS Design answered:
Hola Ra, los aumentos se trabajan haciendo lazadas, tal y como se explica en la sección RAGLÁN arriba, antes de comenzar con las explicaciones de la chaqueta. En la fila de revés, las hebras se trabajan retorcidas y después de la hebra retorcida y antes del marcapuntos trabajas 1 nueva hebra en esta fila, trabajando siempre 1 hebra antes del punto antes del marcapuntos y después del punto después del marcapuntos. Después de aumentar en 2 filas por el lado derecho y 2 filas por el lado revés y luego solo aumentar en las siguientes 20 filas por el lado derecho.
19.01.2025 - 14:04
![]() Ra wrote:
Ra wrote:
¡Hola! Me gusta mucho esta chaqueta pero la preferiría sin capucha. Sería factible comenzar como dice el patron y a cierta longitud, por ejemplo 15 cm empezar a construir el cuerpo, quedando esos 15 cm como un cuello? Podrías sugerirme una variación del patrón sin capucha? Gracias de antemano!
24.12.2024 - 10:12DROPS Design answered:
Hola Ra, entiendo que quieres un cuello tipo cuello chal. Puedes buscar patrones con cuello chal aquí: https://www.garnstudio.com/search.php?action=search&k=200&lang=es y mirar si hay una chaqueta similar a la que quieres; luego puedes modificar el patrón de puntos. Los dobles botones se suelen usar en las chaquetas con capucha, que necesitan un cierre más firme por el peso de la capucha, por lo que no lo encontrarás en los patrones de chaqueta habituales. También puedes modificar este patrón como has indicado, pero nosotros no hacemos patrones personalizados. Ten en cuenta que el patrón es de arriba abajo, por lo que los primeros 15 cm son la parte superior de la capucha.
29.12.2024 - 20:52
![]() Natalia Galán Martínez wrote:
Natalia Galán Martínez wrote:
Si para drops nepal necesito 1350 gr en la talla L ,y el hilo drops air es del mismo grupo y la muestra es igual en puntos por qué me indica el conversor de hilos que con 650 gr de drops air me vale??? Está bien el cálculo? En cuanto a si cambio a drops sweet tweed cuantos gr necesito? Con cual quedaría mejor este patrón? Gracias!!
11.11.2024 - 20:30DROPS Design answered:
Hola Natalia, DROPS Nepal son 50g = 75m, mientras que DROPS Air son 50g = 150m. Es decir, DROPS Air tiene mayor metraje, pero como el hilo es más hueco el grosor queda similar al de Nepal, pero el peso es menor y la prenda saldría más ligera. Como el número de metros necesarios es igual para DROPS Nepal y DROPS Air, vas a necesitar menos gramos/menos ovillos de DROPS Air. DROPS Soft Tweed es del grupo de lanas B, no como Air o Nepal, por lo que en principio no podría aplicarse el patrón directamente, sino que tendrías que hacer una regla de 3, como se indica en esta lección: https://www.garnstudio.com/lesson.php?id=14&cid=23.
17.11.2024 - 19:05
![]() Mireille wrote:
Mireille wrote:
Merci pour vos précisions sur l'étape de 38cm avec les diminutions puis augmentations. Pour les augmentations, je ne lis pas la même chose : est écrit de faire 8 augmentations (taille M) au-dessus des mailles point mousse => cela veut dire que c'est sur les mailles centrales tricotées en côte mousse (donc point mousse). Vous confirmez bien ? Belle journée.
26.04.2024 - 09:43DROPS Design answered:
Bonjour Mireille, quand vous avez vos 105 mailles, vous tricotez 6 rangs endroit (= 3 côtes mousse sur les mailles centrales tricotées auparavant en jersey). En même temps, vous augmentez 8 mailles au-dessus des mailles point mousse (= au milieu effectivement, pas de chaque côté) au 2ème rang + au 3ème rang sur l'endroit = 105+8+7=120 mailles. Bon tricot!
26.04.2024 - 11:56
![]() Mireille wrote:
Mireille wrote:
Bonjour, Au niveau de la capuche, à 38cm, est indiqué de faire des diminutions. Je ne comprends pas où les faire. Est ce sur la partie point mousse (52m en M) ou sur les points fantaisie au-dessus des 32m (en M) restantes ? Merci pour votre aide ! Belle journée.
26.04.2024 - 09:36DROPS Design answered:
Bonjour Mireille, vous diminuez 11 mailles dans les 52 mailles jersey (et tricotez les 32 premières/dernières mailles comme avant), vous diminuez ainsi: 116-11= 105 mailles. Bon tricot!
26.04.2024 - 11:54
![]() Mireille wrote:
Mireille wrote:
Bonjour, Au niveau de la capuche, à 38cm, est indiqué de faire des diminutions. Je ne comprends pas où les faire. Est ce sur la partie point mousse (52m en M) ou sur les points fantaisie au-dessus des 32m (en M) restantes ? Merci pour votre aide ! Belle journée.
16.04.2024 - 14:05DROPS Design answered:
Bonjour Mireille, en taille M tricotez sur l'endroit ainsi: 32 m point mousse, 52 m jersey en dim. 11 mailes (= il reste ainsi 41 m jersey) et 32 m point mousse. Au rang suivant sur l'envers, tricotez 32 m end, 41 m jersey et 32 m end. Au rang suivant sur l'endroit, tricotez 32 m end en augmentant 4 m (= 36 m), 41 m end, 32 m end en augm. 4 m ( = 36 m) (8 augm au total). Tricotez sur l'envers 36 m end, 41 m env, 36 m end. Tricotez ensuite 36 m end en augm 3 m (= 39 m), 41 m end et 36 m end en augm. 4 m (40m) (7 augm. au total)= 120 m. Bon tricot!
16.04.2024 - 15:52
![]() Mireille wrote:
Mireille wrote:
Bonjour, Je n'arrive pas à comprendre l'explication pour la côte mousse en allers/retours. Puisque tous les rangs se font à l'endroit pour le point mousse, je ne comprends pas la différence pour la côte mousse puisque est indiqué 2 rangs endroit... Pouvez-vous détailler la manière de faire ? Avez-vous une vidéo expliquant ce point côte mousse ? Je vous remercie de votre aide. Belle journée.
15.04.2024 - 20:22DROPS Design answered:
Bonjour Mireille, effectivement, il faut 2 rangs endroit pour tricoter 1 côte mousse: 1 rang endroit sur l'endroit et 1 rang endroit sur l'envers - cf vidéo. Bon tricot!
16.04.2024 - 08:10
![]() Izabela wrote:
Izabela wrote:
Witam. Chciałam zapytać,ile oczek dodawać w co drugim rzędzie?Czy 18? Jeśli tak,to ile na rękaw,a ile na plecy?"Powt. dodawanie o. 1-1-4-6-8-10 razy w każdym rzędzie (tj. na prawej i na lewej stronie robótki) i 21-22-20-19-18-17 razy w każdym rzędzie na prawej stronie robótki"
10.10.2023 - 09:09DROPS Design answered:
Witaj Izo, w tym wzorze na reglany dodajemy zawsze 8 oczek w rzędzie (czyli 1 oczko na przód, 2 oczka na rękaw, 2 oczka na tył, 2 oczka na drugi rękaw i 1 oczko na drugi przód). Pozdrawiamy!
10.10.2023 - 10:36
![]() Ulrike wrote:
Ulrike wrote:
Hallo, ich habe ein Problem bei den Raglanzunahmen in Gr.M. In der Anleitung heißt es, 24 M glatt rechts und wären nach den Zunahmen laut Anleitung bei 168. ich komme aber auf 170. Meine Rechnung: 23x2=46+24=170. Wo liegt mein Fehler? Oder liegt der Fehler in der Anleitung? Danke schon mal. Freundliche Grüße Ulrike
08.03.2023 - 10:45Ulrike answered:
Hallo nochmal. Ich habe meinen Fehler gefunden. 2 Maschen gehen ja weg wegen den Raglanärmeln. Liebe Grüße Ulrike
08.03.2023 - 10:58
|
|
Snow Princess#snowprincessjacket |
|
 |
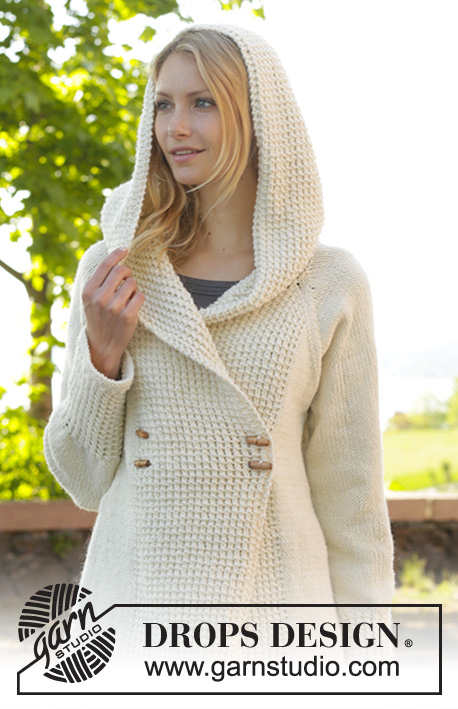 |
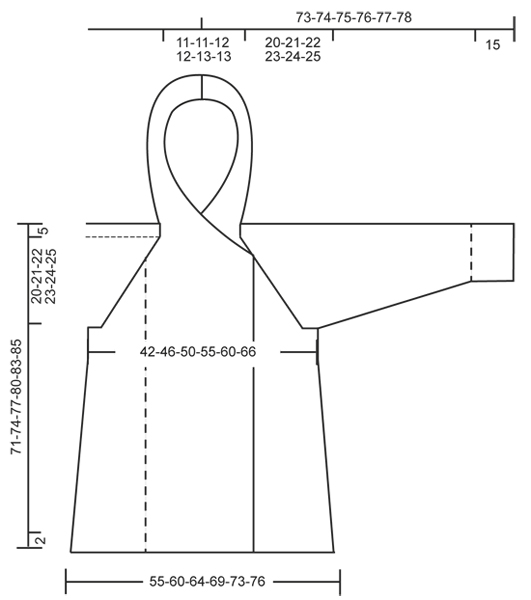
Knitted DROPS jacket with raglan, hood and bamboo pattern, worked top down in ”Nepal”. Size: S - XXXL.
DROPS 156-1 |
|
|
GARTER ST (back and forth on needle): K all rows. 1 ridge = K2 rows. GARTER ST (in the round on double pointed needles): * K 1 round and P 1 round *, repeat from *-*. 1 ridge = 2 rounds. BAMBOO PATTERN (back and forth on needle): Row 1 (= RS): * 1 YO, K 2, pass YO over 2 K sts *, repeat from *-*. Row 2 (= WS): P all sts. Repeat rows 1 and 2. BAMBOO PATTERN (in the round on double pointed needles): Round 1: * 1 YO, K 2, pass YO over 2 K sts *, repeat from *-*. Round 2: K all sts. Repeat rounds 1 and 2. DECREASE TIP: Dec 1 st before marker as follows: Work until 2 sts remain before marker, slip 1 st as if to K, K 1, psso. Dec 1 st after marker as follows: K 2 tog. RAGLAN: Inc as follows at every marker: Work until 1 st remains before marker, 1 YO, K 2, 1 YO = 2 sts inc. Repeat at the remaining markers in piece = 8 sts inc on needle. On next row work YOs twisted (i.e. work in back loop of st instead of front) to avoid holes. ---------------------------------------------------------- JACKET: Worked back and forth, top down on circular needle/double pointed needles. HOOD: Cast on 116 sts in all sizes (includes 2 edge sts in GARTER ST – see explanation above, in each side of piece) on circular needle size 5 mm / US 8 with Nepal. Work 1 ridge in garter st. Then work BAMBOO PATTERN back and forth – see explanation above, with 2 edge sts in garter st in each side (continue the 2 edge sts in garter st in each side until finished measurements). REMEMBER THE GAUGE! When piece measures 38 cm / 15'', work as follows from RS: Pattern as before over the first 30-32-36-40-44-48 sts, garter st over the next 56-52-44-36-28-20 sts AT THE SAME TIME dec 12-11-10-6-4-0 sts evenly, pattern over the remaining 30-32-36-40-44-48 sts = 104-105-106-110-112-116 sts. Continue back and forth until 3 ridges have been worked over the middle sts, AT THE SAME TIME on 2nd row from RS inc 4-8-14-19-25-32 sts evenly over sts in garter st, and on 3rd row from RS inc 4-7-13-18-25-31 sts evenly over sts in garter st = 112-120-133-147-162-179 sts. Now work an elevation in back of neck in garter st as follows from RS: Work until 30-32-36-40-44-48 sts remain, turn, work until 30-32-36-40-44-48 sts remain, turn, work until 40-42-46-50-55-58 sts remain, turn, work until 40-42-46-50-55-58 sts remain, turn, work until 50-52-56-60-65-68 sts remain, turn, work until 50-52-56-60-65-68 sts remain, turn, work until 55-57-61-65-70-73 sts remain, turn, work until 55-57-61-65-70-73 sts remain, turn and work the rest of row (pattern over the last 30-32-36-40-44-48 sts). YOKE: Now work pattern as before over the first 30-32-36-40-44-48 sts, 1 st in stockinette st, insert 1st marker here, stockinette st over the next 15 sts, insert 2nd marker here, stockinette st over the next 20-24-29-35-42-51 sts, insert 3rd marker here, stockinette st over the next 15 sts, insert 4th marker here, 1 st in stockinette st, pattern as before over the remaining 30-32-36-40-44-48 sts. Now start inc for RAGLAN – see explanation above! Repeat inc every row 1-1-4-6-8-10 times (i.e. from RS and WS), and every row from RS 21-22-20-19-18-17 times = 288-304-325-347-370-395 sts. NOTE: Work the new inc sts on back piece and sleeves in stockinette st, and work the first 8 new inc sts on front piece in bamboo pattern (i.e. inc 2 sts before there is enough sts to work bamboo pattern), then work the remaining inc sts in stockinette st. Piece now measures 20-21-22-23-24-25 cm / 8''-8¼''-8¾''-9''-9½''-9¾'' (measure from 1st row after edge in garter st at the back). Now work next row as follows: Work the first 52-55-60-65-70-75 sts, slip the next 61-63-65-67-69-71 sts on a stitch holder for sleeve, cast on 10 new sts under sleeve (insert a marker in the middle of the new sts), work the next 62-68-75-83-92-103 sts, slip the next 61-63-65-67-69-71 sts on a stitch holder for sleeve, cast on 10 new sts under sleeve (insert a marker in the middle of the new sts), work the remaining 52-55-60-65-70-75 sts. There are now 186-198-215-233-252-273 sts for body. NOW MEASURE PIECE FROM HERE! BODY: Continue back and forth with pattern as before. Work the new sts under sleeve in stockinette st. When piece measures 4 cm / 1½'' from marker under sleeves, inc 1 st on each side of each marker as follows: Work until 1 st before first marker, 1 YO, 2 sts in stockinette st, 1 YO, repeat at the other marker = 190-202-219-237-256-277 sts. Repeat inc every 3½-3½-3½-4-4½-6 cm / 1 1/4"-1 1/4"-1 1/4"-1½"-1 3/4"-2½" 11-12-12-12-11-8 more times = 234-250-267-285-300-309 sts. When piece measures 46-48-50-52-54-55 cm / 18"-19"-19 3/4"-20½"-21 1/4"-21½" from marker under sleeves, work 3 ridges. Loosely bind off. SLEEVE: Worked in the round on double pointed needles. Slip sts from stitch holder back on double pointed needles size 5 mm / US 8. Work 1 row from RS and cast on 10 new sts under sleeve (insert a marker in the middle of the new sts) = 71-73-75-77-79-81 sts. NOW MEASURE THE PIECE FROM HERE. When piece measures 4 cm / 1½'', beg dec on each side of marker - READ DECREASE TIP. Repeat dec every 2-2-2-1½-1½-1½ cm/3/4"-3/4"-3/4"-½"-½"-½" 12-13-13-14-14-15 more times = 45-45-47-47-49-49 sts. When piece measures 32-32-32-32-31-31 cm / 12½"-12½"-12½"-12½"-12 1/4"-12 1/4", inc 3 sts evenly in all sizes = 48-48-50-50-52-52 sts. Now work BAMBOO PATTERN in the round on double pointed needles - see explanation above. When piece measures 47-47-47-47-48-48 cm / 18½"-18½"-18½"-18½"-19"-19", dec 4 sts in all sizes = 44-44-46-46-48-48 sts. Work 3 ridges in GARTER ST in the round on double pointed needles - see explanation above. Bind off. ASSEMBLY: Sew the holes under the sleeves. Sew tog hood st by st in cast-on edge. Sew on buttons on section with bamboo pattern on left front piece as follows: Sew 1 button approx. 2 cm / 3/4'' in from edge and 43-45-47-49-51-53 cm / 17"-17 3/4"-18½"-19 1/4"-20"-21" from bind-off edge and 1 button 47-49-51-53-55-57 cm / 18½''-19¼''-20''-21''-21 5/8''-22½'' from bind-off edge. Repeat in the other side of section with bamboo pattern. Button through a hole in bamboo texture. |
|
|
|
Have you finished this pattern?Tag your pictures with #dropspattern #snowprincessjacket or submit them to the #dropsfan gallery. Do you need help with this pattern?You'll find 27 tutorial videos, a Comments/Questions area and more by visiting the pattern on garnstudio.com. © 1982-2025 DROPS Design A/S. We reserve all rights. This document, including all its sub-sections, has copyrights. Read more about what you can do with our patterns at the bottom of each pattern on our site. |
|


With over 40 years in knitting and crochet design, DROPS Design offers one of the most extensive collections of free patterns on the internet - translated to 17 languages. As of today we count 314 catalogs and 11822 patterns - 11812 of which are translated into English (US/in).
We work hard to bring you the best knitting and crochet have to offer, inspiration and advice as well as great quality yarns at incredible prices! Would you like to use our patterns for other than personal use? You can read what you are allowed to do in the Copyright text at the bottom of all our patterns. Happy crafting!
Post a comment to pattern DROPS 156-1
We would love to hear what you have to say about this pattern!
If you want to leave a question, please make sure you select the correct category in the form below, to speed up the answering process. Required fields are marked *.