
Looking for a yarn?


Comments / Questions (19)
![]() Helene Glastonbury wrote:
Helene Glastonbury wrote:
Hi am trying to print the pattern but wont print.
28.02.2025 - 09:15
![]() Suzanne St-Jacques wrote:
Suzanne St-Jacques wrote:
Est-ce vraiment 10 mailles pour les bras, il me semble que c'est peu. Merci
22.03.2023 - 01:35DROPS Design answered:
Bonjour Mme St-Jacques, il faut bien monter 10 mailles pour les bras et on tricote ensuite en jersey avec 1 m point mousse de chaque côté. Bon tricot!
22.03.2023 - 09:02
![]() Gry Frafjord wrote:
Gry Frafjord wrote:
Hei, Har spørsmål ang. hode. Lurer på om omgang starter i siden og bakover til bakhodet, eller i siden og fremover mot ansiktet? Ref. "Sett 1 merke etter de første 3 m på beg av omg og 1 merke etter ytterligere 6 m. Videre økes det 1 m på innsiden av de 2 merkene – LES ØKETIPS (= 2 m økt). Gjenta økningen på hver 2.omg, 2 ganger til (= totalt 3 økninger i hver side) = 42 m." er dette til ansiktet?
05.02.2023 - 18:04DROPS Design answered:
Hei Gry. Hodet strikkes rundt på fra snuten og bakover (mot bakhodet). Når du skal sette 2 merker i arbeidet og øke, er snuten/ansiktet allerede strikket, nå strikkes det rundt selve hodet. Etter 20. omgang starter fellingene til bakhodet. mvh DROPS Design
06.02.2023 - 11:54
![]() Nelly De Nil wrote:
Nelly De Nil wrote:
Er staan geen armen op van het konijn de mouw heeft ook geen hand anders zou ik denken dat dat de arm was voor op te vullen
26.02.2022 - 12:34DROPS Design answered:
Dag Nelly,
De armen van het konijn staan onder de paragraaf 'Voorpoot' :)
26.02.2022 - 16:23
![]() Solis wrote:
Solis wrote:
Ska börja på örat. Hur stickar man runt på 2 stickor? Får inte ihop det.
01.04.2019 - 22:05DROPS Design answered:
Hej. Du stickar på samma sätt som när du har fler stickor. och stickar runt. Du har i detta fall maskorna på två stickor och stickar med en tredje. Lycka till!
05.04.2019 - 10:26
![]() Tanja wrote:
Tanja wrote:
Wo kann ich das Foto des nachgemachten Hasen posten?
28.03.2019 - 09:51DROPS Design answered:
Liebe Tanja, gerne können Sie das Foto auf unserem Facebook posten, und auch in unserem DROPS Workshop :)
01.04.2019 - 09:36
![]() Marion Böhm wrote:
Marion Böhm wrote:
Stellt der Bereich zwischen den Markierungen am Kopf eine bestimmte Stelle dar?
07.03.2018 - 13:38DROPS Design answered:
Liebe Frau Böhm, 2 Markierungen werden eingesetzt, und danach nach 1. und vor 2. Markierung zunehmen. Viel Spaß beim stricken!
07.03.2018 - 15:53
![]() Marion Böhm wrote:
Marion Böhm wrote:
Stellt der Bereich zwischen den Markierungen am Kopf eine bestimmte Stelle dar???
03.03.2018 - 16:54
![]() Marion Böhm wrote:
Marion Böhm wrote:
Beim Übergang zu rosa am Bein soll man nach der ersten Reihe 23 Maschen auf der Nadel haben. Das geht jedoch nicht auf, da das Bein aus "zwei" Teilen besteht und 23 nicht durch 2 teilbar ist. Zudem stricke ich den Bär in Nadelstärke 4, da die Beine ansonsten viel zu dünn würden und keinesfalls die Stärke des Fotos erreichen würden.
08.02.2018 - 17:38DROPS Design answered:
Liebe Frau Böhm, bei der 3. Reihe werden Sie (2 re, 1 Umschlag) stricken = 34 M am Ende der 3. Reihe. Viel Spaß beim stricken!
09.02.2018 - 09:17
![]() Cindy Marie Vorkinn wrote:
Cindy Marie Vorkinn wrote:
Glem det spørsmålet, oppdaget feilen selv 😊
12.06.2017 - 15:07
|
|
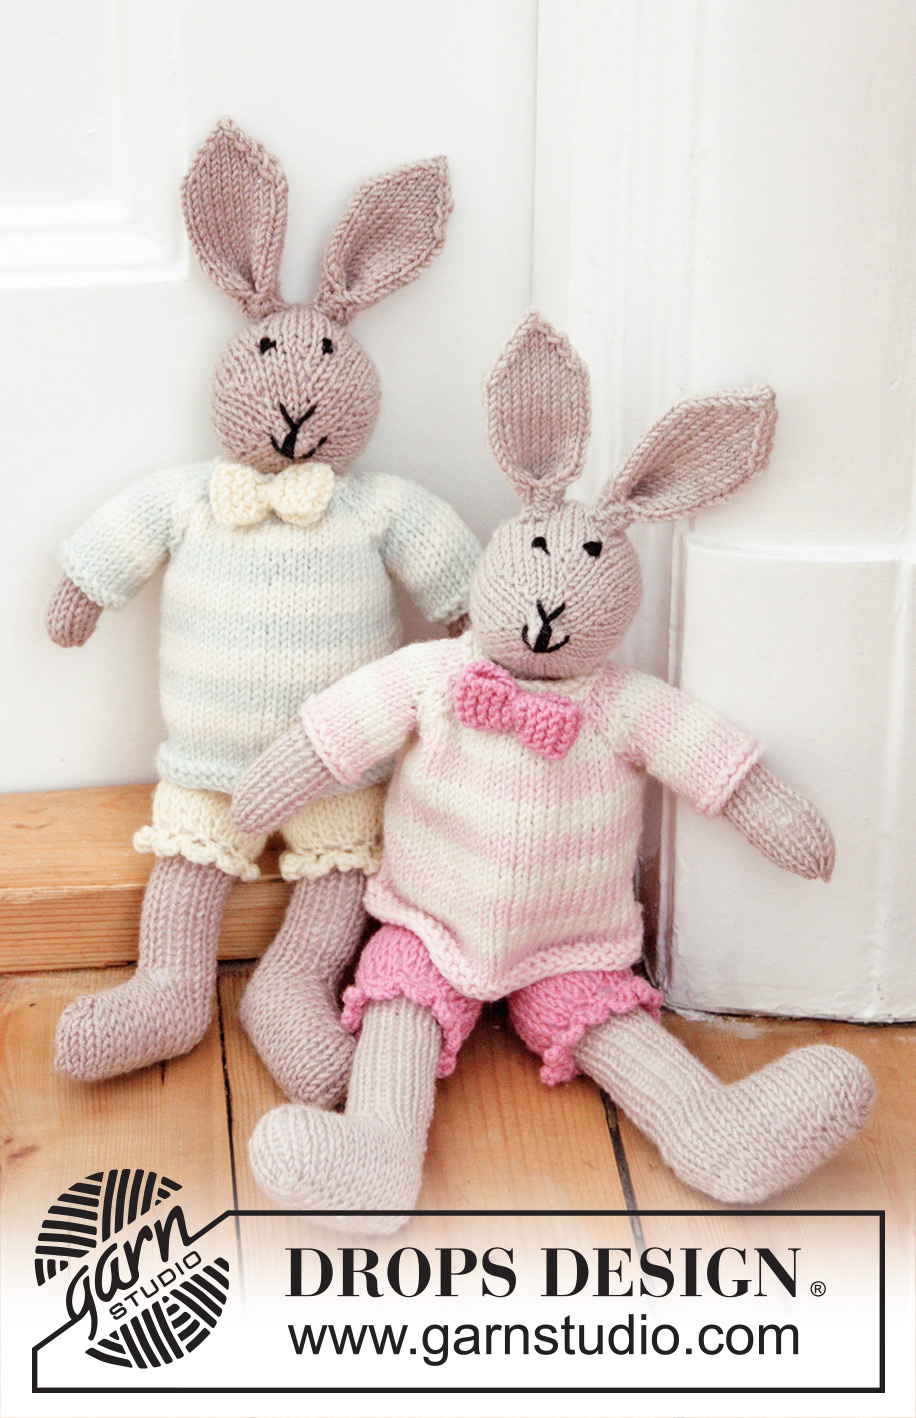
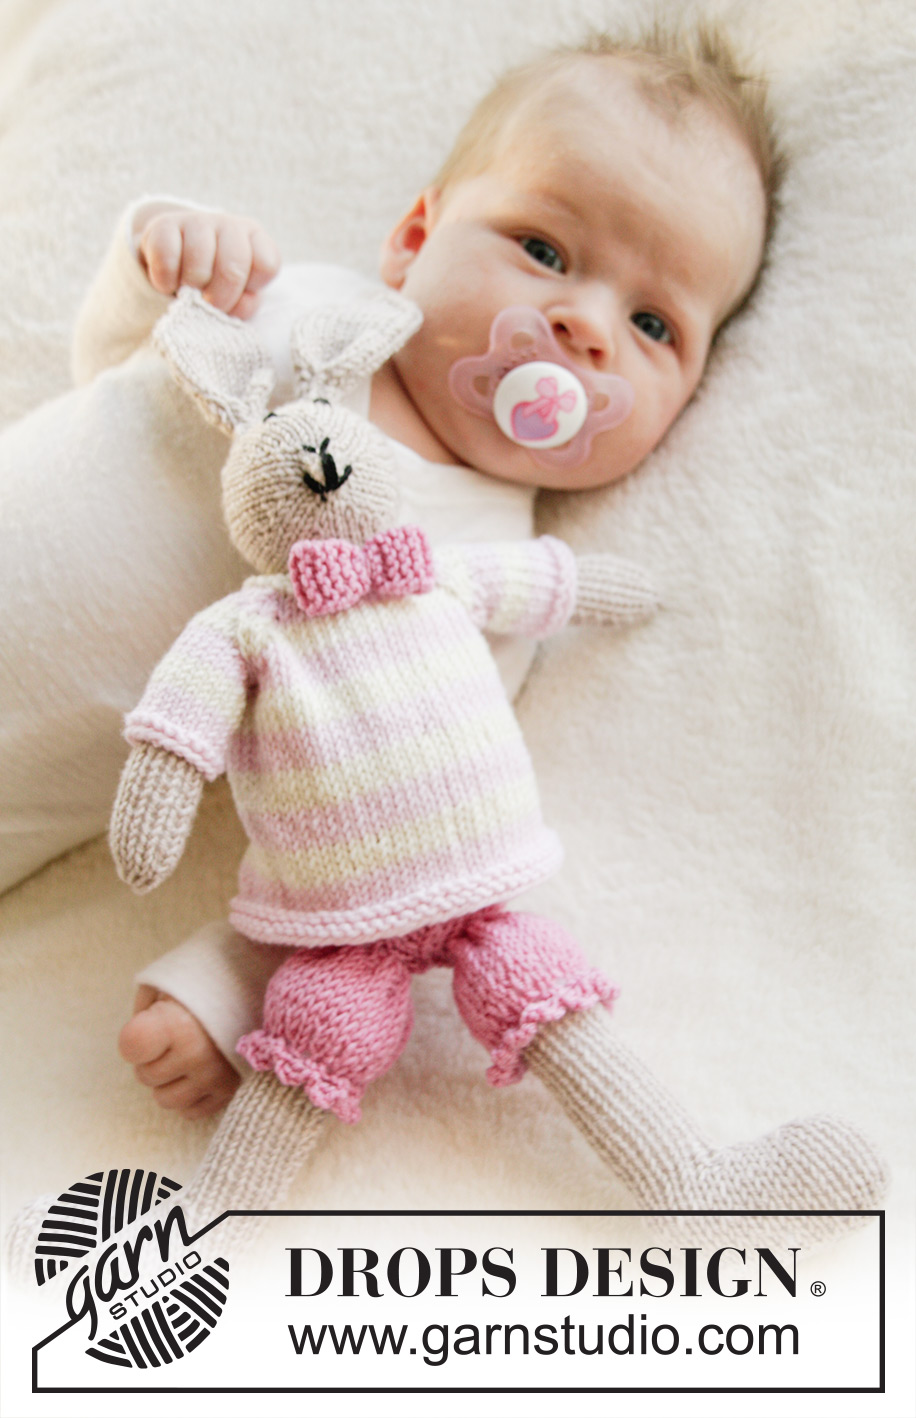
Mrs. Bunny#dropsmrsbunny |
|
 |
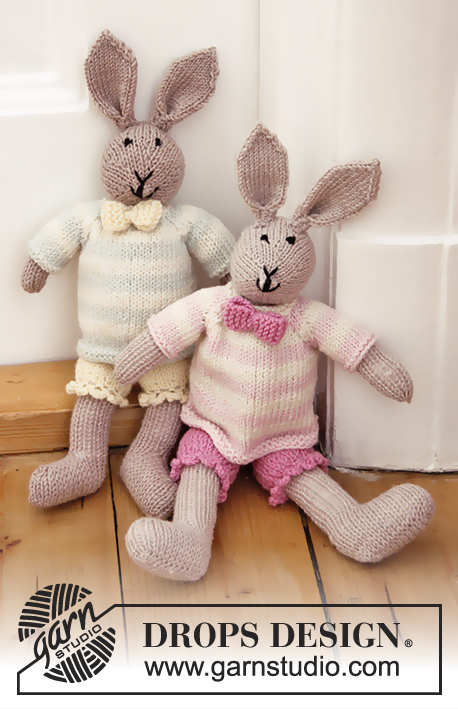 |
Knitted bunny toy with pants, jumper and bow in DROPS BabyMerino
DROPS Baby 25-36 |
|
|
MAGIC CIRCLE: To avoid hole in the middle beg with this technique: Hold yarn end in the left hand and make a loop around left index finger (from left to right). Hold the loop with left thumb and index finger. Insert needle through loop, get yarn from ball (i.e. place yarn 1 time over needle from you), pull yarn back through loop, 1 YO (now place yarn from the back and towards you) and pull YO through sts on needle, * insert needle through loop, 1 YO (place yarn from the back and towards you), pull YO through loop, 1 YO (from the back and towards you) and pull YO through outermost st on right needle (i.e. the last st made) *, repeat from *-* until there are 6 sts on needle. Then work as explained in pattern – AT THE SAME TIME pull yarn end so that loop is tighten tog and the hole disappears. INCREASE TIP: Inc 1 st by making 1 YO. On next round/row work YO twisted to avoid holes. GARTER ST (back and forth on needle): K all rows. 1 ridge = K2 rows. STRIPES: * 4 rounds/rows light pink, 4 rounds/rows off white *, repeat from *-*. ---------------------------------------------------------- HEAD: Worked in the round on double pointed needles from snout and back. Make a MAGIC CIRCLE with light beige - see explanation above = 6 sts on needle. Distribute sts on 3 double pointed needles size 3 mm / US 2.5 (work with fourth needle) and work in the round as follows: ROUND 1: K all sts. ROUND 2: * K 1, 1 YO *, repeat from *-* the entire round = 12 sts. ROUND 3: K all sts (always K YOs twisted to avoid holes). ROUND 4: * K 2, 1 YO *, repeat from *-* the entire round = 18 sts. ROUND 5: K all sts. ROUND 6: * K 3, 1 YO *, repeat from *-* the entire round = 24 sts. ROUND 7: K all sts. ROUND 8: * K 4, 1 YO *, repeat from *-* the entire round = 30 sts. ROUND 9: K all sts. ROUND 10: * K 5, 1 YO *, repeat from *-* the entire round = 36 sts. ROUND 11-12: K all sts = 36 sts. Insert 1 marker after the first 3 sts at beg of round and 1 marker after another 6 sts. Then inc 1 st inside the 2 markers - READ INCREASE TIP (= 2 sts inc). Repeat inc every other round 2 more times (= 3 inc in total in each side) = 42 sts. ROUND 18-19: K all sts = 42 sts. ROUND 20: * K 5, K 2 tog *, repeat from *-* the entire round = 36 sts. ROUND 21: K all sts. ROUND 22: * K 4, K 2 tog *, repeat from *-* the entire round = 30 sts. ROUND 23: K all sts. Continue dec like this on every other round (i.e. on every round with dec work 1 st less before working 2 sts tog = 6 sts dec per round) until 12 sts remain on needle, cut the yarn and pull it through sts on needle (without tightening). Embroider eyes, mouth and snout with black, fill the head with poly stuffing, tighten tog sts and fasten (= mid back of head). EAR: Worked in the round from bottom up. Cast on 8 sts with light beige and distribute sts on 2 double pointed needles (work with third needle). ROUND 1-2: K all sts. ROUND 3: * K 1, 1 YO, K 2, 1 YO, K 1 *, repeat from *-* 1 more time = 12 sts on needle. ROUND 4: K all sts (always K YOs twisted to avoid holes). ROUND 5: * K 1, 1 YO, K 4, 1 YO, K 1 *, repeat from *-* 1 more time = 16 sts on needle. ROUND 6: K all sts. ROUND 7: * K 1, 1 YO, K 6, 1 YO, K 1 *, repeat from *-* 1 more time = 20 sts on needle. Then work in stockinette st in the round until piece measures approx. 5½ cm / 2¼". Then dec as follows: ROUND 1: * Slip 1 st as if to K, K 1, psso, K 6, K 2 tog *, repeat from *-* 1 more time = 16 sts. ROUND 2: K all sts. ROUND 3: * Slip 1 st as if to K, K 1, psso, K 4, K 2 tog *, repeat from *-* 1 more time = 12 sts. ROUND 4: K all sts. Continue dec like this every other round until 4 sts remain on needle (i.e. on every round with dec work 2 sts less between dec in each side). On next round K2 tog around. Cut the yarn and pull it through sts, tighten tog and fasten. Fold each side at the bottom of ear towards the middle so that a pleat is formed in the mid of ear. Sew tog at the bottom with a couple of stitches and fasten ear on head. Work another ear the same way. BODY: Worked in the round, top down. Cast on 16 sts with light beige and distribute sts on 4 double pointed needles (work with fifth needle). ROUND 1-2: K all sts. ROUND 3: * K 2, 1 YO *, repeat from *-* the entire round = 24 sts. ROUND 4: K all sts (always K YOs twisted to avoid holes). ROUND 5: * K 2, 1 YO *, repeat from *-* the entire round = 36 sts. ROUND 6: K all sts. ROUND 7: * K 3, 1 YO *, repeat from *-* the entire round = 48 sts. Then work in stockinette st in the round until piece measures 5½ cm / 2¼". Switch to pink and K 1 round and P 1 round. Then work 8 rounds in stockinette st. Continue to dec as follows: ROUND 1: * K 6, K 2 tog *, repeat from *-* the entire round = 42 sts. ROUND 21: K all sts. ROUND 22: * K 5, K 2 tog *, repeat from *-* the entire round = 36 sts. ROUND 23: K all sts. Continue dec like this on every other round (i.e. on every round with dec work 1 st less before working 2 sts tog = 6 sts dec per round) until 12 sts remain on needle, cut the yarn and pull it through sts on needle (without tightening). Fill body with poly stuffing, tighten tog sts on yarn and fasten. Sew head to body (pink should be down (= pants)). LEG: Worked back and forth, bottom up. Cast on 30 sts on double pointed needles size 3 mm / US 2.5 with light beige. Work in stockinette st back and forth for 3 cm / 1". Then work as follows: ROW 1 (= RS): 1 edge st in GARTER ST – see explanation above, K 10, K2 tog 4 times, K 10 and 1 edge st in garter st = 26 sts. ROW 2 (= WS): 1 edge st in garter st, P 5, bind off the next 14 sts, P 5 and 1 edge st in garter st = 6 sts remain in each side. ROW 3 (= RS): Work the first 6 sts on needle and then the next 6 sts on needle (the 14 bind off sts form a hole in the mid of piece). Then work in stockinette st back and forth over the 12 sts with 1 edge st in garter st in each side until leg measures approx. 8 cm / 3". Switch to pink, K 1 row from RS and K 1 row from WS. Then work as follows: ROW 1 (= RS): * K 1, 1 YO *, repeat from *-* until 1 st remains and finish with K 1 = 23 sts. ROW 2 (= WS): P but K edge sts in each side and P YOs twisted to avoid holes. ROW 3: * K 2, 1 YO *, repeat from *-* until 1 st remains and finish with K 1 = 34 sts. Then work in stockinette st back and forth with 1 edge st in garter st in each side until leg measures approx. 12 cm / 4¾", bind off. Sew opening mid on top of foot with grafting/kitchener sts. Sew foot tog mid under and continue up along mid back - sew in front loop of outermost st. Fill leg with some poly stuffing. Baste a strand up and down through bind-off edge at the top of leg (on the pink). Tighten tog to make it baggy. Work another leg the same way and fasten both legs on body. LACE EDGE Crochet a lace edge on hook size 3 mm / C with pink at the bottom around pants on each leg as follows (crochet in P sts): 1 sc in first st, * ch 4, 1 dc in 4th ch from hook, 1 sc in next P st on pants *, repeat from *-* the entire round and finish with 1 sl st in first sc from beg of round. Fasten off. ARM: Worked back and forth on double pointed needles, top down. Cast on 10 sts with light beige and work in stockinette st back and forth with 1 edge st in garter st in each side until arm measures 9 cm / 3½". Cut the yarn (make it long enough to use for sewing the arm tog), pull yarn through sts on needle (= at the bottom of arm), tighten tog and then sew arm tog in front loop of outermost st. Fill arm with poly stuffing and fasten at the top of body by neck (below the head). Work another arm the same way and fasten in the opposite side. JUMPER: Piece is worked in the round on double pointed needles up to armhole, then work back and forth on needle. BODY: Cast on 60 sts with light pink. P 1 round, K 1 round and P 1 round. Then work in stockinette st and STRIPES - see explanation above. When piece measures approx. 9 cm / 3½" – adjust so that last round in a stripe with light pink remains, work next round as follows: bind off 6 sts for armhole, work 24 sts, bind off the next 6 sts for armhole and work the last 24 sts. Put piece aside and knit the sleeves. SLEEVE: Worked in the round on double pointed needles. Cast on 20 sts with light pink. K 1 round and P 1 round. Then work in stockinette st and STRIPES in the round. When 11 rounds with stripes have been worked (i.e. last round in a stripe with light pink remains), work next round as follows: bind off 6 sts for armhole and work the remaining 14 sts. Cut the yarn, put piece aside and Make another sleeve. YOKE: Slip sleeves on to same needle as body where armholes were bind off (without working them first) = 76 sts on needle. Begin round from RS mid back on body and continue stripes as follows (1st round = off white): ROUND 1: 1 edge st in garter st, K 9, K 2 tog, K 2 twisted tog, K 10 (= sleeve), K 2 tog, K 2 twisted tog, K 20 (= front), K 2 tog, K 2 twisted tog, K 10 (= sleeve), K 2 tog, K 2 twisted tog, K 9 and 1 edge st in garter st = 68 sts. Then work back and forth from mid back. ROW 2 (= WS): P but work edge sts in garter st. ROW 3 (= RS): 1 edge st in garter st, K 8, K 2 tog, K 2 twisted tog, K 8 (= sleeve), K 2 tog, K 2 twisted tog, K 18 (= front), K 2 tog, K 2 twisted tog, K 8 (= sleeve), K 2 tog, K 2 twisted tog, K 8 and 1 edge st in garter st = 60 sts. ROW 4 (= WS): P but work edge sts in garter st. ROW 5 (= RS): Switch to light pink and work 1 edge st in garter st, K 7, K 2 tog, K 2 twisted tog, K 6 (= sleeve), K 2 tog, K 2 twisted tog, K 16 (= front), K 2 tog, K 2 twisted tog, K 6 (= sleeve), K 2 tog, K 2 twisted tog, K 7 and 1 edge st in garter st = 52 sts. ROW 6 (= WS): P but work edge sts in garter st. ROW 7 (= RS): 1 edge st in garter st, K 6, K 2 tog, K 2 twisted tog, K 4 (= sleeve), K 2 tog, K 2 twisted tog, K 14 (= front), K 2 tog, K 2 twisted tog, K 4 (= sleeve), K 2 tog, K 2 twisted tog, K 6 and 1 edge st in garter st = 44 sts. ROW 8 (= WS): P but work edge sts in garter st. Switch to off white and work next row as follows: 1 edge st in garter st, * K 1, K 2 tog *, repeat from *-* until 1 st remains and finish with 1 edge st in garter st = 30 sts. K 1 row from WS, K 1 row from RS and K 1 row from WS before binding off with K from RS. Fasten off. BOW: Cast on 5 sts on double pointed needles size 3 mm / US 2.5 with pink. Work in garter st back and forth for 8 cm / 3", bind off. Sew short sides tog in outer loop of edge sts to form a ring. Fasten off. Find a new strand, wind it a couple of times around the middle of bow and fasten bow in the neck on jumper. Put the jumper on the bunny and fasten the button through both layers at the top of neck at the back. |
|
Have you finished this pattern?Tag your pictures with #dropspattern #dropsmrsbunny or submit them to the #dropsfan gallery. Do you need help with this pattern?You'll find 27 tutorial videos, a Comments/Questions area and more by visiting the pattern on garnstudio.com. © 1982-2025 DROPS Design A/S. We reserve all rights. This document, including all its sub-sections, has copyrights. Read more about what you can do with our patterns at the bottom of each pattern on our site. |
|


With over 40 years in knitting and crochet design, DROPS Design offers one of the most extensive collections of free patterns on the internet - translated to 17 languages. As of today we count 314 catalogs and 11822 patterns - 11812 of which are translated into English (US/in).
We work hard to bring you the best knitting and crochet have to offer, inspiration and advice as well as great quality yarns at incredible prices! Would you like to use our patterns for other than personal use? You can read what you are allowed to do in the Copyright text at the bottom of all our patterns. Happy crafting!
Post a comment to pattern DROPS Baby 25-36
We would love to hear what you have to say about this pattern!
If you want to leave a question, please make sure you select the correct category in the form below, to speed up the answering process. Required fields are marked *.