
Looking for a yarn?


Comments / Questions (129)
![]() Sommer Claudia wrote:
Sommer Claudia wrote:
Huhu,\r\nRechtes Vorderteil, da heißt es...abnahme nach 15 und 25cm 1/2 Rapporte.\r\nAm Rückenteil war die Abnahme nach 10 und 20cm. Hat das seine Richtigkeit
02.05.2025 - 15:56DROPS Design answered:
Liebe Frau Sommer, die Abnahmen sind absichtlich nach einer verschiedenen Höhe, so wird die Naht an die Seiten schöner. Viel Spaß beim Häkeln!
02.05.2025 - 16:07
![]() Sylvie wrote:
Sylvie wrote:
Bonjour, Je suis en train de faire les diminutions d'encolure du devant gauche et je me demande si c'est normal que ça fasse des escaliers car on doit diminuer un demi motif tous les 2 rangs 6 fois ? C'est dommage que je ne puisse pas mettre une photo... Merci par avance pour votre réponse.
01.05.2025 - 12:08DROPS Design answered:
Bonjour Sylvie, c'est tout à fait normal, à la toute fin, vous crochèterez une bordure qui viendra égaliser ces escaliers et faire ainsi une jolie finition comme sur la photo. Bon crochet!
02.05.2025 - 08:17
![]() Veronika Lotzer wrote:
Veronika Lotzer wrote:
Hallo, möchte die Jacke ca 10cm kürzer machen nicht so lang. Was muss ich bei den Abnahmen berücksichtigen? Bzw. wie muss ich das dann machen? Vielen Dank!
09.04.2025 - 08:22DROPS Design answered:
Liebe Frau Lotzer, je nach Geschmack können Sie die Abnahmen in der neue Höhe regelmäßig verteilt kalkuliere (sollte die untere Breite richtig sein), sonnst sollen Sie je nach der gewünschten untere Breite die Abnahmen neu kalkulieren. Viel Spaß beim Häkeln!
09.04.2025 - 15:58
![]() Delphine wrote:
Delphine wrote:
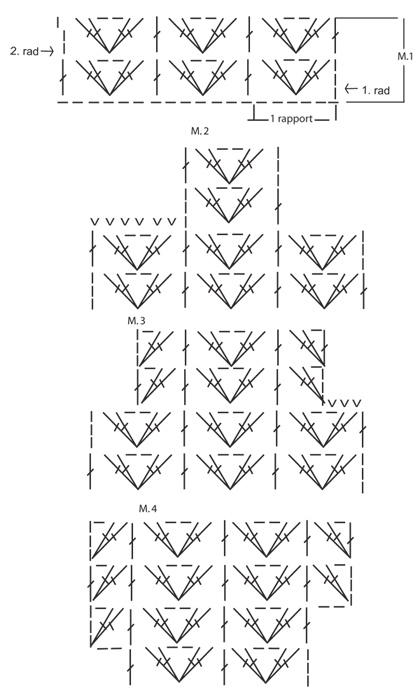
Bonjour, pour les manches, j'ai réussi à faire l'augmentation des deux premiers demi-motifs. Par contre, 4 rangs plus tard, je n'arrive pas à comprendre : on doit faire 1/2 motif d'augmentation, soit 6ml, 2 brides dans 4è maille à partir du crochet, sauter 2 brides, bride dans la maille suivante, mais ensuite on a le 1/2 motif du rang précédent ... et c'est là que je ne sais pas comment faire et le diagramme M4 ne m'aide pas non plus. Merci
10.03.2025 - 16:53DROPS Design answered:
Bonjour Delphine, pour "terminer" le motif, commencez le rang par 6 mailles en l'air, puis crochetez 1 groupe de brides dans la maille en l'air du rang précédent; et terminez le rang; tournez et augmentez de la même façon de l'autre côté. Bon crochet!
12.03.2025 - 07:56
![]() Delphine wrote:
Delphine wrote:
Bonjour, je suis en train de faire le dos et je suis arrivée à 20cm de hauteur. je dois diminuer 1/2 motif de chaque coté, mais je ne comprends pas comment faire étant donné que le rang se termine par 1/2 motif. Doit-je faire 5mc et repartir avec 3ml dans la bride isolée du motif pour enchainer sur le motif entier suivant? Merci
06.03.2025 - 22:51DROPS Design answered:
Bonjour Delphine, dans le diagramme M.3 nous montrons comment diminuer 1/2 motif en début + en fin de rang: en début de rang, crochetez 3 mc, puis 4 ml + 2 brides dans le 1er arceau, en fin de rang, terminez par 2 brides, 1 ml, 1 bride dans le dernier arceau; la fois suivante, allez en mc jusqu'à la 1ère bride = on a diminué la 2ème moitié du motif et à la fin du rang, terminez par 1 bride dans la bride (sans faire le dernier demi-motif). Bon crochet!
07.03.2025 - 10:21
![]() Samira wrote:
Samira wrote:
Hi hi, I have a question about finishing the back piece: How do i divide the piece for neck and finish each shoulder separately? I don't understand how I divide and how to start the shoulder parts after dividing. Thank you!
07.02.2025 - 17:36DROPS Design answered:
Dear Samira, for the back piece, you cut the thread and start on the side (the armhole edge, where you were decreasing for the armhole before). Then you work towards the neck over 6 or 7 repeats of the pattern (depending on the size), turn the piece and decrease the first stitch of the row and work back up to the side. Cut and fasten the thread. In the other shoulder you also start at the side, work towards the neck, turn, decrease the first stitch and work back towards the side before cutting and fastening off the thread. Happy crochetting!
09.02.2025 - 23:22
![]() Sam wrote:
Sam wrote:
I've just finished the 12 cm of my first pocket, but i'm stuck now. The instructions says to work edge by starting with 1 sc. But should i turn my work and start with a ch3? Or do i turn my work and crochet the 1 sc directly into the last dc of my previous row? Thank you
25.12.2024 - 11:36DROPS Design answered:
Dear Sam, you don't need to turn, since you will work around the piece. Start with 1 sc in the first stitch of the previous row, then work over the 2nd stitch and continue around. Happy crochetting!
29.12.2024 - 21:15
![]() Samira wrote:
Samira wrote:
Hi, when working on the pockets i keep counting 36 chains (instead of 37) after working the first round of dc. Is this correct?
21.12.2024 - 10:22DROPS Design answered:
Dear Samira, remember that the first 3 chain stitches of a dc round = 1 double crochet. See "CROCHET INFO" at the top of the pattern instructions: "Replace first dc on every row with ch 3." So you work dc over 36 chain stitches and the first 3 chain stitches of the round are the first double crochet (nº 37). Happy crochetting!
22.12.2024 - 23:40
![]() Sara Norinder wrote:
Sara Norinder wrote:
När arb mäter 48-47-47-46-46-45 cm (kortare mått i större stl pga längre ärmkulle och bredare axelvidd) minskas det 1 rapport i varje sida till ärmkulle. Sedan minskas det ½ rapport i varje sida på vartannat v totalt 0-0-0-0-2-2 ggr sedan på varje varv totalt 6-7-8-8-6-6 ggr = 5-6-6-6-7-7 rapporter" Tolkar jag detta rätt att jag, som virkar L, ska minska 1 rapport i varje sidan, sen hoppa över "vartannat varv" och minska en halv varje var 8 ggr?
09.12.2024 - 19:54DROPS Design answered:
Hej Sara, ja det stämmer :)
11.12.2024 - 13:24
![]() Merja wrote:
Merja wrote:
Miten hihan levennykset muuttuvat puolikkaasta kuviosta täydeksi? Kaavakuvan olisi pitänyt olla pitempi jotta ohje olisi ollut selkeämpi.
28.09.2024 - 13:56
|
|||||||||||||
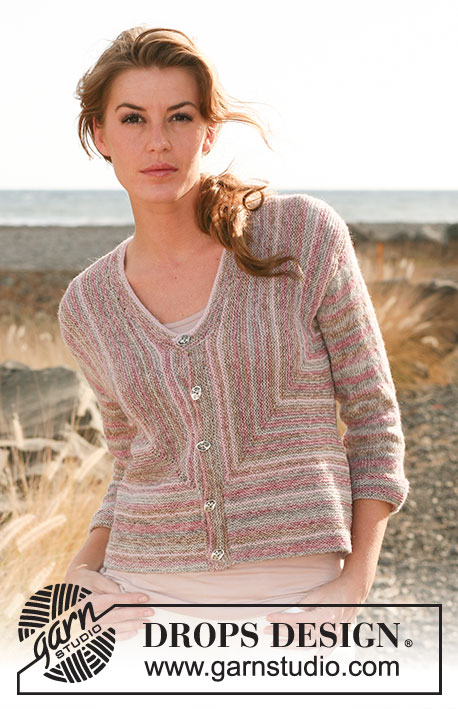
Up North#upnorthcardigan |
|||||||||||||
 |
 |
||||||||||||
Crochet DROPS jacket in ”Safran”. Size: S - XXXL
DROPS 127-7 |
|||||||||||||
|
CROCHET INFO: Replace first dc on every row with ch 3. TR-GROUP: In same st work: 2 dc, ch 2, 2 dc. PATTERN: See diagram M.1 – M.4. DECREASE TIP: Dec 1 or ½ repetition - see M.2 and M.3. Dec at beg of row as follows: Replace 1 repetition with 6 sl st and ½ repetition with 3 sl st. Dec at end of row as follows: Turn piece when either 1 or ½ repetition remains. INCREASE TIP (applies to sleeve): Inc ½ repetition. Inc by turning with 5 ch instead of 3 ch. On next row, work ½ repetition over the extra 2 ch – see M.4. --------------------------------------------------------- BACK PIECE: Ch 118-130-142-154-166-178 (includes 6 ch to turn with) on hook size 3 mm / C with Safran. Work 1 dc-group – see explanation – in the 7th ch from hook, skip 2 ch, 1 dc in next ch, * skip 2 ch , 1 dc-group in next ch, skip ch 2, 1 dc in next ch*, repeat from *-* (18-20-22-24-26-28 times). Continue to work M.1 (1st row is now done, beg on 2nd row) = 19-21-23-25-27-29 repetitions. When piece measures 10 and 20 cm / 4" and 8", dec ½ repetition in each side – read Decrease tip = 17-19-21-23-25-27 repetitions. When piece measures 51-52-53-54-55-56 cm / 20"-20½"-21"-21¼"-21⅝"-22", dec for armhole in each side on every row as follows – read Decrease tip: 1 repetition a total of 1-1-2-2-2-2 times, then ½ repetition 0-2-2-2-4-4 times = 15-15-15-17-17-19 repetitions. When piece measures 68-70-72-74-76-78 cm / 26¾"-27½"-28⅜"-29⅛"-30"-30¾", divide the piece for neck and finish each shoulder separately. RIGHT SHOULDER: Start in the side and work in towards the middle. Work pattern over the first 6-6-6-6-6-7 repetitions, on next row dec 1 repetition towards the neck, 5-5-5-5-5-6 repetitions remain for shoulder. Cut and fasten the thread, piece measures approx. 70-72-74-76-78-80 cm / 27½"-28⅜"-29⅛"-30"-30¾"-31½. LEFT SHOULDER: Work as right shoulder but reversed. RIGHT FRONT PIECE: Ch 64-70-76-82-88-94 (includes 6 ch to turn with) on hook size 3 mm / C with Safran. 1st row = RS: Beg from mid front and work towards the side. Work 1 dc-group in the 7th ch from hook, skip 2 ch, 1 dc in next ch, * skip 2 ch, 1 dc-group in next ch, skip 2 ch, 1 dc in next ch *, repeat from *-* (9-10-11-12-13-14 times). Continue to work M.1 (1st row is now done, beg on 2nd row) = 10-11-12-13-14-15 repetitions. When piece measures 15 and 25 cm / 6" and 9¾", dec in the side (end of row from RS) as on back piece = 9-10-11-12-13-14 repetitions. When piece measures 51-52-53-54-55-56 cm / 20"-20½"-21"-21¼"-21⅝"-22", dec for armhole in the side as on back piece while AT THE SAME TIME dec for neck on every other row towards mid front as follows: Dec ½ repetition a total of 6-6-6-8-8-8 times. After all dec, 5-5-5-5-5-6 repetitions remain for shoulder. Continue to work until piece measures 70-72-74-76-78-80 cm / 27½"-28⅜"-29⅛"-30"-30¾"-31½, fasten off. LEFT FRONT PIECE: Work as right front piece. 1st row = from WS. SLEEVE: Work sleeve back and forth. Ch 65-65-72-72-79-79 (includes 3 ch to turn with) on hook size 3 mm / C with Safran. Work 1 dc in the 4th ch from hook, * 1 dc in each of the next ch 6, skip 1 ch *, repeat from *-*, and finish with 1 dc in each of the last 5 ch = 55-55-61-61-67-67 dc. Work 1 dc in every dc until piece measures 6 cm / 2⅜" – see CROCHET INFO, now work M.1. (Work first row in M.1 as follows: ch 3 in 1st dc, * skip 2 dc, 1 dc-group in next dc, skip 2 dc, 1 dc in next dc*, repeat from *-*) = 9-9-10-10-11-11 repetitions. When piece measures 15-18-18-18-18-18 cm / 6"-7"-7"-7"-7"-7", inc ½ repetition in each side, repeat on every 8th-4th-4th-4th-4th-4th row a total of 4-6-6-6-6-6 times - Read INCREASE TIP = 13-15-16-16-17-17 repetitions. When piece measures 48-47-47-46-46-45 cm / 19"-18½"-18½"-18"-18"-17¾" (shorter measurements in the larger sizes because of longer sleeve cap and wider shoulders), dec 1 repetition in each side for sleeve cap. Then dec ½ repetition in each side on every other row a total of 0-0-0-0-2-2 times then on every row a total of 6-7-8-8-6-6 times = 5-6-6-6-7-7 repetitions – read Decrease tip. Work until piece measures 57-57-58-58-59-59 cm / 22½"-22½"-22¾"-22¾"-23¼"-23¼", fasten off. POCKETS: Ch 44 (includes 3 ch to turn with) on hook size 3 mm / C with Safran. Work 1 dc in the 4th ch from hook, * 1 dc in each of the next ch 6, skip 1 ch *, repeat from *-*, and finish with 1 dc in each of the last 5 ch = 37 dc. Work 1 dc in every dc back and forth until piece measures 12 cm / 4¾". Then work edge as follows: Work 1 sc, * skip 2 cm / ¾", 4 tr in next dc, ch 2, 4 tr in same dc, skip 2 cm / ¾", 1 sc in next dc *, repeat from *-* a total of 4 times. Continue to work an edge around the rest of the pocket as follows: 1 sc, * ch 2, skip ½ cm / ¼", 1 sc *, repeat from *-* down along the side, along the bottom and up the other side. Fasten off. Work another pocket. ASSEMBLY: Sew the shoulder seams tog. Sew in sleeves. Sew sleeve and side seams in one - sew edge to edge with neat, little stitches. Sew the pockets on each front piece, approx. 10 cm / 4" from bottom edge on jacket and approx. 4 cm / 1½" from front edge, sew with neat little stitches. CROCHET BORDER: Work edge from WS of jacket. Work an edge on hook size 3 mm / C with Safran up along left front piece, around the neckline, down along right front piece, around the edge at the bottom and then around the sleeves as follows: Work 1 sc, * skip 2 cm / ¾", 4 tr in next ch, ch 2, 4 tr in same st, skip 2 cm / ¾", 1 sc in next st *, repeat from *-*. AT THE SAME TIME work 5 button loops along the edge of right front piece as follows: Work first loop 2-4 cm / ¾"-1½" after neck dec (measured from top). Make the loop between two tr-loops (i.e 1 tr-loop = * skip 2 cm / ¾", 4 tr in next ch, ch 2, 4 tr in same st, skip 2 cm / ¾", 1 sc in next st *), so after the sc in next st, ch 12, 1 sc in same st. Continue with crochet edge as before with two tr-loops between each button loop until 5 loops have been worked. BUTTONS: Work covers for 5 buttons on hook size 3 mm / C with Safran as follows: Ch 2, then work 16 dc in the first of the 2 ch worked, finish with 1 sl st at top of first dc (= 1st round). 2nd round: Work 1 sc in every dc and finish with 1 sl st in first sc on round. 3rd round: Work 1 dc in every other sc and finish with 1 sl st in first dc on round = 8 dc. Place the button in the cover, sew around the edge, tighten tog and fasten the thread. Sew buttons on to left front piece. |
|||||||||||||
Diagram explanations |
|||||||||||||
|
|||||||||||||
|
|||||||||||||

|
|||||||||||||
Have you finished this pattern?Tag your pictures with #dropspattern #upnorthcardigan or submit them to the #dropsfan gallery. Do you need help with this pattern?You'll find 8 tutorial videos, a Comments/Questions area and more by visiting the pattern on garnstudio.com. © 1982-2025 DROPS Design A/S. We reserve all rights. This document, including all its sub-sections, has copyrights. Read more about what you can do with our patterns at the bottom of each pattern on our site. |
|||||||||||||


With over 40 years in knitting and crochet design, DROPS Design offers one of the most extensive collections of free patterns on the internet - translated to 17 languages. As of today we count 314 catalogs and 11822 patterns - 11812 of which are translated into English (US/in).
We work hard to bring you the best knitting and crochet have to offer, inspiration and advice as well as great quality yarns at incredible prices! Would you like to use our patterns for other than personal use? You can read what you are allowed to do in the Copyright text at the bottom of all our patterns. Happy crafting!
Post a comment to pattern DROPS 127-7
We would love to hear what you have to say about this pattern!
If you want to leave a question, please make sure you select the correct category in the form below, to speed up the answering process. Required fields are marked *.