
Popular categories
Looking for a yarn?


|
|
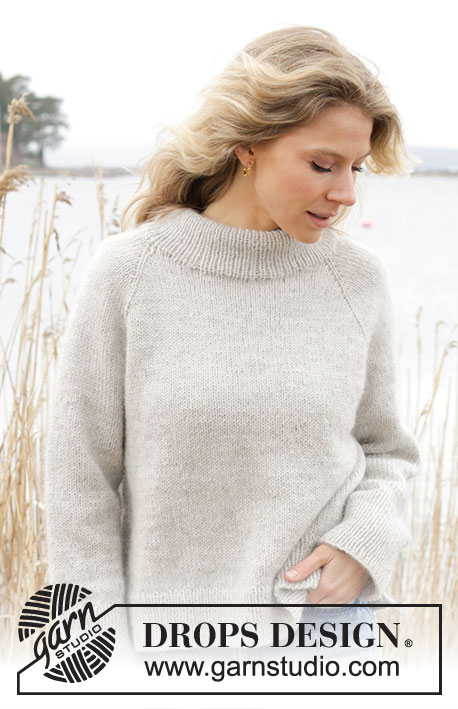
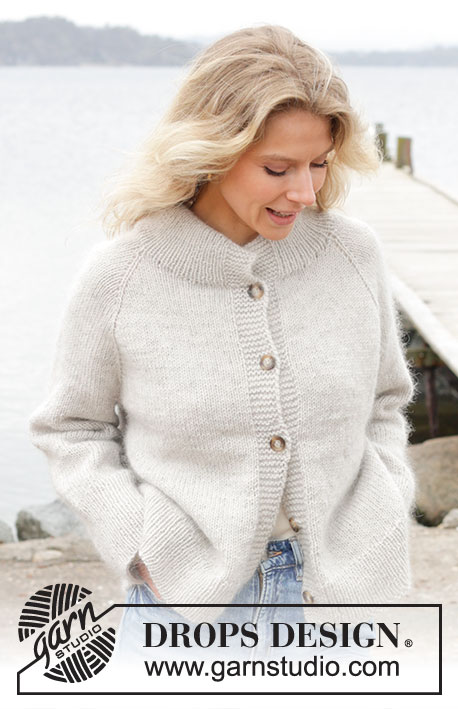
Moon Mist Cardigan |
|
 |
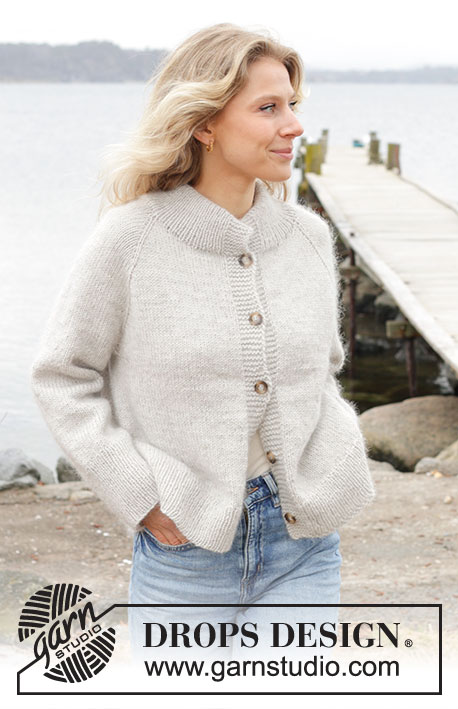 |
Knitted jacket in DROPS Lima and DROPS Kid-Silk. The piece is worked top down with raglan, double neck and split in sides. Sizes S - XXXL.
DROPS 245-8 |
|
|
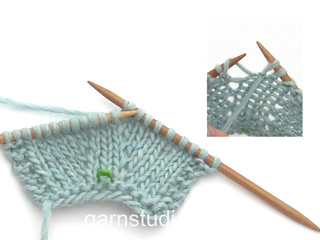
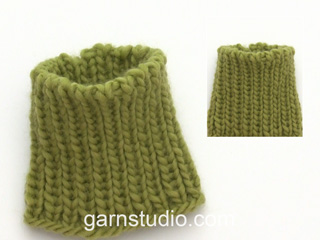
------------------------------------------------------- EXPLANATIONS FOR THE PATTERN: ------------------------------------------------------- GARTER STITCH (worked back and forth): Knit all rows. 1 ridge = knit 2 rows. RAGLAN-1: All increases are worked from the right side! Increase 1 stitch before/after the 4 marker-stitches – hereafter called raglan-stitches. The raglan-stitches are always worked in stocking stitch. Increase 1 stitch by making 1 yarn over, which is worked twisted as described below, then worked in stocking stitch. From the wrong side: BEFORE raglan-stitches: Purl the back loop – no hole. AFTER raglan-stitches: Slip the yarn over off the left needle and replace it the other way round (insert the left needle in the back when replacing it). Purl the front loop – no hole. RAGLAN-2: Increase 1 stitch before/after the raglan-stitches on the front/back pieces (not on the sleeves). Raglan-2 is worked in addition to Raglan-1. Work as follows: BEFORE raglan-stitches: Work until there are 3 stitches left before the raglan-stitches, use left needle to pick up thread between 2 stitches from row below, pick up thread from behind and knit stitch in front loop – no hole. AFTER raglan-stitches: Work 3 stitches past the raglan-stitches (if there are yarn overs, they are not counted as stitches), use left needle to pick up thread between 2 stitches from row below, pick up thread from front and knit stitch in back loop – no hole. INCREASE TIP: Increase 1 stitch by making 1 yarn over, which is worked twisted on the next row/round to avoid a hole. DECREASE TIP (for sleeves): Decrease 1 stitch on either side of the marker-thread as follows: Work until there are 3 stitches left before the marker-thread, knit 2 together, knit 2 (marker-thread sits between these 2 stitches), slip 1 stitch knit-wise, knit 1 and pass the slipped stitch over the knitted stitch. BUTTONHOLES: Work buttonholes on the right band (when the garment is worn). Work from the right side when there are 4 stitches left on the row as follows: Make 1 yarn over, knit 2 together and knit 2. On the next row (wrong side), knit the yarn over to leave a hole. The first buttonhole is worked when the rib on the neck is finished. Then work the other 4-4-5-5-5-5 buttonholes with approx. 9½-10-8½-9-9½-10 cm between each one. ------------------------------------------------------- START THE PIECE HERE: ------------------------------------------------------- JACKET – SHORT OVERVIEW OF THE PIECE. The neckline is worked first back and forth with circular needles then new stitches are cast on on each side for neckline, then the yoke is continued back and forth from mid-front. The yoke is divided for body and sleeves and the body continued back and forth with circular needle. The sleeves are worked in the round with double pointed needles/short circular needle. The neck is worked to finish. NECKLINE: Cast on 61-63-65-67-69-71 stitches with circular needle size 5 mm and 1 strand of each quality (2 strands). Insert 4 markers as follows: Insert 1 marker in the first stitch, count 17 stitches (sleeve), insert 1 marker in the next stitch, count 23-25-27-29-31-33 stitches (back piece), insert 1 marker in the next stitch, count 17 stitches (sleeve), insert 1 marker in the next stitch. These marker stitches are now called raglan-stitches. Work back and forth as follows: ROW 1 (wrong side): Purl, cast on 2 stitches at the end of the row = 63-65-67-69-71-73 stitches. ROW 2 (right side): Knit and increase for RAGLAN-1 on each side of the 4 raglan-stitches – read description above (8 increased stitches), cast on 2 stitches at the end of the row = 73-75-77-79-81-83 stitches. ROW 3 (wrong side): Purl (yarn overs worked as described under Raglan-1), cast on 2 stitches at the end of the row = 75-77-79-81-83-85 stitches. ROW 4 (right side): Knit and increase for raglan-1 on each side of the 4 raglan-stitches (8 increased stitches), cast on 2 stitches at the end of the row = 85-87-89-91-93-95 stitches. ROW 5 (wrong side): Purl, cast on 3 stitches at the end of the row = 88-90-92-94-96-98 stitches. ROW 6 (right side): Knit, increase for raglan-1 on each side of the 4 raglan-stitches (8 stitches increased), cast on 3 stitches at the end of the row = 99-101-103-105-107-109 stitches. ROW 7 (wrong side): Purl, cast on 10-12-12-14-14-16 stitches at the end of the row = 109-113-115-119-121-125 stitches. ROW 8 (right side): Knit and increase for raglan-1 on each side of the 4 raglan-stitches (8 increased stitches), cast on 10-12-12-14-14-16 stitches at the end of the row = 127-133-135-141-143-149 stitches. ROW 9 (wrong side): Purl, work the outermost 7 stitches on each side in GARTER STITCH – read description above. The neckline is finished and you have increased 4 times for raglan-1 on each side of the 4 raglan-stitches. YOKE: Work stocking stitch back and forth with 7 band stitches in garter stitch on each side. REMEMBER THE KNITTING TENSION and the BUTTONHOLES on the right band – read description above. NOTE: You will now increase more stitches on the front/back pieces than on the sleeves, so you will now work raglan-2 regularly in addition to raglan-1. Read the next 3 paragraphs before continuing. Increase for raglan-1 on each side of the 4 raglan-stitches every 2nd row (each row from the right side) 3-5-8-13-13-11 times (i.e., 7-9-12-17-17-15 times including the 4 increases on the neckline). AT THE SAME TIME on the first row from the right side increase for RAGLAN-2 on the front and back pieces – read description above (raglan-2 is worked in addition to raglan-1). Increase for raglan-2 every 10th-12th-12th-8th-6th-6th row a total of 3-3-3-5-6-6 times. When you have increased for raglan-1 a total of 3-5-8-13-13-11 times, continue to increase for raglan-1 every 2nd row but every second increase is only worked on the front and back pieces (i.e., increase on the front/back pieces every 2nd row and on the sleeves every 4th row). Increase like this 14-14-12-8-10-14 times on the front/back pieces (7-7-6-4-5-7 times on the sleeves) – remember raglan-2. You have now increased a total of 24-26-27-30-33-35 times on the front/back pieces (including raglan-2) and 14-16-18-21-22-22 times on the sleeves. After all the increases for raglan-1 and raglan-2 there are 247-269-283-313-331-345 stitches (41-45-46-51-54-58 stitches on the front pieces between the raglan-stitches, 45-49-53-59-61-61 stitches on the sleeves and 71-77-81-89-97-103 stitches on the back piece). Continue with stocking stitch and 7 band stitches in garter stitch on each side, without further increases, until the piece measures 22-24-25-26-28-30 cm, measured from the cast-on edge, mid-back. Now divide for the body and sleeves as follows: Work 42-46-47-52-55-59 stitches as before (front piece), place the next 45-49-53-59-61-61 stitches on a thread for the sleeve, cast on 8-8-10-10-12-14 stitches (in side under sleeve), work 73-79-83-91-99-105 stitches (back piece), place the next 45-49-53-59-61-61 stitches on a thread for the sleeve, cast on 8-8-10-10-12-14 stitches (in side under sleeve), work the last 42-46-47-52-55-59 stitches (front piece). The body and sleeves are finished separately. The piece is now measured from here! BODY: = 173-187-197-215-233-251 stitches. Insert 1 marker-thread in the middle of the 8-8-10-10-12-14 stitches cast on under each sleeve. Allow the threads to follow your work onwards – they are used when working the split in each side. Continue stocking stitch back and forth with 7 band stitches in garter stitch on each side until the body measures 21-21-22-23-23-23 cm from the division – finish after a row from the wrong side. Now divide the piece at both marker-threads and finish each piece separately. Place the stitches from the right front piece and back piece on 2 separate stitch holders = 46-50-52-57-61-66 stitches on the needle (left front piece). LEFT FRONT PIECE: Change to circular needle size 3.5 mm. Knit 1 row from the right side and increase 13-13-15-16-18-19 stitches evenly spaced – read INCREASE TIP (do not increase over the bands) = 59-63-67-73-79-85 stitches. Work as follows from the wrong side (from the side): 1 garter stitch, * purl 1, knit 1 *, work from *-* until there are 8 stitches left, purl 1 and 7 band stitches in garter stitch. Continue this rib back and forth for 8 cm. Cast off with rib or Italian cast off. The jacket measures approx. 56-58-60-62-64-66 cm from the shoulder. BACK PIECE: Place the 81-87-93-101-111-119 stitches from the stitch holder on circular needle size 3.5 mm. Knit 1 row and increase 24-26-26-30-32-36 stitches evenly spaced = 105-113-119-131-143-155 stitches. Work as follows from the wrong side: 1 garter stitch, * purl 1, knit 1 *, work from *-* until there are 2 stitches left, purl 1 and 1 garter stitch. Continue this rib back and forth for 8 cm. Cast off in the same way as on the left front piece. RIGHT FRONT PIECE: Place the 46-50-52-57-61-66 stitches from the stitch holder on circular needle size 3.5 mm. Knit 1 row and increase 13-13-15-16-18-19 stitches evenly spaced (do not increase over the bands) = 59-63-67-73-79-85 stitches. Work as follows from the wrong side (from the mid-front): 7 band stitches in garter stitch, * purl 1, knit 1 *, work from *-* until there are 2 stitches left, purl 1 and1 garter stitch. Continue this rib back and forth for 8 cm. Cast off in the same way as on the left front piece. SLEEVES: Place the 45-49-53-59-61-61 stitches from the thread on the one side of the piece on short circular needle/double pointed needles size 5 mm and knit up 1 stitch in each of the 8-8-10-10-12-14 stitches cast on under the sleeve = 53-57-63-69-73-75 stitches. Insert a marker-thread in the middle of the new stitches under the sleeve. Start at the marker-thread and work stocking stitch in the round. When the sleeve measures 4-4-4-2-2-3 cm, decrease 1 stitch on each side of the marker – read DECREASE TIP. Decrease like this every 7-5-3½-3-2½-2 cm a total of 4-5-7-9-10-10 times = 45-47-49-51-53-55 stitches. Continue working until the sleeve measures 31-29-29-28-27-25 cm from the division (or to desired length before the rib. There is 12 cm left). Change to double pointed needles size 3.5 mm. Knit 1 round and increase 19-21-21-21-23-23 stitches evenly spaced = 64-68-70-72-76-78 stitches. Work rib (knit 1, purl 1) for 12 cm. Cast off in the same way as on the front/back pieces. The sleeve measures approx. 43-41-41-40-39-37 cm from the division. Work the other sleeve in the same way. DOUBLE NECK: Knit up from the right side approx. 111-115-119-127-131-135 stitches round the neck, with circular needle size 3.5 mm and 1 strand of each quality (2 strands). The stitch number should be divisible by 4 + 3 – match the rib to the raglan-stitches so they continue to be knitted (from the right side). Work the first row from the wrong side as follows: 7 band stitches in garter stitch, * purl 1, knit 1 *, work from *-* until there are 8 stitches left, purl 1 and 7 band stitches in garter stitch. Continue this rib back and forth for 7 cm. Cast off 6 stitches at the beginning of the next 2 rows. Continue the rib with 1 garter stitch on each side until the neck measures 14 cm. Cast off a little loosely. Fold the neck double into the inside and fasten with a couple of stitches in each raglan-line. Sew together the openings on the bands with small stitches. ASSEMBLY: Sew the buttons onto the left band. |
|

|
|
|
Have you made this or any other of our designs? Tag your pictures in social media with #dropsdesign so we can see them! Do you need help with this pattern?You'll find tutorial videos, a Comments/Questions area and more by visiting the pattern on garnstudio.com. © 1982-2024 DROPS Design A/S. We reserve all rights. This document, including all its sub-sections, has copyrights. Read more about what you can do with our patterns at the bottom of each pattern on our site. |
|


With over 40 years in knitting and crochet design, DROPS Design offers one of the most extensive collections of free patterns on the internet - translated to 17 languages. As of today we count 304 catalogues and 11422 patterns - 11422 of which are translated into English (UK/cm).
We work hard to bring you the best knitting and crochet have to offer, inspiration and advice as well as great quality yarns at incredible prices! Would you like to use our patterns for other than personal use? You can read what you are allowed to do in the Copyright text at the bottom of all our patterns. Happy crafting!
Comments / Questions (24)
Bonjour a nouveau, je me suis trompee dans ma question pour le modele 245-8. Le Raglan 2 si je comprends bien se fait comme suit: une aug. devant le 1er. marqueur a gauche et ensuite apres le 2eme marqueur a drte, ensuite a gche du 3e. marqueur et a gche du dernier marqueur. Merci d'avance. Lily , ensuite a drte du 3eme. marqueur et apres le 4e marqueur.
13.02.2024 - 14:16DROPS Design answered:
Bonjour Mme Legrand, les augmentations-2 se font uniquement sur les devants et le dos, autrement dit, à la fin du devant gauche = avant le 1er marqueur, au début du dos = après le 2ème marqueur, à la fin du dos = avant le 3ème marqueur et au début du devant = après le 4ème marqueur. Bon tricot!
20.02.2024 - 08:58Bonjour, le patron 245.8 Si je comprend bien le Raglan 2 se fait sur les 2e et 3e marqueurs? Merci
13.02.2024 - 13:02Bonjour madame Pour le modele Drops 245-8 et concernant la réalisation du col boulé, il est indiqué, après 7 cm de côtes de rabattre 6 m au début des 2 rangs suivants. Cela signifie-t-il 1 fois 6m en début du premier rang (à l’endroit) et 1 fois 6 m en début du rang suivant (à l’envers) ? Merci par avance pour votre retour
22.01.2024 - 18:24DROPS Design answered:
Bonjour Mme Perrone, tout à fait, vous rabattez 6 des mailles de bordure des devants de chaque côté, il reste 1 seule de ces mailles qui est désormais la maille lisière, ainsi quand on double le col, il est moins épais au niveau de la bordure des devants. Bon tricot!
23.01.2024 - 07:20Hi, Can the pattern be breakdown in row wise instructions, so that it is easier to follow both the Raglan Increases at the same time?
18.01.2024 - 14:20Hola, Me podrían explicar cómo hacer los aumentos para los primeros y últimos puntos reglan1, según línea escote, hilera 2? No me queda claro según la explicación. Gracias
13.01.2024 - 12:17DROPS Design answered:
Hola Diana, trabajas toda la fila de derecho, pero tienes que aumentar según lo que se indica en RAGLÁN 1. En la 2ª fila, trabajada por el lado derecho, aumentas haciendo 1 hebra simplemente. Estas hebras se trabajarán en la siguiente fila como se indica " por el lado revés". Antes del punto raglán, las hebras se trabajan de revés en el bucle posterior del punto. Después del punto raglán dejar caer la hebra de la fila anterior de la aguja, colocarla de vuelta retorcida y trabajar de revés en el bucle anterior del punto.
14.01.2024 - 19:30Bonjour Madame, Une précision s'il vous plait : pour le col et les boutonnières du modèle 245-8, faut-il bien commencer la 1ère boutonnière AVANT d'avoir tricoté le col en côtes ? Merci pour votre aide. Cordialement et tous mes Voeux pour 2024.
10.01.2024 - 12:01DROPS Design answered:
Bonjour Brigitte, bonne année 2024 à vous aussi. La 1ère boutonnière se fait au 1er rang sur l'endroit après les côtes, autrement dit, au 1er rang de l'empiècement. Bon tricot!
10.01.2024 - 15:59Merci beaucoup pour cette réponse rapide. Dernière demande : on commence donc les augmentations du Raglan 2 dés le 10ème rang et en même temps que le raglan 1, également au 10ème rang ?
02.01.2024 - 12:31DROPS Design answered:
Bonjour Mme Perrone, on commence les augmentations du raglan-2 au 1er rang sur l'endroit de l'empiècement, autrement dit, on va augmenter pour le raglan-1 et -2 en même temps au 1er rang sur l'endroit de l'empiècement, puis tous les 2 rangs pour le raglan-1 et tous les 10 rangs (taille S) pour le raglan-2. Bon tricot!
03.01.2024 - 07:54Bonjour Pour le modele Drops 245-8 on parle de Raglan 1 et Raglan 2. Dès le démarrage on identifie les 4 mailles de raglan et l’on fait des augmentations avant et après chacun d’entre eux appelés Ranglan 1, durant les 9 premiers rangs. J’avoue ne pas comprendre ensuite la distinction entre Raglan 1 et Raglan 2 pour tricoter l’empiétement. Comment les distinguer ? Merci par avance de votre retour.
31.12.2023 - 17:21DROPS Design answered:
Bonjour Mme Perrone, les augmentations Raglan-2 permettent d'augmenter uniquement les devants et le dos, elles vont être tricotées en plus de celles du raglan-1: 3-3-3-5-6-6 fois au total tous les 10-12-12-8-6-6 rangs. Augmentez alors pour le raglan-2 comme indiqué, et en même temps, augmentez pour le raglan-1 comme avant. Bon tricot!
02.01.2024 - 11:33Bonjour! désolée, encore moi!! Pourriez vous svp m'apporter quelques précisions sur ces augmentations : "augmenter ts les 2 rgs pour devants et le dos et ts les 4 rgs pour les manches. Augmenter ainsi 14 fois pour devants/dos (soit 7 fois pour manches" > n'y a-t-il pas une erreur car pour les manches il ne faut augmenter que tous les 4 rgs et dans les 14 fois je ne peux pas inclure les 7 fois tous les 4 rangs! Merci encore à vous...
30.11.2023 - 13:59DROPS Design answered:
Bonjour Mme Cardona, vous devez maintenant augmenter alternativement 4 mailles (devants et dos seulement) et 8 mailles (devants, dos et manches, autrement dit comme avant); augmentez ainsi 14 fois pour le devant et le dos tous les 2 tours, et comme vous augmenterez 1 fois sur 2 pour les manches en même temps, vous augmenterez 7 fois sur les manches. Bon tricot!
30.11.2023 - 16:18Une dernière précision svp : lorsque vous écrivez : (cf RAGLAN-2) "avant les augmentations du raglan-1 au début du dos/des devants et après les augmentations du raglan-1 à la fin du dos/des devants" : cela veut donc dire avant et après tous les 4 marqueurs appelés" mailles des raglans" ? merci encore!
22.11.2023 - 10:41DROPS Design answered:
Bonjour Mme Cardona, non car on n'augmente pour le raglan-2 que pour les devants et le dos, autrement dit, vous augmentez pour le raglan-2: avant le marqueur à la fin du devant droit, après le marqueur au début du dos + avant le marqueur à la fin du dos et après le marqueur au début du devant gauche. Bon tricot!
22.11.2023 - 16:13