
Looking for a yarn?


Comments / Questions (33)
![]() Marie-Jeanne wrote:
Marie-Jeanne wrote:
Après avoir monté les mailles nous sommes sur l'endroit, doit-on faire un rang endroit sur l'endroit puis un rang envers sur l'envers ? J'ai du mal à comprendre. Merci
21.05.2025 - 12:24DROPS Design answered:
Bonjour Marie-Jeanne, dans ce modèle, on doit d'abord tricoté 1 rang envers sur toutes les mailles, juste après avoir monté les mailles, ce sera un rang sur l'envers de l'ouvrage, ainsi, avant les côtes, on aura 1 rang jersey en bas du top. Bon tricot!
21.05.2025 - 13:12
![]() Silvia wrote:
Silvia wrote:
Salve, io lavorerò con i ferri al dritto, taglia L, devo quindi montare 61 maglie per il dietro e 61 per il davanti?
09.04.2025 - 10:20DROPS Design answered:
Buongiorno Silvia, questo modello è progettato per la lavorazione in tondo. Se preferisce lavorarlo in piano deve riadattare le spiegazioni: per un aiuto più personalizzato può rivolgersi al suo rivenditore DROPS di fiducia. Buon lavoro!
10.04.2025 - 16:25
![]() Marita Katsaounis wrote:
Marita Katsaounis wrote:
I just want to know if this is the whole pattern and where can I find the whole pattern because I don’t see you mention where to apply diagrams A.1 and A.2. Please let me know. Thank you so much!
01.04.2024 - 16:23DROPS Design answered:
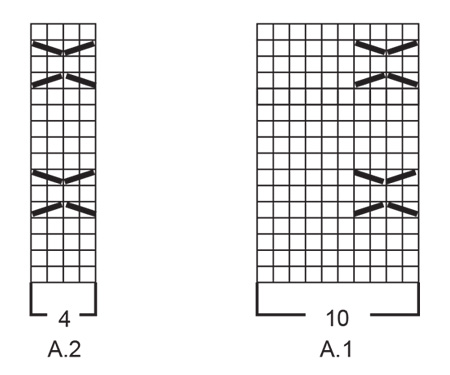
Dear Marita, the whole pattern is on the page. You should start to knit the A.1 and A.2 pattern on the body, right after you switch to the 4 mm single pointed needles. See: "Then work as follows: 2 stitches in garter stitch, 5-4-4-4-5-6 stitches in stocking stitch, work A.1 7-8-9-10-11-12 times, A.2, 5-4-4-4-5-6 stitches in stocking stitch, and 2 stitches in garter stitch. Continue this pattern." I hope this helps. Happy Knitting.
01.04.2024 - 16:37
![]() Brenda Monks wrote:
Brenda Monks wrote:
Explain what you mean by 1ridge vertically =knit 2rows ?what I do you mean by a ridge is that a row of knitting my ? Comes from pattern Midsummers day
17.04.2023 - 05:00DROPS Design answered:
Hi Brenda, 1 ridge is 2 knitted rows. Happy crafting!
17.04.2023 - 06:40
![]() Christelle wrote:
Christelle wrote:
Bonjour, Peut-on réaliser cet ouvrage en circulaire svp ? Merci pour tous ces superbes modèles et vos réponses toujours rapides.
19.02.2023 - 20:32DROPS Design answered:
Bonjour Christelle, probablement, notez qu'ici nous avons 6 cm de fente de chaque côté, il vous faudra commencer séparément, puis joindre et diviser de nouveau après les emmanchures. Bon tricot!
20.02.2023 - 10:12
![]() Mima wrote:
Mima wrote:
Can you please explain what this means? thanks. AT THE SAME TIME cast off for neck at the beginning of every row from neck as follows: Cast off 2 stitches 1 time and 1 stitch 1 time.
17.11.2022 - 03:03DROPS Design answered:
Dear Mima, this doesn't apply to this pattern, correct? I couldn't find this sentence here - but this means to cast off the stitches for neck at the beginning of each row starting from neck (it might be either from RS or from WS depending on the shoulder you are working on): first 2 sts then 1 stitch at the beg of next row starting from neck. Happy knitting!
17.11.2022 - 10:13
![]() Alba wrote:
Alba wrote:
Hello, when it says to seam in the outer loops of edge stitch, is there a special technique to use or do you just adapt something like the invisible side seam or matress stitch?
16.11.2022 - 18:34DROPS Design answered:
Dear Alba, you can yes, or then sew the outermost loop of garter stitche edges on each side as shown in this video. Happy assembly!
17.11.2022 - 09:59
![]() May wrote:
May wrote:
Hello i find this instruction confusing: Now work rib over all stitches, but adjust so that at least 3 rows in stocking stitch have been worked after a row with relief pattern and that last row is from wrong side – increase in addition 1 stitch on last row = 69-71-75-77-81-83 stitches. . What does all stitches mean? And what is atleast 3 rows in stocking stitch mean. And where specifically will I put the additional stitch on last row
17.09.2022 - 02:17DROPS Design answered:
Hello May! Knit 3 rows after a row with a relief pattern, on the last row (which is on the wrong side) increase 1 stitch anywhere in the row, then start knitting rib = 69-71-75-77-81-83 stitches in on the row. Happy knitting!
17.09.2022 - 10:43
![]() May wrote:
May wrote:
Can i get clarification from this instruction: if relief pattern meets rib when decreasing, work stocking stitch over these stitches instead of cable what is relief pattern and when does the decrease happen? thanks!
15.09.2022 - 09:55DROPS Design answered:
Dear May, the relief pattern is the pattern worked following the diagrams, when decreasing for armholes, you will also decrease some stitches that cannot be worked anymore in the pattern, then just work these stitches in stocking stitch instead. Happy knitting!
15.09.2022 - 13:13
![]() Roz wrote:
Roz wrote:
Regarding the straps on the front piece Page 4 I started the first strap in ribbing on 13 stitches I don’t understand what you mean by “try the front piece and work to desired length”
12.09.2022 - 08:23DROPS Design answered:
Dear Roz, you work the strap over 13 sts (in first 2 sizes) until 1 row remains before piece measures ca 40-42 cm (see size), then adjust this length depending on your own body working more or less rows on the strap. Happy knitting!
12.09.2022 - 11:59
|
||||||||||
Midsummer's Day#midsummersdaytop |
||||||||||
 |
 |
|||||||||
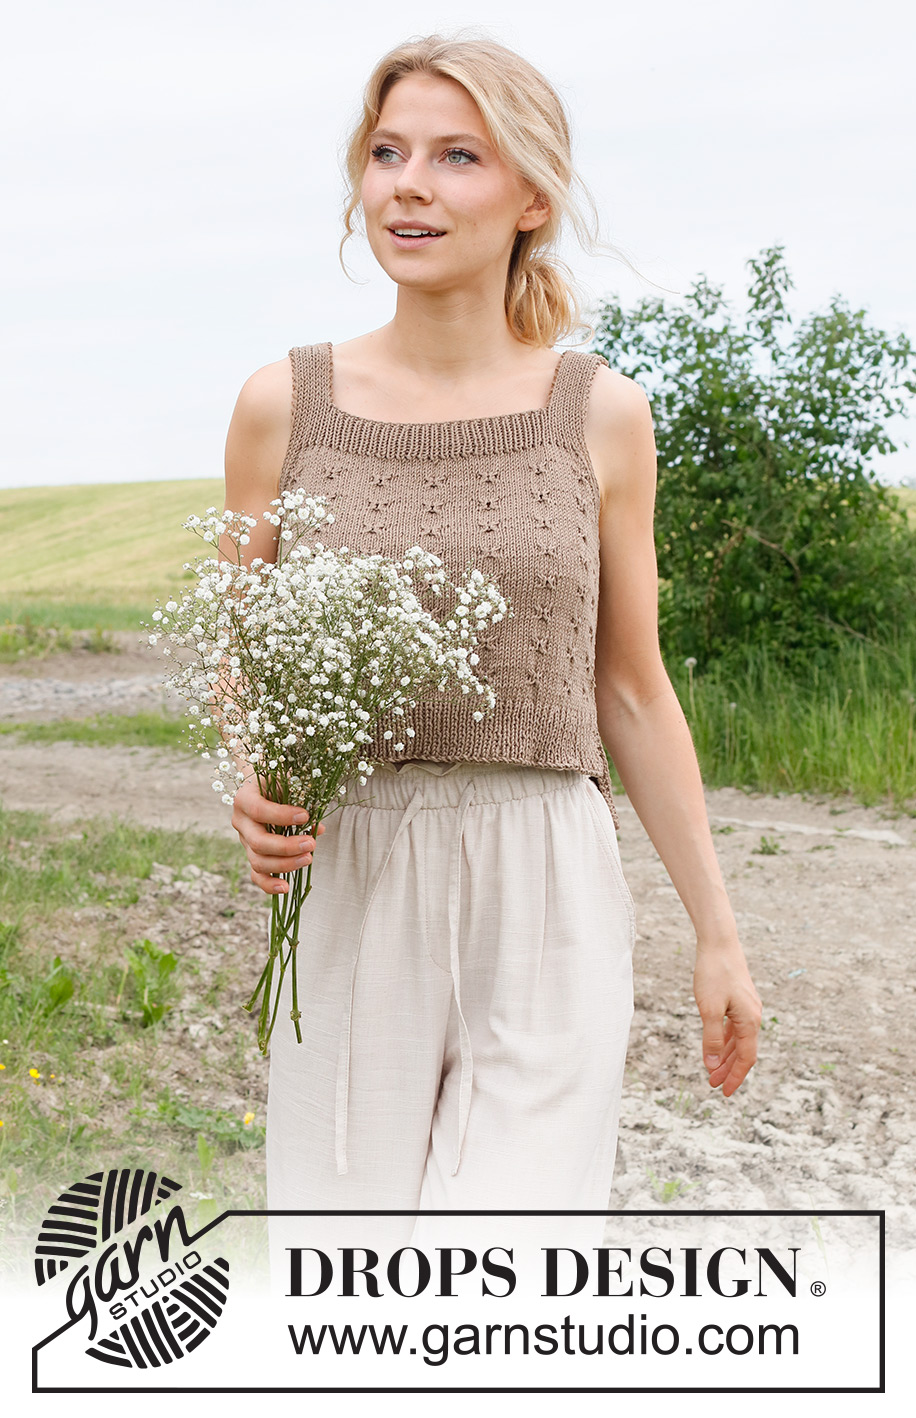
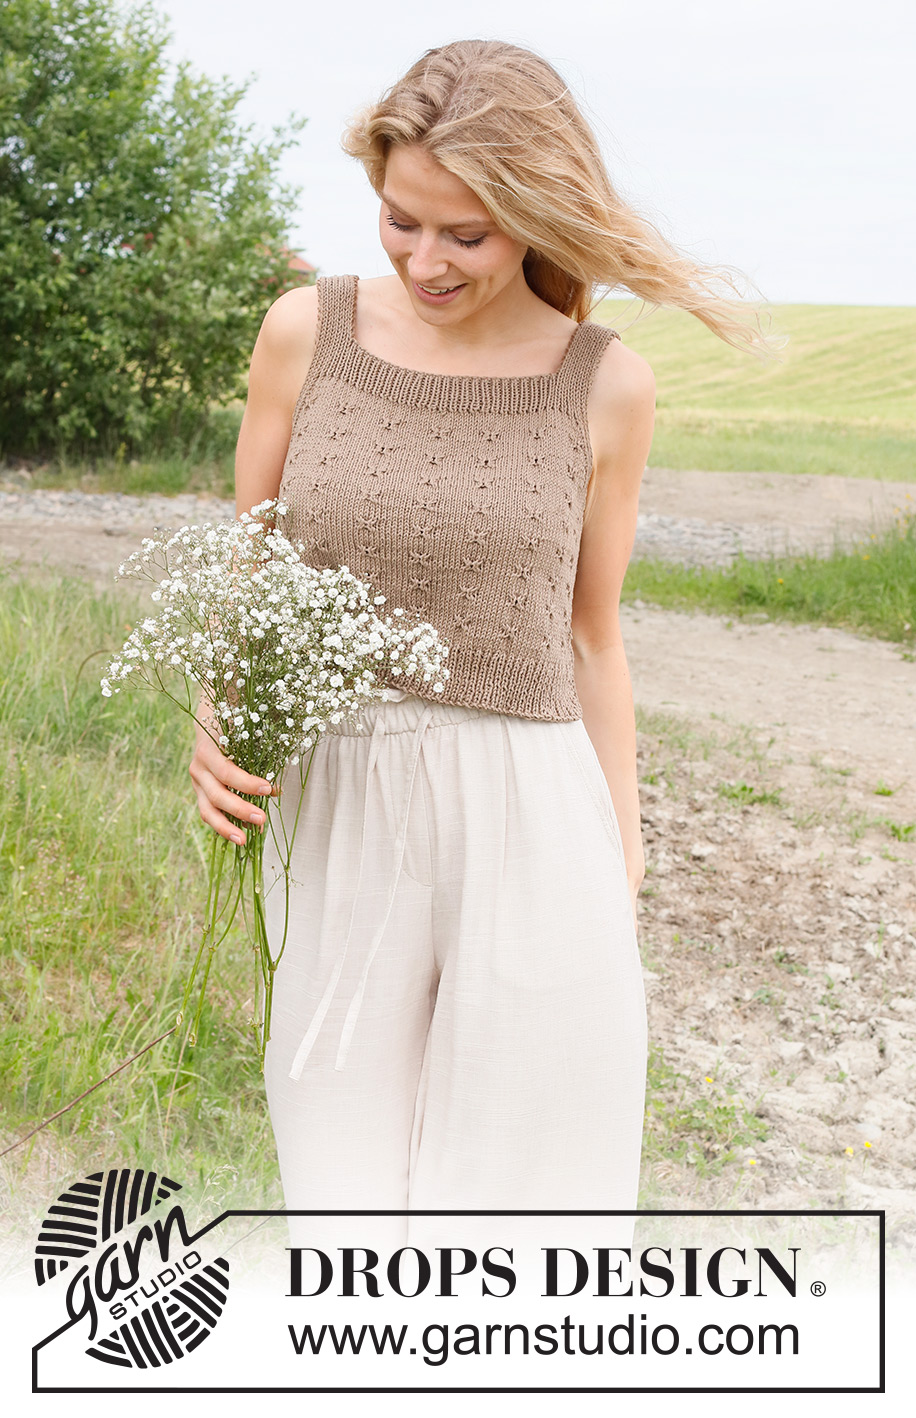
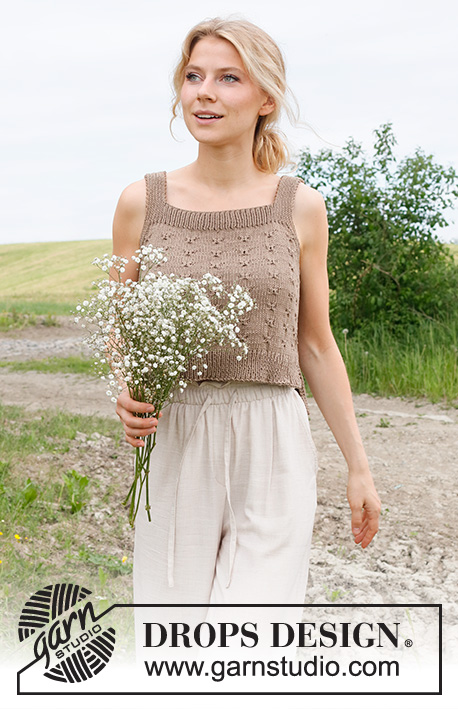
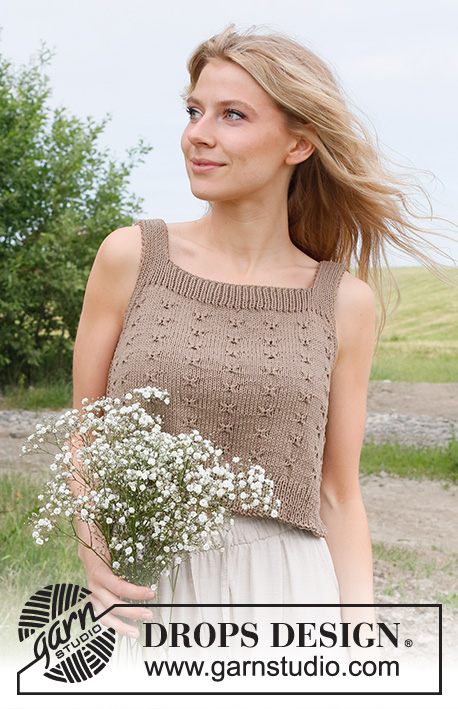
Knitted top/singlet in DROPS Cotton Light. Piece is knitted bottom up with relief pattern. Size: S - XXXL
DROPS 232-24 |
||||||||||
|
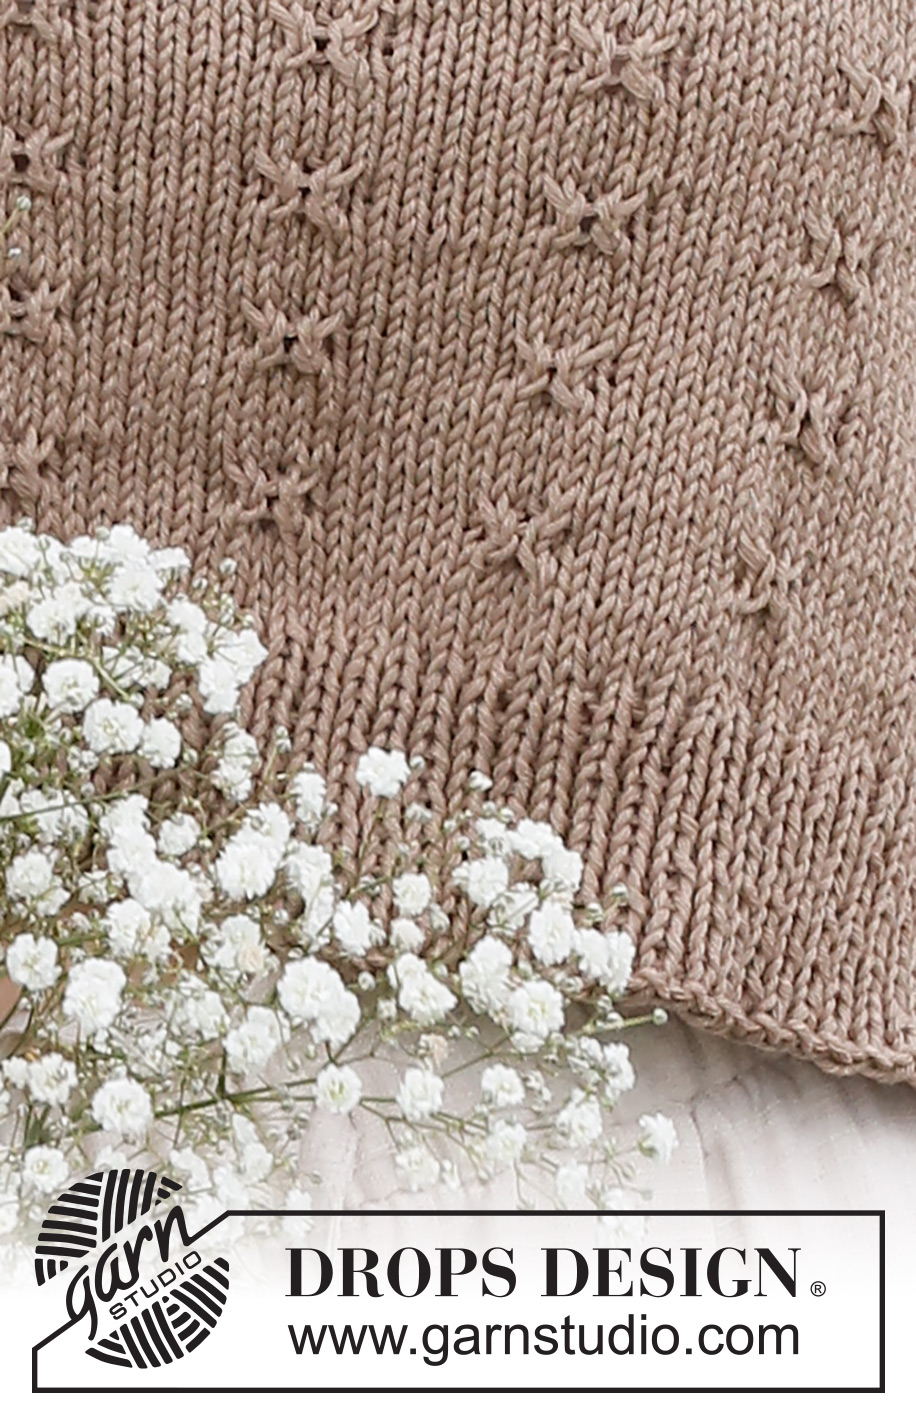
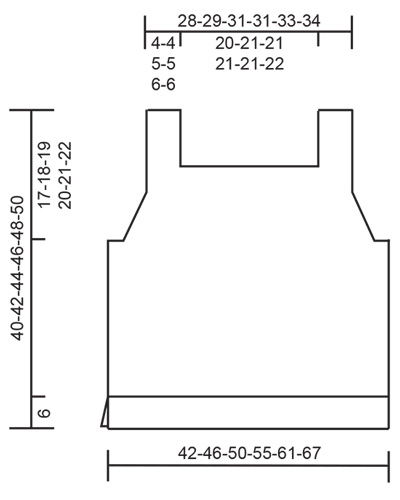
---------------------------------------------------------- EXPLANATION FOR THE PATTERN: ---------------------------------------------------------- GARTER STITCH (back and forth): Knit all rows. 1 ridge vertically = knit 2 rows. PATTERN: See diagrams A.1 and A.2. Diagrams show all rows in pattern seen from the right side. DECREASE TIP (applies to armholes): Decrease inside the outermost 5-5-7-7-9-9 stitches in each side. FROM RIGHT SIDE: DECREASE AT BEGINNING OF ROW AS FOLLOWS: Knit 5-5-7-7-9-9 stitches rib as explained in pattern, slip 1 stitch knitwise, knit 1, pass slipped stitch over stitch worked DECREASE AT END OF ROW AS FOLLOWS: Knit until 7-7-9-9-11-11 stitches remain on row, knit 2 together, knit 5-5-7-7-9-9 stitches rib as explained in pattern. FROM WRONG SIDE: DECREASE AT BEGINNING OF ROW AS FOLLOWS: Knit 5-5-7-7-9-9 stitches rib as explained in pattern, purl 2 together. DECREASE AT END OF ROW AS FOLLOWS: Knit until 7-7-9-9-11-11 stitches remain on row, purl 2 twisted together, knit 5-5-7-7-9-9 stitches rib as explained in pattern. ---------------------------------------------------------- START THE PIECE HERE: ---------------------------------------------------------- TOP - SHORT OVERVIEW OF THE PIECE: Piece is worked back and forth, bottom up in 2 equal parts. Sew the piece together on shoulders and in the sides as explained in pattern. FRONT PIECE: Cast on 101-109-121-133-147-161 stitches on single pointed needles size 3.5 MM = US 4 with DROPS Cotton Light. Purl 1 row from wrong side. Work next row as follows from right side: 2 stitches in GARTER STITCH - read explanation above - * knit 1, purl 1 *, repeat from *-* until 3 stitches remain, knit 1, 2 stitches in garter stitch. Continue rib back and forth like this for 6 cm = 2⅜". When rib has been worked, knit 1 row from right side while decreasing 13-13-15-17-19-21 stitches evenly (do not decrease over the outermost 2 stitches in each side) = 88-96-106-116-128-140 stitches. Purl 1 row from wrong side with 2 stitches in garter stitch in each side. Switch to single pointed needles 4 MM = US 6. Then work as follows: 2 stitches in garter stitch, 5-4-4-4-5-6 stitches in stockinette stitch, work A.1 7-8-9-10-11-12 times, A.2, 5-4-4-4-5-6 stitches in stockinette stitch, and 2 stitches in garter stitch. Continue this pattern. REMEMBER THE KNITTING GAUGE! When piece measures 21-22-23-24-25-26 cm = 8¼"-8¾"-9"-9½"-9¾"-10¼", work rib in each side as explained below before binding off for armholes – if the relief pattern meets with the rib and decrease for armholes, work stockinette stitch over these stitches instead of cable. Work first row as follows from right side: 2 stitches in garter stitch, * knit 1, purl 1 *, work from *-* 3-4-6-6-8-8 times in total, continue pattern as before until 8-10-14-14-18-18 stitches remain on needle, * purl 1, knit 1 *, work from *-* 3-4-6-6-8-8 times in total, 2 stitches in garter stitch. Continue back and forth like this. When piece measures 23-24-25-26-27-28 cm = 9"-9½"-9¾"-10¼"-10⅝"-11", bind off 3-5-7-7-9-9 stitches for armholes at the beginning of the 2 next rows = 82-86-92-102-110-122 stitches. Then bind off for sleeve as explained below. ARMHOLE: Continue pattern back and forth as before with 4-4-6-6-8-8 stitches rib and 1 stitch in garter stitch at the edge in each side (remember that if relief pattern meets rib when decreasing, work stockinette stitch over these stitches instead of cable). AT THE SAME TIME on first row from right side begin decrease for armhole - read DECREASE TIP. Decrease 1 stitch in each side on every row (both from right and wrong side) 0-0-3-7-11-19 times in total, then decrease 1 stitch in each side every other row (every row from right side) 7-8-6-6-4-1 times in total = 68-70-74-76-80-82 stitches. Now work rib over all stitches, but adjust so that at least 3 rows in stockinette stitch have been worked after a row with relief pattern and that last row is from wrong side – increase in addition 1 stitch on last row = 69-71-75-77-81-83 stitches. Switch to single pointed needles size 3.5 MM = US 4. Work as follows from right side: 1 stitch in garter stitch, * knit 1, purl 1 *, work from *-* until 2 stitches remain, knit 1, 1 stitch in garter stitch. Continue rib back and forth like this for 4 cm = 1½". Now bind off for neck as follows: Work 1 stitch in garter stitch, 12-12-14-14-16-16 stitches rib as before, then slip these 13-13-15-15-17-17 stitches on a thread for strap, bind off the next 43-45-45-47-47-49 stitches for neck, work 12-12-14-14-16-16 stitches rib as before and 1 stitch in garter stitch. Then work straps as explained below. STRAP: = 13-13-15-15-17-17 stitches. Work rib back and forth as before with 1 stitch in garter stitch in each side, until 1 row remain before piece measures 40-42-44-46-48-50 cm = 15¾"-16½"-17¼"-18"-19"-19¾" from cast-on edge. Try the front piece and work to desired length. Knit 1 row from right side while decreasing 4 stitches evenly = 9-9-11-11-13-13 stitches. Bind off by purling from wrong side. Work the other strap the same way. BACK PIECE: Cast on the same number of stitches as on front piece, and work the same way as front piece. ASSEMBLY: Sew strap together inside bind-off edge at the top of shoulders. Sew side seams – being at the top by armhole and sew in outer loops of edge stitch to get a flat seam, stop when 6 cm = 2⅜" remain at the bottom in each side (vents). |
||||||||||
Diagram explanations |
||||||||||
|
||||||||||
|
||||||||||
|
||||||||||
Have you finished this pattern?Tag your pictures with #dropspattern #midsummersdaytop or submit them to the #dropsfan gallery. Do you need help with this pattern?You'll find 21 tutorial videos, a Comments/Questions area and more by visiting the pattern on garnstudio.com. © 1982-2025 DROPS Design A/S. We reserve all rights. This document, including all its sub-sections, has copyrights. Read more about what you can do with our patterns at the bottom of each pattern on our site. |
||||||||||


With over 40 years in knitting and crochet design, DROPS Design offers one of the most extensive collections of free patterns on the internet - translated to 17 languages. As of today we count 314 catalogs and 11821 patterns - 11811 of which are translated into English (US/in).
We work hard to bring you the best knitting and crochet have to offer, inspiration and advice as well as great quality yarns at incredible prices! Would you like to use our patterns for other than personal use? You can read what you are allowed to do in the Copyright text at the bottom of all our patterns. Happy crafting!
Post a comment to pattern DROPS 232-24
We would love to hear what you have to say about this pattern!
If you want to leave a question, please make sure you select the correct category in the form below, to speed up the answering process. Required fields are marked *.