
Looking for a yarn?


Comments / Questions (18)
![]() Gail wrote:
Gail wrote:
Hallo, lovely pattern, but the edge is curling over. What type of cast off do you recommend please? I have used 4stitch icord. Thanks. Gail
09.06.2024 - 10:53DROPS Design answered:
Dear Gail, are you using DROPS Alpaca Bouclé? Since this thread doesn't usually curl. The curling over is usually due to the gauge or stitch pattern worked at the end. You can try and finish with a larger needle (so that stitches are looser). You can also cast off with a normal cast off, like this: https://www.garnstudio.com/video.php?id=15&lang=en, since i-cord is usually tighter, which may cause the curling. Happy knitting!
09.06.2024 - 19:59
![]() Vera wrote:
Vera wrote:
Kette ich beim Ärmel in jeder Reihe beidseitig 1 Masche ab oder in jeder 2. Reihe ? Vielen Dank für die Antwort Lg Vera
17.12.2023 - 19:51DROPS Design answered:
Liebe Vera, es wird 1 Masche am Anfang jeder Reihe (= Hin-Reihe sowie Rückreihe) abgekettet. Viel Spaß beim stricken!
18.12.2023 - 09:11
![]() JUAN MANUEL wrote:
JUAN MANUEL wrote:
En el diagrama los marcadores 2-4-6-8 estarían en la parte superior o inferior?
04.09.2023 - 05:04DROPS Design answered:
Hola Juan Manuel, son los marcadores en las sisas, es decir, en la parte superior.
10.09.2023 - 20:02
![]() Juan Manuel wrote:
Juan Manuel wrote:
Gracias por compartir sus patrones. Los marcadores que se quitan son del lado del cuello o del lado del talle?
31.08.2023 - 07:10DROPS Design answered:
Hola Juan Manuel, tienes que quitar los marcapuntos 2-4-6-8 de los 14 marcapuntos insertados al inicio de la labor, contados desde el comienzo de la vuelta.
03.09.2023 - 19:19
![]() Heike wrote:
Heike wrote:
Hallo, ich habe eine Frage zu den Ärmeln. Nach den Zunahmen und der ersten Abnahme sind 50 Maschen auf der Nadel. Die weiteren anfangen erfolgen wieder im 3,5 cm Abstand? (Bei Annahmen in jeder Reihe ( also 25 Reihen) erreicht man nicht mehr 13 cm...)
05.04.2023 - 11:58DROPS Design answered:
Liebe Heike, die Zunahmen sollen fertig sein, wenn man die Maschen für den Armkugel abkettet. Viel Spaß beim stricken!
11.04.2023 - 11:20
![]() Veerle Van Coillie wrote:
Veerle Van Coillie wrote:
Of komt het midden van de mouw in het midden van het afgekante gedeelte voor, zodat het pand naar achteren kanteld ?
26.02.2023 - 11:37DROPS Design answered:
Dag Veerle,
Je legt de mouw plat dubbel en je legt de cirkel plat neer. De onderarmnaad komt aan de onderkant in de opening op de cirkel en de bovenkant van de mouw komt aan de bovenkant van de opening voor het armsgat.
26.02.2023 - 18:52
![]() Veerle Van Coillie wrote:
Veerle Van Coillie wrote:
Als ik klaar ben en heb afgekant, is er dan een onder of bovenkant aan de cirkel ? ivm met de mouwen die ik ga innaaien ?
26.02.2023 - 11:12DROPS Design answered:
Dag Veerle,
Ja, de onderkant is hoger dan de bovenkant. Zie ook de tekening onderaan het patroon. Daar kun je zien dat de mouwen niet in het midden zitten, maar een beetje omhoog.
26.02.2023 - 18:51
![]() Veerle Van Coillie wrote:
Veerle Van Coillie wrote:
Als ik precies doe wat er staat gaat er op ieder mouwgedeelte 1 markeerder weg en op het hals gedeelte van 50 steken 2 , klopt dat ?
14.02.2023 - 15:12DROPS Design answered:
Dag Veerle,
Heb het uitgeteld en dat zou inderdaad moeten kloppen.
15.02.2023 - 20:45
![]() Veerle Van Coillie wrote:
Veerle Van Coillie wrote:
En in welke van de steeds vier herhalende naalden kan ik het beste beginnen met het afkanten ? Zelf denk ik in de tweede, de naald nadat inde omslagen heb gebreid ?
14.02.2023 - 08:31DROPS Design answered:
Dag Veerle,
In principe kun je op iedere gewenste naald beginnen met afkanten, maar zelf vind ik het inderdaad ook handiger als de omslagen niet in de web zitten, dus 1 of 2 naalden na een naald met omslagen.
19.02.2023 - 18:38
![]() Veerle Van Coillie wrote:
Veerle Van Coillie wrote:
Waar zitten de markeerdraden 2/4/6 en 8 ? Zijn dat va het begin van de toer de eerste 4 ?
14.02.2023 - 08:18
|
|
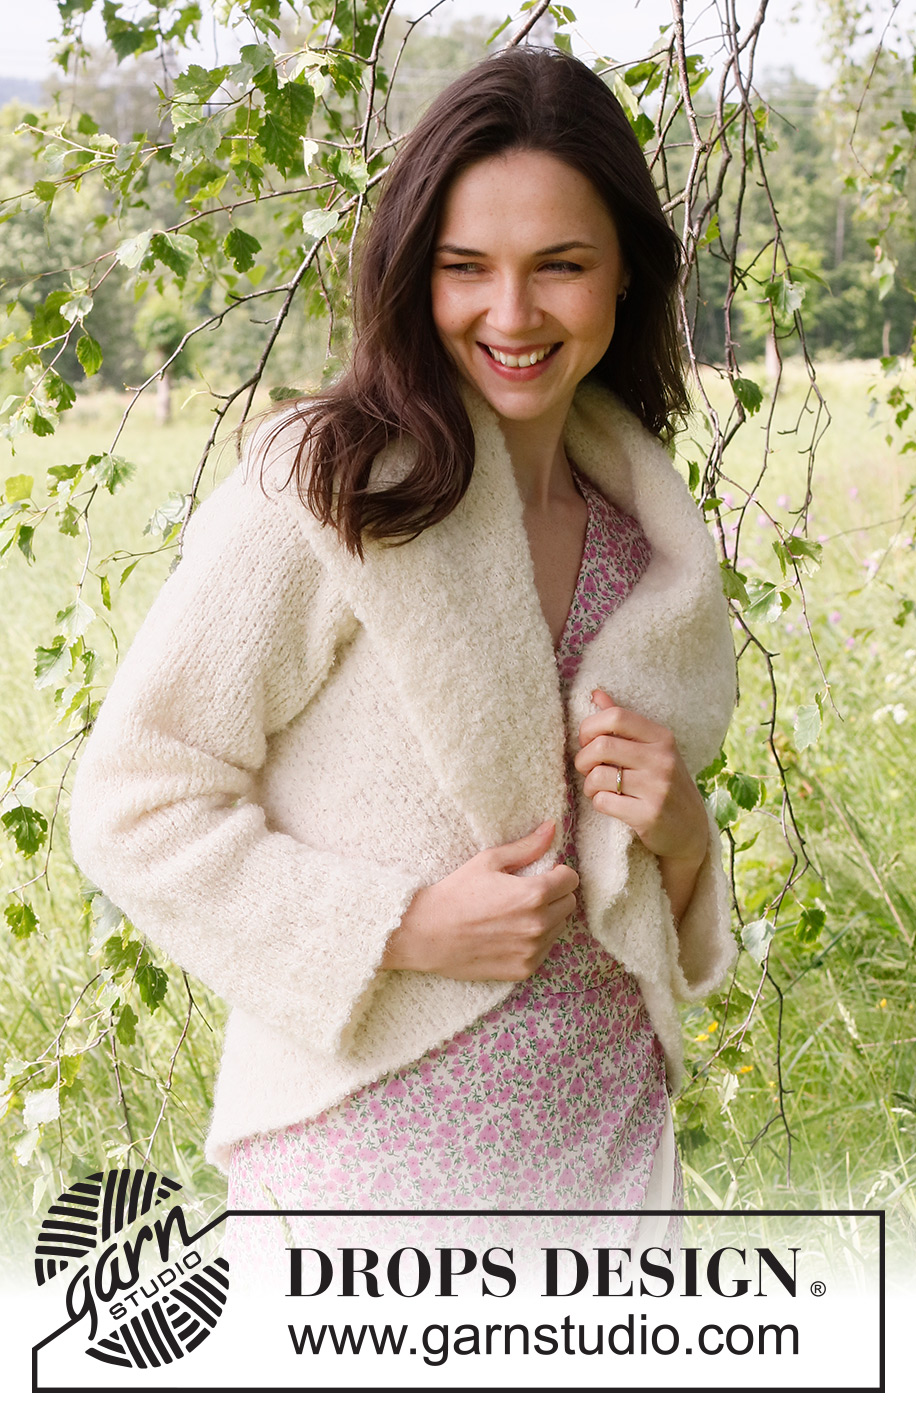
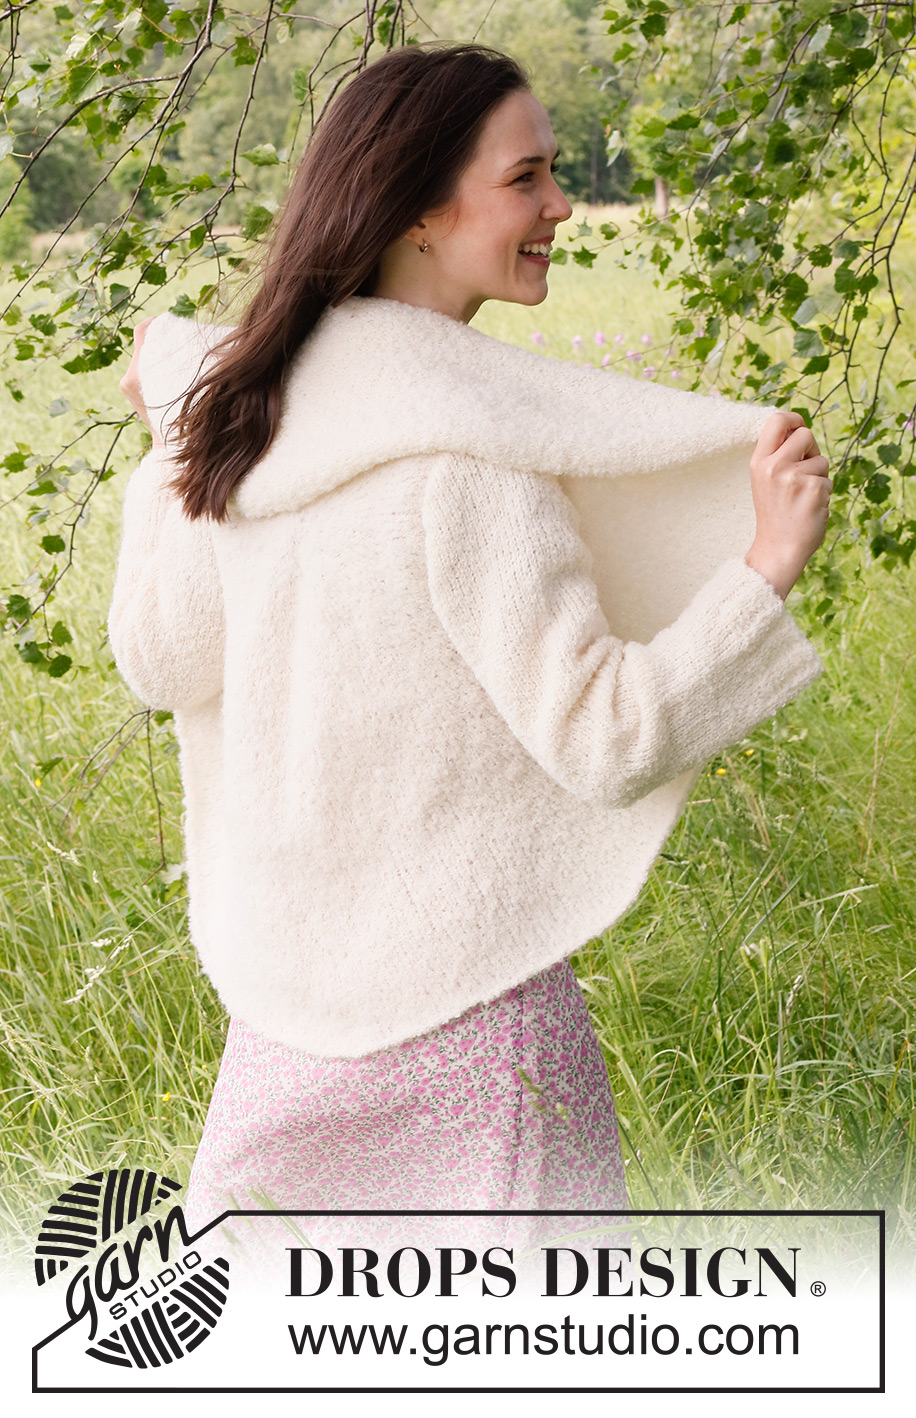
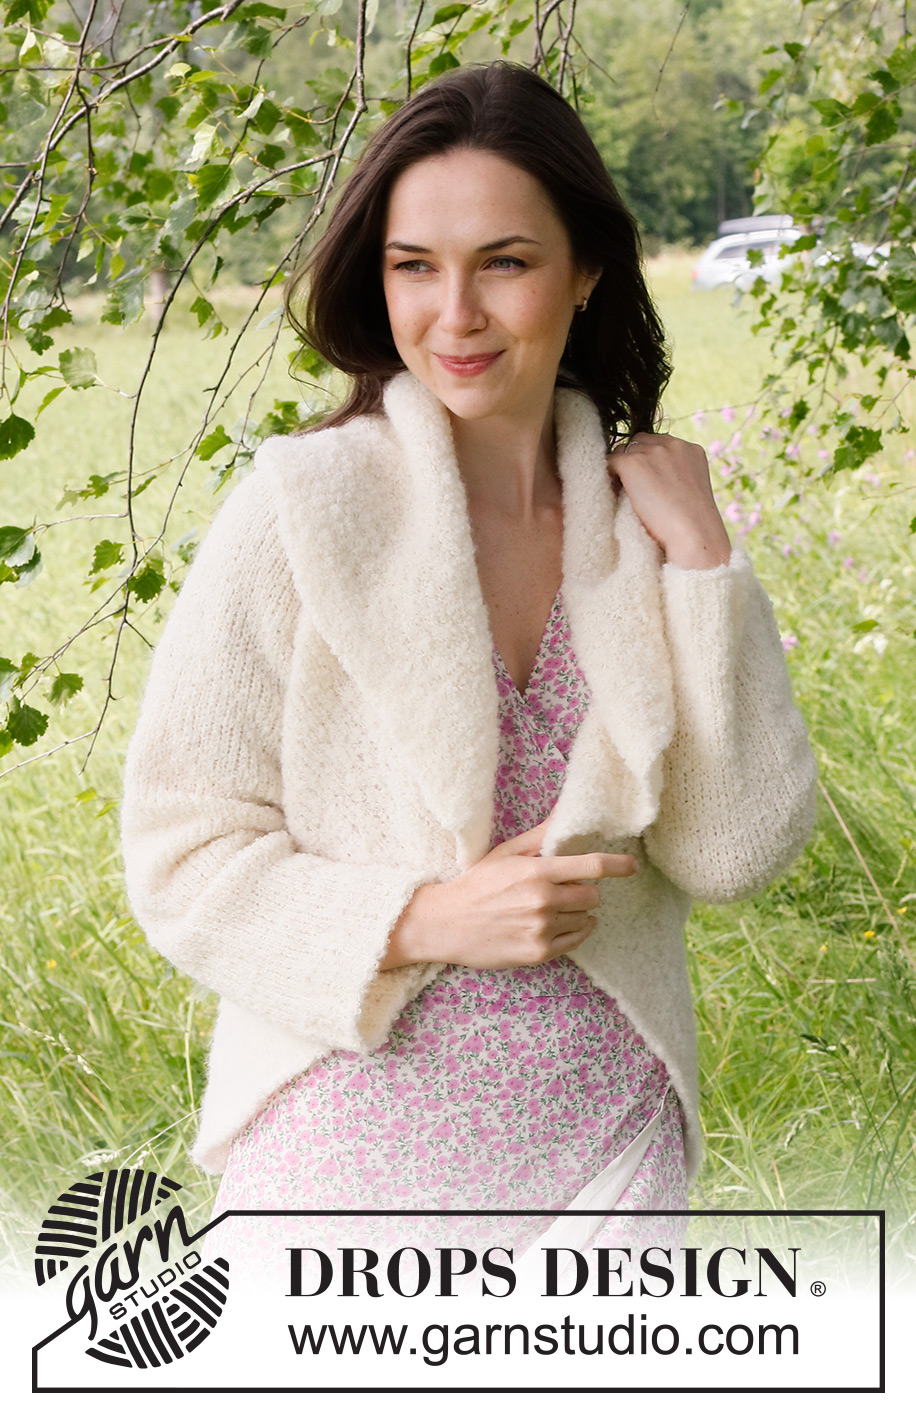
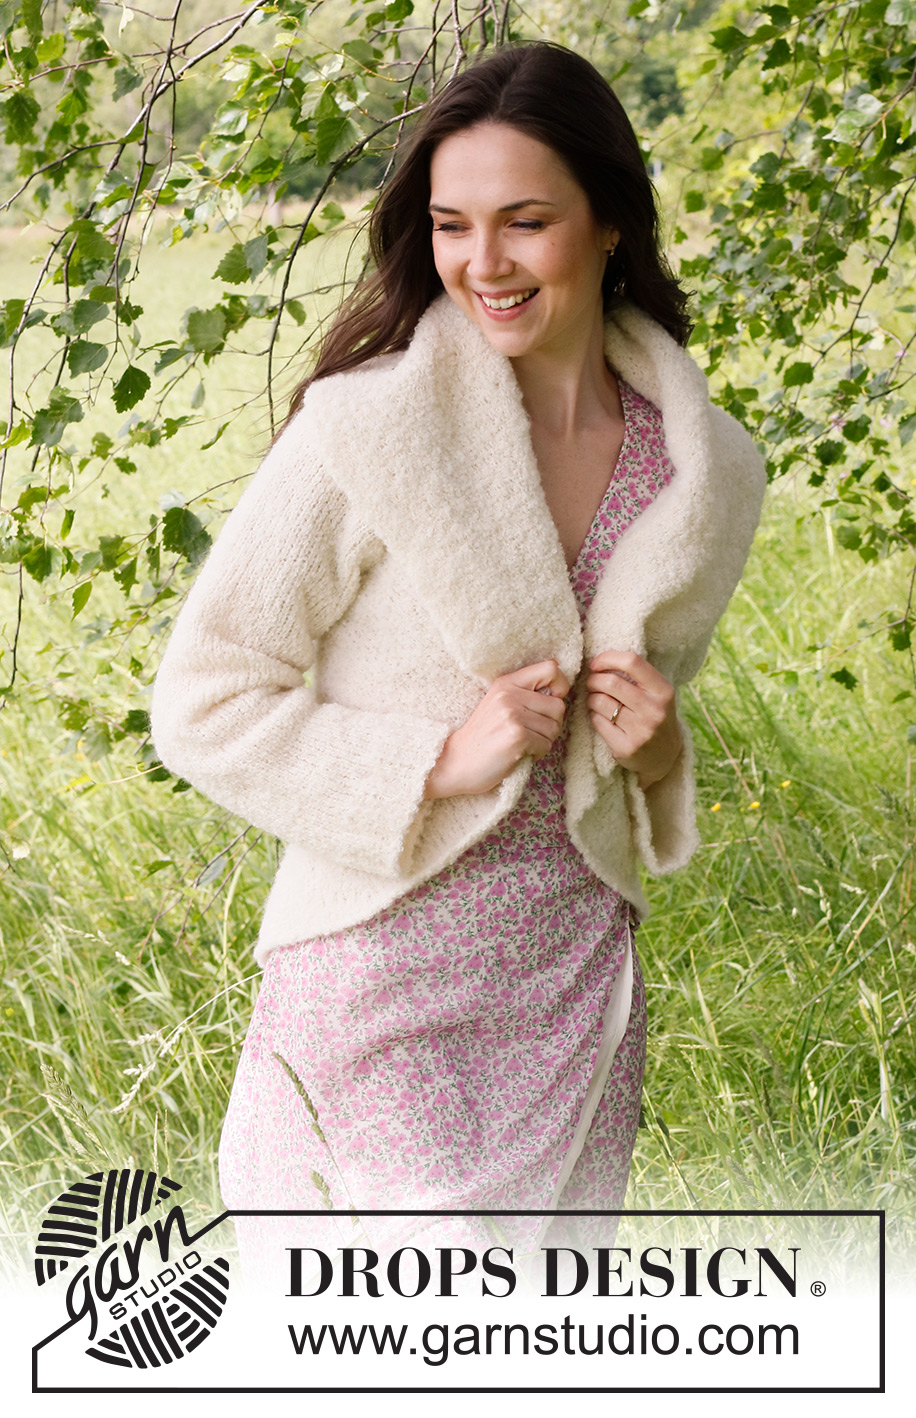
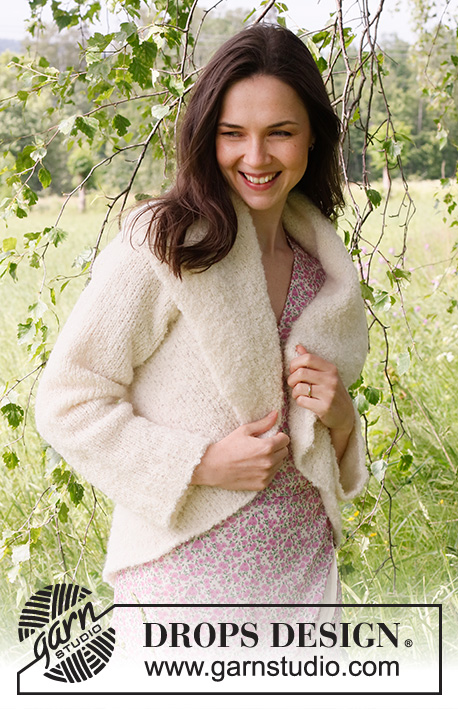
Trail Rider Coat#trailridercoat |
|
 |
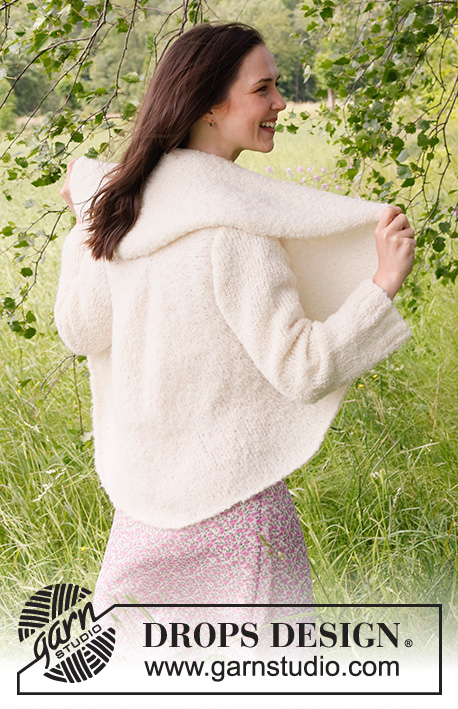 |
Knitted jacket in DROPS Alpaca Bouclé. The piece is worked in the round in a circle. Sizes S - XXXL.
DROPS 232-42 |
|
|
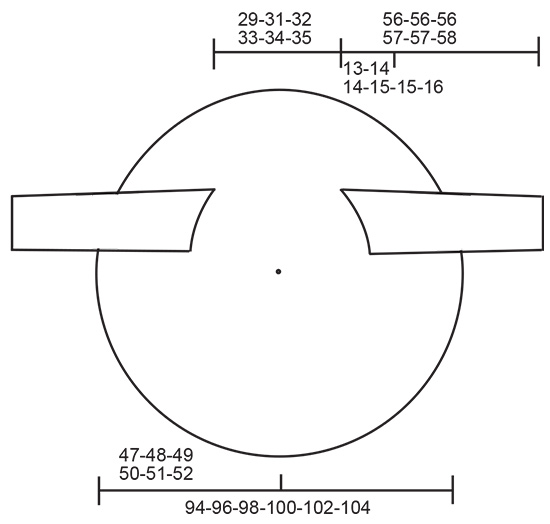
------------------------------------------------------- EXPLANATIONS FOR THE PATTERN: ------------------------------------------------------- RIDGE/GARTER STITCH (worked back and forth): Knit all rows. 1 ridge = knit 2 rows. ------------------------------------------------------- START THE PIECE HERE: ------------------------------------------------------- JACKET – SHORT OVERVIEW OF THE PIECE: The piece is worked in the round in a circle, from mid-back and outwards. Stitches are bind off for the sleeves, then new stitches cast on for the front pieces. The sleeves are worked back and forth, then sewn into the body. BACK PIECE: Cast on 7 stitches with double pointed needles size 5 MM = US 8 and DROPS Alpaca Bouclé. Work as follows: * Knit 1, 1 yarn over *, work from *-* to the end of the round = 14 stitches. Knit 1 round (yarn overs knitted twisted). Then work the next round as follows: * Knit 1, 1 yarn over *, work from *-* to the end of the round = 28 stitches. Knit 1 round (yarn overs knitted twisted). Insert 1 marker in every 2nd stitch (14 markers). Continue with stockinette stitch and, on the first round, increase by making 1 yarn over after each marker-stitch. On the next round knit the yarn overs twisted to avoid holes. Repeat this increase every 4th round, alternately before and after the marker-stitch (= 14 increased stitches each increase-round). Continue like this until the piece measures 19-20-21-22-23-24 cm = 7½"-8"-8¼"-8¾"-9"-9½" from the middle. There are approx. 168-182-182-196-210-210 stitches (10-11-11-12-13-13 increases at each marker). Now work the armholes as follows: Bind off 30-32-32-36-40-40 stitches (first armhole), work 50-52-54-56-58-60 stitches (neck), bind off 30-32-32-36-40-40 stitches (second armhole) and work the remaining stitches (bottom edge = 58-66-64-68-72-70 stitches). On the next round cast on the same number of stitches over the bind-off stitches = 168-182-182-196-210-210 stitches. Remove markers 2, 4, 6 and 8, leaving 10 markers. Continue in the round, increasing as before every 4th round (10 increased stitches each increase-round). Work until the piece measures 47-48-49-50-51-52 cm = 18½"-19"-19¼"-19¾"-20"-20½" from the middle. Bind off. SLEEVES: Cast on 38-38-42-42-46-46 stitches with circular needle size 4.5 MM = US 7 and DROPS Alpaca Bouclé. Work rib (knit 2, purl 2) with 1 edge stitch in GARTER STITCH – read description above, on both sides. When the rib measures 5 cm = 2", change to circular needle size 5 MM = US 8. Continue with stockinette stitch and 1 edge stitch in garter stitch on each side. When the piece measures 10 cm = 4", with the next row from the right side, increase 1 stitch by making 1 yarn over inside 2 stitches on each side = 2 stitches increased. The yarn overs are purled twisted on the next row (wrong side), to avoid holes. Increase like this every 3½-3-3½-2½-2½-2 cm = 1¼"-1⅛"-1¼"-1"-1"-¾" a total of 9-10-9-11-11-14 times = 56-58-60-64-68-74 stitches. When the sleeve measures 43-42-42-42-42-42 cm = 17"-16½"-16½"-16½"-16½"-16½" bind off for the sleeve cap at the beginning of each row as follows: 3 stitches 1 time on each side, then 1 stitch on each side until the piece measures 56-56-56-57-57-58 cm = 22"-22"-22"-22½"-22½"-22¾". Bind off the remaining stitches. Work 1 more sleeve in the same way. ASSEMBLY: Sew the sleeve cap to the armhole and sew the sleeve seams. |
|
|
|
Have you finished this pattern?Tag your pictures with #dropspattern #trailridercoat or submit them to the #dropsfan gallery. Do you need help with this pattern?You'll find 21 tutorial videos, a Comments/Questions area and more by visiting the pattern on garnstudio.com. © 1982-2025 DROPS Design A/S. We reserve all rights. This document, including all its sub-sections, has copyrights. Read more about what you can do with our patterns at the bottom of each pattern on our site. |
|


With over 40 years in knitting and crochet design, DROPS Design offers one of the most extensive collections of free patterns on the internet - translated to 17 languages. As of today we count 314 catalogs and 11821 patterns - 11811 of which are translated into English (US/in).
We work hard to bring you the best knitting and crochet have to offer, inspiration and advice as well as great quality yarns at incredible prices! Would you like to use our patterns for other than personal use? You can read what you are allowed to do in the Copyright text at the bottom of all our patterns. Happy crafting!
Post a comment to pattern DROPS 232-42
We would love to hear what you have to say about this pattern!
If you want to leave a question, please make sure you select the correct category in the form below, to speed up the answering process. Required fields are marked *.