
Popular categories
Looking for a yarn?


Comments / Questions (22)
![]() Ana wrote:
Ana wrote:
Boa tarde, Tenho uma dúvida quando se começa o ponto jarreteira para as cavas, como se contam as malhas? Pelo 8 que estão no desenho do padrão ou pelo número de malhas que estão na agulha. Isto porque tenho um total de 9 malhas por repetição e não 8.
15.02.2025 - 17:06DROPS Design answered:
Boa tarde, Deve tricotar as malhas em ponto jarreteira de acordo com o indicado nas explicações. Bons tricôs!
31.03.2025 - 17:15
![]() Hannah Helene Hollekim-Strand wrote:
Hannah Helene Hollekim-Strand wrote:
Jeg bruker vanligvis størrelse XS (har overvidde 83 cm). Lurer på om jeg burde justere oppskriften for at toppen skal passe meg, eller om den er såpass sammentrukket i mønsteret at størrelse S/M vil passe? Eller er det meningen at mønsteret skal være helt strukket når man har den på?
07.02.2025 - 09:41DROPS Design answered:
Hej Hannah, den vil måske nok være lidt stor til dig... du kan evt trække 1 rapport fra på for og bagstykke...
12.02.2025 - 13:42
![]() Margot wrote:
Margot wrote:
Bonjour, pour la première partie du DOS & DEVANT, pour la partie où il faut tricoter en A1 et en A2 (avant "Tricoter A.2 en rond") je comprends qu'il faut tricoter en aller-retours et il faut joindre le tricot en rond à "Tricoter A.2 en rond" ? Merci d'avance !
02.11.2024 - 13:25DROPS Design answered:
Bonjour Margot, le top se tricote de bas en haut, on tricote d'abord en rond puis on divise l'ouvrage aux emmanchures pour terminer le dos et le devant séparément. Après avoir monté les mailles vous tricotez A.1. Quand A.1 est terminé, vous tricote en suivant A.2 = vous répétez les 8 mailles de A.2 tout le tour et répétez le diagramme en hauteur jusqu'à ce qu'il soit indiqué de tricoter les mailles autrement (point mousse pour les emmanchures et pour l'encolure). Bon tricot!
04.11.2024 - 08:13
![]() Zoe Mason-Chard wrote:
Zoe Mason-Chard wrote:
Hi i tried the 640 stitches , knitted about an inch and found it was twisted , would it be possible to cast on 320 and do a normal rib instead of the frill , if so would you cast on more or less for the rib and increase or decrease from the rib up please
08.08.2024 - 17:44DROPS Design answered:
Dear Mrs Mason-Chard, if you just cast on 320 sts, you won't get the thrill at the bottom and you might have to adjust A.1 over this number of stitches to match A.2 afterwards. Happy knitting!
09.08.2024 - 07:13
![]() Antje wrote:
Antje wrote:
Liebes Team, ist es wirklich richtig 640 Maschen aufzunehmen? Die Anleitung ist ja eigentlich klar, aber ich hatte einen Dreher drin und musste deswegen alles nochmal aufribbeln. Der Umfang des bislang Gestrickten war aber so enorm (!!!) , dass ich mir nicht vorstellen kann, dass das Top tatsaechlich so wie auf dem Bild aussehen wird. Bevor ich von vorn anfange, moechte ich mich da gern vergewissern. Vielen Dank!
08.04.2024 - 21:35DROPS Design answered:
Liebe Antje, ja genau, aber man wird 80 Mal die 8 Maschen in A.1 stricken und am Ende A.1 sind es nur noch 4 Maschen x80 = 320 Maschen. Sollte Ihre Maschenprobe richtig sein, dann stricken Sie genauso wie in die schriftliche Anleitung, so bekommen Sie die richtigen fertige Maßnahmen wie in der Skizze. Viel Spaß beim Stricken!
09.04.2024 - 08:48
![]() Edith Jackson wrote:
Edith Jackson wrote:
Hallo liebes Drops Team, 640 Maschen anschlagen und nicht verdrehen scheint irgendwie unmoeglich. Ich hab es jetzt 3 x versucht. Gibt es da irgend einen Trick? Ich helfe mir jetzt so: Ich nehme 320 auf, stricke A1, dann mache ich das ganze nochmal. Ab da stricke ich dann alles zusammen in Runden und lasse entweder die Seiten unten offen oder, naehe die Seiten unten spaeter zu. Mal sehen. Vielen Dank fuer Eure tollen Designs.
03.03.2024 - 02:30
![]() Tanja Elin Johansen wrote:
Tanja Elin Johansen wrote:
Str L/XL oppgitt garnmengde 200g. Det er for lite slik jeg ser det. Til sammenligning er modell 221-13, oppgitt til 300g i oppskrift på samme str. De to modellene er veldig like.
18.10.2023 - 21:39
![]() Solveig wrote:
Solveig wrote:
På Fellingstips står det: "Det felles innenfor 7 masker i hver side. Fell ved å strikke 2 masker vrang sammen." Men på bildet synes jeg det ser ut til at fellingen er like innenfor de fem kantmaskene og ikke to masker lenger inn i mønsteret?
25.08.2023 - 22:46DROPS Design answered:
Hei Solveig. Du feller innenfor 7 masker i hver side, fra retten strikkes de 5 første maskene strikkes i riller, mens maske nr. 6. og 7. strikkes 2 masker vrang sammen. mvh DROPS Design
11.09.2023 - 11:04
![]() Solveig wrote:
Solveig wrote:
Mønsterforklaring linje 4, det står: "ta 1 maske løs av pinnen som om den skulle strikkes rett, strikk 2 masker, løft den løse masken over masken som ble strikket": Betyr det over den første eller den andre masken som ble strikket etter at masken ble tatt løst av, eller dem begge? (Hvis det siste, så skal det kanskje rettes fra "masken" til "maskene"?)
07.07.2023 - 09:01DROPS Design answered:
Hej Solveig, tak for info - det fixer vi :)
07.07.2023 - 11:05
![]() Andrée Vangi wrote:
Andrée Vangi wrote:
Bonjour, avec les aiguilles numéro 3 ,3/5 je n'arrive pas à avoir l'échantillon 10 /10 sinon il faut ajouter 4 mailles en aiguilles 4 c'est pas joli , je ne peu faire ce modèle sinon que me conseillez vous je suis déçue andrée
12.06.2023 - 11:46DROPS Design answered:
Bonjour Mme Vangi, essayez avec des aiguilles plus petites (3,5 ) mais bloquez votre échantillon (mouillez-le et faites le sécher à plat aux mesures finales) pour voir si cela peut vous aider; sinon, vous devrez adapter ce modèle à votre propre échantillon ou bien rechercher un modèle qui correspond davantage à votre tension. Bon tricot!
12.06.2023 - 13:32
|
|||||||||||||||||||
Amalfi Blue#amalfibluetop |
|||||||||||||||||||
 |
 |
||||||||||||||||||
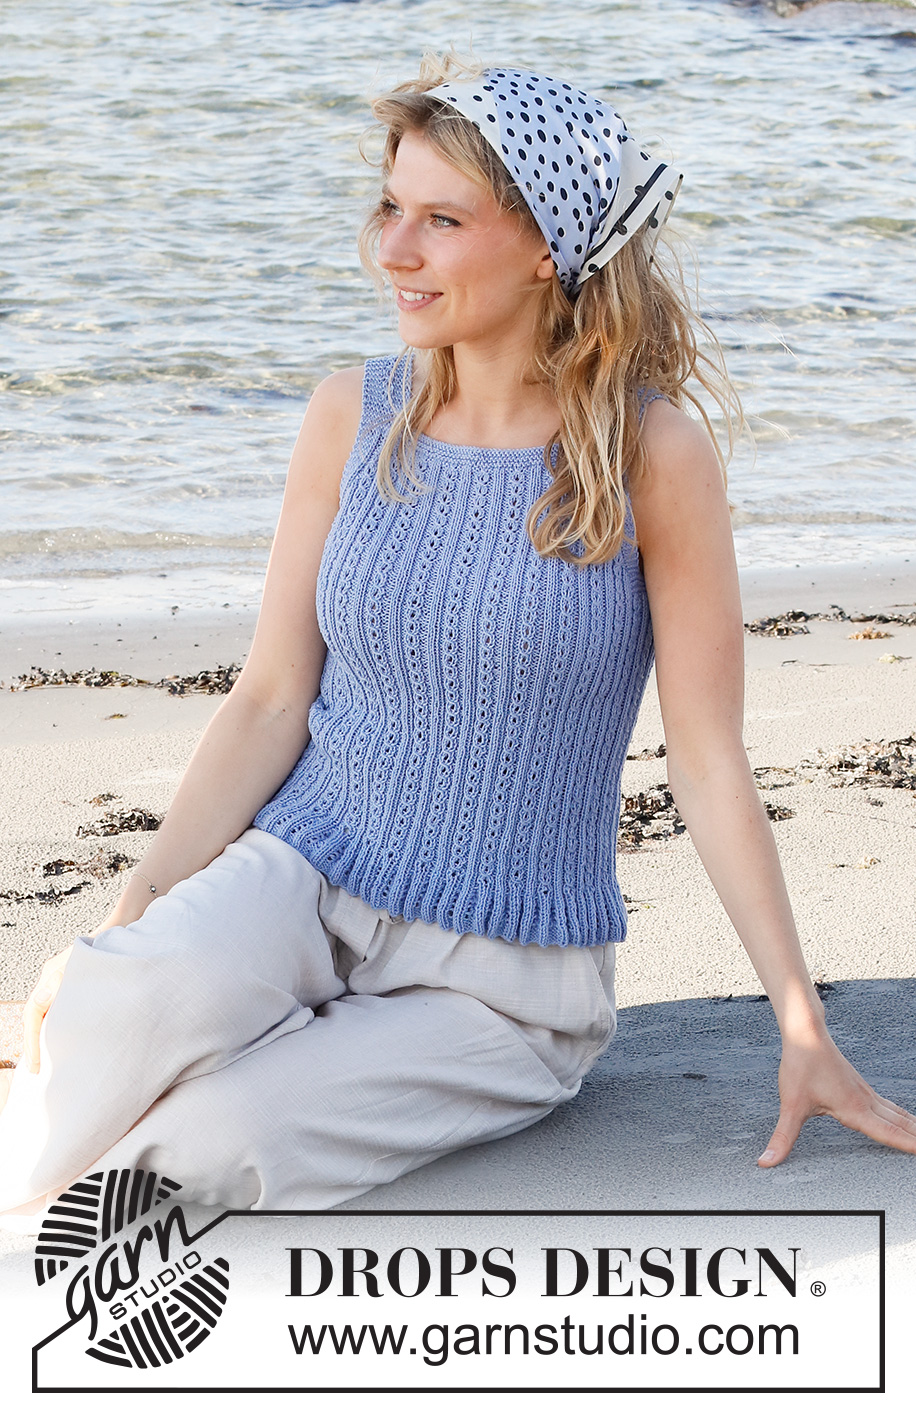
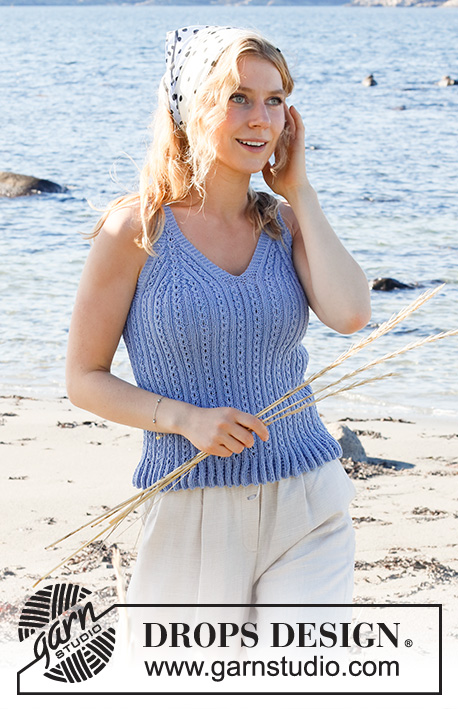
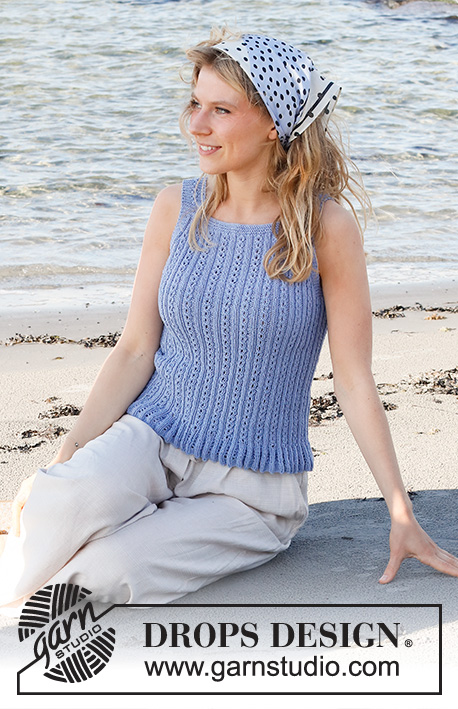
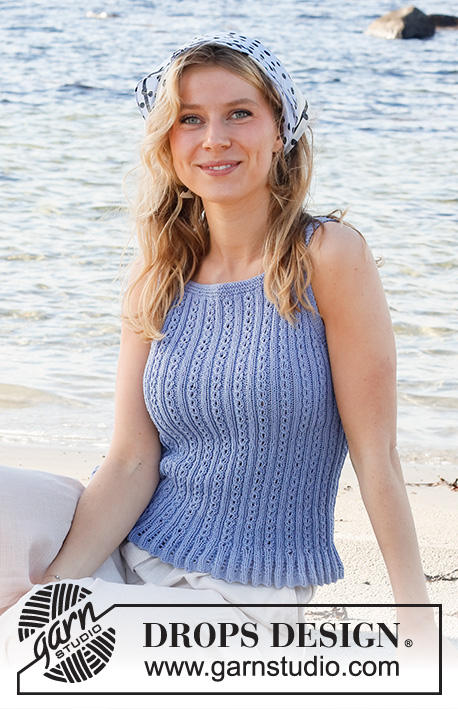
Knitted top in DROPS Safran. Piece is knitted bottom up with pattern. Size: S - XXXL
DROPS 221-14 |
|||||||||||||||||||
|
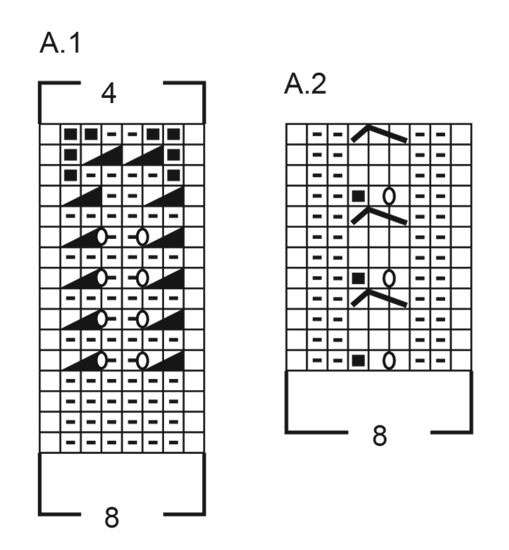
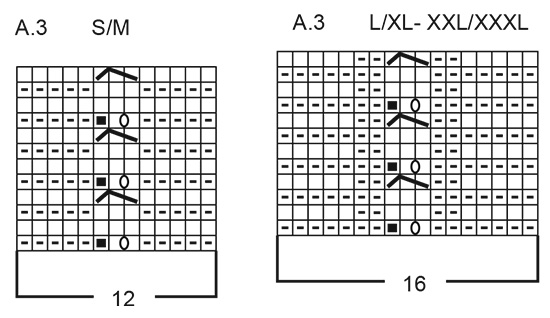
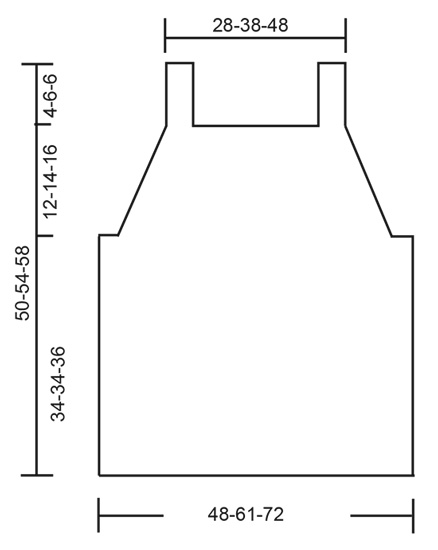
------------------------------------------------------- EXPLANATION FOR THE PATTERN: ------------------------------------------------------- GARTER STITCH (worked in the round): 1 ridge vertically = 2 rounds, i.e. knit 1 round and purl 1 round. GARTER STITCH (back and forth): Knit all rows. 1 ridge vertically = knit 2 rows. PATTERN: See diagrams A.1 to A.3. Diagrams show all rows in pattern seen from the right side. NOTE! Stitches in A.2 are always counted as 8 stitches even though stitches in cable alternates between 2 and 3 stitches. Stitches in A.3 are always counted as 12 stitches in S/M and 16 stitches in L/XL and XXL/XXXL. See diagram for your size in A.3. DECREASE TIP: Decrease inside 7 stitches in each side. Decrease by purling 2 together. ------------------------------------------------------- START THE PIECE HERE: ------------------------------------------------------- TOP - SHORT OVERVIEW OF THE PIECE: Work body in the round on circular needle, from the bottom and up to armholes. Then work back piece and front piece separately, back and forth on circular needle until finished measurements. Straps on front piece are fastened to back piece. BODY: Cast on 512-640-768 stitches on circular needle size 3 MM = US 2.5 with Safran. Work A.1 over all stitches (= 64-80-96 repetitions of 8 stitches). When A.1 has been worked 1 time vertically, there are 256-320-384 stitches on round. Work A.2 over all stitches (= 32-40-48 repetitions of 8 stitches). NOTE! Stitches in A.2 are always counted as 8 stitches even though stitches in cable alternates between 2 and 3 stitches. Work A.2 in the round – insert at the same time 1 marker thread at the beginning of round (= left side when garments is worn), and 1 marker thread after 128-160-192 stitches (= right side when garment is worn). Both marker threads are between 2 knit stitches. Move the marker thread upwards when working. REMEMBER THE KNITTING GAUGE! When piece measures 33-33-35 cm = 13"-13"-13¾", work next round as follows (approx. 1 cm = ⅜" remains until decrease for armholes): NOTE! Adjust so that next round worked, is a even round in pattern, this is important so that the cable row is from right side when piece is worked back and forth. Work in GARTER STITCH over the first 15-15-15 stitches – read explanation above, work pattern as before over the next 98-130-162 stitches, work in garter stitch over the next 30-30-30 stitches, work pattern as before over the next 98-130-162 stitches, and work in garter stitch over the last 15-15-15 stitches. Continue pattern like this until 3 ridges have been worked over stitches in the side. On next round bind off for armholes, i.e. work next round as follows: Bind off 10-10-10 stitches for armhole, work 5 stitches in garter stitch, continue pattern as before over the next 98-130-162 stitches, work 5 stitches in garter stitch, cast of 20-20-20 stitches for armhole, work 5 stitches in garter stitch, continue pattern as before over the next 98-130-162 stitches, work 5 stitches in garter stitch, and bind off the remaining 10-10-10 stitches for armhole. Cut the yarn. Finish back piece and front piece separately. BACK PIECE: = 108-140-172 stitches. Begin from wrong side and work 1 row in PATTERN as before with 5 edge stitches in GARTER STITCH - read explanation above, in each side. Continue with A.2 and in garter stitch, at the same time decrease for armhole in each side on every row from right side - read DECREASE TIP! Decrease 17-19-23 times in total in each side = 74-102-126 stitches remain. Work 3 ridges back and forth over all stitches. Bind off - make sure that the bind-off edge is not too tight. Back piece measures approx. 12-14-16 cm = 4¾"-5½"-6¼" from where piece was divided for front piece and back piece. FRONT PIECE: = 108-140-172 stitches. Begin from wrong side and work 1 row in pattern as before with 5 edge stitches in garter stitch in each side. Continue with A.2 and in garter stitch, at the same time decrease for armhole in each side on every row from right side. Decrease 17-19-23 times in total = 74-102-126 stitches remain. Work 3 ridges back and forth over all stitches. Front piece measures approx. 12-14-16 cm = 4¾"-5½"-6¼" from where piece was divided for front piece and back piece. Work next row as follows from right side: Knit the first 12-16-16 stitches and slip them on a stitch holder, bind off the next 50-70-94 stitches, knit the last 12-16-16 stitches on row. Keep the last 12-16-16 stitches on needle, and work strap as explained below. STRAP: = 12-16-16 stitches. Work A.3 (= 12-16-16 stitches) - see diagram for your size. Work first row from wrong side: Work pattern back and forth until the strap measures approx. 9-13-13 cm = 3½"-5⅛"-5⅛" – try the top on and work to desired length, strap should continue over the shoulder and down to back piece. Bind off. Slip the 12-16-16 stitches from stitch holder back on circular needle size 3 MM = US 2.5 and work the other strap the same way. ASSEMBLY: Fasten straps to back piece - begin at the edge in each side and fasten with 1 grafting/kitchener stitch in every stitch. Fasten off. |
|||||||||||||||||||
Diagram explanations |
|||||||||||||||||||
|
|||||||||||||||||||
|
|||||||||||||||||||
|
|||||||||||||||||||
|
|||||||||||||||||||
Have you finished this pattern?Tag your pictures with #dropspattern #amalfibluetop or submit them to the #dropsfan gallery. Do you need help with this pattern?You'll find 20 tutorial videos, a Comments/Questions area and more by visiting the pattern on garnstudio.com. © 1982-2025 DROPS Design A/S. We reserve all rights. This document, including all its sub-sections, has copyrights. Read more about what you can do with our patterns at the bottom of each pattern on our site. |
|||||||||||||||||||


With over 40 years in knitting and crochet design, DROPS Design offers one of the most extensive collections of free patterns on the internet - translated to 17 languages. As of today we count 314 catalogs and 11822 patterns - 11812 of which are translated into English (US/in).
We work hard to bring you the best knitting and crochet have to offer, inspiration and advice as well as great quality yarns at incredible prices! Would you like to use our patterns for other than personal use? You can read what you are allowed to do in the Copyright text at the bottom of all our patterns. Happy crafting!
Post a comment to pattern DROPS 221-14
We would love to hear what you have to say about this pattern!
If you want to leave a question, please make sure you select the correct category in the form below, to speed up the answering process. Required fields are marked *.