
Popular categories
Looking for a yarn?


Comments / Questions (46)
![]() Ilayda wrote:
Ilayda wrote:
Hello, im making xl version but after i did neck edge i have 72 stiches like pattern said. But in the yoke numbers doesnt add up for adding the markers its 12 - 10 - 24 - 10 - 12. It makes 68 stiches. In the end i have left 16 stiches not 12. So my question is what am i supposed to do or how should i part it ? i am beginner so im not sure what to do.
26.04.2026 - 15:05DROPS Design answered:
Dear Ilayda, the markers in the yoke are inserted into stitches (= raglan-stitches), not between stitches. Since you have 4 markers, you have 4 raglan-stitches. So it would be: 12 stitches+ 1 raglan stitch + 10 stitches + 1 raglan stitch + 24 stitches + 1 raglan stitch + 10 stitches + 1 raglan stitch + 12 stitches = 72 stitches. Happy knitting!
27.04.2026 - 02:11
![]() Bruna wrote:
Bruna wrote:
Ciao! Cosa vuol dire aumentare per il ragalan ogni 5 giri? L'aumento va fatto sul quinto o sul sesto giro? Grazie
07.09.2025 - 07:11DROPS Design answered:
Buongiorno Bruna, deve lavorare 4 giri senza aumenti e aumentare sul quinto. Buon lavoro!
07.09.2025 - 15:29
![]() Patricia wrote:
Patricia wrote:
" monter 6-6-6-8-8-10 mailles (= côté, sous la manche), tricoter 44-50-54-58-66-70 mailles jersey (= devant), glisser les 30-34-40-40-42-42 mailles suivantes en attente sur 1 arrêt de mailles pour la manche, monter 6-6-6-8-8-10 mailles " Je ne comprends pas ce que veut dire monter 6 mailles? Merci
26.12.2024 - 20:44DROPS Design answered:
Bonjour Patricia, on peut monter les mailles comme dans cette vidéo / cette leçon - retrouvez également cette étape à partir de la photo 11 dans cette leçon. Bon tricot!
02.01.2025 - 11:46
![]() Lara wrote:
Lara wrote:
Please clarify the pattern instructions for working the Body. The last line of working the Yoke finishes with 1/2 of back piece. The first line of Body then says to put marker at beginning of round (middle of back piece) and another after 50 stitches (I'm working the XS small). It says that decreases will be worked at these markers but they are in mid-back and mid-front, and not sides of body mentioned in the pattern. How should I proceed?
07.08.2023 - 03:40DROPS Design answered:
Dear Lara, after you have divided piece (rounds ended on mid back), work the stitches at the beg of the round (1st half back piece) until the middle of the new stitches cast on mid under sleeve - the rounds now start here. Continue in the round from here. Happy knitting!
07.08.2023 - 11:09
![]() Lorna Strombeck wrote:
Lorna Strombeck wrote:
Thank you for taking this question: The style is perfect for my kidsilk mohair cropped elbow-length raglan seamless top down sweater. I would like, however, to rouche at the sleeve shoulder for a puffed rather than the fitted shape. How do I achieve the rouche incorporated into the raglan pattern?
08.08.2022 - 17:57
![]() Elah wrote:
Elah wrote:
I have a wool sensitivity, is there a substitute for the melody yarn thats as affordable?
25.04.2022 - 11:21DROPS Design answered:
Dear Elah, use our yarn converter to see suggested Alternatives - read even more about yarn alternatives here and do not hesitate to contact your DROPS store, even per mail or telephone for any further individual assistance choosing the best matching alternatives. Happy knitting!
25.04.2022 - 12:15
![]() Karien wrote:
Karien wrote:
Bij het breien van de pas start ik met 64 steken voor maat M. Als ik de markers goed plaats in deze maat, houd ik vier steken over. Immers: 20 steken voor voor- en achterpand maakt 40. Twee keer 10 steken voor mouwen maakt 20. Totaal 60. Waar verdeel ik de vier over gebleven steken in?
22.02.2022 - 21:48DROPS Design answered:
Dag Karien,
Je plaatst de markeerdraden in de steken en niet tussen de steken. Wellicht ontstaat hierdoor het verschil van 4 steken?
26.02.2022 - 13:35
![]() Helga wrote:
Helga wrote:
Hei, jeg hadde et spørsmål om felling under armen på størrelse s. Det skal felles første gang etter 2 cm, etter hvor mange cm skal man felle 2 og 3 gangen?
17.02.2022 - 10:48DROPS Design answered:
Hej Helga, det kommer an på hvilken størrelse du strikker: sådan her står det: Fell slik på hver 5.-3.-½.-½.-½.-½.cm totalt 2-3-5-5-5-5 ganger = 32-34-36-38-40-42 masker. God fornøjelse!
18.02.2022 - 13:47
![]() Aleksandra wrote:
Aleksandra wrote:
Dzień dobry. Mam pytanie do tego wzoru. Planuję zrobić rozmiar M, czyli nabieram na druty nr 6 60 oczek włóczki i na reglan mam dodac równomiernie 8 oczek, według wskazówek wychodzi mi co 7.5 oczka. Jak to zrobić przecież nie ma 7.5 oczka? I jeśli dodam 8 oczek będę miała na drucie 68 oczek... Przy dzieleniu karczka 4 markerami 22 na tył, 22 na przód po 20 oczek na rekawy zostaje mi 4 oczka z tych 68. Co mam z nimi zrobić?
07.02.2022 - 22:14DROPS Design answered:
Witaj Olu, dodajesz równomiernie 8 oczek, tj. na przemian za każdym 6tym i 7mym oczkiem (ok.). 4 oczka nie zostaną, ponieważ markery są wkładane w oczka, a nie między oczkami. Miłej pracy!
07.02.2022 - 23:30
![]() Victoria wrote:
Victoria wrote:
Hei. Jeg strikker i str S, og Jeg har kommet til der hvor jeg skal øke til raglan. Det står at jeg skal øke på hver 4 omgang og 6 ganger i høyden? Betyr det at jeg skal strikke glattstrikk uten noe økninger i 4 omg, også øke etter 4 og? Også skal det skje 6 ganger til jeg har fått 160 m? Stemmer det?
06.05.2021 - 17:29DROPS Design answered:
Hei Victoria, Du skal øke til raglan på den 1. omgangen, deretter strikke 3 omganger til før du øker til raglan på den 4. omgangen. Og økninger skal skje 6 ganger, som du sier. God fornøyelse!
07.05.2021 - 07:40
|
|
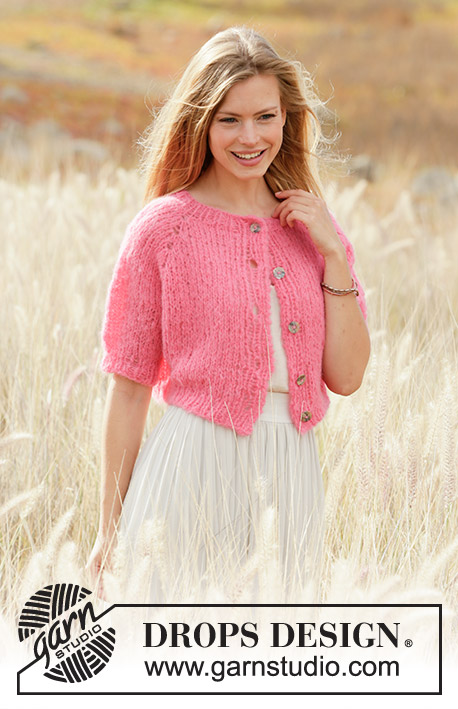
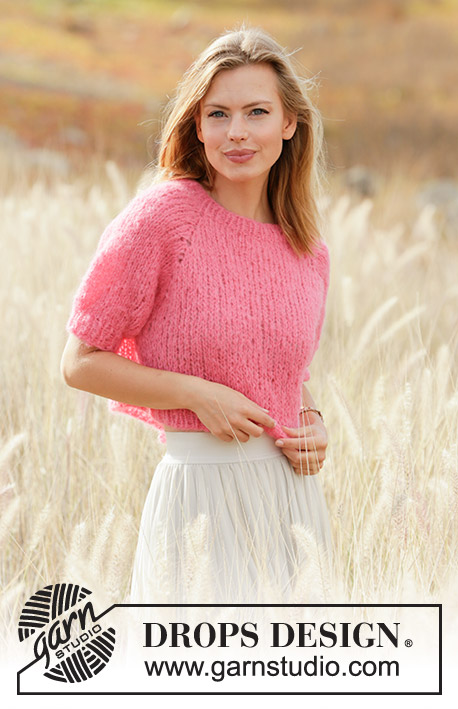
Sweet Melody#sweetmelodysweater |
|
 |
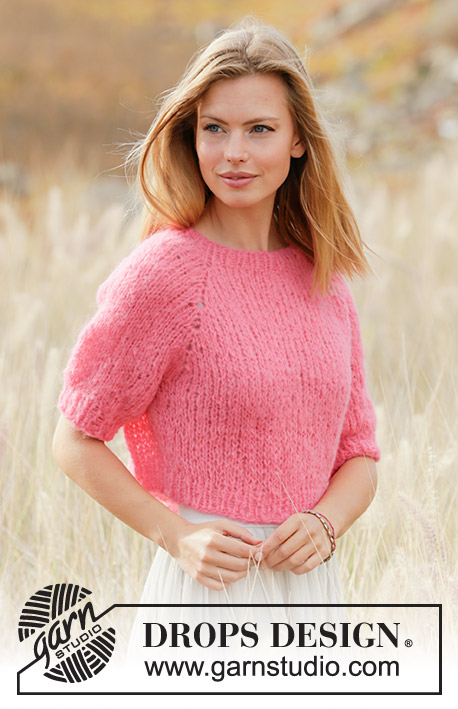 |
Knitted jumper with short sleeves in DROPS Melody. Piece is knitted top down with raglan. Size XS–XXL.
DROPS 212-23 |
|
|
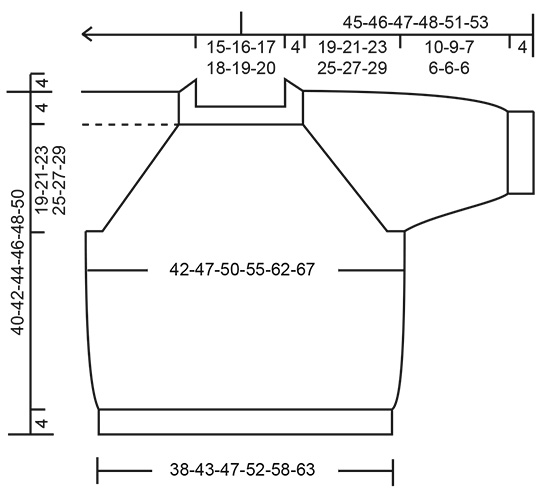
---------------------------------------------------------- EXPLANATION FOR THE PATTERN: ---------------------------------------------------------- INCREASE/DECREASE TIP (evenly): To calculate how to increase/decrease evenly, use the total number of stitches on row (e.g. 56 stitches) and divide stitches by number of increases/decreases to be done (e.g. 4) = 14. In this example increase by making 1 yarn over after every 14th stitch. On next round, work yarn overs twisted to avoid holes. To decrease in this example knit every 13th and 14th stitch together. RAGLAN: Increase for raglan in every transition between front/back piece and sleeves as explained below, and increase every 4th round as explained in pattern. INCREASE 4 STITCHES AS FOLLOWS: Knit 1 in stitch below stitch with marker (raglan stitch), do not slip stitches off the needle, make 1 yarn over on right needle, knit 1 in same stitch, but wait to slip off the needle, make 1 yarn over on right needle and knit 1 in same stitch, then slip the stitch off the left needle (= 4 stitches increased). Insert 1 marker in the middle of these 5 stitches (for next increase). INCREASE 2 STITCHES AS FOLLOWS: Knit 1 in stitch below stitch with marker (raglan stitch), do not slip stitches off the needle, make 1 yarn over on right needle, knit 1 in same stitch, then slip the stitch off the left needle (= 2 stitches increased). Insert 1 marker in the middle of these 3 stitches (for next increase - only applies to size L). DECREASE TIP (applies to sides on body and mid under sleeves): Decrease 1 stitch on each side of marker thread as follows: Work until 3 stitches remain before marker thread, knit 2 together, knit 2 (marker thread is between these 2 stitches), slip 1 stitch knitwise, knit 1, pass slipped stitch over stitch worked (= 2 stitches decreased by marker). CAST-OFF TIP: To avoid a tight cast-off edge you may use a larger needle size. ---------------------------------------------------------- START THE PIECE HERE: ---------------------------------------------------------- JUMPER - SHORT OVERVIEW OF THE PIECE: Neck edge and yoke are worked in the round on circular needle, top down. Now divide yoke for body and sleeves. Body is worked in the round on circular needle, top down. Work sleeves in the round on double pointed needles/short circular needle, top down. NECK EDGE: Cast on 56-58-60-62-64-68 stitches on a short circular needle size 6 mm with Melody. Knit 1 round. Then work rib in the round (= knit 1/purl 1) for 4 cm. When rib is done, knit a round while at the same time increasing 4-6-8-6-8-4 stitches evenly - read DECREASE/INCREASE TIP = 60-64-68-68-72-72 stitches. Insert 1 marker in the middle of row (= mid front). Measure yoke from this marker! Switch to circular needle size 8 mm and knit 1 round (knit all yarn overs twisted to avoid holes). Then work yoke as explained below. YOKE: Insert 4 markers in the piece as explained below. Use markers when increasing for raglan. Count 9-10-11-11-12-12 stitches (= ½ back piece), insert 1 marker in next stitch, count 10 stitches (= sleeve), insert 1 marker in next stitch, count 18-20-22-22-24-24 stitches (= front piece), insert 1 marker in next stitch, count 10 stitches (= sleeve), insert 1 marker in next stitch. 9-10-11-11-12-12 stitches remain on back piece after last marker. Work in stocking stitch in the round. REMEMBER THE KNITTING TENSION! AT THE SAME TIME on first round, increase for RAGLAN – read explanation above. I.e. increase first 4 stitches in every stitch with marker (= 16 stitches in total increased on round). Work in stocking stitch and increase for raglan every 4th round 5-6-7-7-9-9 times in total vertically = 140-160-180-180-216-216 stitches. Continue with increase every 4th round, but now increase only 2 stitches in every stitch with marker, as explained above (= 8 stitches increased in total on round). Increase 2 stitches at every marker 1-1-1-2-0-1 times in total vertically. After last increase there are 148-168-188-196-216-224 stitches on needle. Work in stocking stitch without increases until piece measures 19-21-23-25-27-29 cm from marker by the neck. Now divide yoke for body and sleeves. I.e. work next round as follows from mid back: Work 22-25-27-29-33-35 stitches in stocking stitch (= ½ back piece), slip the next 30-34-40-40-42-42 stitches on 1 stitch holder for sleeve, cast on 6-6-6-8-8-10 new stitches on needle (= in the side under sleeve), work 44-50-54-58-66-70 stitches in stocking stitch (= front piece), slip the next 30-34-40-40-42-42 stitches on 1 stitch holder for sleeve, cast on 6-6-6-8-8-10 new stitches on needle (= in the side under sleeve) and work the remaining 22-25-27-29-33-35 stitches in stocking stitch (= ½ back piece). Finish body and sleeves separately. NOW MEASURE PIECE FROM HERE! BODY: = 100-112-120-132-148-160 stitches. Insert 1 marker thread at beginning of round and 1 marker thread after 50-56-60-66-74-80 stitches (= in the sides on body). Move the marker threads upwards when working; they should be used for decrease later. Begin round in the side at one of the marker threads, and work stocking stitch in the round. When piece measures 4 cm from division, decrease 1 stitch on each side of both marker threads - read DECREASE TIP (= 4 stitches decreased). Repeat decrease when piece measures 8 cm from division = 92-104-112-124-140-152 stitches. Work until piece measures 13 cm from division (approx. 4 cm remain until finished measurements, try the jumper on and work to desired length). Switch to circular needle size 6 mm. Knit 1 round while increasing 4-6-6-6-8-8 stitches evenly - remember INCREASE/DECREASE TIP = 96-110-118-130-148-160 stitches. Then work rib in the round (= knit 1/purl 1) for 4 cm. Cast off with knit over knit and purl over purl - read CAST-OFF TIP. Jumper measures approx. 40-42-44-46-48-50 cm from shoulder and down. SLEEVES: Slip the 30-34-40-40-42-42 stitches from stitch holder in one side of piece on double pointed needles or short circular needle size 8 mm, and pick in addition up 1 stitch in each of the 6-6-6-8-8-10 stitches under sleeve = 36-40-46-48-50-52 stitches. Insert 1 marker thread in the middle of the 6-6-6-8-8-10 stitches under sleeve and move the marker thread upwards when working. Use marker later when decreasing mid under sleeve. Begin round at the marker thread and work stocking stitch in the round. When sleeve measures 2 cm from division in all sizes, decrease 2 stitches mid under sleeve - read DECREASE TIP. Decrease like this every 5-3-½-½-½-½ cm 2-3-5-5-5-5 times in total = 32-34-36-38-40-42 stitches. Work until sleeve measures 10-9-7-6-6-6 cm from division (approx. 4 cm remain until finished measurements, try the jacket on and work to desired length). NOTE! Shorter measurements in the larger sizes because of wider neck and longer yoke. Knit 1 round while decreasing 2 stitches evenly = 30-32-34-36-38-40 stitches. Switch to double pointed needles size 6 mm. Work rib in the round = knit 1/purl 1 for 4 cm. Cast off with knit over knit and purl over purl - remember CAST-OFF TIP. Sleeve measures approx. 14-13-11-10-10-10 cm from division. Work the other sleeve the same way. |
|
 |
|
Have you finished this pattern?Tag your pictures with #dropspattern #sweetmelodysweater or submit them to the #dropsfan gallery. Do you need help with this pattern?You'll find 27 tutorial videos, a Comments/Questions area and more by visiting the pattern on garnstudio.com. © 1982-2026 DROPS Design A/S. We reserve all rights. This document, including all its sub-sections, has copyrights. Read more about what you can do with our patterns at the bottom of each pattern on our site. |
|


With over 40 years in knitting and crochet design, DROPS Design offers one of the most extensive collections of free patterns on the internet - translated to 17 languages. As of today we count 325 catalogues and 12298 patterns translated into English (UK/cm). 12298
We work hard to bring you the best knitting and crochet have to offer, inspiration and advice as well as great quality yarns at incredible prices! Would you like to use our patterns for other than personal use? You can read what you are allowed to do in the Copyright text at the bottom of all our patterns. Happy crafting!
Post a comment to pattern DROPS 212-23
We would love to hear what you have to say about this pattern!
If you want to leave a question, please make sure you select the correct category in the form below, to speed up the answering process. Required fields are marked *.