Comments / Questions (55)
![]() Aud Sveen wrote:
Aud Sveen wrote:
Jeg strever fortsatt. Har altså kommet til den første økningen på diagrammet, hvor det skal økes to m. på hver side av hver mønsterrapport. Jeg er ikke i stand til å finne noen beskrivelse på hvordan dette gjøres. Hverken video eller økebeskrivelse passer på det jeg skal gjøre synes jeg. Det står ett sted at alle økninger skal foretas fra retten. Men diagrammet sier at økningspinnen skal strikkes fra vrangen??? Håper på godt svar denne gangen også!! Takk!
16.12.2019 - 20:43DROPS Design answered:
Hej, Jo du øger ifølge diagrammet, symbolet er sort og således står det i symbolforklaringen: = fra vrangen: øk 2 masker med farge-2 slik: Strikk 3 masker i rettmasken og kastet slik: Strikk kastet og rettmasken rett sammen, men vent med å løfte masken av pinnen, lag 1 kast om høyre pinne og strikk masken og kastet rett sammen 1 gang til = 3 masker
15.01.2020 - 11:45
![]() Aud Sveen wrote:
Aud Sveen wrote:
Jeg er nå kommet til den første økningen i diagrammet A.1B - (etter 11 pinner oppover). Lurer på om jeg skal øke 2 masker på hver side - av HVER mønsterrapport? Eller bare 2 masker mellom mønsterrapportene?
25.11.2019 - 23:11DROPS Design answered:
Hei Aud, Du skal øke 2 masker på hver side av hver mønsterrapport. God fornøyelse!
26.11.2019 - 07:35
![]() Aud Sveen wrote:
Aud Sveen wrote:
Det tar litt tid for meg dette. Har rekkket opp flere ganger, men har nå forstått mønsteret : - fram til første økning. Prøvd å lese hele men ikke funnet svar på følgende: betyr anvisningen i diagrammet at det skal økes 2 masker på hver side av hver mønsterrapport (A.1B) ?
19.11.2019 - 18:02DROPS Design answered:
Hei Aud. På raden der du begynner på A.1B strikkes du 5 masker i rillestolper, A.1B startes med diagrammet ikonet - firkant inni en firkant, som er en patent maske, altså ingen økning. God Fornøyelse!
25.11.2019 - 14:08
![]() Ragna Tangerud wrote:
Ragna Tangerud wrote:
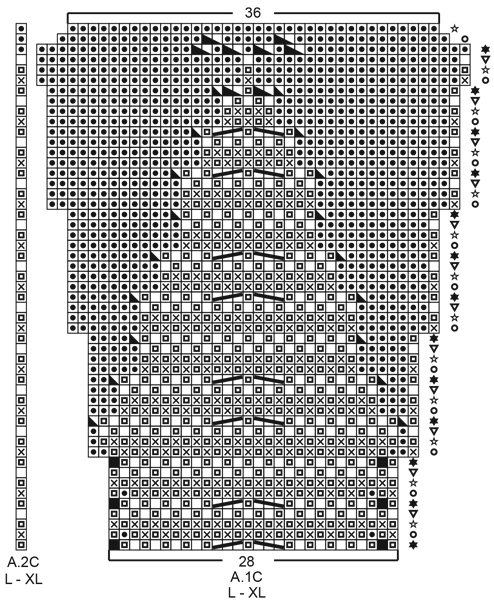
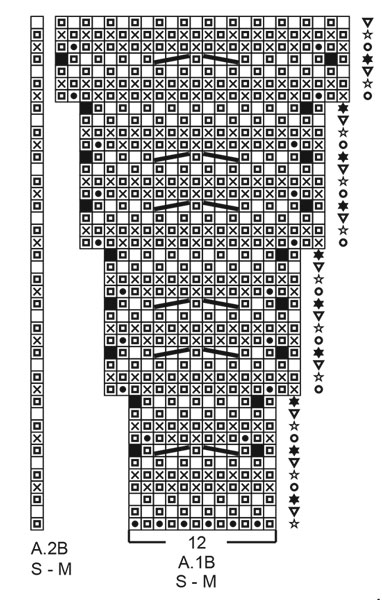
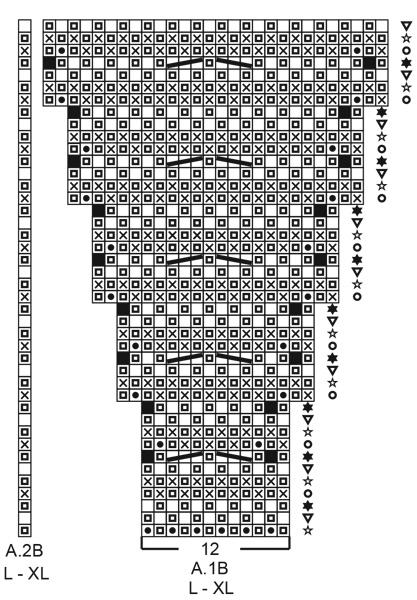
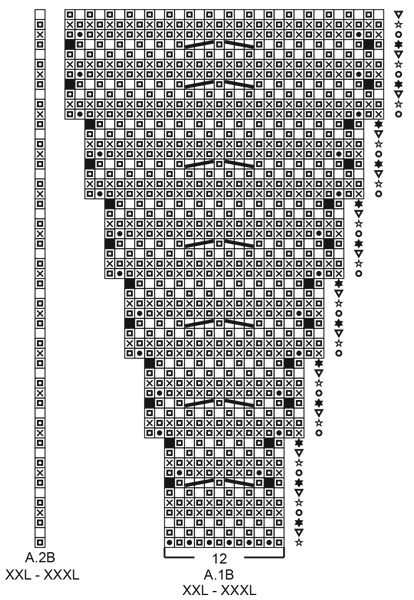
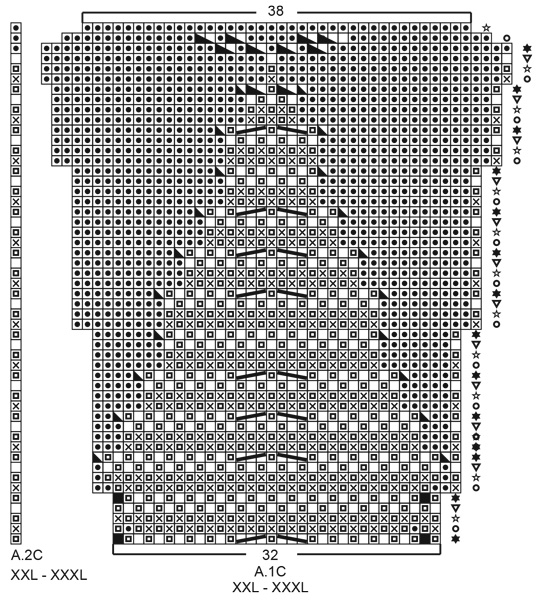
På høyre side av diagrammene A1B osv står det loddrette rekker med tegn lik dem som maskene skal strikkes etter. Hvilken funksjon har disse?
12.11.2019 - 17:30DROPS Design answered:
Hej. Du hittar förklaringar till dem bland de övriga diagramsymbolerna. Mvh DROPS Design
13.11.2019 - 09:04
![]() AUD SVEEN wrote:
AUD SVEEN wrote:
Tusen takk for god oppfølging på spørsmålene mine! Den siste opplysningen om at diagrammene skal leses fra v. mot h. på vrangen, tror jeg løste det meste for meg. Tror kanskje dette hadde vært et godt råd å ta med på strikketipsene! For oss som ikke er så bevandret i kompliserte mønster! Mvh Aud
18.10.2019 - 14:24
![]() AUD SVEEN wrote:
AUD SVEEN wrote:
Takk for raske svar! Skulle være greit å forstå den siste videoen. Men for meg ser det ut som at symbolene for felling mot hhv. høyre og venstre er byttet om i forklaringen på videoen - i forhold til det som står i mønsteret. Når man feller fra vrangen, blir det da kanskje motsatt? Jeg trodde man skulle følge diagrammet slik det står - både fra retten og fra vrangen (altså fra h. mot venstre på diagrammet). Beklager at jeg har så tungt for å forstå dette! :)
17.10.2019 - 22:17DROPS Design answered:
Hei Aud, Diagrammene skal leses fra høyre til venstre fra retten og fra venstre til høyre fra vrangen. God fornøyelse!
18.10.2019 - 07:22
![]() AUD SVEEN wrote:
AUD SVEEN wrote:
Jeg synes det var veldig unøyaktig beskrevet hvordan du gjør felling av 2 masker (fra h. mot v.) - første fellingen på bærestykket. Hvilken maske og kast er det du skal dra enda en gang over den masken du har satt tilbake på v. pinne?
16.10.2019 - 18:12DROPS Design answered:
Hej, Vi kan ikke lige se hvor du er i opskriften. På bærestykket øger du ifølge diagrammerne. Er det et diagramsymbol du er usikker på?
17.10.2019 - 07:51
![]() Jill Scheetz wrote:
Jill Scheetz wrote:
Thank you for your response. The symbol I am unable to locate the meaning of is indicated by a black box with a white dot in it's center.
26.09.2019 - 07:43DROPS Design answered:
Hi Jill, There is a white box, with a black open square inside, which is maybe what you are referring to? And this symbol is 'make 1 yarn over the right needle, slip 1 stitch onto right needle as if to purl'. I hope this helps and happy knitting!
26.09.2019 - 07:49
![]() Jill Scheetz wrote:
Jill Scheetz wrote:
There are some symbols in the diagrams that do not seem to have an explanation in the 'Diagram explanations'.
25.09.2019 - 10:46DROPS Design answered:
Dear Mrs Scheetz, all symbols used in diagram look to have the explanation under the diagram key, which one are you looking for?
25.09.2019 - 11:25
![]() Jofrid Nordbø wrote:
Jofrid Nordbø wrote:
Leter etter diagram A. 1A og A. 2A? Har kjøpt og mottatt garn pakke med oppskrift, men finner den ikke. Ikke her i oppskriften heller, så eg får ikke begynt... Er eg helt blind? Ingen lett oppskrift
08.09.2019 - 21:42DROPS Design answered:
Hei Jofrid, Diagrammene er helt ned på bunnen av sida. God fornøyelse!
09.09.2019 - 07:12
Egyptian Feathers Jacket#egyptianfeathersjacket |
||||||||||||||||||||||||||||||||||||||||||||||
|
|
||||||||||||||||||||||||||||||||||||||||||||||
Knitted jacket with round yoke in DROPS Fabel. The piece is worked top down with 2-coloured English rib and zigzag stripes. Sizes S - XXXL.
DROPS 201-29 |
||||||||||||||||||||||||||||||||||||||||||||||
|
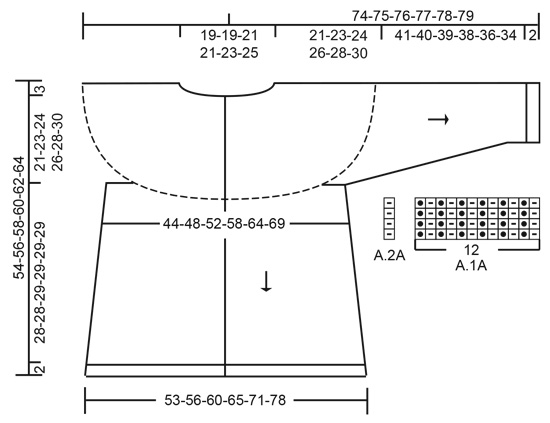
------------------------------------------------------- EXPLANATIONS FOR THE PATTERN: ------------------------------------------------------- RIDGE/GARTER STITCH (worked back and forth): Knit all rows. 1 ridge in height = Knit 2 rows. GARTER STITCH BAND (worked back and forth like this because of English rib pattern): ROW 1 (= from right side): Knit. ROW 2 (= from right side): Purl. ROW 3 (= from wrong side): Purl. ROW 4 (= from wrong side): Knit. PATTERN: See diagrams A.1 and A.2. Choose diagram for your size. First work A.1A/A.2A (= rib on neck). When A.A has been worked 1 time in height work A.1B/A.2B over A.A. When A.B has been worked 1 time in height work A.1C/A.2C over A.B. STRIPES: When working 2-coloured English rib, work back and forth with circular needle as follows: Work row 1 from the right side with colour-2, push all stitches back to the other end of the circular needle so the next row is also worked from the right side with colour-1. Then turn the piece, work 1 row from the wrong side with colour-2, push all stitches back to the other end of the circular needle so the next row is also worked from the wrong side with colour-1. So you work 2 rows from the right side with different colours and 2 rows from the wrong side with different colours. Work stripes in English rib, i.e. colour-1 = used for knitted stitch from right side and colour-2 = used for purled stitch from right side. Adjust so that each stripe finishes after 2 rows from the wrong side. STRIPE 1: Colour-1 = lavender, colour-2 = off white. Work until the piece measures 5 cm at the shortest point. STRIPE 2: Colour-1 = grey blue, colour-2 = off white. Work until the piece measures a total of 9 cm at the shortest point. STRIPE 3: Colour-1 = off white, colour-2 = lavender. Work until A.1c and A.2c have been worked 1 time in height. The last row in the diagram is worked with lavender from the right side. Then continue the stripes on yoke and body as follows (bands in garter stitch are worked as before): ROW 1: Purl with off white. ROW 2: Knit with lavender. Push all stitches to other end of circular needle so the next row is also from the wrong side. ROW 3 (= wrong side): Knit with off white. ROW 4 (= right side): Purl with lavender. Push all stitches to other end of circular needle so the next row is also from the right side. Repeat rows 1 to 4. KNITTING TIP-1: If you are in doubt about which colour to use on next row, you can see the colour used on the previous row by looking at the bands. KNITTING TIP-2: All stitch counts when working English rib are without yarn overs, because the yarn overs belong to the knitted stitches and are therefore counted as 1 stitch (unless otherwise stated). DECREASE TIP (for mid under sleeves): Decrease 1 stitch on each side of the marker thread as follows: Work until there are 3 stitches left before the marker thread, purl 2 together, purl 2 (marker thread sits between these 2 stitches), purl 2 stitches twisted together (2 stitches decreased). INCREASE TIP-1 (evenly spaced): To work out how to increase evenly, count the total number of stitches on the needle (e.g. 331 stitches) minus bands (e.g. 10 stitches) and divide the remaining stitches by the number of increases to be made (e.g. 4) = 80.25. In this example, increase by making 1 yarn over after approx. each 80th stitch. Do not increase on bands. On the next row (wrong side) work the yarn overs twisted to avoid holes. INCREASE TIP-2 (for sides of body): All increases are worked from the right side! Work until there are 2 stitches left before marker thread, 1 yarn over, purl 4 (marker thread sits in middle of these 4 stitches), 1 yarn over (= 2 stitches increased). On the next row (wrong side) knit the yarn overs twisted to avoid holes. Then purl the new stitches from the right side and knit from the wrong side. BUTTONHOLES: Work buttonholes on right band (when garment is worn). Work from the right side when there are 3 stitches left on row as follows: Make 1 yarn over, work 2 together and work the last stitch. On the next row (wrong side) work the yarn over normally to leave a hole (ie: The first buttonhole is worked when the neck measures 1½-2 cm. Then work the other 5-5-6-6-6-6 buttonholes with approx. 9-9-8-8-8½-9 cm between each one. ------------------------------------------------------- START THE PIECE HERE: ------------------------------------------------------- JACKET - SHORT OVERVIEW OF THE PIECE: Neck and yoke are worked back and forth with circular needle from mid front, top down. The yoke is worked in 2-coloured English rib with zigzag, then continue with stocking stitch with wrong side out and stripes with 1 row in each colour. The yoke is divided for body and sleeves. The body is continued back and forth from mid front. The sleeves are worked in the round with short circular needle/double pointed needles, top down. NECK: Cast on 131-143-143-155-155-167 stitches (including 5 band stitches on each side towards mid front) with circular needle size 2.5 mm and off-white. Work as follows from the wrong side: Knit 5 band stitches, purl until there are 5 stitches left and knit these 5 stitches. Then work pattern as follows: Work 5 band stitches in GARTER STITCH – read description above, work A.1A until there are 6 stitches left on row (= a total of 10-11-11-12-12-13 repeats of 12 stitches), A.2A (= 1 stitch) and finish with 5 band stitches in garter stitch– remember BUTTONHOLE – read description above. When A.1A and A.2A have been worked 1 time in height, work yoke as described below. YOKE: Change to circular needle size 3 mm and work pattern as follows (first row from the right side with off-white): Work 5 stitches in GARTER STITCH BANDS – read description above, A.1B until there are 6 stitches left on row (= a total of 10-11-11-12-12-13 repeats of 12 stitches), A.2B (= 1 stitch) and finish with 5 stitches in garter stitch bands. Push all stitches back to the other end of the circular needle so the next row can be worked with colour-1 from the right side. Read STRIPES, KNITTING TIP-1 and KNITTING TIP-2 and REMEMBER THE KNITTING TENSION! When A.1B and A.2B have been worked 1 time in height there are 251-275-319-347-395-427 stitches on the needle. The piece measures approx. 9-9-9-9-11-11 cm from the cast-on edge mid front. Now work A.1C over A.1B and A.2C over A.2B. When A.1C and A.2C have been worked 1 time in height there are 331-363-407-443-467-505 stitches on the needle. The piece measures approx. 17-17-19-19-21-21 cm from the cast-on edge mid front. Continue with knit from wrong side and purl from right side, 5 stitches in garter stitch bands on each side and with stripes as before. When the piece measures 19-19-21-21-21-21 cm from the cast-on edge increase stitches evenly spaced as follows: Increase 4-4-4-4-8-8 stitches every 2 cm a total of 1-2-1-1-2-2 times = 335-371-411-447-483-521 stitches – read INCREASE TIP-1. When the piece measures 21-23-24-26-28-30 cm from the cast-on edge (measured along the band) divide the piece for body and sleeves as follows: Work 5 stitches in garter stitch bands and work the next 49-53-58-66-72-78 stitches as before (= front piece), place the next 64-74-84-88-92-98 stitches on 1 thread for sleeve, cast on 8 new stitches on the needle (= in side under sleeve), work the next 99-107-117-129-145-159 stitches as before (= back piece), place the next 64-74-84-88-92-98 stitches on 1 thread for sleeve, cast on 8 new stitches on the needle (= in side under sleeve) and work the next 49-53-58-66-72-78 stitches as before, finishing with 5 stitches in garter stitch bands. Body and sleeves are finished separately. THE PIECE IS NOW MEASURED FROM HERE! BODY: = 223-239-259-287-315-341 stitches. Insert 1 marker thread on each side of the body, in the middle of the 8 stitches cast on under each sleeve. Allow the marker threads to follow your work onwards; they are used when increasing in the sides. Continue back and forth with stripes as before with knit from the wrong side, purl from the right side and 5 stitches in garter stitch bands on each side towards mid front. When the piece measures 2 cm from the division increase 1 stitch on each side of both marker threads – read INCREASE TIP-2 (= 4 stitches increased). Increase like this every 2½-2½-2½-3-3-2½ cm a total of 10-10-10-9-9-11 times = 263-279-299-323-351-385 stitches. Continue working until the piece measures 28-28-29-29-29-29 cm from the division (or to desired length; there is 2 cm left to finished length). Purl 1 row from the wrong side (bands worked as before), where you increase 18-20-18-18-17-19 stitches evenly spaced (not on bands) = 281-299-317-341-368-404 stitches. Change to circular needle size 2.5 mm and work rib as follows with off-white (first row from right side): 5 stitches in garter stitch *knit 1, purl 2*, work from *-* until there are 6 stitches left, knit 1 and finish with 5 band stitches in garter stitch. Work this rib for 2 cm. Loosely cast off with garter stitch over garter stitch, knit over knit and purl over purl. The jacket measures approx. 54-56-58-60-62-64 cm from the shoulder down. SLEEVE: Place the 64-74-84-88-92-98 stitches from the thread on the 1 side of the piece on short circular needle/double pointed needles size 3 mm and knit up 1 stitch in each of the 8 stitches cast on under the sleeve = 72-82-92-96-100-106 stitches. Insert 1 marker thread in the middle of the 8 stitches cast on under the sleeve. Allow the marker threads to follow your work onwards; they will be used when decreasing under the sleeve. Start the round by the marker thread and purl in the round with stripes with alternately 1 round off white and 1 round lavender. When the piece measures 2 cm from the division decrease 2 stitches mid under sleeve – read DECREASE TIP. Decrease like this every 4-2½-2-1½-1½-1½ cm a total of 9-13-17-18-19-21 times = 54-56-58-60-62-64 stitches. Continue working until the piece measures 41-40-39-38-36-34 cm from the division (or to desired length; there is 2 cm left to finished length. NOTE: Shorter measurements in larger sizes due to wider neck and longer yoke). Knit 1 round where you increase 0-1-2-0-1-2 stitches evenly spaced = 54-57-60-60-63-66 stitches. Change to double pointed needles size 2.5 mm and work rib in the round with off-white (= knit 1/ purl 2) for 2 cm. Loosely cast off with knit over knit and purl over purl. The sleeve measures approx. 44-43-42-41-39-37 cm from the division. Work the other sleeve in the same way. ASSEMBLY: Sew buttons onto left band. |
||||||||||||||||||||||||||||||||||||||||||||||
Diagram explanations |
||||||||||||||||||||||||||||||||||||||||||||||
|
||||||||||||||||||||||||||||||||||||||||||||||
 |
||||||||||||||||||||||||||||||||||||||||||||||
 |
||||||||||||||||||||||||||||||||||||||||||||||
 |
||||||||||||||||||||||||||||||||||||||||||||||
 |
||||||||||||||||||||||||||||||||||||||||||||||
 |
||||||||||||||||||||||||||||||||||||||||||||||
 |
||||||||||||||||||||||||||||||||||||||||||||||
 |
||||||||||||||||||||||||||||||||||||||||||||||
Have you finished this pattern?Tag your pictures with #dropspattern #egyptianfeathersjacket or submit them to the #dropsfan gallery. Do you need help with this pattern?You'll find 25 tutorial videos, a Comments/Questions area and more by visiting the pattern on garnstudio.com. © 1982-2025 DROPS Design A/S. We reserve all rights. This document, including all its sub-sections, has copyrights. Read more about what you can do with our patterns at the bottom of each pattern on our site. |
||||||||||||||||||||||||||||||||||||||||||||||


Post a comment to pattern DROPS 201-29
We would love to hear what you have to say about this pattern!
If you want to leave a question, please make sure you select the correct category in the form below, to speed up the answering process. Required fields are marked *.