
Popular categories
Looking for a yarn?


Comments / Questions (234)
![]() Ellen wrote:
Ellen wrote:
När man stickar halsen står det att man ska sticka resår i 4 cm. Menar ni att man mäter från uppläggningskanten då eller från varvet då man börjar med de aviga maskorna i resåren? Eftersom det är så stora maskor så blir uppläggningskanten ca 1 cm så det blir ju stor skillnad beroende på vart man börjar mäta.... Tack på förhand!
21.04.2026 - 10:44DROPS Design answered:
Hej Ellen, du mäter från början :)
21.04.2026 - 14:40
![]() Daniela wrote:
Daniela wrote:
Wie mache ich die Zunahmen unter dem Arm?
16.03.2026 - 11:44DROPS Design answered:
Liebe Daniela, in diesem Video - Zeit ca 07:00 zeigen wir, wie die neuen Maschen unter den Ärmel angeschlagen werden, das können Sie auch hier, im Fotos sehen. Viel Spaß beim Stricken!
16.03.2026 - 16:35
![]() Daniela wrote:
Daniela wrote:
Ich habe eine Frage. Wie bekomme ich bei dem Summer Shells Pullover die zusätzliche rechte/ linke Masche in Runde zwei hin? Durch eine Raglanzunahme habe ich einen Maschenüberfluss, sodass ich nicht hinkomme. Habe sie auch eine vereinfachte Anleitung oder Tipos für mich?
13.03.2026 - 15:01DROPS Design answered:
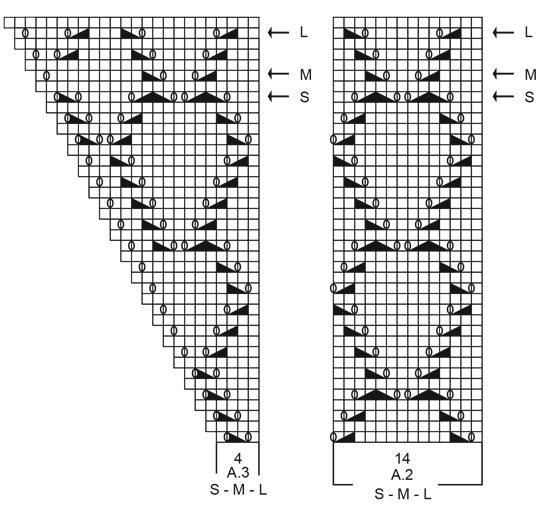
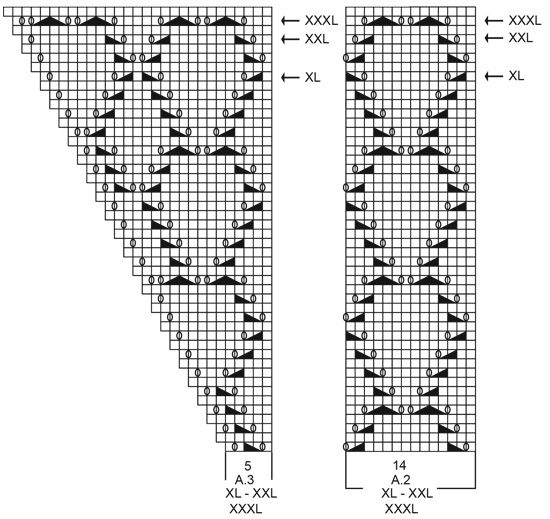
Liebe Daniela, diese Zunahmen sind im Diagram gezeichnet, schauen Sie z.B. A.1 bei der 1. Reihe: Es sind 2 Umschläge aber nur 1 Abnahme = es gibt 1 Maschen mehr; so wird es genauso bei A.3 - bei A.2 ist aber die Maschenanzahl immer gleich. So nehmen Sie bei jeder Runde in A.1 und A.3. Viel Spaß beim Stricken!
13.03.2026 - 15:45
![]() Stephanie Talv wrote:
Stephanie Talv wrote:
Bonjour, je ne comprends pas comment faire les mailles envers et torse envers alors que suis en circulaire sur du tricot endroit à chaque tours. Merci pou votre aide.
08.03.2026 - 13:46DROPS Design answered:
Bonjour Mme Talv, découvrez en vidéo: ici comment diminuer en tricotant 2 mailles ensemble à l'envers et là, comment diminuer en tricotant 2 mailles ensemble torse à l'envers - Que l'on tricote sur l'endroit ou sur l'envers, tricoter ensemble à l'envers = comme d'habitude, on tricote les 2 mailles ensemble dans le brin avant, mais à l'envers, et pour les tricoter torse à l'envers, on les tricote dans le brin arrière. Bon tricot!
09.03.2026 - 09:54
![]() Mel wrote:
Mel wrote:
Bonjour, Pourriez-vous me dire avec quelle numéro d'aiguille faire l'échantillon? Doit il être fait en jersey ou avec le motif? Merci
07.03.2026 - 21:58DROPS Design answered:
Bonjour Mel, l'échantillon est ici tricoté en jersey avec les aiguilles 9 (on doit avoir les mêmes dimensions en point ajouré). Bon tricot!
09.03.2026 - 08:56
![]() Veronica wrote:
Veronica wrote:
Hola! Quisiera saber cómo se ejecuta el punto “dos puntos juntos de revés retorcido” tomando en cuenta que este saco se lo trabaja con agujas circulares siempre al lado derecho. Muchas gracias 🙏
18.02.2026 - 18:47
![]() Anette wrote:
Anette wrote:
Ik kom niet uit het patroon. Ik begrijp niet hoe je maar één keer op de naald (de tour) A1, A2 A3 A1 A3 kunt breien. Ik brei nu A1 A2 A3 A1 A3 A1 A3 A1 A2 A3 A1 A3 A1 A3 Maar dat klopt nuet met het aantal steken van 64. Ik meerder in de oneven touren telkens volgens het patroon: 1 bij begin A1, 1 bij einde A3 enz klopt dat wel? Hopelijk kunnen jullie me helpen. Groet, Anette
12.02.2026 - 19:18DROPS Design answered:
Dag Anette,
De meerderingen zijn al aangegeven in de telpatronen, door deze meerderingen worden de telpatronen steeds breder hoe verder je in de hoogte werkt. Je hoeft dus geen extra meerderingen te doen, deze staan al in het telpatroon.
15.02.2026 - 15:15
![]() Ellinoora wrote:
Ellinoora wrote:
Miksi tässä tai muissakaan ohjeissa ei ole viimeistelyohjetta? Ja olisi hyvä jos olisi lankojen tiedoissa miten kyseinen materiaali viimeistellään.
28.01.2026 - 09:24DROPS Design answered:
Hei, löydät langan hoito-ohjeet langan vyötteestä sekä verkossa langan värikartasta.
30.01.2026 - 18:18
![]() Gillian wrote:
Gillian wrote:
Thank you for your reply. How do i incorporate the increase stitches do i repeat the pattern. 216 stitches = 4 repeats of chart. Thank you
14.01.2026 - 12:17DROPS Design answered:
Dear Gillian, the new stitches are shown in the diagrams, you just work them as shown in diagrams A.1 and A.3 showing how the new stitches are increased and worked on next row. Happy knitting!
15.01.2026 - 09:53
![]() Gillian wrote:
Gillian wrote:
Hello Can I please ask a question. As you increase stitches by 10 in rounds 1 and 2? How do we incorporate the increase stitches into pattern as only 2 stitches increased on chart? Stuck on this pattern totally. Thank you
12.01.2026 - 10:23DROPS Design answered:
Dear Gillian, when working diagrams you will increase 8 stitches every increase round, 1 stitch in each A.1 and 1 stitch in each A.3, the increase are shown in the diagrams and are worked as diagram shows. Or do I misunderstand what you mean?
13.01.2026 - 08:52
|
|||||||||||||||||||
Summer Shells#summershellssweater |
|||||||||||||||||||
 |
 |
||||||||||||||||||
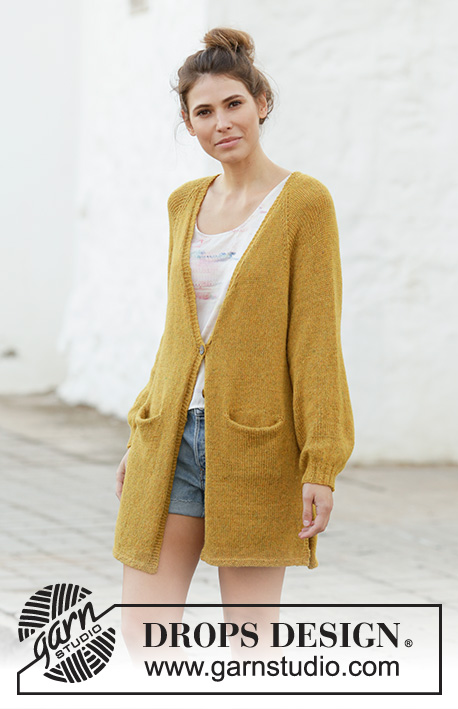
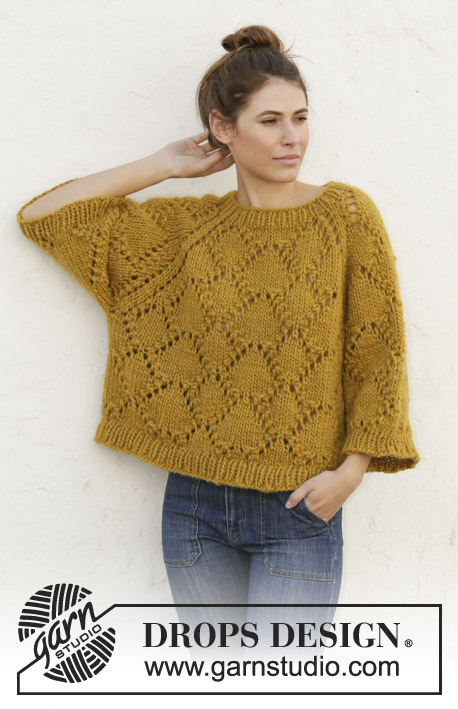
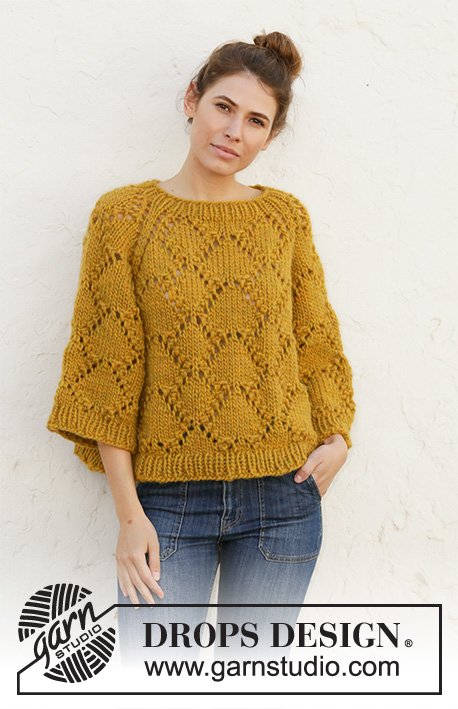
Knitted jumper with raglan with 1 thread DROPS Snow or 1 thread SROPS Wish or 2 threads Air. The piece is worked top down with lace pattern. Sizes S - XXXL.
DROPS 200-5 |
|||||||||||||||||||
|
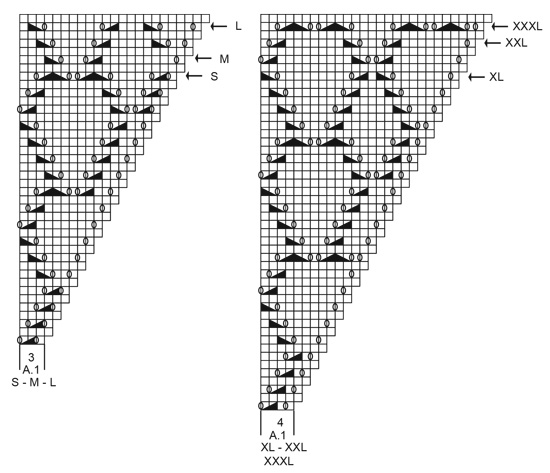
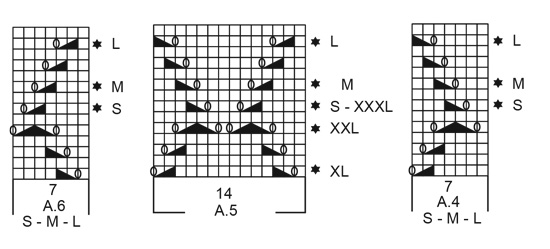
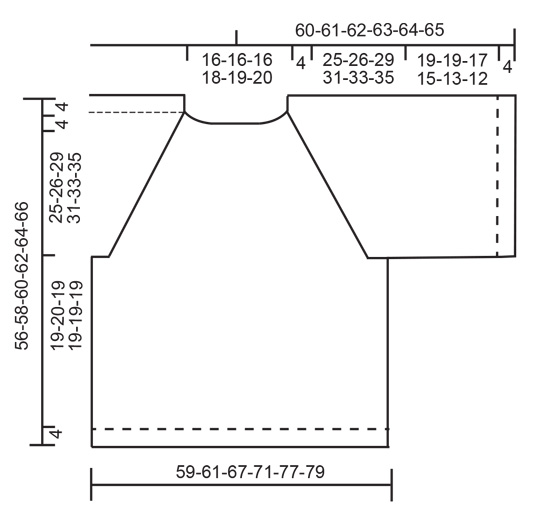
------------------------------------------------------- EXPLANATIONS FOR THE PATTERN: ------------------------------------------------------- PATTERN: See diagrams A.1 to A.6 (A.4 and A.6 apply to sizes S, M and L). Choose diagram for your size. DECREASE TIP (evenly spaced): To work out how to decrease evenly, count the total number of stitches on the needle (e.g. 58 stitches) and divide by the number of decreases to be made (e.g. 2) = 29. In this example decrease by knitting each 28th and 29th stitch together. INCREASE TIP (evenly spaced): To work out how to increase evenly, count the total number of stitches on the needle (e.g. 118 stitches) and divide by the number of increases to be made (e.g. 24) = 4.9. In this example increase by making 1 yarn over after approx. each 5th stitch. On the next row work the yarn overs twisted to avoid holes. ------------------------------------------------------- START THE PIECE HERE: ------------------------------------------------------- JUMPER - SHORT OVERVIEW OF THE PIECE: The piece is worked in the round with circular needle top down. Sleeves are worked in the round with short circular needle. JUMPER: NECK: Cast on 56-58-60-64-64-68 stitches with circular needle size 8 mm and 1 thread Snow, 1 thread Wish or 2 threads Air. Knit 1 round. Then work rib (knit 1, purl 1) for 4 cm. YOKE: Change to circular needle size 9 mm. Knit 1 round where you decrease 0-2-4-0-0-4 stitches evenly spaced – read DECREASE TIP = 56-56-56-64-64-64 stitches. Now work pattern – choose diagram for your size, as follows: * insert a marker thread here, A.1 over the first 3-3-3-4-4-4 stitches, A.2 over the next 14 stitches, A.3 over the next 4-4-4-5-5-5 stitches (= back/ front piece), insert a marker thread here, A.1 over the next 3-3-3-4-4-4 stitches, A.3 over the next 4-4-4-5-5-5 stitches (= sleeve) *, work from *-* 1 more time on the round. There are now 4 marker threads in the piece. They follow your work onwards and mark the transitions between body and sleeves. Continue this pattern in the round. Increase on each side of the diagrams to raglan (increases are drawn into the diagrams). REMEMBER THE KNITTING TENSION! When you have worked as far as the round with an arrow in the diagrams (see arrow for your size), there are 192-200-216-232-248-256 stitches on the round. The piece measures approx. 29-30-33-35-37-39 cm from the cast-on edge and down mid front. The next round is worked as follows: Work the first 55-57-61-65-69-71 stitches (= back piece), place the next 41-43-47-51-55-57 stitches on a thread (= sleeve), cast on 4-4-6-6-8-8 new stitches on the needle (= in side under sleeve), work the next 55-57-61-65-69-71 stitches (= front piece), place the next 41-43-47-51-55-57 stitches on a thread (= sleeve), cast on 4-4-6-6-8-8 new stitches under sleeve. THE PIECE IS NOW MEASURED FROM HERE! BODY: = 118-122-134-142-154-158 stitches. Insert a marker thread in each side, in the middle of the 4-4-6-6-8-8 new stitches cast on under the sleeves (= 2-2-3-3-4-4 new stitches on each side of the marker thread). Start the round by the marker thread on one side of the piece and work pattern, beginning on the round marked with a star for your size in the diagram(s) as follows: Sizes S, M and L: * Knit 1-2-5 stitches, A.4 over the next 7 stitches, A.5 over the next 42 stitches (= 3 repeats of 14 stitches), A.6 over the next 7 stitches, knit 2-3-6 stitches *, work from *-* 1 more time on the round. Sizes XL, XXL and XXXL: * Knit 0-3-4 stitches, A.5 over the next 70 stitches (= 5 repeats of 14 stitches), knit 1-4-5 stitches *, work from *-* 1 more time on the round. Continue in the round like this until the piece measures approx. 19-20-19-19-19-19 cm – adjust so that you finish after round 5 or 13 in A.5. Knit 1 round where you increase 24-24-26-28-30-32 stitches evenly spaced – read INCREASE TIP = 142-146-160-170-184-190 stitches. Change to circular needle size 8 mm. Work rib (knit 1, purl 1) in the round for 4 cm. Cast off with knit over knit and purl over purl. Make sure that the cast-off edge is not tight. Use a size larger needle if necessary. The jumper measures approx. 56-58-60-62-64-66 cm from the shoulder down. SLEEVE: Place the 41-43-47-51-55-57 stitches from the thread on the one side of the piece back on short circular needle size 9 mm and knit up 1 stitch in each of the 4-4-6-6-8-8 stitches cast on under the sleeve = 45-47-53-57-63-65 stitches. Insert a marker thread in the middle of the 4-4-6-6-8-8 stitches cast on under the sleeve (= 2-2-3-3-4-4 new stitches on each side of the marker thread). Start the round by the marker thread and work pattern, beginning on the round marked with a star for you size in the diagram(s) as follows: Sizes S, M and L: Knit 1-2-5 stitches, A.4 over the next 7 stitches, A.5 over the next 28 stitches (= 2 repeats of 14 stitches), A.6 over the next 7 stitches, knit 2-3-6 stitches. Sizes XL, XXL and XXXL: Knit 0-3-4 stitches, A.5 over the next 56 stitches (= 4 reports of 14 stitches), knit 1-4-5 stitches. Continue in the round like this until the piece measures approx. 19-19-17-15-13-12 cm – adjust so that you finish after round 5 or 13 in A.5. Knit 1 round where you increase 9-9-11-11-13-13 stitches evenly spaced = 54-56-64-68-76-78 stitches. Change to circular needle size 8 mm. Work rib (knit 1, purl 1) in the round for 4 cm. Cast off with knit over knit and purl over purl. Make sure that the cast-off edge is not tight. Use a size larger needle if necessary. The sleeve measures approx. 23-23-21-19-17-16 cm. Work the other sleeve in the same way. |
|||||||||||||||||||
Diagram explanations |
|||||||||||||||||||
|
|||||||||||||||||||
 |
|||||||||||||||||||
 |
|||||||||||||||||||
 |
|||||||||||||||||||
 |
|||||||||||||||||||
 |
|||||||||||||||||||
Have you finished this pattern?Tag your pictures with #dropspattern #summershellssweater or submit them to the #dropsfan gallery. Do you need help with this pattern?You'll find 26 tutorial videos, a Comments/Questions area and more by visiting the pattern on garnstudio.com. © 1982-2026 DROPS Design A/S. We reserve all rights. This document, including all its sub-sections, has copyrights. Read more about what you can do with our patterns at the bottom of each pattern on our site. |
|||||||||||||||||||


With over 40 years in knitting and crochet design, DROPS Design offers one of the most extensive collections of free patterns on the internet - translated to 17 languages. As of today we count 325 catalogues and 12298 patterns translated into English (UK/cm). 12298
We work hard to bring you the best knitting and crochet have to offer, inspiration and advice as well as great quality yarns at incredible prices! Would you like to use our patterns for other than personal use? You can read what you are allowed to do in the Copyright text at the bottom of all our patterns. Happy crafting!
Post a comment to pattern DROPS 200-5
We would love to hear what you have to say about this pattern!
If you want to leave a question, please make sure you select the correct category in the form below, to speed up the answering process. Required fields are marked *.