
Popular categories
Looking for a yarn?


Comments / Questions (30)
![]() Detlev wrote:
Detlev wrote:
Hallo, recht herzlichen Dank. Jetzt hab ich meinen Fehler erkannt :-)
08.07.2019 - 18:38
![]() Anne Larsen wrote:
Anne Larsen wrote:
Kan jeg ændre opskriften så den passer str xs?
08.07.2019 - 16:54DROPS Design answered:
Hej Anne, mindste voksen størrelse har en brystvidde på 88 cm. Største børne størrelse har en brystvidde på 64 cm. Kan du bruge en af dem? Det som er vigtigt hvis du ændrer i opskriften, er at du får diagrammerne til at stemme. God fornøjelse!
09.07.2019 - 10:59
![]() Detlev wrote:
Detlev wrote:
Hallo, muss es in der Anleitung nicht heißen, wenn A4 oder A5 einmal in der Höhe gestrickt ist? Oder wo ist mein Denkfehler?
08.07.2019 - 12:05DROPS Design answered:
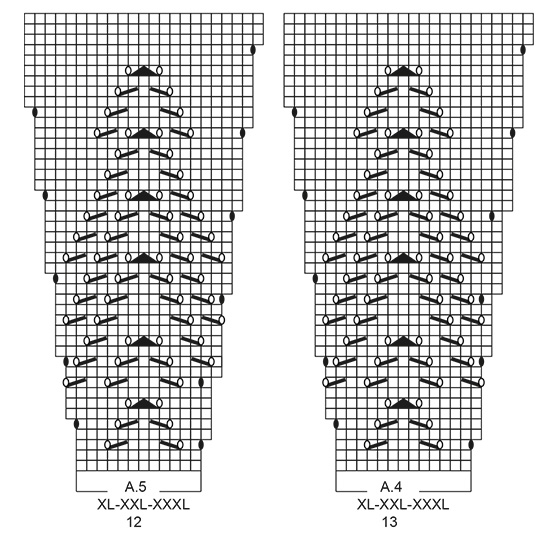
Lieber Detlev, so ist es auch geschrieben: Wenn A.4 und A.5 1 x in der Höhe gestrickt wurden, sind 307-343-365-404-427-450 Maschen auf der Nadel. oder misverstehe ich Ihre Frage?
08.07.2019 - 14:27
![]() Odile wrote:
Odile wrote:
Bonjour , Après avoir termine le gilet , je vois qu'il y a deux mailles perdues qui ne sont pas bien tricotées Y a t il un moyen de les rattraper ? Merci
23.06.2019 - 13:06DROPS Design answered:
Bonjour Odile, cette vidéo montre comment rattraper une maille perdue sur plusieurs rangs. Bonnes finitions!
24.06.2019 - 08:00
![]() Anne Droz wrote:
Anne Droz wrote:
Faut-il faire les motifs A1,A2 et A3 l'un après l'autre ou seulement un des trois ?
14.01.2019 - 13:07DROPS Design answered:
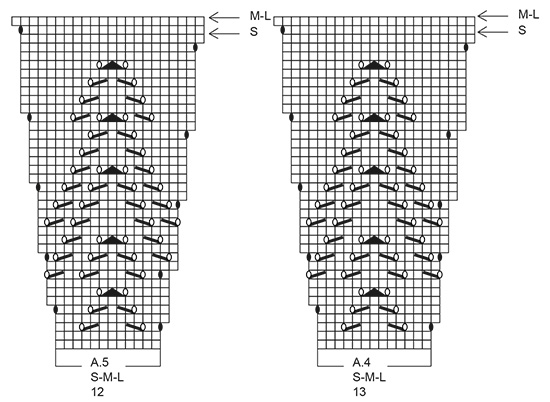
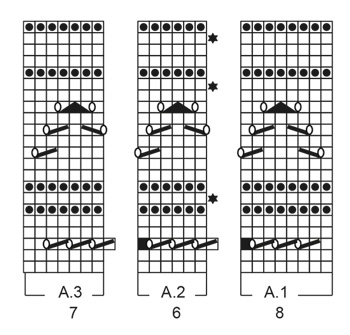
Bonjour Mme Droz, on tricote tous les motifs sur un même rang ainsi: 5 mailles de bordure devant au point mousse, A.1 (= 8 mailles ) = début du motif, répéter A.2 (= 6 mailles) au-dessus des 102-132 mailles suivantes (= 17-22 fois en largeur), on termine le motif par A.3 (= 7 mailles) et on termine rang par 5 mailles de bordure devant au point mousse. Bon tricot!
14.01.2019 - 13:28
![]() Dilys wrote:
Dilys wrote:
Bonjour, Je commence ce gilet et je voulais m assurer d'une chose : arrivée au schéma A1,doit on commencer le schéma par le bas ou par le haut et de droite à gauche ou de gauche à droite ? Merci
27.12.2018 - 21:59DROPS Design answered:
Bonjour Dilys, vous comencez le schema par le bas, de droite à gauche. Bon tricot!
28.12.2018 - 18:30
![]() Kirsten Olsen wrote:
Kirsten Olsen wrote:
Der ser ud til at være fejl i diagramforklaringen lige under ordet DIAGRAM i opskriften. Der er 3 ens kvadrater med forskellige anvisninger til strikkemetode??
05.12.2018 - 19:54DROPS Design answered:
Hei Kirsten. Vi har nå sjekket dette, og alle symbolene i forklaringen er forskjellige. Gjelder dette uansett hvaslags enhet du bruker? Det første symbolet er en hvit firkant (rett), det andre er en hvit firkant med en stor sort prikk (vrang), viodere er det en over 2 masker: en skrå strek fra øverst til høyre til nederst til venstre (2 rett sammen). God fornøyelse
06.12.2018 - 11:34
![]() Ladolcegrita wrote:
Ladolcegrita wrote:
Wunderschönes Jäckchen! Insgesamt sehr trendige Kollektion in diesem Jahr, vielen, vielen Dank! Nun muss ich mich doch wieder an ein Jäckchen wagen...! ;-)
10.08.2018 - 22:13
![]() Monique wrote:
Monique wrote:
Eine zeitlos schöne Jacke! Ich freue mich schon, die zu stricken. Bitte auch die Anleitung für die Mütze. Pass toll zusammen!
13.07.2018 - 08:44
![]() Doris wrote:
Doris wrote:
Bitte die Anleitung unbedingt veröffentlichen!
17.06.2018 - 11:15
|
||||||||||||||||||||||||||||
Agnes#agnesjacket |
||||||||||||||||||||||||||||
 |
 |
|||||||||||||||||||||||||||
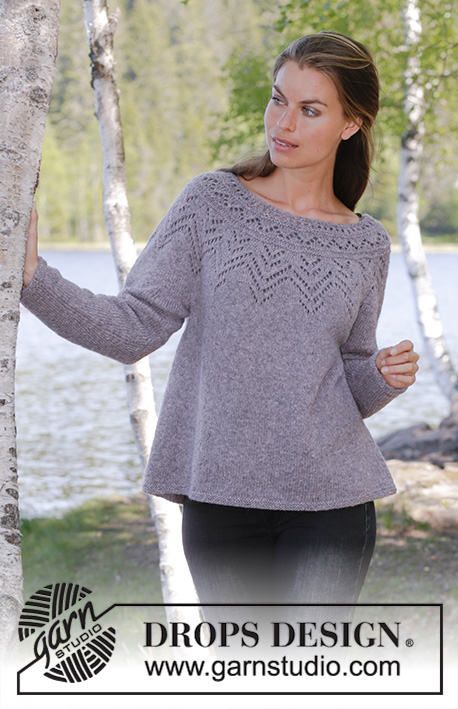
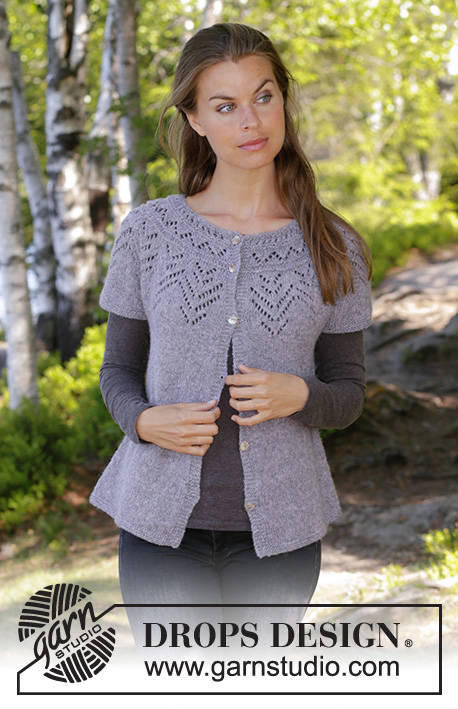
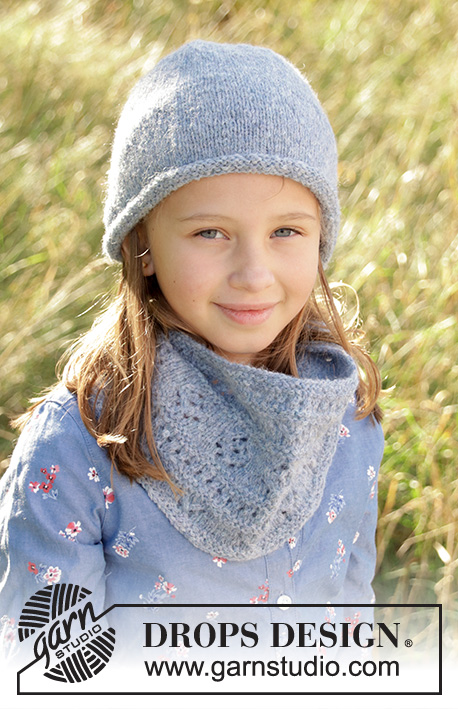
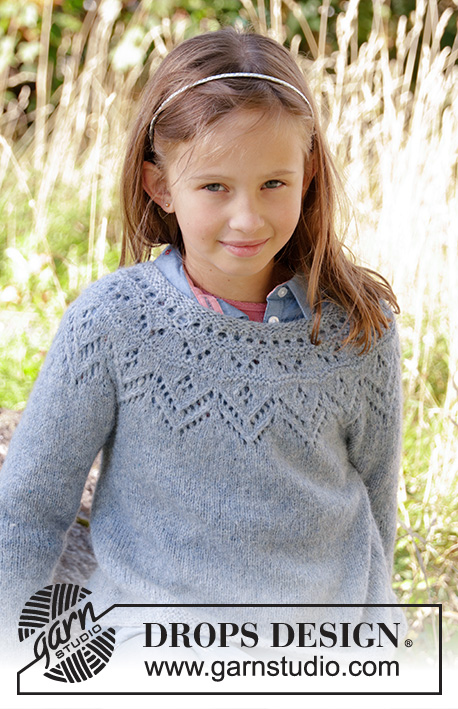
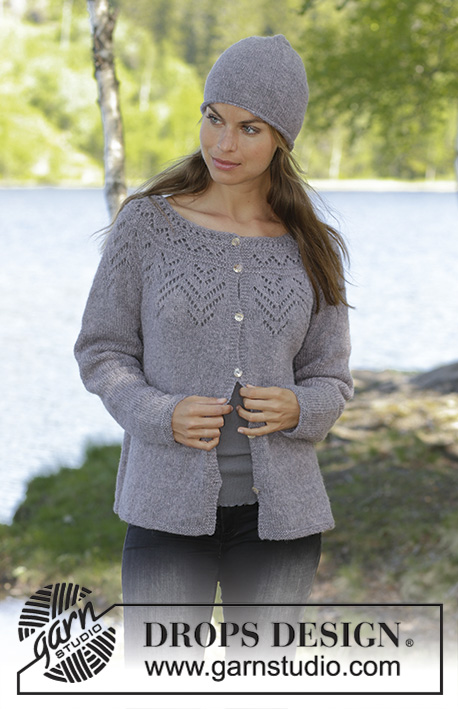
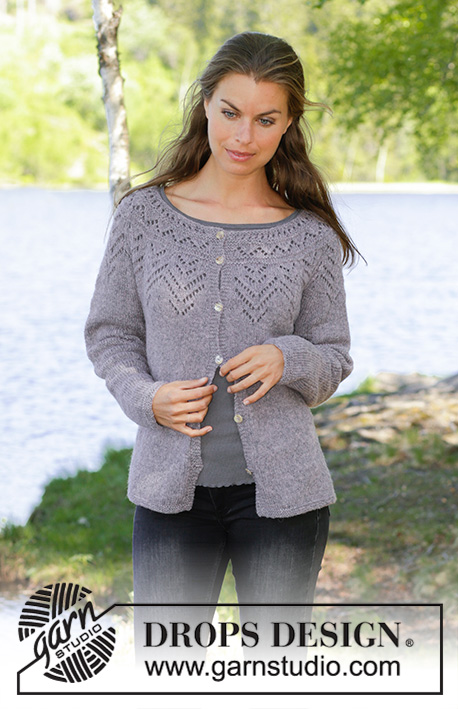
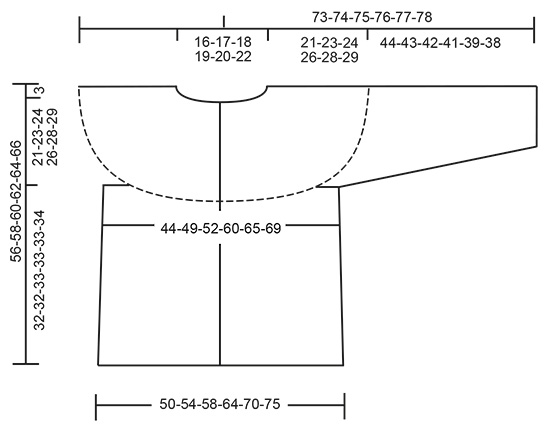
Knitted jacket with round yoke in DROPS Sky. Piece is knitted top down with lace pattern. Size: S - XXXL Knitted hat in DROPS Sky with rolling edge.
DROPS 197-15 |
||||||||||||||||||||||||||||
|
EXPLANATION FOR PATTERN: ---------------------------------------------------------- GARTER STITCH (back and forth): 1 ridge = knit 2 rows. GARTER STITCH (worked in the round): 1 ridge = 2 rounds. Knit 1 round and purl 1 round. PATTERN: See diagrams A.1 to A.5. Choose diagram for your size. Diagrams show all rows in pattern seen from the right side. ELEVATION (applies to back of neck): Work the elevation in garter stitch. Insert 1 marker thread after 63-66-69-72-75-78 stitches (= approx. mid back). Begin from right side and knit 7-8-8-9-9-10 stitches past marker thread, turn, tighten yarn and knit 14-16-16-18-18-20 stitches. Turn, tighten yarn and knit 21-24-24-27-27-30 stitches, turn, tighten yarn and knit 28-32-32-36-36-40 stitches. Turn, tighten yarn and knit 35-40-40-45-45-50 stitches, turn, tighten yarn and knit 42-48-48-54-54-60 stitches. Turn, tighten yarn and knit 49-56-56-63-63-70 stitches, turn, tighten yarn and knit the rest of row. INCREASE TIP-1 (evenly): To calculate how to increase evenly, use the total number of stitches on row (e.g. 102 stitches), minus band (= 10 stitches in total = 92 stitches) and divide stitches by number of increases to be done (e.g. 25) = 3.68. In this example increase by making 1 yarn over after approx. every 4th stitch. On next row work yarn overs twisted to avoid holes. INCREASE TIP-2 (applies to sides of body): All increases are done from the right side. Work until 2 stitches remain before marker thread, 1 yarn over, knit 4 (marker thread is in the middle of these stitches), 1 yarn over. On next row work yarn over twisted to avoid holes Then work the new stitches in stocking stitch. DECREASE TIP-1 (applies to sleeves): Decrease 1 stitch on each side of marker thread as follows: Work until 3 stitches remain before marker thread and knit 2 together, knit 2 (marker thread is between these stitches), slip 1 stitch knitwise, knit 1, pass slipped stitch over stitch worked. BUTTONHOLES: Decrease for buttonholes on right band (when garment is worn). Decrease from right side when 3 stitches remain on row as follows: Make 1 yarn over, knit the next 2 stitches together, knit last stitch. On next row knit yarn over to make holes. Decrease first buttonhole when piece measures approx. 1½-2 cm. Decrease for second buttonhole when piece measures 7 cm. Then decrease the next 4-4-5-5-6-6 approx. 8½-8½-7½-7½-7-7 cm apart. DECREASE TIP-2 (applies to hat): Decrease 1 stitch after every marker thread as follows: Slip 1 stitch knitwise, knit 1, pass slipped stitch over stitch worked (= 1 stitch decreased = 6 stitches decreased in total). ---------------------------------------------------------- BEGIN PIECE HERE: ---------------------------------------------------------- JACKET - SHORT SUMMARY OF GARMENT: Worked back and forth, top down on circular needle to armhole, then finish body and sleeves separately. Continue body back and forth. Sleeves are worked in the round on double pointed needles. YOKE: Cast on 102-106-110-118-122-128 stitches (including 5 band stitches in each side of piece) on circular needle size 3.5 mm with Sky. Work 2 ridges in GARTER STITCH - read explanation above. Knit 1 row from right side and increase 25-27-29-27-29-29 stitches evenly - read INCREASE TIP-1 = 127-133-139-145-151-157 stitches. Knit 1 row from wrong side. Switch to circular needle size 4 mm. For better fit work an elevation at the back of neck so that yoke is somewhat higher on back piece. This elevation can be skipped, to make the neck the same at the front and back - read ELEVATION. Decrease for BUTTONHOLES on right band - read explanation above. Then work pattern as follows from right side: Work 5 band stitches in garter stitch, A.1 (= 8 stitches), A.2 (= 6 stitches) over the next 102-108-114-120-126-132 stitches (= 17-18-19-20-21-22 times in width), A.3 (= 7 stitches) and finish with 5 band stitches in garter stitch. On every row with star (= increase row) increase as follows: REMEMBER THE KNITTING TENSION! 1ST INCREASE: Increase 24-24-24-24-30-30 stitches evenly = 151-157-163-169-181-187 stitches. Then repeat A.2 21-22-23-24-26-27 times in width. 2ND INCREASE: Increase 18-18-24-24-24-30 stitches evenly = 169-175-187-193-205-217 stitches. Then repeat A.2 24-25-27-28-30-32 times in width. 3RD INCREASE: Increase 12-18-18-24-24-24 stitches evenly = 181-193-205-217-229-241 stitches. Then repeat A.2 26-28-30-32-34-36 times in width. When A.1 to A.3 have been worked 1 time vertically, piece measures approx. 8 cm from cast-on edge. Then work as follows from right side: Work 5 band stitches in garter stitch, 1 stitch in stocking stitch, A.4 (= 13 stitches), work A.5 (= 12 stitches) over the next 156-168-180-192-204-216 stitches (= 13-14-15-16-17-18 times in width), 1 stitch in stocking stitch and finish with 5 band stitches in garter stitch. When A.4 and A.5 have been worked 1 time vertically, there are 307-343-365-404-427-450 stitches on needle. Piece measures approx. 21-22-22-24-24-24 cm. Continue back and forth in stocking stitch until piece measures 21-23-24-26-28-29 cm. Now divide the piece for sleeves and body as follows: Work 5 band stitches in garter stitch, stocking stitch over the next 42-47-50-57-62-66 stitches, slip the next 64-72-78-82-84-88 stitches on a stitch holder for sleeve and cast on 8-8-10-10-12-12 stitches under sleeve, work stocking stitch over the next 85-95-99-116-125-132 stitches, slip the next 64-72-78-82-84-88 stitches on a stitch holder for sleeve and cast on 8-8-10-10-12-12 stitches under sleeve, work 42-47-50-57-62-66 stitches in stocking stitch and finish with 5 band stitches in garter stitch = 195-215-229-260-283-298 stitches. BODY: Insert 1 marker thread in the middle of the 8-8-10-10-12-12 stitches under each sleeve. Work in stocking stitch with 5 band stitches in garter stitch in each side. When piece measures 2 cm from where body was divided for sleeves, increase 1 stitch on each side of every marker thread - read INCREASE TIP-2! Increase like this every 3½-4½-4-6-5-3½ cm 6-5-6-4-5-7 times in total = 219-235-253-276-303-326 stitches. Continue in stocking stitch until piece measures 30-30-31-31-31-32 cm from where body was divided from sleeves. Switch to circular needle size 3.5 mm and work in garter stitch until piece measures 32-32-33-33-33-34 cm from where body was divided from sleeves. Cast off by knitting. Piece measures 56-58-60-62-64-66 cm from shoulder. SLEEVE: Slip the 64-72-78-82-84-88 stitches from stitch holder in one side of piece on double pointed needles size 4 mm and pick up 1 stitch in each of the 8-8-10-10-12-12 stitches under sleeve = 72-80-88-92-96-100 stitches. Insert 1 marker thread in the middle of the 8-8-10-10-12-12 stitches under sleeve. Work in stocking stitch in the round. When piece measures 3 cm, decrease 1 stitch on each side of marker thread - read DECREASE TIP-1. Decrease like this every 2½-2-1½-1½-1½-1½ cm 13-16-19-19-20-21 times in total = 46-48-50-54-56-58 stitches. When sleeve measures 42-41-40-39-37-36 cm from where sleeve was divide from body, switch to double pointed needles size 3.5 mm and work 3 ridges in GARTER STITCH in the round - read explanation above. Then loosely cast off by knitting. Sleeve measures approx. 65-66-66-67-67-67 cm in total from cast-on edge. Work the other sleeve the same way. ASSEMBLY: Sew on buttons on left band. ---------------------------------------------------------- HAT - SHORT SUMMARY OF PIECE: Worked in the round on circular needle, switch to double pointed needles when decreasing. HAT: Cast on 108-112 stitches with Sky on circular needle size 3.5 mm. Work 4 rounds in stocking stitch. Work next round as follows: * Knit 1, purl 1 *, repeat from *-* the entire round. Now work in stocking stitch over all stitches until finished measurements. REMEMBER THE KNITTING TENSION! When piece measures 20-22 cm, decrease 0-4 stitches evenly (i.e. knit every 27th and 28th stitch in size M/L together) = 108 stitches. Insert 6 markers in the piece, 18 stitches apart. On next round, decrease 1 stitch at every marker thread – read DECREASE TIP-2. Decrease like this on every other round 8 times in total and then on every round 6 times in total = 24 stitches. On next round knit all stitches twisted together 2 by 2 = 12 stitches. Cut the yarn and pull it through the remaining stitches, tighten together and fasten. Piece measures approx. 27-29 cm from top and down. |
||||||||||||||||||||||||||||
Diagram explanations |
||||||||||||||||||||||||||||
|
||||||||||||||||||||||||||||
 |
||||||||||||||||||||||||||||
 |
||||||||||||||||||||||||||||
 |
||||||||||||||||||||||||||||
 |
||||||||||||||||||||||||||||
Have you finished this pattern?Tag your pictures with #dropspattern #agnesjacket or submit them to the #dropsfan gallery. Do you need help with this pattern?You'll find 32 tutorial videos, a Comments/Questions area and more by visiting the pattern on garnstudio.com. © 1982-2026 DROPS Design A/S. We reserve all rights. This document, including all its sub-sections, has copyrights. Read more about what you can do with our patterns at the bottom of each pattern on our site. |
||||||||||||||||||||||||||||


With over 40 years in knitting and crochet design, DROPS Design offers one of the most extensive collections of free patterns on the internet - translated to 17 languages. As of today we count 324 catalogues and 12245 patterns translated into English (UK/cm). 12245
We work hard to bring you the best knitting and crochet have to offer, inspiration and advice as well as great quality yarns at incredible prices! Would you like to use our patterns for other than personal use? You can read what you are allowed to do in the Copyright text at the bottom of all our patterns. Happy crafting!
Post a comment to pattern DROPS 197-15
We would love to hear what you have to say about this pattern!
If you want to leave a question, please make sure you select the correct category in the form below, to speed up the answering process. Required fields are marked *.