
Popular categories
Looking for a yarn?


Comments / Questions (40)
Anna wrote:
Sorry, this is a queation related to the whole catalogue. Will be other patterns released too? I was really looking forward to a cabled jumper which I can see has not been included here:-(
13.08.2018 - 19:23DROPS Design answered:
Dear Anna, those designs that did not ake into the catalogs will be released at a later time, over the fall. Happy Knitting!
13.08.2018 - 21:20
![]() Simona Dohnalová wrote:
Simona Dohnalová wrote:
Dobrý den, prosím o radu: Chtěla bych si tento svetřík uplést z příze Drops Sky. V převodníku nejsou zatím převody k této přízi uvedeny. Můžete mi prosím poradit, klolik příze Drops Sky bude potřeba? Děkuji.
08.08.2018 - 08:27DROPS Design answered:
Dobrý den, Simono, pro nahrazení dvojité příze Air doporučuji pro zachování obdobné síly úpletu použít 3 vlákna DROPS Sky. Přesnou spotřebu v závislosti na zvolené velikosti pak můžete spočítat podle těchto vzorců. Přeji pohodové pletení! Hana
08.08.2018 - 12:06
![]() Frisotti wrote:
Frisotti wrote:
Magnifique modèle. Est-ce que le dos est comme le devant ou le dos est entièrement en point de riz?
07.08.2018 - 12:00DROPS Design answered:
Bonjour Mme Frisotti, le dos et le devant sont tous les 2 en point ajouré. Bon tricot!
08.08.2018 - 09:04
![]() ISABEL wrote:
ISABEL wrote:
Buenos días, podeis indicarme si este modelo va a ser traducido al español y si es así, cuándo aproximadamente???? Gracias
28.07.2018 - 10:08DROPS Design answered:
Hola Isabel. Durante el agosto todos los patrones publicados de la nueva colección estarán traducidos al español.
31.07.2018 - 12:05
![]() Isa wrote:
Isa wrote:
Qué ganas de que esté la traducción para poder hacerlo!!
19.07.2018 - 14:47Kristina wrote:
I would like measures for the different sizes in order to choose the correct size.
15.07.2018 - 09:23DROPS Design answered:
Dear Kristina, you will find all finished measurements in each size (in cm) in the chart at the bottom of the page. These measurements are taken flat from side to side. Compare them to a similar garment you have and like the shape to find out the matching size. Happy knitting!
16.07.2018 - 09:32
![]() Laura Sanna wrote:
Laura Sanna wrote:
MOLTO BELLO, SE NON CI FOSSE TANTO CALDO LO FAREI SUBITO
13.07.2018 - 13:19Jan wrote:
I love the relaxed fit, the seed stitch sleeves and the large lace pattern. It looks so comfortable 💕
12.07.2018 - 10:18
![]() Lisa wrote:
Lisa wrote:
Schönstes grün udn ein ausgefallenes Muster! Das perfekte erste projekt für den Herbst!
10.07.2018 - 16:50
![]() Frederique Morvan wrote:
Frederique Morvan wrote:
Magnifique modèle ! Superbe jeu de points
07.07.2018 - 18:07
|
||||||||||||||||
Miss Moss#missmosssweater |
||||||||||||||||
 |
 |
|||||||||||||||
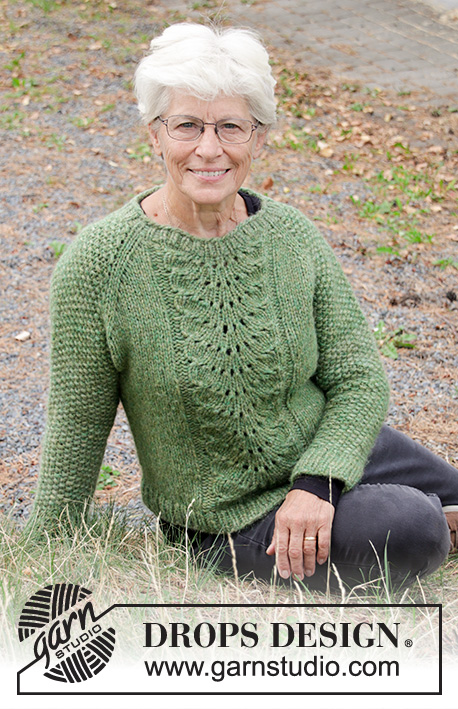
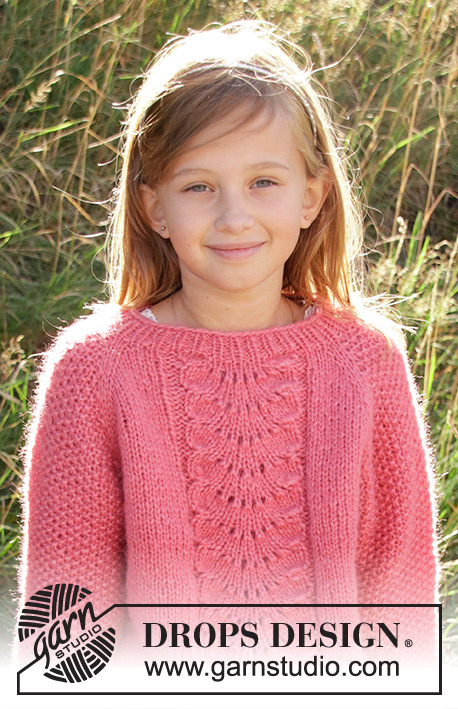
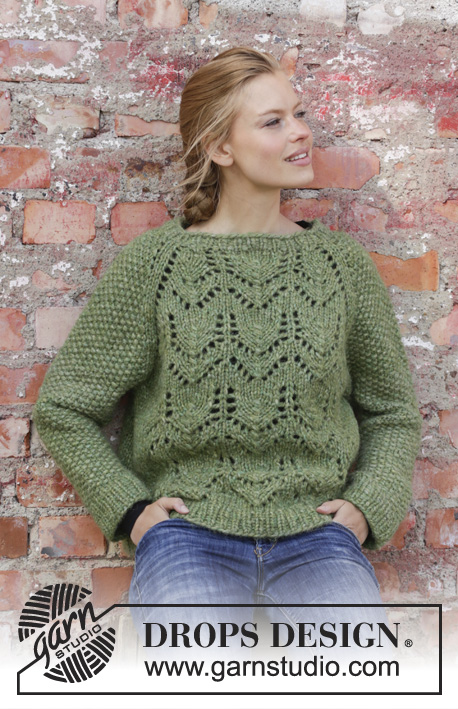
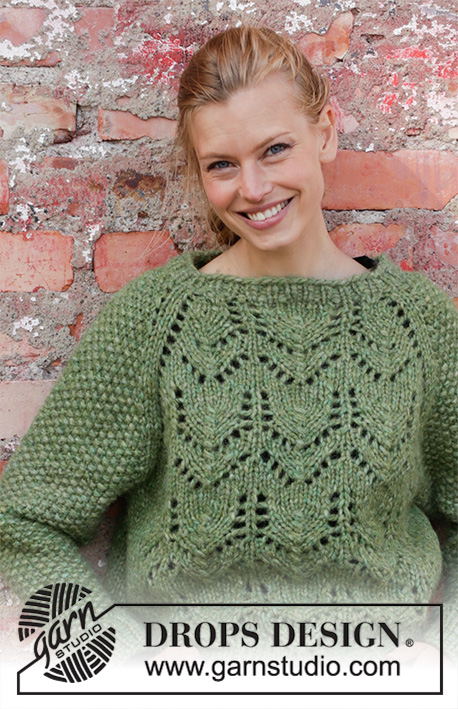
Knitted jumper with raglan in 2 strands DROPS Air. The piece is worked top down with lace pattern and moss stitch. Sizes S - XXXL.
DROPS 196-1 |
||||||||||||||||
|
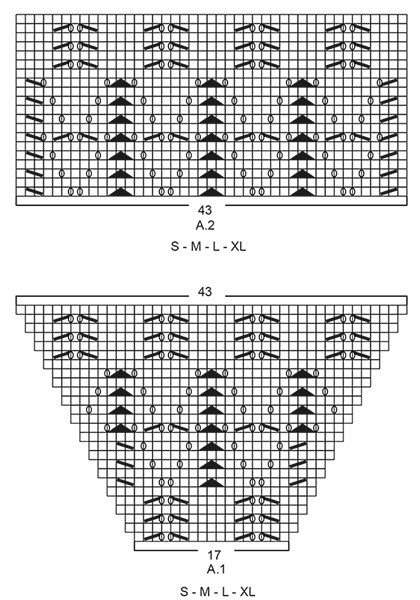
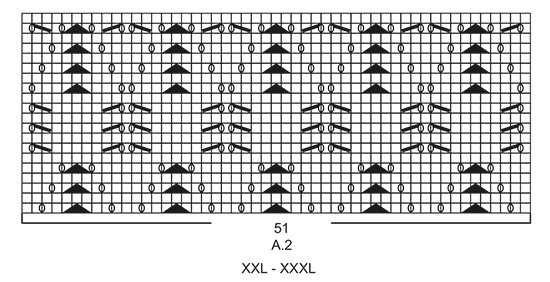
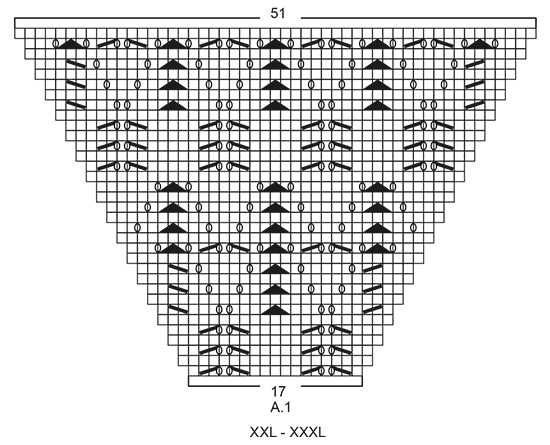
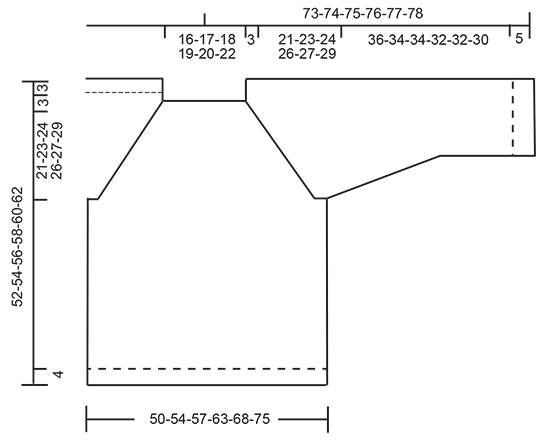
EXPLANATIONS FOR THE PATTERN: ------------------------------------------------------- INCREASE/DECREASE TIP (evenly spaced): To work out how to increase/decrease evenly, count the total number of stitches on the needle (e.g. 50 stitches) and divide by the number of increases/decreases to be made (e.g. 6) = 8.3. In this example, increase by making 1 yarn over after approximately each 8th stitch. On the next round work the yarn overs twisted to avoid holes. When decreasing, in this example, knit each 7th and 8th stitch together (approx.). MOSS STITCH: ROUND 1: * Knit 1, purl 1 *, work from *-*. ROUND 2: Knit over purl and purl over knit. Repeat round 2. PATTERN: See diagrams A.1 and A.2. Choose diagram for your size. RAGLAN: Increase 1 stitch on each side of the 2 knitted stitches in each transition between body and sleeves (= 8 stitches increased on round). Increase 1 stitch by making 1 yarn over. On the next round knit the yarn overs twisted (= no holes), apart from on the front piece where you knit the yarn overs (= holes). Then work the new stitches into the pattern (i.e. in moss stitch on the sleeves, stocking stitch on the back piece and pattern/stocking stitch on the front piece. DECREASE TIP (for sleeves): Decrease 1 stitch on each side of the marker thread as follows: Work until there is 1 stitch left before the marker thread, knit 3 together = 1 stitch (move marker thread to before this stitch). ------------------------------------------------------- START THE PIECE HERE: ------------------------------------------------------- JUMPER - SHORT OVERVIEW OF THE PIECE: The piece is worked in the round with circular needle, top down. You can work an elevation in the back of the neck for a better fit, so that the yoke is slightly higher at the back. This elevation can be left out; the neck is then the same front and back – read description of elevation further down the text. After the yoke the body is worked in the round with circular needle. The sleeves are worked in the round with short circular needle/double pointed needles. NECK: Cast on 50-50-52-56-58-60 stitches with circular needle size 7 mm and 2 strands Air. Knit 1 round. Then work rib (= knit 1 / purl 1) for 3 cm. Knit 1 round where you increase 6-6-8-4-6-0 stitches evenly on round – read INCREASE/DECREASE TIP = 56-56-60-60-64-60 stitches. Change to circular needle size 8 mm. Now you can work an elevation in the back of the neck or go straight to yoke if you do not want an elevation. ELEVATION IN BACK OF NECK: Skip this section if you do not want an elevation. Insert 1 marker at the beginning of the round (mid back). Start from the right side and knit 6-6-6-7-7-7 stitches past the marker, turn, tighten the strand and purl 12-12-12-14-14-14 stitches. Turn, tighten the strand and knit 18-18-18-21-21-21 stitches, turn, tighten the strand and purl 24-24-24-28-28-28 stitches. Turn, tighten the strand and knit 30-30-30-35-35-35 stitches, turn, tighten the strand and purl to mid back, then purl 10 stitches past the marker, turn. Start the next round (i.e. the yoke) here. YOKE: Insert 1 marker here - THE PIECE IS NOW MEASURED FROM HERE! Now insert 4 marker threads in the piece as follows (without working the stitches): Insert 1 marker thread at the beginning of the round (= in transition between sleeve and back piece), the 2nd marker thread is inserted after the next 19 stitches (= back piece), 3rd marker thread is inserted after the next 9-9-11-11-13-11 stitches (= sleeve) and 4th marker thread is inserted after the next 19 stitches (= front piece). There are 9-9-11-11-13-11 stitches left to the first marker thread (= sleeve). The next round is worked as follows: The round starts at the first marker thread, in the transition between sleeve and back piece. Knit 1, make 1 yarn over, work 17 stitches in stocking stitch (= back piece), make 1 yarn over, knit 2 (the marker thread sits in the middle of these 2 stitches), make 1 yarn over, work 7-7-9-9-11-9 stitches MOSS STITCH – read description above (= sleeve), make 1 yarn over, knit 2 (the marker thread sits in the middle of these 2 stitches), make 1 yarn over, work A.1 (= 17 stitches - choose diagram for your size = front piece), make 1 yarn over, knit 2 (the marker thread sits in the middle of these 2 stitches), make 1 yarn over, work 7-7-9-9-11-9 stitches in moss stitch (= sleeve), make 1 yarn over, knit 1. The first increase to RAGLAN – read description above, is now finished (= 8 stitches increased on the round). Continue this pattern and increase to raglan every 2nd round a total of 15-17-18-19-20-22 times (including the first round described above). NOTE: When A.1 has been completed in height, there are still 2-4-5-6-3-5 increases to raglan left. Then work A.2 (= 43-43-43-43-51-51 stitches) over A.1, the last increases are worked in stocking stitch on each side of A.2 as you go. Repeat diagram A.2 in height to finished length. REMEMBER THE KNITTING TENSION! After the last increase to raglan there are 176-192-204-212-224-236 stitches on the needle. Continue with pattern as before, without increases, until the piece measures 21-23-24-26-27-29 cm from the marker at the beginning of the yoke. The next round is worked as follows: Work 50-54-57-60-63-68 stitches in stocking stitch (= on back piece), place the next 37-41-43-43-45-45 stitches on 1 thread for sleeve, cast on 4-4-4-6-8-10 new stitches on the needle (= in side under sleeve), work 4-6-8-10-8-11 stitches in stocking stitch, continue A.2 (= 43-43-43-43-51-51 stitches) and work 4-6-8-10-8-11 stitches in stocking stitch (= front piece), place the next 37-41-43-43-45-45 stitches on 1 thread for sleeve, cast on 4-4-4-6-8-10 new stitches on the needle (= in side under sleeve), work the last 1-1-2-3-4-5 stitches (= on back piece). Body and sleeves are finished separately. THE PIECE IS NOW MEASURED FROM HERE! BODY: = 110-118-126-138-150-166 stitches. Insert a marker thread in the middle of the 4-4-4-6-8-10 new stitches cast on under the sleeve in each side. Start the round by one of the marker threads and allow the marker threads to follow your work onwards. Continue with stocking stitch and pattern A.2. When the piece measures 24-24-25-25-26-26 cm from the division (approx. 48-50-52-54-56-58 cm from the shoulder) knit 1 round where you increase 16-18-18-20-22-24 stitches evenly on round = 126-136-144-158-172-190 stitches. Change to circular needle size 7 mm and work rib (= knit 1 / purl 1) for 4 cm. Cast off with knit over knit and purl over purl – to avoid the cast-off edge being tight, you can cast off with a needle size 8 mm. The jumper measures approx. 52-54-56-58-60-62 cm from the shoulder. SLEEVE: Place the 37-41-43-43-45-45 stitches from the thread on the one side of the piece on short circular needle/double pointed needles size 8 mm and knit up 1 stitch in each of the 4-4-4-6-8-10 stitches cast on under the sleeve = 41-45-47-49-53-55 stitches. Insert 1 marker thread in the middle of the 4-4-4-6-8-10 stitches under the sleeve and start the round here. Work moss stitch. When the piece measures 2 cm from the division, decrease 2 stitches mid under sleeve - read DECREASE TIP. Decrease like this every 4-3½-2½-3-2-2 cm a total of 7-8-9-9-11-11 times = 27-29-29-31-31-33 stitches. Continue working until the piece measures 36-34-34-32-32-30 cm from the division (shorter measurements in larger sizes due to longer yoke). Knit 1 round where you increase 5 stitches evenly on round = 32-34-34-36-36-38 stitches. Change to double pointed needles size 7 mm and work rib (=knit 1/ purl 1) for 5 cm. The sleeve measures approx. 41-39-39-37-37-35 from the division. Cast off with knit over knit and purl over purl - to avoid the cast-off edge being tight, you can cast off with a needle size 8 mm. Work the other sleeve in the same way. |
||||||||||||||||
Diagram explanations |
||||||||||||||||
|
||||||||||||||||
 |
||||||||||||||||
 |
||||||||||||||||
 |
||||||||||||||||
 |
||||||||||||||||
Have you finished this pattern?Tag your pictures with #dropspattern #missmosssweater or submit them to the #dropsfan gallery. Do you need help with this pattern?You'll find 33 tutorial videos, a Comments/Questions area and more by visiting the pattern on garnstudio.com. © 1982-2026 DROPS Design A/S. We reserve all rights. This document, including all its sub-sections, has copyrights. Read more about what you can do with our patterns at the bottom of each pattern on our site. |
||||||||||||||||


With over 40 years in knitting and crochet design, DROPS Design offers one of the most extensive collections of free patterns on the internet - translated to 17 languages. As of today we count 325 catalogues and 12298 patterns translated into English (UK/cm). 12298
We work hard to bring you the best knitting and crochet have to offer, inspiration and advice as well as great quality yarns at incredible prices! Would you like to use our patterns for other than personal use? You can read what you are allowed to do in the Copyright text at the bottom of all our patterns. Happy crafting!
Post a comment to pattern DROPS 196-1
We would love to hear what you have to say about this pattern!
If you want to leave a question, please make sure you select the correct category in the form below, to speed up the answering process. Required fields are marked *.