
Popular categories
Looking for a yarn?


Comments / Questions (116)
![]() Jeanette Leander Payberg wrote:
Jeanette Leander Payberg wrote:
Nu har jeg pillet op 6 gange kan lige meget hvad ikke få det til at gå op, strikker str xl og får aldrig 16 masker vrang på hver side af mønstret nå a2 er færdigt og jeg når heller aldrig op på 85 masker når alle udtagninger er færdige, hvad gør jeg forkert
18.10.2020 - 17:48DROPS Design answered:
Hej Jeanette, hvor er du i opskriften, jeg kan ikke finde de 85 masker du refererer til i opskriften....
22.10.2020 - 12:27
![]() Martine wrote:
Martine wrote:
Bonjour les mailles que l'on augmente pour l'arrondi des manches sont elles dessinées sur le diagramme A2 ou sont elles en plus? Merci
11.10.2020 - 08:01DROPS Design answered:
Bonjour Martine, pour l'arrondi des manches vous augmentez 1 m de chaque côté de chaque A.2, les augmentations ne figurent pas dans le diagramme mailes mais ces mailles vont progressivement se tricoter comme le montre A.2. Bon tricot!
12.10.2020 - 08:21
![]() Martine wrote:
Martine wrote:
Bonjour , je suis arrivée aux augmentations pour l'arrondi des manches .Je vais augmenter en tout 60 mailles pour chaque manches( Taille M ).Donc à la fin des augmentations j'aurai 96 mailles pour le devant , 96 mailles pour le dos , 61 mailles par manches à la fin du diagramme ( 122 mailles pour les 2 ) et 120 mailles pour l'arrondi des manches( 2 x 60 mailles ).Donc 434 mailles en tout .Et vous , vous notez Que lorsque toutes les augmentations sont finies on a 338 mailles ?
11.10.2020 - 07:40DROPS Design answered:
Bonjour Martine, quand vous arrêtez les rangs raccourcis, vous avez 142 m, vous allez augmenter pour chaque demi-dos: 3x2 m + 7x1 m (= 17m par demi-dos x2 = 34 m pour le dos) et pour le devant: 7x2m+7x1m = 21 m x 2 = 42 m au total et pour les manches: 30 x2 m = 60 m par manche, vous aurez ainsi: 142+ 34+42+60+60= 338 m. Bon tricot!
12.10.2020 - 08:20
![]() Jacqueline Chartier wrote:
Jacqueline Chartier wrote:
Question - pouvez-vous me dire au niveau des augmentations épaules , comment savoir si j'augmente 2 mailles avant les marqueurs 1 et 3 ou augmenter 2mailles après les marqueurs 2 et 4 etc .... Je n'arrive pas à m'y retrouver ! Merci
18.09.2020 - 19:59DROPS Design answered:
Bonjour Mme Chartier, vous augmentez pour les épaules entre les marqueurs 4 et 1 (dos) soit entre les marqueurs 2 et 3 (= devant), autrement dit, vous augmentez après le marqueur-4 et avant le -1 pour le dos et après le marqueur-2 et avant le-3 pour le devant - cf ÉPAULES; Bon tricot!
21.09.2020 - 15:53
![]() Pascale GUIBERT wrote:
Pascale GUIBERT wrote:
Re Bonjour , Quand je repars après le rang 13 , je vais donc faire les jetés pour les augm sur un côté ( marqueurs 1 et 2 ) et tricoter les jetés précédents sur l'autre côté (marqueurs 3 et 4 ) ?? Si je comprends bien , les augmentations de l'arrondi des manches se situent entre la derniere maille avant le marqueur et la première de A2 ?
01.09.2020 - 17:05DROPS Design answered:
Bonjour Mme Guibert, vous augmentez pour les épaules de part et d'autre de A.2 = avant A.2 et après A.2 cf ÉPAULES (1 m avant/1 m après A.2) - celles de l'arrondi des manches se situent bien là, vous tricotez d'abord ces augmentations à l'endroit (= comme le jersey du devant/dos) puis à l'envers (comme les premières/dernières mailles de A.2). Bon tricot!
02.09.2020 - 08:21
![]() Pascale GUIBERT wrote:
Pascale GUIBERT wrote:
Bonjour, Au rang 13 je repart de 16 mailles avant le marqueur 3 , je fais les augm de 2 m pour les épaules sur le devant , puis les 13 mailles du dessin A.2, puis les 2 m augm épaule dos et je vais jusqu'au milieu ....jusque là OK . Pourquoi après vous me dites "continuer en POINT FANTAISIE ??si je vais au marqueur 2 je continue donc l'autre moitie de dos et je devrais la faire à l'endroit ...puis A2 sans augmentations après le milieu dos , et je coupe .
01.09.2020 - 16:50DROPS Design answered:
Bonjour Mme Guibert, continuez simplement le point fantaisie comme avant en suivant les diagrammes indiqués/en tricotant les mailles comme avant. Bon tricot!
01.09.2020 - 16:54
![]() Pascale wrote:
Pascale wrote:
Bonsoir , moi je commence mal , je ne comprends pas comment refermer mon cercle , lorsque je monte les 106 mailles + 1 pour ne pas avoir de décalage avec le cable 40 , ça ne se referme pas pourtant je suis passée au numero d'aiguilles au dessus après avoir fait l'échantillon ....
17.07.2020 - 23:06DROPS Design answered:
Bonjour Pascale, avez-vous bien le bon échantillon? Avec les aiguilles les plus fines vous devez avoir 23 mailles = 10 cm de large (et 32 rangs pour 10 cm de hauteur) - vos 106 mailles vont ainsi mesurer 46 cm environ. Pensez à bien vérifier votre tension pour que les mesures du schéma soient correctes (plus d'infos ici - vous pouvez aussi tricoter en magic loop si c'est plus simple pour vous. Bon tricot!
20.07.2020 - 08:55
![]() Camilla wrote:
Camilla wrote:
Hej, när man har stickat 13 förkortade varv och A2 är klart en gång, ska man sen backa tillbaka maskorna på stickan till mitt bak? Om jag börjar det nya varvet där så har jag inte stickat ökningarna som gjordes före markör 3 och efter markör 4 på varv 13, eftersom jag inte ska sticka tillbaka dit innan jag börjar det nya varvet. För min del så kommer ju ökningarna att bli i otakt då. Är det riktigt?
29.05.2020 - 22:26DROPS Design answered:
Hej Camilla, ja du kan göra ökningen när du kommer dit nästa gång, det gör inget att det blir otakt. Lycka till :)
05.06.2020 - 09:27
![]() Madeleine wrote:
Madeleine wrote:
Jag har kommit till varv 4 och jag fattar inte. Jag ska sticka till markör 4 göra A2 sen är 3:e markören där? Vadå? Den har jag ju stickat förbi?
15.12.2019 - 20:59DROPS Design answered:
Hej Madeleine, du har markör 1 i ena sidan bak i övergången mot ärmen, och du har markör 4 i andra sidan bak i övergången mot ärmen. Lycka till!
17.12.2019 - 11:44
![]() Catherine Richard wrote:
Catherine Richard wrote:
Bonjour, Concernant le diagramme A2. Ne faut-il pas inverser le sens de lecture des rangs endroits entre l'épaule droite et l'épaule gauche, vu qu'il y a surjet d'un côté et maille glissée rabattue de l'autre ? Cordialement
31.10.2019 - 16:28DROPS Design answered:
Bonjour Mme Richard, ce point ajouré se fait bien ainsi, vous retrouvez le même motif en haut de A.2 - et de la même façon sur les 2 épaules/manches. Bon tricot!
04.11.2019 - 14:15
|
||||||||||||||||||||||
Vanilla Kiss#vanillakisssweater |
||||||||||||||||||||||
 |
 |
|||||||||||||||||||||
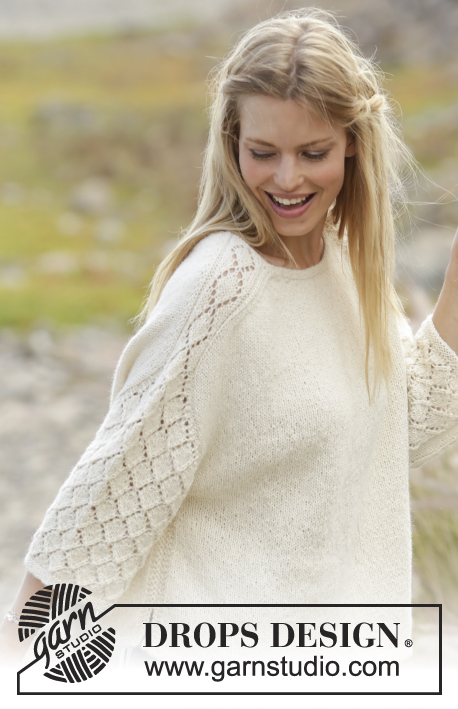
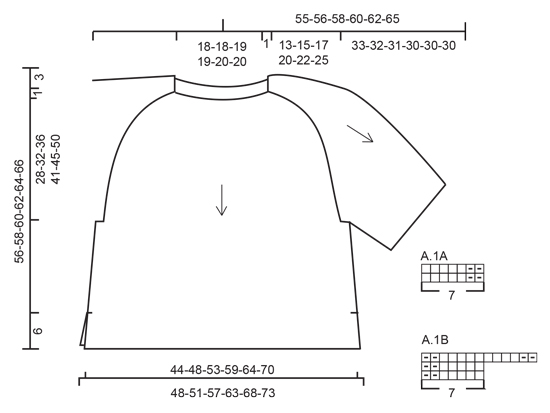
Jumper with lace pattern on shoulders and sleeves, knitted top down in DROPS Puna or Sky. Size: S - XXXL
DROPS 178-16 |
||||||||||||||||||||||
|
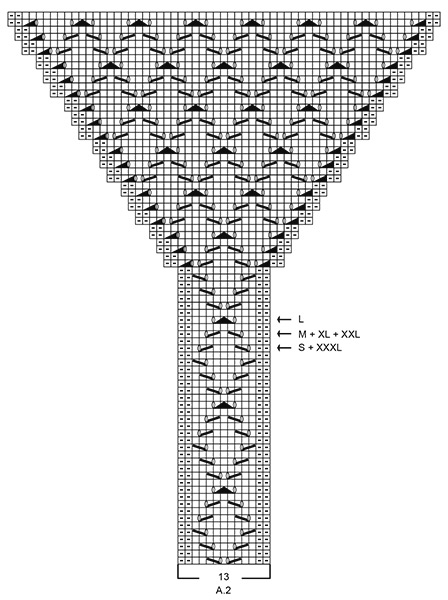
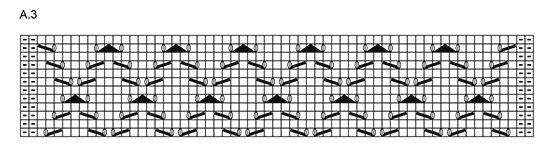
RIDGE/GARTER STITCH (worked in the round): 1 ridge = 2 rounds. Knit 1 round and purl 1 round. RIDGE/GARTER STITCH (worked back and forth): 1 ridge = Knit 2 rows. PATTERN: See diagrams A.1 to A.3. The diagrams show all rows in pattern seen from the right side. SHOULDER: NOTE: All increases worked from right side! On next row work yarn overs twisted to avoid holes. Increase 2 stitches as follows: INCREASE 2 STITCHES BEFORE MARKERS 1 AND 3: Start 3 stitches before marker, 1 yarn over, knit 2, 1 yarn over, knit 1, (= 2 stitches increased). INCREASE 2 STITCHES AFTER MARKERS 2 AND 4: Knit 1, 1 yarn over, knit 2, 1 yarn over (= 2 stitches increased). Increase 1 stitch as follows: INCREASE 1 STITCH BEFORE MARKERS 1 AND 3: Start 1 stitch before marker, 1 yarn over, knit 1 (= 1 stitch increased). INCREASE 1 STITCH AFTER MARKERS 2 AND 4: Knit 1, 1 yarn over (= 1 stitch increased). SLEEVE CAP: Increase 1 stitch by making 1 yarn over (make sure the yarn over is not too loose). On next round: work yarn over twisted to avoid holes – knit the first 21 stitches increased, purl the remaining stitches. next round purl yarn over twisted to avoid a hole – all increased stitches on sleeve cap are purled. INCREASE TIP (for sides of front and back pieces): Increase on inside of the 4 outermost stitches in each side (i.e. 3 edge stitches in garter stitch + 1 stitch in stocking stitch). Increase 1 stitch by making 1 yarn over, on next row work yarn over twisted to avoid a hole (the increased stitch is worked in stocking stitch). DECREASE TIP (for mid under sleeve): Start 3 stitches before marker mid under sleeve, purl 2 together, knit 2 (the marker sits in the middle of these 2 stitches), purl 2 together (= 2 stitches decreased). ---------------------------------------------------------- JUMPER The piece is worked in the round with circular needle, top down, as far as below the sleeves. Then the front and back pieces are worked separately back and forth. The sleeves are worked in the round. The photo deviates somewhat from pattern regarding increases in sleeve caps (A.2) – the fit has been improved. YOKE: Cast on 102-102-106-106-110-110 stitches with short circular needle size 3 mm and Puna. The round starts mid back. Insert a marker here which will follow your work onwards. Work 2 RIDGES in the round – see description above. Insert 4 new markers in the piece as follows (without working the stitches): Insert marker 1 after the first 19-19-20-20-21-21 stitches (= ½ back piece), marker 2 after the next 13 stitches (= shoulder/sleeve), marker 3 after the next 38-38-40-40-42-42 stitches (= front piece), marker 4 after the next 13 stitches (= shoulder/sleeve), there are now 19-19-20-20-21-21 stitches left after the last marker (= ½ back piece). Change to circular needle size 4 mm. Now work short rows over the stitches in the neck for a better fit, AT THE SAME TIME as you increase stitches to shoulder and work pattern on shoulders/sleeves (= 13 stitches) as follows: ROW 1 (from right side): Knit until 3 stitches before the marker 1, increase 2 stitches to SHOULDER – see description above, work A.1A (= 7 stitches), turn piece and tighten strand. ROW 2 (from wrong side): Work A.1A, purl as far as marker 4, A.1B (= 7 stitches –you read the diagram from left to right when working from the wrong side), turn the piece and tighten strand. ROW 3: Work A.1B, increase 2 stitches to shoulder, knit to 3 stitches before marker 1 and increase 2 stitches to shoulder, work A.2 (= 13 stitches), marker 2 is here, turn the piece and tighten strand. ROW 4: Work A.2, purl to marker 4, work A.2 – start on row 2 in the diagram, marker 3 is here, turn the piece and tighten strand. ROW 5: Work A.2, increase 2 stitches to shoulder, knit to 3 stitches before marker 1, increase 2 stitches to shoulder, continue A.2 and increase 2 stitches to shoulder on front piece, (i.e. you work as follows after marker 2: Knit 1, 1 yarn over, knit 2, 1 yarn over), knit 1, (= 4 stitches + 2 yarn overs on front piece), turn the piece and tighten strand. ROW 6: Purl to marker 2 (= purl 6 stitches on front piece), continue A.2, purl to marker 4, continue A.2, purl 4 stitches on front piece (= 4 stitches past marker 3) turn the piece and tighten strand. REMEMBER THE KNITTING TENSION! ROW 7: Knit 1, increase 2 stitches to shoulder (= 4 stitches + 2 yarn overs on front piece), continue A.2, increase 2 stitches to shoulder, knit to 3 stitches before marker 1, increase 2 stitches to shoulder, continue A.2, increase 2 stitches to shoulder on front piece and knit over 2 more stitches than on previous row on front piece (= 8 stitches + 2 yarn overs on front piece), turn the piece and tighten the strand. ROW 8: Purl to marker 2 (= 10 purled stitches on front piece), continue A.2, purl to marker 4, continue A.2 and purl over 2 stitches more than on the previous row on front piece (= 8 stitches on front piece), turn the piece and tighten strand. ROW 9: Knit to 3 stitches before the marker, increase 2 stitches to shoulder (= 8 knitted stitches + 2 yarn overs on front piece), continue A.2, increase 2 stitches to shoulder, knit to 3 stitches before marker 1, increase 2 stitches to shoulder, continue A.2, increase 2 stitches to shoulder on front piece, Knit over 2 stitches more than on the previous row on front piece (= 12 stitches + 2 yarn overs on front piece), turn piece and tighten strand. ROW 10: Purl to marker 2 (= 14 purled stitches on front piece), continue A.2, purl to marker 4, continue A.2 and purl over 2 stitches more than on previous row on front piece (= 12 stitches on front piece), turn the piece and tighten strand. ROW 11: Knit to 3 stitches before the marker, increase 2 stitches to shoulder (= 12 knitted stitches + 2 yarn overs on front piece), continue A.2, increase 2 stitches to shoulder, knit to 3 stitches before marker 1, increase 2 stitches to shoulder, continue A.2, increase 2 stitches to shoulder on front piece, knit over 2 more stitches than on the previous row on front piece (= 16 stitches + 2 yarn overs on front piece), turn the piece and tighten strand. ROW 12: Purl to marker 2 (= 18 purled stitches on front piece), continue A.2, purl to marker 4, continue A.2 and purl over 2 stitches more than on previous row on front piece (= 16 stitches on front piece), turn piece and tighten strand. ROW 13: Knit to 3 stitches before marker, increase 2 stitches to shoulder (= 18 stitches before next marker), continue A.2, increase 2 stitches to shoulder, knit to mid back (= start of the round). Continue with pattern but without increasing as far as marker 2. Now you have worked 11 rows of A.2. Cut the strand. You have now increased 2 stitches to shoulder in each side of the front piece 4 times and 2 stitches to shoulder in each side of the back piece 6 times = 142-142-146-146-150-150 stitches (= 54-54-56-56-58-58 stitches on front piece and 62-62-64-64-66-66 stitches on back piece). The short rows are now finished and you continue in the round with circular needle. Start at marker mid back. On the next round continue the increases to shoulder (= work the increased stitches on front and back piece in stocking stitch) and work A.2 as before, AT THE SAME TIME on round with arrow in A.2 (i.e. before the increases to shoulder are finished) start the increases to sleeve cap (= work the first 21 increased stitches knit. AT THE SAME TIME work the new stitches into A.2 as A.2 expands outwards). When A.2 has been completed in height, repeat A.3 over A.2 to finished length. Increase to shoulder and to sleeve cap as described below: INCREASE TO SHOULDER AS FOLLOWS: NOTE: You increase differently on front and back pieces and, on the rounds after increases, the yarn overs are knitted twisted to avoid holes - Remember SHOULDER! INCREASE ON BACK PIECE (= between markers 4 and 1): Increase 2 stitches every 2nd round a total of 2-3-5-7-8-10 times, then increase 1 stitch every 2nd round a total of 9-11-12-14-16-18 times. INCREASE ON FRONT PIECE (= between markers 2 and 3): Increase 2 stitches every 2nd round a total of 6-7-9-11-12-14 times, then increase 1 stitch every 2nd round a total of 5-7-8-10-12-14 times. After all increases to shoulder there are 88-96-108-120-130-142 stitches on both front and back pieces. INCREASE TO SLEEVE CAP AS FOLLOWS: On the round with an arrow in diagram A.2 start increasing to SLEEVE CAP – see description above. Increase 1 stitch on each side of A.2 on every shoulder/sleeve (= 4 stitches increased on round). Increase in this way every round a total of 1-4-6-4-4-2 times and then every 2nd round a total of 25-26-28-32-34-38 times. There should always be at least 2 purled stitches on each side of the lace pattern A.2 on sleeves. (These purl stitches are included in the diagram). A.2 expands outwards as diagram is worked, so that more and more stitches are included in the lace pattern. When all increases to sleeve cap are finished, there are 65-73-81-85-89-93 stitches on each sleeve. After all increases to shoulder and sleeve cap there are 306-338-378-410-438-470 stitches on the needle and piece measures 31-33-35-37-38-41 cm (measured from shoulder down). There are now 4-8-12-14-16-18 purled stitches on each side of the lace pattern (including the 2 stitches in each side of A.2/A.3). The next round is worked as follows: Work 44-48-54-60-65-71 stitches stocking stitch (= ½ back piece), place the next 65-73-81-85-89-93 stitches on 1 thread (= sleeve), cast on 4 new stitches on needle (= in side under sleeve), work 88-96-108-120-130-142 stitches stocking stitch (= front piece), place the next 65-73-81-85-89-93 stitches on 1 thread (= sleeve), cast on 4 new stitches on needle (= in side under sleeve) and work the remaining 44-48-54-60-65-71 stitches in stocking stitch (= ½ back piece). BODY: = 184-200-224-248-268-292 stitches. THE PIECE IS NOW MEASURED FROM HERE! Now divide the piece in the middle of the 4 new stitches under each sleeve and the front and back pieces are worked separately, back and forth on circular needle to finished length. BACK PIECE: = 92-100-112-124-134-146 stitches. Work stocking stitch with 3 edge stitches in GARTER STITCH – see description above, in each side. When piece measures 3 cm from the division, increase 1 stitch in each side – read INCREASE TIP (= 2 stitches increased). Increase in this way every 14th-14th-14th-14th-14th-14th row a total of 4 times in each side = 100-108-120-132-142-154 stitches. When piece measures 24-24-24-24-25-24 cm from the division, change to circular needle size 3 mm. Work 3 ridges, change back to circular needle size 4 mm and loosely cast off. The jumper measures approx. 56-58-60-62-64-66 cm from top of shoulder down. FRONT PIECE: = 92-100-112-124-134-146 stitches. Work in the same way as the back piece. SLEEVE: Place the 65-73-81-85-89-93 stitches from the thread in one side of the piece onto short circular needle/double pointed needles size 4 mm and, in addition, knit up 1 stitch in each of the 4 stitches cast on under the sleeve = 69-77-85-89-93-97 stitches on needle. Insert 1 marker in the middle of the 4 new stitches mid under sleeve and allow the marker to follow your work onwards. Continue A.3 as before, knit 1 stitch on each side of the marker mid under sleeve and purl the remaining stitches on the round. When piece measures 3 cm from the division, decrease 2 stitches mid under sleeve – read DECREASE TIP. Repeat the decrease when piece measures 8-8-7-7-6-6 cm = 65-73-81-85-89-93 stitches. Continue working until piece measures 14-12-11-11-11-12 cm from the division. Change to double pointed needles size 3 mm. Work 3 ridges over all stitches, change back to double pointed needles size 4 mm and cast off. Work the other sleeve in the same way. ASSEMBLY: Sew side seams in outermost loop of outermost stitch so that the seam is flat, but stop when there is 6 cm left in each side (= split). |
||||||||||||||||||||||
Diagram explanations |
||||||||||||||||||||||
|
||||||||||||||||||||||
 |
||||||||||||||||||||||
 |
||||||||||||||||||||||
 |
||||||||||||||||||||||
Have you finished this pattern?Tag your pictures with #dropspattern #vanillakisssweater or submit them to the #dropsfan gallery. Do you need help with this pattern?You'll find 33 tutorial videos, a Comments/Questions area and more by visiting the pattern on garnstudio.com. © 1982-2026 DROPS Design A/S. We reserve all rights. This document, including all its sub-sections, has copyrights. Read more about what you can do with our patterns at the bottom of each pattern on our site. |
||||||||||||||||||||||


With over 40 years in knitting and crochet design, DROPS Design offers one of the most extensive collections of free patterns on the internet - translated to 17 languages. As of today we count 324 catalogues and 12245 patterns translated into English (UK/cm). 12245
We work hard to bring you the best knitting and crochet have to offer, inspiration and advice as well as great quality yarns at incredible prices! Would you like to use our patterns for other than personal use? You can read what you are allowed to do in the Copyright text at the bottom of all our patterns. Happy crafting!
Post a comment to pattern DROPS 178-16
We would love to hear what you have to say about this pattern!
If you want to leave a question, please make sure you select the correct category in the form below, to speed up the answering process. Required fields are marked *.