
Popular categories
Looking for a yarn?


Comments / Questions (39)
![]() Frøydis Andersen wrote:
Frøydis Andersen wrote:
Jeg har kommet til omgang 19 på genseren, og nå får jeg ikke hullmønsteret på ermene til å stemme. Jeg har prøvd flere ganger. Det virker som det er en maske for lite til at mønsteret går opp på denne omgangen. Noen som kan hjelpe?
21.02.2017 - 14:41DROPS Design answered:
Hej Frøydis, for at det skal stemme må du have et omslag for hver indtagning, og 1 maske imellem hver indtagning/kast - husk udtagningen i hver side. God fornøjelse!
22.02.2017 - 08:36
![]() Laura wrote:
Laura wrote:
Grazie dell'aiuto!
12.02.2017 - 23:30
![]() Laura wrote:
Laura wrote:
Buongiorno! Sto sviluppando il modello in taglia M. La mia domanda è:gli aumenti del corpo vanno iniziati insieme a quelli delle maniche (quindi allo schema A.1) oppure si inziano allo schema A.2 ? In entrambi i casi, facendo il calcolo, terminerei prima gli aumenti delle maniche e continuerei solo con gli aumenti del corpo, ma come lo lavoro lo schema delle maniche senza aumentare le maglie fino a quando non termino anche gli aumenti del corpo?
12.02.2017 - 17:50DROPS Design answered:
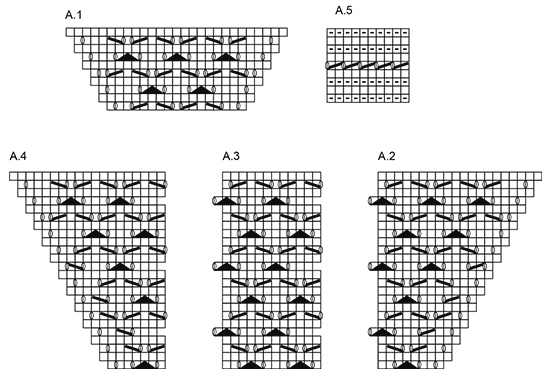
Buongiorno Laura. Gli aumenti sul corpo iniziano insieme a quelli sulle maniche; seguono poi una cadenza diversa. Gli aumenti sulle maniche e sul corpo dovrebbero finire sullo stesso giro: 52 giri per gli aumenti sulle maniche e 16x2 + 5x4 = 52 giri sul corpo. Metterà poi le maglie delle maniChe in sospeso e in un secondo momento le lavorerà seguendo il diagramma A.3 mantenendolo incolonnato con la parte già lavorata. Buon lavoro!
12.02.2017 - 18:37
![]() Prüfer wrote:
Prüfer wrote:
Warum,bitte,kann ich keine Anleitung direkt ausdrucken,es ist nur das Bild vom Modell zu sehen und die Musterzeichnung,mehr wird mir nicht ausgedruckt,jetzt habe ich schon so viel Papier verschwendet,da ich dachte es klappt doch irgendwann!!!! MfG Gudrun Prüfer
02.02.2017 - 17:56DROPS Design answered:
Liebe Frau Prüfer, Schauen Sie mal die Einstellungen von Ihrem Drucker, es sollte klappen. Viel Spaß beim stricken!
03.02.2017 - 09:12
![]() Roberta wrote:
Roberta wrote:
Confermo quanto scrive la signora francese sopra, c'è un errore nel paragrafo MAGLIONE perché A1 sono 19 maglie e non 17, e se si aumenta con quanto indicato avanzano al secondo giro 4 maglie. Potete cortesemente verificare? Grazie
29.01.2017 - 20:17
![]() Martine wrote:
Martine wrote:
Bonjour, Je suis scrupuleusement les explications dès le début du travail : 2 côtés mousse + 20 augmentations. Tout est parfait. Cependant une fois terminé le 5eme rang (1ère augmentation raglan comme indiqué et avec diagramme A1) au lieu d'obtenir 8 mailles supplémentaires, j'en ai 12 soit 4 de trop ! Pensant m'être trompée j'ai recommencé et obtient le même résultat ! Où est l'erreur ? Merci de votre aide ! Martine.
29.01.2017 - 10:22DROPS Design answered:
Bonjour Martine, pour les manches, on va augmenter tous les 2 tours, mais pour le dos et le devant, on va augmenter à un rythme différent en fonction de la taille, on aura parfois des augmentations juste sur les manches et pas sur le dos/le devant, regardez bien les indications pour votre taille. Bon tricot!
30.01.2017 - 11:49
![]() Judith wrote:
Judith wrote:
Sehr geschmackvoll, schlichter schnitt aber tolles Design
18.01.2017 - 06:43
![]() Monika wrote:
Monika wrote:
Ein schöner Schnitt, ein schönes Muster und eine sonnige Farbe - animiert zum Nachstricken!
21.12.2016 - 08:13
![]() Karin wrote:
Karin wrote:
Sehr apart!
15.12.2016 - 11:20
|
|||||||||||||||||||
Honey Blossom#honeyblossomsweater |
|||||||||||||||||||
|
|
|||||||||||||||||||
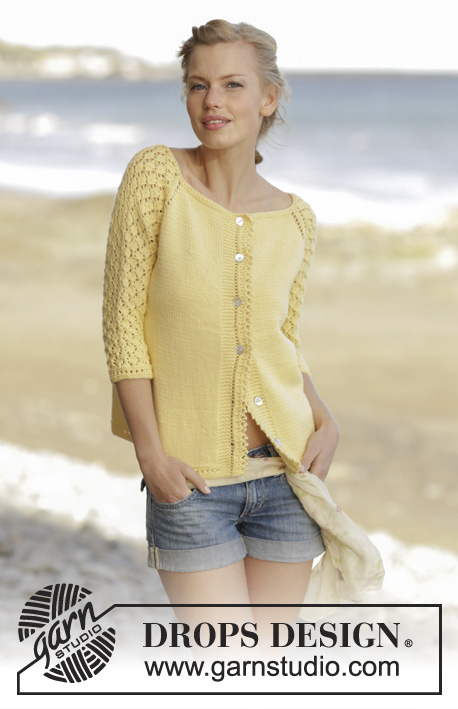
Jumper with lace pattern, worked top down with ¾ length sleeves in DROPS Merino Extra Fine. Sizes S - XXXL.
DROPS 176-5 |
|||||||||||||||||||
|
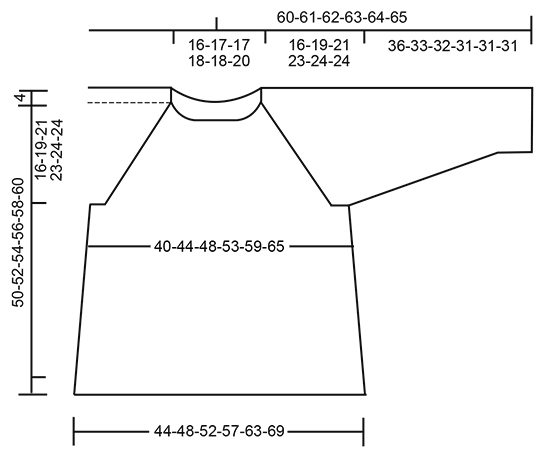
RIDGE/GARTER STITCH(worked in the round): 1 ridge = 2 rounds. Work 1 round knit and 1 round purl. PATTERN: See diagrams A.1 to A.5. RAGLAN: SLEEVE: The increases on the sleeve are a part of diagrams A.1, A.2 and A.4. Increase 1 stitch in each side of each sleeve every 2nd round, knit the yarn overs on next round, there will be holes. BODY: Increase 1 stitch in each side of the front piece and 1 stitch in each side of the back piece as follows (= in total 4 stitches increased): Increase as follows: Start 2 stitches before A.1: Make 1 yarn over, knit 2, work A.1, knit 2, make 1 yarn over. Repeat before and after the next A.1. Knit the yarn overs on next round, there will be holes. When increasing every 4th round, increase as follows: ROUND 1: Start 2 stitches before A.1: Make 1 yarn over, knit 2, work A.1, knit 2, make 1 yarn over. Repeat before and after the next A.1. ROUND 2: Knit the yarn overs, there will be holes. ROUND 3: Start 4 stitches before A.1: Knit 2 together, make 1 yarn over, knit 2, work A.1, knit 2, make 1 yarn over, slip 1 stitch as if to knit, knit 1, pass the slipped stitch over the stitch that was knitted – there are no increases, but the row of holes continues as before. Repeat before and after the next A.1. ROUND 4: Knit the yarn overs, there will be holes. INCREASE TIP: Start 1 stitch before the marker thread, make 1 yarn over, knit 2 (the marker thread sits between these 2 stitches), make 1 yarn over. Knit the yarn overs twisted on the next round. DECREASE TIP: Start 3 stitches before the marker thread, knit 2 together, knit 2 (the marker thread sits between these 2 stitches), slip 1 stitch as if to knit, knit 1, pass the slipped stitch over the knitted stitch. The stitches that do not fit the pattern mid under sleeve are worked in stocking stitch. ---------------------------------------------------------- JUMPER: The piece is worked in the round with circular needle from mid back, top down. Cast on 94-98-102-106-110-114 stitches with circular needle size 4 mm and Merino Extra Fine. Work 2 RIDGES – see description above, on the last round of the ridges increase 20 stitches evenly along the round = 114-118-122-126-130-134 stitches. Continue working as follows: Work 19-20-21-22-23-24 stitches stocking stitch (= half the back piece), 1 yarn over, 1 stitch stocking stitch, A.1 (= 17 stitches) (= right sleeve), 1 stitch stocking stitch, 1 yarn over, 38-40-42-44-46-48 stitches stocking stitch (= front piece), 1 yarn over, 1 stitch stocking stitch, A.1 (= left sleeve), 1 stitch stocking stitch, 1 yarn over, 19-20-21-22-23-24 stitches stocking stitch (= half the back piece). The first increase to RAGLAN is now complete. Continue upwards with this division of pattern and stocking stitch. Increase to raglan as described above. On the sleeve increase every 2nd round 22-26-29-31-32-33 times, on the body increase every round 0-0-0-0-0-6 times, then every 2nd round 14-16-17-25-32-30 times and finally every 4th round 4-5-6-3-0-0 times. NOTE! When A.1 is finished, continue working as follows (across the stitches on the sleeves): A.2 (= 8 stitches), A.3 (= 12 stitches), A.4 (= 7 stitches). When A.2, A.3 and A.4 have been worked 1 time in height work as follows: A.2, A.3 across the next 36 stitches (= 3 repeats), A.4. Every time that A.2 to A.4 are worked one time in height continue with 2 more repeats of A.3 between A.2 and A.4. Finish A.2, A.3 and A.4 when you have increased a total of 22-26-29-31-32-33 times on the sleeves and a total of 18-21-23-28-32-36 times on the front piece and back piece. After all the increases, there are now 61-69-75-79-81-83 stitches on each sleeve, 76-84-90-102-112-122 stitches on the front piece and back piece = 274-306-330-362-386-410 stitches in total. The next round is worked as follows: Work 38-42-45-51-56-61 stitches (= half the back piece), place the next 61-69-75-79-81-83 stitches on a thread (= sleeve), cast on 8-8-10-10-12-14 new stitches, work the next 76-84-90-102-112-122 stitches (= front piece), place the next 61-69-75-79-81-83 stitches on a thread (= sleeve), cast on 8-8-10-10-12-14 new stitches, work the last 38-42-45-51-56-61 stitches (= half the back piece). BODY: There are now 168-184-200-224-248-272 stitches on the body. Continue with stocking stitch. Insert a marker thread in each side, in the middle of the 8-8-10-10-12-14 new stitches which were cast on. THE PIECE IS NOW MEASURED FROM HERE. When the piece measures 3 cm increase 1 stitch on each side of each marker thread (= 4 stitches increased), increase every 7 cm in total 4 times – READ INCREASE TIP! = 184-200-216-240-264-288 stitches. When the piece measures 27-26-26-26-27-29 cm work A.5 across all the stitches, then cast off. The piece measures approx. 50-52-54-56-58-60 cm from the cast-on edge. SLEEVE: Place the stitches from the thread back on double pointed needles size 4 mm and knit up 1 stitch in each of the 8-8-10-10-12-14 stitches that were cast on under the sleeve = 69-77-85-89-93-97 stitches. Insert a marker thread in the middle of the new stitches = mid under sleeve. Continue with A.3, the stitches that do not fit the pattern mid under sleeve are worked in stocking stitch. Continue with this pattern. When the piece measures 3-3-3-5-5-5 cm decrease 1 stitch on each side of the marker thread, decrease every 3-2-1½-1½-1-1 cm in total 9-12-15-16-17-18 times – READ DECREASE TIP = 51-53-55-57-59-61 stitches. When the piece measures 33-30-29-28-28-28 cm work A.5 across all the stitches. Cast off when A.5 has been worked once in height, the sleeve measures approx. 36-33-32-31-31-31 cm. Work the other sleeve the same way. |
|||||||||||||||||||
Diagram explanations |
|||||||||||||||||||
|
|||||||||||||||||||
 |
|||||||||||||||||||
 |
|||||||||||||||||||
Have you finished this pattern?Tag your pictures with #dropspattern #honeyblossomsweater or submit them to the #dropsfan gallery. Do you need help with this pattern?You'll find 27 tutorial videos, a Comments/Questions area and more by visiting the pattern on garnstudio.com. © 1982-2026 DROPS Design A/S. We reserve all rights. This document, including all its sub-sections, has copyrights. Read more about what you can do with our patterns at the bottom of each pattern on our site. |
|||||||||||||||||||


With over 40 years in knitting and crochet design, DROPS Design offers one of the most extensive collections of free patterns on the internet - translated to 17 languages. As of today we count 324 catalogues and 12245 patterns translated into English (UK/cm). 12245
We work hard to bring you the best knitting and crochet have to offer, inspiration and advice as well as great quality yarns at incredible prices! Would you like to use our patterns for other than personal use? You can read what you are allowed to do in the Copyright text at the bottom of all our patterns. Happy crafting!
Post a comment to pattern DROPS 176-5
We would love to hear what you have to say about this pattern!
If you want to leave a question, please make sure you select the correct category in the form below, to speed up the answering process. Required fields are marked *.