
Popular categories
Looking for a yarn?


Comments / Questions (268)
![]() Marion Burg wrote:
Marion Burg wrote:
Hallo. Ik ga nu aan de verhoging beginnen en moet beginnen met de eerste 78 steken, begin ik dan met de laatste 4 steken van a,2 of na deze 4 steken, dus met het patroon? Hartelijk dank.
09.01.2024 - 22:47DROPS Design answered:
Dag Marion,
Je zet het patroon voort zoals het was, zodat het patroon doorloopt.
10.01.2024 - 10:26
![]() Marion Burg wrote:
Marion Burg wrote:
Hallo. Ik ga nu aan de verhoging beginnen en moet beginnen met de eerste 78 steken, begin ik dan met de laatste 4 steken van a,2 of na deze 4 steken, dus met het patroon? Hartelijk dank.
09.01.2024 - 09:53DROPS Design answered:
Dag Marion,
Bij de pas ben je de naald begonnen op het begin van het achterpand, 4 steken na de markeerder tussen de mouw en het achterpand. Dit is nog steeds het begin van de naald wanneer je de verhoging breit, dus ook waar je begint met de 78 steken.
14.01.2024 - 18:58
![]() Lene Arnold wrote:
Lene Arnold wrote:
Hej, I opskriftens første linie for Ryg & Forstk står der "*Strik 1 vrang, (1 ret, 2 vrang), gentag fra (-)....". Hvad refererer stregen i parentes til?
03.01.2024 - 13:11DROPS Design answered:
Hej Lene, du gentager det i parentesen det antal gange som passer til din størrelse :)
09.01.2024 - 14:44
![]() Inger Forsbakk wrote:
Inger Forsbakk wrote:
Strikker str L. Ved sammenstrikking og raglan står det på ermer: fell på hver 4. Omg. 4 ganger. Betyr det fell på første Omg. Så 4 ganger eller bare 3 ganger til. Eller skal jeg strikke 3 Omg. Felle og så 3 ganger til
13.12.2023 - 19:48DROPS Design answered:
Hei Inger, Du feller hver 4. omgang totalt 4 ganger - så den første omgangen + 3 til. Og du strikker 3 omganger uten felling og feller på den fjerde hver gang. God fornøyelse!
14.12.2023 - 06:48
![]() Rosanne wrote:
Rosanne wrote:
Taille L: après les diminutions j'ai 30 m devant et dos et 18 m par manches. Ensuite tricot 78 m donc plus de dim.raglan? Et ensuite pour rehausse dos les reprendre pour avoir 8 dim ? (4 sur le dos et 2 sur chaque manche) Reste 58 m sur mon aiguille (16-26-16) Et ensuite ? je ne comprends pas
18.11.2023 - 21:40DROPS Design answered:
Bonjour Rosanne, quand les diminutions de l'empiècement sont terminées, il vous reste 96 mailles, vous allez maintenant tricoter une rehausse qui doit commencer entre A.2 et la manche droite: tricotez 78 mailles, et à partir de maintenant, tricotez en rangs, en tournant à la fin de chaque rang; tricotez 58 mailles (en diminuant comme avant pour le raglan), tournez et tricotez 48 mailles, tournez et tricotez 46 mailles (en diminuant pour le raglan), tournez et tricotez 36 mailles, tournez et tricotez de nouveau en rond les 80 mailles restantes en côtes. Bon tricot!
20.11.2023 - 10:21
![]() Tina Lorenzen wrote:
Tina Lorenzen wrote:
Er det rigtigt jeg skal starte på halsribben med 150 masker i?? Jeg synes det er meget ?
17.11.2023 - 21:47DROPS Design answered:
Hei Tina. Denne genseren strikkes nedefra og opp. Altså, i str. S starter du med 150 masker som er nederst på genseren. mvh DROPS Design
20.11.2023 - 09:28
![]() Grazia wrote:
Grazia wrote:
Buonasera, lavoro in torno una taglia L. Non mi è chiaro come procedere con gli aumenti: dopo aver lavorato i primi 4 cm del collo, lavoro il diagramma A1 per altri circa 10 cm SENZA aumenti, e successivamente inizio gli aumenti: per ogni giro o solo al cm 15 e al cm 30? Grazie
29.10.2023 - 10:00DROPS Design answered:
Buonasera Grazia, gli aumenti per la Taglia L sono al cm 14 e 29. Buon lavoro!
29.10.2023 - 23:12
![]() Agnes wrote:
Agnes wrote:
Bonjour, Peut on avoir ce modele en explication tricot avec des aiguilles droites et non circulaires .Merci
11.05.2023 - 09:16DROPS Design answered:
Bonjour Agnès, cette leçon vous donnera quelques pistes pour adapter un modèle sur aiguilles droites; dans ce cas, je vous recommande de plutôt tricoter en rond, comme dans les explications pour plus de simplicité; sinon, consultez nos différents modèles, vous en trouverez à tricoter en allers et retours et en différentes parties. Bon tricot!
11.05.2023 - 16:33
![]() Mette Carl wrote:
Mette Carl wrote:
Hej. Jeg er i tvivl om overgangen til bærestykket, Ærmegab: Når der står '– sørg for at næste omg som skal strikkes er som 2.omg i A.1, lukkes der af til ærmegab således:" - betyder det så, at der skal lukkes af til ærmegab på 1. omg. i A1 eller på 2. omgang i A1? Og start på bærestykke: Når der står "På næste omg starter indtagningen til RAGLAN" - betyder det så, at indtagning starter på 1. omg. i A1 eller på 2. omgang i A1? Venlig hilsen Mette
06.05.2023 - 06:08DROPS Design answered:
Hei Mette. Når arbeidet måler x cm - avpass at neste omgang som skal strikkes er som 2.omgangen i A.1 (=omgang med bare rettmasker). Når du har satt maskene fra bol og ermene på samme rundpinne, fortsetter du mønstret som før (siste omgang var omgang med bare rettmasker og når man fortsetter med mønstret blir da neste omgang 2 vrang - 1 rett - 2 vrang - 1 rett osv). På neste omgang starter fellingen til raglan, og det er da bare rettmasker som skal strikkes (+ fellingene). mvh DROPS Design
08.05.2023 - 13:34
![]() Maika wrote:
Maika wrote:
Hallo, Ik ben met maat L bezig. De eerste regel snap ik van de 78 steken, maar daarna is het een beetje duister. Vervolgens wordt erover naald 1 t/m 4 gesproken, waar telkens over steeds minder steken wordt gebreid. Vervolgens hou je 80 steken over van de 96. Helaas de rest van de trui was zeer goed omschreven, maar nu snap ik het niet meer. Kunnen jullie mij helpen?
18.04.2023 - 12:04DROPS Design answered:
Dag Maika,
Je breit 78 steken. Vervolgens plaats je op die plek een markeerder. Dan brei je verder vanaf dit punt met naald 1 aan de goede kant. Je breit het aantal steken, dus 58. Dan keer je het werk en brei je naald 2, dus 48 steken aan e verkeerde kant. Zo werk je de aangegeven naalden af. Je breit dus een aantal naalden heen en weer om een verhoging te maken aan de achterkant.
19.04.2023 - 13:27
|
|||||||
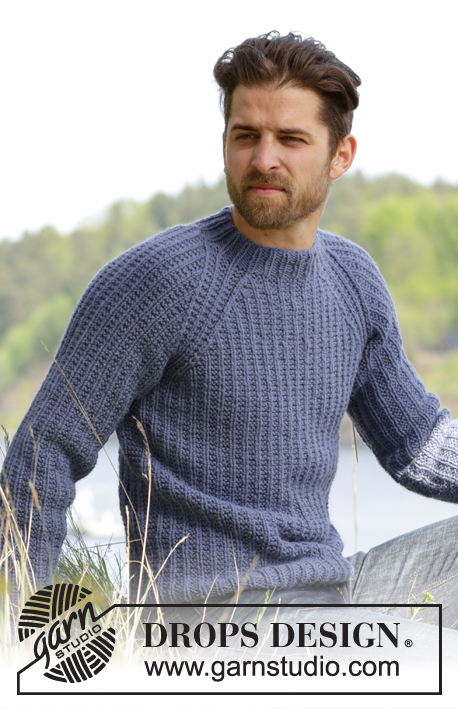
Twin River#twinriversweater |
|||||||
 |
 |
||||||
Knitted DROPS men’s jumper with textured pattern and raglan in Nepal. Size: S - XXXL.
DROPS 174-14 |
|||||||
|
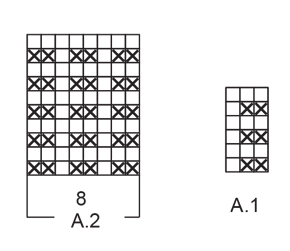
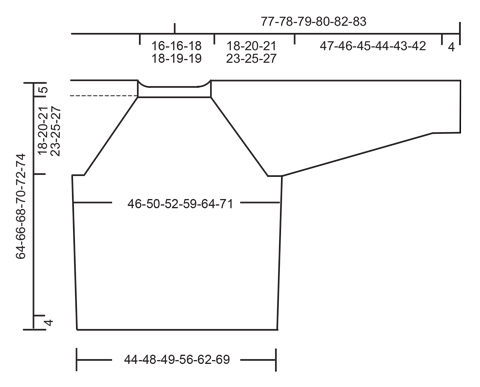
PATTERN: See diagrams A.1 and A.2. RAGLAN: Dec as follows before A.2: Work until 2 sts remain before A.2, K the next 2 tog. Dec as follows after A.2: Slip 1 st as if to K, K 1, psso INCREASE TIP (BODY): Inc 4 sts on round as follows: Work until 1 st remains before marker in the side, 1 YO, work 2 sts in garter st, 1 YO (= 2 sts inc). Repeat inc in the other side of piece. On next round work YO twisted to avoid holes. Work the new sts in garter st. INCREASE TIP (SLEEVE): Inc as follows mid under sleeve: Work until 1 st remains before marker, 1 YO, work 2 sts in garter st, 1 YO. On next round work YO twisted to avoid holes. Work the inc sts gradually in the pattern. NOTE: Work sts on each side of marker in garter st. RAGLAN DEC (ELEVATION): All dec are done from RS! Dec as follows after A.2: K 3 twisted tog. Dec as follows before A.2: Work until 3 sts remain before A.2, K 3 tog. ---------------------------------------------------------- JUMPER: Worked in the round. BODY: Cast on 150-162-168-192-210-234 sts with Nepal on circular needle size 5 mm. * P 1, (K 1, P 2), repeat from (-) 23-25-26-30-33-37 more times, K 1, P 1, insert a marker here (= side) *, repeat from *-* 1 more time. NOTE: Move the markers upwards when working. Continue rib in the round like this until piece measures 4 cm. Now work pattern A.1 as follows: Work the last 2 sts in A.1, then repeat A.1 the entire round until 1 st remains on round, work the first st in A.1. REMEMBER THE KNITTING TENSION When piece measures 13-13-14-14-15-15 cm, inc 1 st on each side of each marker – see INCREASE TIP (BODY). Repeat inc when piece measures 27-28-29-29-30-30 cm = 158-170-176-200-218-242 sts. When piece measures 41-41-42-42-42-42 cm (adjust so that next round worked is 2nd round in A.1), cast off sts for armholes as follows: Cast off the first 5 sts on round, work the next 69-75-78-90-99-111 sts, cast off the next 10 sts for armhole, work the next 69-75-78-90-99-111 sts, cast off the remaining 5 sts. Cut the yarn. Put piece aside and knit the sleeves. SLEEVE: Work sleeves in the round on double pointed needles. Cast on 42-42-42-48-48-48 sts with Nepal on double pointed needles size 5 mm. Insert a marker at beg of round = mid under sleeve. Work rib as follows: P 1, K 1, * P 2, K 1 *, repeat from *-* until 1 st remains on round, P 1. Continue like this in the round until rib measures 4 cm. Now work pattern as follows: Work the last 2 sts in A.1, A.1 until 1 st remains on round, work the first st in A.1. When piece measures 9-8-7-6-10-9 cm, inc 1 st on each side of marker – see INCREASE TIP (SLEEVE). Inc like this approx. every 13th-9th-7th-7th-6th-5th round 8-11-14-14-14-17 times in total = 58-64-70-76-76-82 sts. When piece measures 51-50-49-48-47-46 cm - adjust so that next round worked is 2nd round in A.1, cast off the middle 10 sts under sleeve (= 5 sts on each side of marker) = 48-54-60-66-66-72 sts. Knit another sleeve the same way. YOKE: Slip sleeves on to same circular needle size 5 mm as body where armholes were cast off = 234-258-276-312-330-366 sts. This is done without working the sts. Insert a marker in every transition between sleeves and body = 4 markers. Beg round on back piece, 4 sts after marker between sleeve and back piece. Now continue pattern as before and work in addition A.2 (= 8 sts) in every transition between body and sleeves (markers are in the middle of A.2). On next round start dec for RAGLAN – see explanation above! NOTE: Dec differently on body and sleeves as follows: RAGLAN BODY: Dec every other round 21-24-24-24-26-26 times and then every round 0-0-0-6-7-13 times (= 21-24-24-30-33-39 times in total). RAGLAN SLEEVES: Dec every 4th round 6-6-4-3-5-5 times and then every other round 9-12-17-21-19-22 times (= 15-18-21-24-24-27 times in total). When all dec are done, 90-90-96-96-102-102 sts remain on round (= 144-168-180-216-228-264 sts in total dec). Now work pattern as before over the first 72-72-78-78-84-84 sts. Insert marker here (= between A.2 and right sleeve). Then work an elevation back and forth in neck in pattern as before AT THE SAME TIME dec for raglan on every row from RS over the sts worked – READ RAGLAN DEC (ELEVATION) as follows: NOTE: Tighten yarn at every turn to avoid holes. ROW 1 (= RS): Work 55-55-58-58-61-61 sts (including the 8 dec sts), ROW 2 (= WS): Turn and work 45-45-48-48-51-51 sts, ROW 3: Turn and work 43-43-46-46-49-49 sts (including the 8 dec sts), ROW 4: Turn and work 33-33-36-36-39-39 sts. There are now 74-74-80-80-86-86 sts on round. Turn and continue in the round with rib as follows: Work K over K and P over sts in garter st until rib measures 4 cm. Cast off sts with K over K and P over P. Jumper measures 64-66-68-70-72-74 cm from cast-on edge and up to shoulder. Fasten off. ASSEMBLY: Sew the openings under the sleeves. |
|||||||
Diagram explanations |
|||||||
|
|||||||
 |
|||||||
 |
|||||||
Have you finished this pattern?Tag your pictures with #dropspattern #twinriversweater or submit them to the #dropsfan gallery. Do you need help with this pattern?You'll find 26 tutorial videos, a Comments/Questions area and more by visiting the pattern on garnstudio.com. © 1982-2026 DROPS Design A/S. We reserve all rights. This document, including all its sub-sections, has copyrights. Read more about what you can do with our patterns at the bottom of each pattern on our site. |
|||||||


With over 40 years in knitting and crochet design, DROPS Design offers one of the most extensive collections of free patterns on the internet - translated to 17 languages. As of today we count 325 catalogues and 12291 patterns translated into English (UK/cm). 12291
We work hard to bring you the best knitting and crochet have to offer, inspiration and advice as well as great quality yarns at incredible prices! Would you like to use our patterns for other than personal use? You can read what you are allowed to do in the Copyright text at the bottom of all our patterns. Happy crafting!
Post a comment to pattern DROPS 174-14
We would love to hear what you have to say about this pattern!
If you want to leave a question, please make sure you select the correct category in the form below, to speed up the answering process. Required fields are marked *.