
Popular categories
Looking for a yarn?


Comments / Questions (58)
![]() Makala Jefferies wrote:
Makala Jefferies wrote:
Where exactly do you add the amendment please? (Should this not be in the part of the pattern where the amendment occurs?) If using your colours, is this entire row done in the base colour of light grey?
20.06.2023 - 17:46DROPS Design answered:
Dear Mrs Jefferies, if you printed the pattern after the correction date, then the online pattern is already fixed - when working diagrams, repeat the diagrams all the round, this means repeat the colour(s) as shown in the diagrams to the end of the round. Read more about diagrams here. Happy knitting!
21.06.2023 - 07:45
![]() Makala wrote:
Makala wrote:
Has anyone converted this from a top down round needle to a bottom up straight needle? Whilst I am not a novice, I am not advanced, however, I have had advanced knitters take a look at this pattern, and they were about as confused as I am!!!
19.06.2023 - 10:12DROPS Design answered:
Hi Makala, how to adapt a pattern for circular needles into straight needles you will find HERE. In this case working a dress top-down provides more flexibility and room for personal adjustment. For example it is easier to try the garment on while working, as well as making adjustments to length of yoke and shoulder caps. Happy knitting!
19.06.2023 - 13:34
![]() Mieke wrote:
Mieke wrote:
Ik heb een foto van mijn versie van dit model deze morgen gepubliceerd in de drops workshop op fb. Ik had erbij geschreven dat ik er 1 jaar over gedaan heb. Blijkbaar was dat genoeg om mijn post te verwijderen, owv ‘bepaalde trefwoorden ‘. Wat heb ik fout gedaan?
22.11.2022 - 12:04DROPS Design answered:
Dag Mieke,
Wat jammer! Wat de reden precies is geweest weet ik niet, maar je zou het beste even contact op kunnen nemen met DROPS via facebook hierover.
22.11.2022 - 20:58
![]() Susanne wrote:
Susanne wrote:
Jeg strikker str M. Selve kjolen passer fint men ærmerne bliver for løse/store. Jeg har prøver at lave indtagninger på hver 5. Pind i stedet for på hver 6., og jeg har starter indtagninger med det samme og ikke efter ærmet måler 4 cm. Men stadig er ærmet for løs. Har I en løsning på problemet? Kan jeg strikke ærmerne på en mindre pind feks. 3,5 og tage ind på hver 4. Pind? Eller har I andre forslag?
20.08.2022 - 10:56DROPS Design answered:
Hei Susanne. Om du bytter til p. 3,5 vil du muligens se en "overgang" som du ikke vil ha, der du går fra p. 4,0 til 3,5. Hvordan er strikkefastheten din i forhold til det som er opplyst i oppskriften? Når du ser på cm målene på målskissen, rundt øvre del av ermet, hvordan er det i forhold til armene dine. Du kan evnt prøve å felle ofter, men jevnt fordelt. Om du regner ut fra strikkefastheten hvor mange masker du ønsker å ha til slutt, kan du evnt felle flere masker. mvh DROPS Design
22.08.2022 - 13:20
![]() Liv wrote:
Liv wrote:
Får ikke det til å stemme at maskene som er erme skal strikkes før de settes på en tråd. i videoen som ligger under dette mønsteret settes maskene for erme på en tråd før opplegg under erme og videre strikking av forstykket . Hva er riktig
18.02.2022 - 08:17DROPS Design answered:
Hej Liv, nej de masker du sætter på tråd til ærmet skal ikke strikkes først - vi skal få lavet en rettelse - tak for info :)
18.02.2022 - 10:26
![]() Frederique PASCAL DE RAYKEER wrote:
Frederique PASCAL DE RAYKEER wrote:
Je viens de terminer ma robe, elle est tout simplement MAGNIFIQUE! et très chaude! elle a un franc succès! J'ai beaucoup aimé la façon de tricoter avec des aiguilles circulaires! Merci!
13.02.2022 - 10:33
![]() Mieke Baras wrote:
Mieke Baras wrote:
Kan ik dit model ook breien zonder de gaatjes in de raglan overgangen tijdens het meerderen?
25.01.2022 - 14:13DROPS Design answered:
Dag Mieke,
Ja, dat kan. Je breit de omslag op de volgende naald dan gedraaid.
30.01.2022 - 14:19
![]() Tina wrote:
Tina wrote:
Hi, I'm waiting for my yarn to arrive and reading the pattern in advance. I have a question about the Marker Threads... do I need to carry the marker thread throughout the knitting like in your videos? Or can I simply use different colour regular markers please?
16.01.2022 - 15:04DROPS Design answered:
Hi Tina, yes, you can use regular markers in different colour - it's just a matter of knowing which set indicates which part of the job. Happy knitting!
16.01.2022 - 23:35
![]() Annette wrote:
Annette wrote:
Liebes Drops Team, wieviel Garn benötige ich ungefähr für Größe M, wenn ich das Modell einfarbig stricken möchte. Vielen Dank und liebe Grüße
14.10.2021 - 12:53DROPS Design answered:
Liebe Annette, leider können wir jeder Anleitung nach jedem individuellen Frage anpassen und einzelne Modelle auf individuellen Wunsch hin umrechnen. Wenn sie Hilfe damit brauchen, wenden Sie sich bitte an Ihrem DROPS Laden - auch telefonisch oder per E-Mail; dort hilft man Ihnen gerne weiter. Danke im voraus für Ihr Verständnis. Viel Spaß beim stricken!
14.10.2021 - 13:10
![]() Carina wrote:
Carina wrote:
Hur mycket garn går det om man sticka i en färg? Mvh Carina
03.06.2021 - 11:35DROPS Design answered:
Hej Carina, du kanske kan dra ifrån ett par nystan... men hellre ett för mycket... :)
04.06.2021 - 14:05
|
|||||||||||||||||||||||||||||||
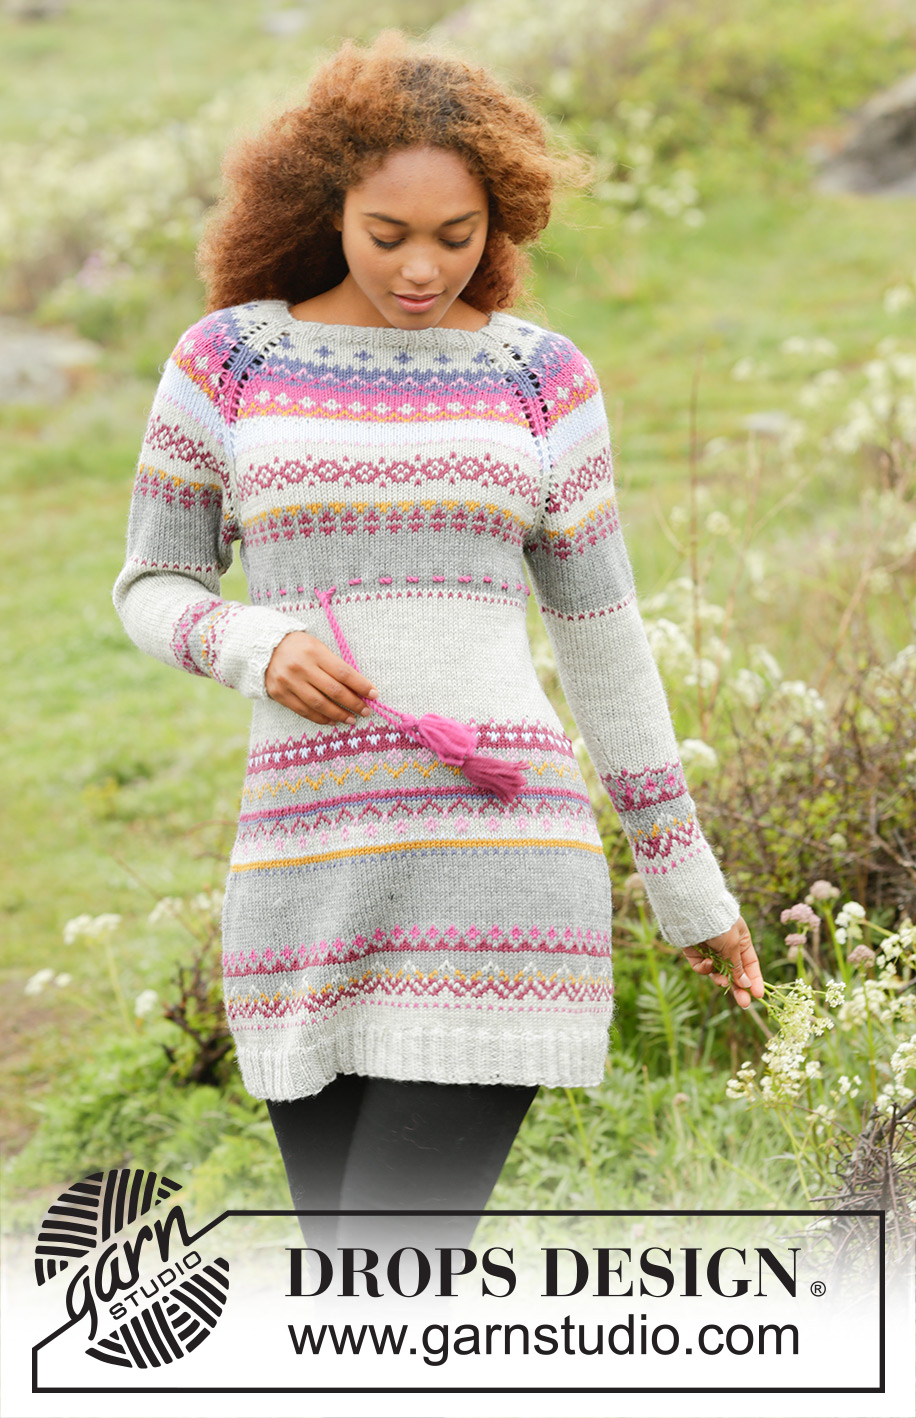
Highland Heather#highlandheatherdress |
|||||||||||||||||||||||||||||||
|
|
|||||||||||||||||||||||||||||||
Knitted DROPS dress with multi-coloured pattern, raglan and twined string with tassels in waist, worked top down in ”Karisma”. Size: S - XXXL.
DROPS 172-5 |
|||||||||||||||||||||||||||||||
|
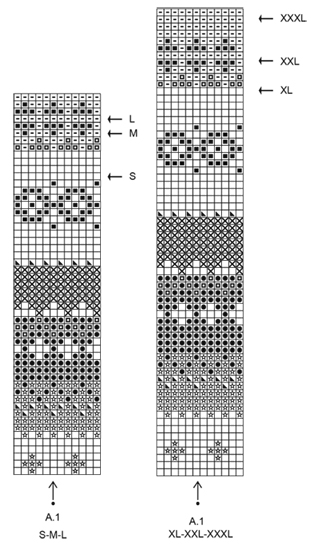
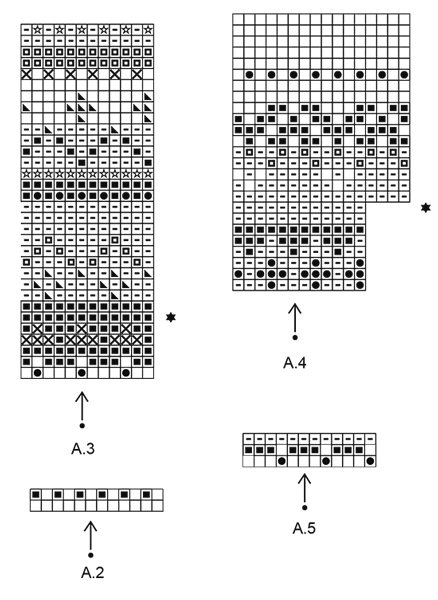
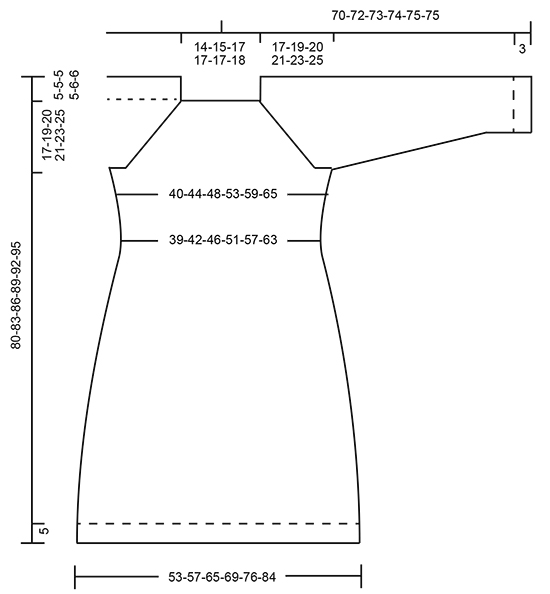
PATTERN: See diagrams A.1 to A.5 – see diagram for correct size. Work all sts in stocking st. PATTERN TIP: In size M, L and XL this round is a round in pattern with 2 colours. Cut the yarn if needed in pattern colour to avoid a long gap under sleeve. In size S, XXL and XXXL cast on on a round in base colour. RAGLAN: Inc 1 st on each side of marker thread as follows: Work until 1 st remains before marker thread, 1 YO, K 2 (marker thread is in the middle of these sts), 1 YO. On next round K the YOs to make holes. INCREASE TIP-1: Work until 2 st remains before marker in the side, 1 YO, K 4 (marker is in the middle of these sts), 1 YO. On next round K YOs twisted to avoid holes. INCREASE TIP-2: To calculate how often inc should be done, use the total no of sts on round (e.g. 192 sts) and divide by no of inc to be done (e.g. 12) = 16. I.e. in this example make a YO after approx. every 16th st worked. On next round work YO´s twisted to avoid holes. ELEVATION: Work an elevation in stocking st in the back of neck from mid back as follows: NOTE: On every turn in the middle of piece slip 1st st, tighten yarn and continue to work. Work 10-11-12-13-13-14 sts, turn, tighten yarn and work 20-22-24-26-26-28 sts. Turn, tighten yarn and work 35-38-41-44-44-47 sts, turn, tighten yarn and work 50-54-58-62-62-66 sts. Turn, tighten yarn and work 65-70-75-80-80-85 sts, turn, tighten yarn and work 80-86-92-98-98-104 sts. Turn and work until mid back. DECREASE TIP: Work until 4 sts remain before marker, K 2 tog, K 4 (marker is in the middle of these sts), slip 1 st as if to K, K 1, psso. CAST-OFF TIP: To avoid a tight cast-off edge you may use a needle ½ size larger. ---------------------------------------------------------- DRESS: Worked in the round, top down. Rounds start mid back. YOKE: Cast on 110-115-130-135-145-150 sts on circular needle size 3.5 mm with light pearl grey. Work rib = K 2/P 3 for 6 rounds. Then work 1 round in stocking st while inc 2-5-10-17-19-26 sts evenly = 112-120-140-152-164-176 sts. Switch to circular needle size 4 mm. Insert 1 marker in the first st = mid back (let this marker follow in piece. Then work ELEVATION - see explanation above - in the neck. REMEMBER THE KNITTING TENSION! Continue in stocking st, on first round insert 4 marker threads and 3 markers more (= 4) in the piece as follows: Work the first 18-19-21-24-27-30 sts (= half back piece), insert a marker thread, work the next 11-12-15-15-15-15 sts, insert a marker in the last st on right needle (= mid st on sleeve), work the next 10-11-14-14-14-14 sts (= sleeve), insert a marker thread, work the next 18-19-21-24-27-30 sts, insert a marker in the last st on right needle (= mid st on front piece), work the next 17-18-20-23-26-29 sts (= front piece), insert a marker thread, work the next 11-12-15-15-15-15 sts, insert a marker in the last st on right needle (= mid st on sleeve), work the next 10-11-14-14-14-14 sts (= sleeve), insert a marker thread, work the last 17-18-20-23-26-29 sts (= half back piece). READ ALL OF THE FOLLOWING SECTION BEFORE CONTINUING! Now work PATTERN according to diagram A.1. NOTE: St with marker on back piece, front piece and sleeves should fit st with arrow in diagram. Count out towards the side (i.e. the pattern will not fit in transitions between body and sleeves). Work st on each side of marker thread (i.e. in each raglan) in base colour in pattern. AT THE SAME TIME on first round inc for RAGLAN - see explanation above, in every transition between body and sleeves (= 8 sts inc on round). Inc like this every other round 21-24-25-27-29-32 times in total = 280-312-340-368-396-432 sts. NOTE: Work the new sts in pattern. When all inc are done, piece measures 22-24-25-26-29-31 cm from shoulder and last round worked is marked with arrow in A.1. Now continue next round in pattern as follows: Work the first 39-43-46-51-56-62 sts (= half back piece), cast on 8-8-10-10-12-14 new sts under sleeve with base colour in pattern – READ PATTERN TIP, put the next 63-71-79-83-87-93 sts on a stitch holder (= sleeve), work the next 77-85-91-101-111-123 sts (= front piece), cast on 8-8-10-10-12-14 new sts under sleeve in base colour in pattern, put the next 63-71-79-83-87-93 sts on a stitch holder (= sleeve), work the remaining 38-42-45-50-55-61 sts on round (= half back piece). BODY: There are now 170-186-202-222-246-274 sts for body. Insert a marker thread in each side, in the middle of the 8-8-10-10-12-14 new sts that were cast on under sleeves. NOW MEASURE PIECE FROM HERE. Continue with the remaining rounds in A.1. NOTE: The pattern will not fit in each side. Then continue with medium grey. When piece measures 4 cm, dec 1 st on each side of marker threads - READ DECREASE TIP (= 4 sts dec). Dec like this every 4th round 2 times in total = 162-178-194-214-238-266 sts. When piece measures 7 cm, work a round with eyelet holes as follows: K 1, * K 2, K 2 tog, 1 YO *, repeat from *-* until 1 sts remain, K 1. Work 2 more rounds in medium grey. Now work pattern A.2 (= 2 rounds). Then work with light pearl grey until piece measures 20 cm in all sizes, AT THE SAME TIME inc 1 st on each side of marker threads in each side – READ INCREASE TIP-1. Inc like this every 5th-5th-5th-4th-4th-4th round 6 times in total = 186-202-218-238-262-290 sts. Work 1 round while adjusting the no of sts to 192-204-228-240-264-300. Work A.3 (= 12 sts) 16-17-19-20-22-25 times on round. On 6th round in A.3 inc 12-12-24-24-24-24 sts evenly – READ INCREASE TIP-2 = 204-216-252-264-288-324 sts. When A.3 has been worked vertically, continue with medium grey. On first round with medium grey inc 12 sts evenly in all sizes = 216-228-264-276-300-336 sts. When piece measures 39-40-42-43-43-44 cm, work A.4 (= 12 sts) 18-19-22-23-25-28 times on round. On 8th round in diagram inc 8-12-8-12-20-16 sts evenly = 224-240-272-288-320-352 sts. When A.4 has been worked, switch to circular needle size 3.5 mm. Work 1 round with light pearl grey while inc 31-45-48-47-55-63 sts evenly = 255-285-320-335-375-415 sts. Work rib = K 2/P 3 for 5 cm. Cast off with K over K and P over P - READ CAST-OFF TIP. Piece measures 80-83-86-89-92-95 cm in total from shoulder. SLEEVE: Worked in the round on double pointed needles. Slip sts from stitch holder back on double pointed needles size 4 mm and pick up 1 st in each of the 8-8-10-10-12-14 sts under sleeve = 71-79-89-93-99-107 sts. Insert 1 marker thread between the new sts under sleeve (= beg of round), and keep the marker in mid st on top of sleeve. NOW MEASURE PIECE FROM HERE! Continue with pattern as on body, i.e. the remaining rounds in A.1 - st with marker in mid on top of sleeve should fit st with arrow in diagram, the pattern will not fit mid under sleeve. When A.1 is done continue with medium grey and A.2 as on body. NOTE! Do not work eyelet row on sleeve, then continue with light pearl grey, AT THE SAME TIME when piece measures 4 cm, dec 1 st on each side of marker thread under sleeve. Dec like this every 8th-6th-5th-5th-4th-3rd round 13-16-20-21-23-26 times in total = 45-47-49-51-53-55 sts. AT THE SAME TIME when sleeve measures 30-29-28-28-27-25 cm (NOTE: Shorter measurements in the larger sizes because of longer yoke) - work A.5 – st with marker mid on top of sleeve should fit st with arrow in diagram. When A.5 has been worked, continue with A.4 over A.5. NOTE: Do not inc on round with star. When A.4 has been worked, continue with light pearl grey until finished measurements. When piece measures 43-42-41-41-40-38 cm, switch to double pointed needles size 3.5 mm. Work 1 round while AT THE SAME TIME inc 5-3-6-4-7-5 sts evenly = 50-50-55-55-60-60 sts. Work rib = K 2/P 3 for 3 cm. Cast off sts with K over K and P over P. Work the other sleeve the same way. TWINED STRING WITH TASSELS: Cut 3 lengths of 3 metres each with cerise. Twine the strands tog until they resist, fold them double so that they twine again. Make a knot at each end. Thread tie up and down through eyelet row in waist. Make a tassel in each end as follows: Cut 12 strands with cerise of 16 cm, thread them through knot at the end of string. Twine a strand around the top of tassel several times and tie this string to keep the tassel tog. Make another tassel in the other end of string with dark old rose. |
|||||||||||||||||||||||||||||||
Diagram explanations |
|||||||||||||||||||||||||||||||
|
|||||||||||||||||||||||||||||||
 |
|||||||||||||||||||||||||||||||
 |
|||||||||||||||||||||||||||||||
 |
|||||||||||||||||||||||||||||||
Have you finished this pattern?Tag your pictures with #dropspattern #highlandheatherdress or submit them to the #dropsfan gallery. Do you need help with this pattern?You'll find 32 tutorial videos, a Comments/Questions area and more by visiting the pattern on garnstudio.com. © 1982-2026 DROPS Design A/S. We reserve all rights. This document, including all its sub-sections, has copyrights. Read more about what you can do with our patterns at the bottom of each pattern on our site. |
|||||||||||||||||||||||||||||||


With over 40 years in knitting and crochet design, DROPS Design offers one of the most extensive collections of free patterns on the internet - translated to 17 languages. As of today we count 324 catalogues and 12267 patterns translated into English (UK/cm). 12267
We work hard to bring you the best knitting and crochet have to offer, inspiration and advice as well as great quality yarns at incredible prices! Would you like to use our patterns for other than personal use? You can read what you are allowed to do in the Copyright text at the bottom of all our patterns. Happy crafting!
Post a comment to pattern DROPS 172-5
We would love to hear what you have to say about this pattern!
If you want to leave a question, please make sure you select the correct category in the form below, to speed up the answering process. Required fields are marked *.