
Popular categories
Looking for a yarn?


Comments / Questions (31)
![]() Lulu wrote:
Lulu wrote:
Hola,disculpa las mangas se tejen en redondo? o se pueden tejer en aguja recta. gracias
16.10.2019 - 20:16DROPS Design answered:
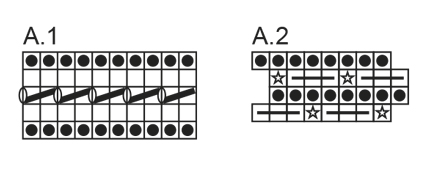
Hola Lulu, las orillas de las mangas se tejen de ida y vuelta de acuerdo al diagrama A.1 con 1 pt de orillo en pt musgo de cada lado. Buen trabajo!
17.10.2019 - 19:21
![]() Alissa wrote:
Alissa wrote:
Maschenprobe Ich habe ein sehr schönes Garn (Baumwoll-Seidemix), aus dem ich gern den Bolero stricken möchte. Dieses Garn ist aber dünner als das in der Anleitung verwendete und um auf die 10 cm der Maschenprobe zu kommen, benötige ich 25 statt 15 Maschen. Wie berücksichtige ich diese Erkenntnis nun bei der Größe bzw. der Maschenanzahl? Ich stehe da grade bissl auf dem Schlauch.... Kann mir vielleicht jemand helfen? Alissa
06.06.2019 - 21:23DROPS Design answered:
Liebe Alissa, leider können wir jeder Anleitung nach jedem individuellen Frage anpassen und einzelne Modelle auf individuellen Wunsch hin umrechnen. Wenn sie Hilfe damit brauchen, wenden Sie sich bitte an dem Laden wo Sie die Wolle gekauft haben, dort hilft man Ihnen gerne weiter. Viel Spaß beim stricken!
07.06.2019 - 08:36
![]() Arielle wrote:
Arielle wrote:
Wie funktioniert Muster a 1? Die erste Reite wird in Links und Rechts gestickt? Oder Sind das zwei Reihen eine Links und eine Rechts?
01.06.2019 - 23:09DROPS Design answered:
Liebe Arielle, bei den Ärmeln wird die 1. Reihe in A.1 eine Rückreihe (die Maschen werden von der Vorderseite aufgenommen) = die erste Reihe in A.1 wird rechts gestrickt. Bei dem Rand wird A.1 in Runden gestrickt = die 1. Reihe in A.1 wird hier links gestrickt. Hier lesen Sie mehr über Diagramme. Viel Spaß beim stricken!
03.06.2019 - 09:26
![]() Terttu wrote:
Terttu wrote:
En ole saanut vastausta kysymykseeni. Olen aloittanut työn, mutta en tiedä meneekö se oikein. Ovatko hihan "alut" piirroksen keskellä olevat levennykset?
23.05.2019 - 13:28
![]() Nancy Heintzman wrote:
Nancy Heintzman wrote:
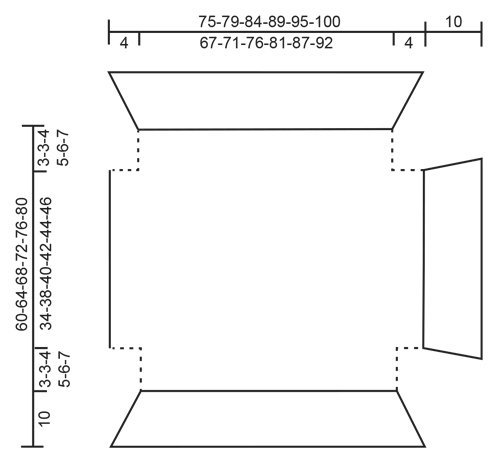
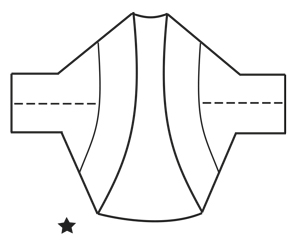
Thank you. It would make sense that the top side would be on the top, but isn't the left side (sleeve) also supposed to have a corresponding additional feature as shown on the right, top & bottom? I am SO sorry for being so obtuse! The diagram just looks unfinished. :(
15.11.2018 - 19:44DROPS Design answered:
Dear Mrs Heintzman, work folllowing the written pattern, you will by and by see how it will look at and it will have also more sense when you see the finished work. The sleeves will be the new sts you have cast on on each side (sew bottom and top dotted lines tog to close the seams) then you work the edge around these sts (= 34 to 46 cm in chart). And finally you work an edge around the opening of the jacket (sts picked up from cast on and cast off edges) to create the 2nd chart with a black star. Happy knitting!
16.11.2018 - 09:18
![]() Nancy Heintzman wrote:
Nancy Heintzman wrote:
Which part of the garment is the left side of the schematic?
14.11.2018 - 17:29DROPS Design answered:
Dear Mrs Heintzman, if you consider the work flat on a table, the bottom edge is the cast on edge (at the bottom of the drawing), left side will be on the right side of schematic when worn and right side will be on the left side of schematic when worn. Top side is towards neck. Happy knitting!
15.11.2018 - 08:31
![]() Nancy Heintzman wrote:
Nancy Heintzman wrote:
I can't quite figure out the orientation of the first schematic as to where the top or bottom of the pattern is and why the left side doesn't have the the added piece that the other 3 sides do. Where are the sleeves?
14.11.2018 - 04:16DROPS Design answered:
Dear Mrs Heintzman, read the shematic bottom up, as you are working: cast on the sts (= 67... 92 cm - see size) at the bottom of the "cross" - then cast on sts for sleeves on each side and work for 34... 46 cm and cast off the sts for sleeve on each side, then continue for 3-7 cm - then sew dotted lines tog (= sleeves) and pick up sts around sleeve to work the edge then pick up sts in the cast-on + cast off edge and work the edge around the opening of bolero. Happy knitting!
14.11.2018 - 08:59Lenia wrote:
How do I work chart a1? The first row says p from rs k from ws is that in the same row or is it 2 rows?
04.07.2018 - 13:39DROPS Design answered:
Dear Lenia, when working in the round, you will always work from the right side, so that row 1 = P all sts, row 2 = K all sts and so on. Happy knitting!
04.07.2018 - 16:41
![]() Ulla Bach wrote:
Ulla Bach wrote:
Hej, Jeg er lidt forvirret over at jeg ikke skal lave brombærkant på ærme nr. 2. Der står i opskriften at man kun skal lave den på det ene ærme. Mvh Ulla
13.02.2018 - 16:30DROPS Design answered:
Hei Ulla. Her manglet det nok bare en linje med forklaring at man skal strikker den samme ermkanten med bjørnebærmønster på det andre ermet. Takk for at du gjorde oss oppmerksom på dette, vi vil ordne dette så fort som mulig. mvh Drops design
14.02.2018 - 14:22
![]() Mariolina wrote:
Mariolina wrote:
Grazie della velocissima risposta! Avrei però un'altra domanda: quando giro il lavoro mettendo il rovescio davanti,poi continuo nella stessa direzione o devo lavorare sul rovescio tornando indietro sul giro?
03.05.2017 - 14:53DROPS Design answered:
Buonasera Mariolina. Prosegue regolarmente, lavorando le maglie dal ferro di sinistra sul ferro di destra. Buon lavoro!
03.05.2017 - 16:32
|
||||||||||||||||||||||
Tea Rose |
||||||||||||||||||||||
 |
 |
|||||||||||||||||||||
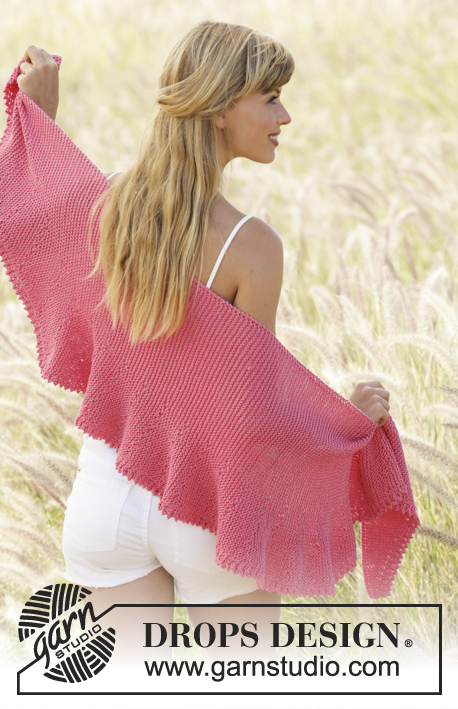
Knitted DROPS bolero with blackberry pattern and crochet edges in ”Brushed Alpaca Silk”. Size: S - XXXL.
DROPS Extra 0-1275 |
||||||||||||||||||||||
|
GARTER ST (back and forth): K all rows. 1 ridge = 2 rows K. GARTER ST (worked in the round): * K 1 round and P 1 round *, repeat from *-*. 1 ridge = 2 rounds. INCREASE TIP-1: Inc 1 st by working 2 sts in the same st. INCREASE TIP-2: To calculate how often inc should be done, use the total no of sts on row (e.g. 52 sts) and divide by no of inc to be done (e.g. 10) = 5.2. I.e. in this example inc in every 5th st. PATTERN: See diagrams A.1 and A.2. The diagrams show all rows in pattern seen from RS. BLACKBERRY PATTERN: When this pattern is worked in the round, RS will be on the inside of piece. Bolero must therefore be turned inside out before beg pattern so that RS is outwards when garment is turned right way again. ROUND 1: K all sts. ROUND 2: * Work 3 sts in same st as follows: K 1, P 1, K 1, then P the next 3 sts tog *, repeat from *-*. ROUND 3: K all sts. ROUND 4: * P 3 tog, then work 3 sts in next st as follows: K 1, P 1, K 1 *, repeat from *-*. Repeat 1st-4th round. ---------------------------------------------------------- BOLERO: Worked back and forth on circular needle, then pick up sts for edge and continue piece in the round. LOOSELY cast on 124-132-142-152-162-172 sts on circular needle size 6 mm with Brushed Alpaca Silk. K 1 row from RS, then K 1 row from WS while dec 24-26-28-30-32-34 sts evenly ( K every 4th and 5th st tog) = 100-106-114-122-130-138 sts. Continue in stocking st with 1 edge st in GARTER ST in each side - see explanation above. REMEMBER THE KNITTING TENSION When piece measures 3-3-4-5-6-7 cm, cast on 6 new sts at the end of the next 2 rows for sleeves = 112-118-126-134-142-150 sts on needle. Continue in stocking st with 1 edge sts in garter st in each side. When piece measures 37-41-44-47-50-53 cm, cast off 6 sts at the beg of the next 2 rows = 100-106-114-122-130-138 sts. Continue in stocking st with 1 edge st in garter st in each side. When piece measures 39-43-47-51-55-59 cm, K 1 row from WS while inc 24-26-28-30-32-34 sts evenly (inc after every 4th st) = 124-132-142-152-162-172 sts on row. K 1 row from RS and LOOSELY cast off with K from WS. SLEEVE EDGE: Pick up from RS along one sleeve inside 1 edge st in garter st 52-56-60-62-66-68 sts on circular needle size 6 mm. Work pattern back and forth according to diagram A.1 with 1 edge st in garter st in each side (1st row = WS). When A.1 is done, K 1 row from RS while inc 10-14-14-16-16-18 sts evenly - READ INCREASE TIP 1 and 2 = 62-70-74-78-82-86 sts. Then work pattern back and forth according to diagram A.2 with 1 edge st in garter st in each side (1st row = WS). When entire sleeve edge measures 8 cm - NOTE: Finish after 1st or 3rd row in diagram, work 2 ridges back and forth over all sts before LOOSELY casting off with K from RS. Make the same sleeve edge on the other sleeve. ASSEMBLY: Sew side and underarm seams in one inside 1 edge st - see dotted line in chart. EDGE WITH BLACKBERRY PATTERN: Pick up 1 st in every st along entire cast-on and cast-off edge on bolero = 244-260-280-300-320-340 sts on needle. Insert 1 marker, NOW MEASURE PIECE FROM HERE! Work pattern in the round according to diagram A.1. When A.1 is done, K 1 round while inc 28-32-32-36-40-40 sts evenly - READ INCREASE TIP 1 and 2 = 272-292-312-336-360-380 sts. Turn piece inside out to that WS is outwards. Then work BLACKBERRY PATTERN in the round - see explanation above. When edge measures 9 cm from marker - NOTE: Finish after 2nd or 4th round in diagram, P 1 round, K 1 round, P 1 round and K 1 round before LOOSELY casting off with P. Turn piece again so that RS is outwards again. CROCHET EDGE: Work a finishing edge at the bottom around both sleeves and around entire edge along opening on bolero on hook size 5 mm as follows: 1 dc in first st, * 4 ch, skip 2 sts, 1 dc in next st *, repeat from *-* the entire round but finish with 1 sl st in dc from beg of round (instead of 1 dc in last st). Cut the yarn and fasten. |
||||||||||||||||||||||
Diagram explanations |
||||||||||||||||||||||
|
||||||||||||||||||||||
 |
||||||||||||||||||||||
 |
||||||||||||||||||||||
 |
||||||||||||||||||||||
Have you finished this pattern?Tag your pictures with #dropspattern or submit them to the #dropsfan gallery. Do you need help with this pattern?You'll find 26 tutorial videos, a Comments/Questions area and more by visiting the pattern on garnstudio.com. © 1982-2026 DROPS Design A/S. We reserve all rights. This document, including all its sub-sections, has copyrights. Read more about what you can do with our patterns at the bottom of each pattern on our site. |
||||||||||||||||||||||


With over 40 years in knitting and crochet design, DROPS Design offers one of the most extensive collections of free patterns on the internet - translated to 17 languages. As of today we count 324 catalogues and 12267 patterns translated into English (UK/cm). 12267
We work hard to bring you the best knitting and crochet have to offer, inspiration and advice as well as great quality yarns at incredible prices! Would you like to use our patterns for other than personal use? You can read what you are allowed to do in the Copyright text at the bottom of all our patterns. Happy crafting!
Post a comment to pattern DROPS Extra 0-1275
We would love to hear what you have to say about this pattern!
If you want to leave a question, please make sure you select the correct category in the form below, to speed up the answering process. Required fields are marked *.