
Popular categories
Looking for a yarn?


Comments / Questions (134)
![]() Gerd wrote:
Gerd wrote:
Er det normale størrelser på oppskriften i forhold til herrestørrelsene S, M osv.? Har kjøpt garn herre str. M, som jeg alltid tidligere har brukt i ulike oppskrifter, men ser nå at det virker som størrelsene er litt anderledes her. At feks str M her tilsvarer str S i andre oppskrifter, og at jeg egentlig skulle ha valgt str L her istedenfor M? Har nettopp strikket en genser i Sandnesgarn str M der overvidde = 108, og hel lengde = 70. Mens her er overvidde 102 og hel lengde 66 for M
11.10.2019 - 19:23DROPS Design answered:
Hei Gerd. For noen kan f.eks størrelse M i denne oppskriften være helt perfekt , men andre syns det er en stor M eller en for liten M. Noen plagg skal også være stramme/ sitte tight på, mens andre er mer romslig. Denne modellen ser ut på bildet at den skal være litt tight. Derfor er det veldig viktig å sjekke de målene som er oppgitt i målskissen for å finne ut hvilken størrelse man skal strikke. God Fornøyelse!
14.10.2019 - 11:03
![]() Natalie wrote:
Natalie wrote:
Un grand merci à vous pour votre réponse rapide et claire ! Bonne journée !
11.10.2019 - 13:39
![]() Natalie wrote:
Natalie wrote:
Bonjour Drops , Je tricote le pull Olafur en taille S . Après la ré- hausse, j'ai donc 39 m pour le dos et le devant et 19 m pour les manches . En tricotant le raglan, j'obtient bien 73m pour le dos et le devant mais 15 fois 2 augmentations tous les deux tours pour mes manches me donnent 49 m pour chaque manche au lieu des 53 indiquées sur le modèle . Merci de m'éclairer sur ce point .
11.10.2019 - 11:17DROPS Design answered:
Bonjour Natalie, tout à fait, mais avec les 2 m du raglan de chaque côté de chaque manche, vous avez 49 + 2 +2= 53 m soit 53 m x 2 pour les manches et 73 m x 2 pour le dos/le devant = 252 m. Bon tricot!
11.10.2019 - 12:46
![]() Elisa wrote:
Elisa wrote:
Hallo ich brauche Hilfe bei den Raglanzunahmen die man in jeder Runde für Vorder - und Rückseite stricken soll und dabei entehenden Löchern. Hier muss man ja einen Umschlag machen nachdem man aus der Vorrunde gerade verschränkt die Raglanzunahmen abgestrickt hat. Doch dabei entstehen wirklich relativ große Löcher. Brauche unbedingt einen Tipp oder mache ich etwas falsch??
03.10.2019 - 21:15DROPS Design answered:
Liebe Elisa, bei Aufnehmen mit einem Umschlag kann ein kleines Loch entstehen (sie Video, aber sollte Ihre Maschenprobe stimmen, dann sollte es nicht so sichtbar (siehe Pullover von oben nach unten gestrickt, Sie können gerne eine Maschenprobe stricken, und dann abwaschen, so wissen Sie wie es dann aussieht, oder gerne können Sie auch mit einer anderen Technik zunehmen. Viel Spaß beim stricken!
04.10.2019 - 09:33
![]() Dennis wrote:
Dennis wrote:
Hallo, ich habe Probleme bei den Raglanzunahmen während den verkürzten Reihen. Die erste Reihe, in der Zunahmen passieren ist die fünfte, während man insgesamt 40 Maschen strickt. Die Zunahmen sind allerdings nur vor dem 1. und nach dem 2. Markierer, also nur auf einer Seite. Zunahmen nach dem 7. und vor dem 8. Markierer würden dann erst in Reihe 7 passieren. Dann sind die Zunahmen aber nicht gleichmäßig und ich würde nicht auf die passende Zahl Zunahmen kommen?
23.08.2019 - 00:06DROPS Design answered:
Liebe Dennis, so wird es gestrickt, die 1. Zunahme (nach der Markierung) bei 40 M = 5. Reihe wird auf einer Seite gestrickt und die 1. Zunahme (vor der Markierung) wird bei 7. Reihe gestrickt = es sind 3 Hinreihen beidseitig von der Markierung. Viel Spaß beim stricken!
23.08.2019 - 09:20
![]() Jannie wrote:
Jannie wrote:
Bij de ronding: hoeveel steken brij je (maat l) vanaf midden achter, totdat je bij 8st r voorbij de markeerder bent en moet je dan ook al meerderen? Alvast bedankt
05.07.2019 - 09:15DROPS Design answered:
Dag Jannie,
De markeerder zit midden achter, dus je breit 8 steken voorbij midden achter, dan brei je weer terug, maar dan meer steken; steeds 8 steken meer. Omdat het aantal steken van de ronding steeds meer wordt, kom je op een gegeven moment bij de hulpdraden die de raglanlijnen aangeven en daar moet je meerderen voor de raglan zoals aangegeven.
08.07.2019 - 11:01
![]() Elsa T wrote:
Elsa T wrote:
Bonjour, Je viens de terminer la rehausse et je ne comprend pas le détail des augmentations des raglans devant et dos. Que dois on faire 12 fois tous les tours et que doit on faire 11 fois tous les deux tours(taille L) ? Ça ne me semble pas clair et je suis du coup bloquée. Merci d'avance pour votre aide !
26.05.2019 - 15:31DROPS Design answered:
Bonjour Elsa T, en taille L on augmente différemment sur le dos/le devant et sur les manches, soit: 12 fois tous les tours et 11 fois tous les 2 tours = augmentations du dos/devant et, en même temps, 17 x tous les 2 tours pour les manches. C'est-à-dire que vous allez parfois augmenter 4 m pour le raglan (ex 4 m pour le dos/devant (= tous les tours) mais pas sur les manches (= tous les 2 tours) ) et parfois 8 m (= 4 m pour le dos/le devant et 4 m pour les manches). Bon tricot!
27.05.2019 - 11:18
![]() Corrie wrote:
Corrie wrote:
Hoe kan ik de ronding achterband breien en tegelijk raglan meerderingen maken? Brei ik 8 st r 16 st av 24 st r en dan eerst door met de restant steken ?
10.05.2019 - 21:00DROPS Design answered:
Dag Corrie,
Je breit 8 steken, dan keer je het werk en brei je 16 steken terug, en zo ga je steeds verder, heen en weer breiend over midden achter terwijl er aan beide kanten steeds meer steken bij komen. Tegelijkertijd moet je ook al meerderen voor de raglan, op elke naald aan de goede kant. Dus als je bij de raglan bent (markeerdraad), meerder je daar zoals beschreven bovenaan het patroon.
11.05.2019 - 17:54
![]() Corrie wrote:
Corrie wrote:
Hoe kan ik de ronding achterband breien en tegelijk raglan meerderingen maken? Brei ik 8 st r 16 st av 24 st r en dan eerst door met de restant steken ?
10.05.2019 - 20:53
![]() Emma wrote:
Emma wrote:
Hej jeg er gået igang med at tage ud til Raglan på ærme. Jeg læser at der skal være 23 masker på ærme før man går igang. Nu står der at man skal tage en maske ud hver 2. Omgang 17 gange. Så på hver ærmeside altså 17+17=34 masker. Der står dog at der endeligt skal være 61 masker, men 34+23=57. Er der noget jeg har misforstået? :) Mvh Emma
13.03.2019 - 14:25DROPS Design answered:
Hei Emma. De 2 rettmaskene mellom merkene er en del av ermet. Altså det første erme er alt mellom merke 1 og 4: 2 masker rett (2 merke), 23 masker (3 merke), 2 masker rett. 34 + 23 + 2 + 2 = 61. God fornøyelse
25.03.2019 - 08:43
|
|||||||||||||
Ólafur |
|||||||||||||
|
|
|||||||||||||
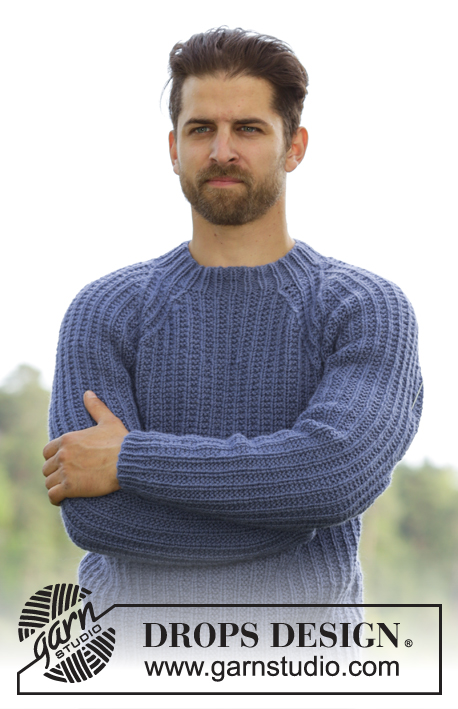
Men's knitted jumper in DROPS Karisma or DROPS Merino Extra Fine, with raglan and Norwegian pattern. Worked top down. Size: S - XXXL.
DROPS Extra 0-1146 |
|||||||||||||
|
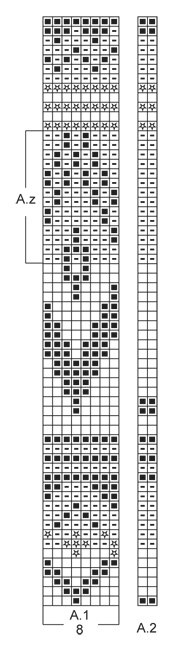
See diagrams A.1 to A.3. The diagrams are worked in stocking st. INCREASE TIP: Increase with YO, knit YO twisted over on next round to avoid holes. DECREASE TIP: Dec 1 st before marker as follows: Work until 2 sts remain before marker, slip 1 st as if to K, K 1, psso. Dec 1 st after marker as follows: K 2 tog. ---------------------------------------------------------- JUMPER: Worked in the round on circular needle, top down. Cast on 86-90-94-100-104-108 sts on circular needle size 3 mm with off white. K 1 round. Switch to dark grey blue Karisma / dark blue Merino Extra Fine. Then work in stocking st. Switch to off white and circular needle size 4 mm when piece measures 6 cm. Work 1 round in stocking st. On next round, inc 26-30-34-34-44-52 sts evenly = 112-120-128-134-148-160 sts. On next round work as follows from mid back: K 16-18-18-19-24-27, insert 1st marker, K 2, insert 2nd marker, K 16-16-20-21-19-19, insert 3rd marker, K 2 (= sleeve), insert 4th marker, K 39-43-43-45-53-59, insert 5th marker (= front piece), K 2, insert 6th marker, K 16-16-20-21-19-19, insert 7th marker, K 2 (= sleeve), insert 8th marker, K 17-19-19-20-25-28. READ ALL OF THE FOLLOWING SECTION BEFORE CONTINUING! Work an elevation at the back of neck from mid back AT THE SAME TIME inc for raglan. ELEVATION: K 8 sts past marker, turn, tighten yarn and P 16 sts back, turn, tighten yarn and K 24 sts, turn, continue to work 8 sts more in stocking st for every turn until a total of 80 sts have been worked after last turn. RAGLAN: Inc for raglan on every row from RS as follows: Inc 1 st before 1st and 7th marker and 1 st after 2nd and 8th marker. There are 6-6-6-6-4-4 sts inc in total on back piece and 3-3-3-2-2-2 sts on each sleeve. When elevation has been worked, there are 124-132-140-144-156-168 sts on needle. Fasten off. Now work in the round from 1st marker. Work next round as follows: (1st marker), K 2 (2nd marker), K 19-19-23-23-21-21, (3rd marker), K 2, (= sleeve), (4th marker), K 39-43-43-45-53-59 (= front piece), (5th marker), K 2, (6th marker), K 19-19-23-23-21-21, (7th marker), K 2, (8th marker) (= sleeve), K 39-43-43-45-53-59 (= back piece). On next round beg inc for raglan. NOTE: Inc differently on body and sleeves. REMEMBER THE KNITTING TENSION RAGLAN BODY: Inc before 1st and 5th marker and after 4th and 8th marker as follows - READ INCREASE TIP: Inc every round 4-8-12-10-8-10 times, then every other round 13-11-11-12-14-13 times. There are 73-81-89-89-97-105 sts on front and back piece. RAGLAN SLEEVE: Inc after 2nd and 6th marker and before 3rd and 7th marker as follows: Inc every other round 15-15-17-17-18-18 times in total = 53-53-61-61-61-61 sts on each sleeve. After inc for raglan, there are 252-268-300-300-316-332 sts in total. Then work pattern as follows: A.2 (= 2 sts), A.1 (= 8 sts) 6-6-7-7-7-7 times in total, work first st in A.1 (to make it the same in both sides), A.2, A.1 9-10-11-11-12-13 times in total, work first st in A.1, A.2, A.1 6-6-7-7-7-7 times in total, work first st in A.1, A.2, A.1 9-10-11-11-12-13 times in total, work first st in A.1. Continue with pattern like this AT THE SAME TIME continue to inc for raglan as follows: RAGLAN: NOTE: Inc differently on body and sleeves. Work the inc sts in the pattern A.1. RAGLAN BODY: Inc before 1st and 5th marker and after 4th and 8th marker as follows: Inc every other round 8-6-11-14-15-18 times, then every 4th round 1-3-0-0-0-0 times. There are 91-99-111-117-127-141 sts on front and back piece. RAGLAN SLEEVE: Inc after 2nd and 6th marker and before 3rd and 7th marker as follows: Inc every other round 0-0-0-0-1-2 times, every 4th round 5-6-1-1-7-8 times and every 6th round 0-0-3-4-0-0 times. There are 63-65-69-71-77-81 sts for each sleeve. When all inc are done there are 308-328-360-376-408-444 sts on needle. Continue with pattern as before. Work next round as follows: Slip the first 63-65-69-71-77-81 sts on a stitch holder for sleeve, cast on 8-8-8-10-10-10 sts under sleeve (insert a marker in the middle of the new sts), work 91-99-111-117-127-141 sts, slip the next 63-65-69-71-77-81 sts on a stitch holder for sleeve, cast on 8-8-8-10-10-10 sts under sleeve (insert a marker in the middle of the new sts), work 91-99-111-117-127-141 sts = 198-214-238-254-274-302 sts. Work the 8-8-8-10-10-10 new sts under each sleeve in pattern, i.e. pattern is reversed at the markers in the side. NOW MEASURE PIECE FROM HERE! BODY: Continue with A.1 until it has been worked 1 time vertically, then continue piece with dark grey blue Karisma / dark blue Merino Extra Fine. When piece measures 4 cm, dec 1 st on each side of markers in the side - READ DECREASE TIP (= 4 sts dec). Repeat dec every 14-30-10-14-10-14 cm 2-1-3-2-3-2 more times = 186-206-222-242-258-290 sts. When piece measures 39-40-41-41-41-41 cm (approx. 7 cm remain in total on body), K 1 round while AT THE SAME TIME dec 0-2-0-2-0-2 sts evenly = 186-204-222-240-258-288 sts. Then work A.3 (= 6 sts) 31-34-37-40-43-48 times in total in width. When A.3 has been worked 1 time vertically, continue with dark grey blue / dark blue Merino Extra Fine. On next round, dec 9-6-3-6-9-6 sts evenly = 177-198-219-234-249-282 sts. Switch to circular needle size 3 mm. Work rib = K 1/P 2. When rib measures 4 cm, K 1 round. Cast off. SLEEVE: Worked in the round on double pointed needles. Slip the 63-65-69-71-77-81 sts from stitch holder back on double pointed needles size 4 mm. Cast on 8-8-8-10-10-10 new sts under sleeve, insert 1 marker in the middle of the new sts = 71-73-77-81-87-91 sts. NOW MEASURE PIECE FROM HERE! Continue with A.1 over all sts. Work the 8-8-8-10-10-10 new sts and sts from A.2 in pattern A.1, i.e. pattern is reversed at the marker. When A.1 has been work to A.z, skip A.z on sleeve and continue on first row after A.z. When piece measures 4 cm, dec 1 st on each side of marker. Repeat dec every 5½-5½-4½-4-3-2½ cm 7-7-8-9-11-12 more times = 55-57-59-61-63-65 sts. When piece measures 47-47-46-45-44-42 cm, dec 1-3-5-1-3-5 sts evenly = 54-54-54-60-60-60 sts. Approx. 7 cm remain until total length of sleeve. Work A.3 9-9-9-10-10-10 times in total in width. When A.3 has been worked 1 time vertically, continue with dark grey blue Karisma / dark blue Merino Extra Fine. K 1 round. Switch to double pointed needles size 3 mm and work rib = K 1/P 2. Cast off when piece measures 54-54-53-52-51-49 cm (shorter measurements in the larger sizes because of wider shoulders). Work the other sleeve the same way. ASSEMBLY: Sew the openings under the sleeves. Fold neckband double to wrong side and stitch in place loosely. |
|||||||||||||
Diagram explanations |
|||||||||||||
|
|||||||||||||
 |
|||||||||||||
 |
|||||||||||||
Have you finished this pattern?Tag your pictures with #dropspattern or submit them to the #dropsfan gallery. Do you need help with this pattern?You'll find 29 tutorial videos, a Comments/Questions area and more by visiting the pattern on garnstudio.com. © 1982-2026 DROPS Design A/S. We reserve all rights. This document, including all its sub-sections, has copyrights. Read more about what you can do with our patterns at the bottom of each pattern on our site. |
|||||||||||||


With over 40 years in knitting and crochet design, DROPS Design offers one of the most extensive collections of free patterns on the internet - translated to 17 languages. As of today we count 325 catalogues and 12291 patterns translated into English (UK/cm). 12291
We work hard to bring you the best knitting and crochet have to offer, inspiration and advice as well as great quality yarns at incredible prices! Would you like to use our patterns for other than personal use? You can read what you are allowed to do in the Copyright text at the bottom of all our patterns. Happy crafting!
Post a comment to pattern DROPS Extra 0-1146
We would love to hear what you have to say about this pattern!
If you want to leave a question, please make sure you select the correct category in the form below, to speed up the answering process. Required fields are marked *.