
Popular categories
Looking for a yarn?


Comments / Questions (44)
Rafiya wrote:
I’m making the leg. For the following instruction, do I measure 3” from the first 30 sts cast on or after the 14 sts bind off? “ Then work in stockinette st back and forth over the 12 sts with 1 edge st in garter st in each side until leg measures approx. 8 cm / 3’’. “
07.02.2018 - 14:21DROPS Design answered:
Dear Rafiya, the 8 cm / 3" should be measure from beg of leg = cast on row. Happy knitting!
07.02.2018 - 15:14Rafiya Hasan wrote:
Am a little confused. Can you help out. I'm knitting the head and need an explanation of the increase with stitch markers. I have made the first increase inside the markers. For the next two increase, do I increase on same side as the first ones with the markers or the other two sides? The pattern is unclear on this.
01.02.2018 - 19:59DROPS Design answered:
Dear Mrs Hasan, continue increasing inside the markers, ie before 1st marker and after 2nd marker until you have inc a total of 3 times. Happy knitting!
02.02.2018 - 08:40
![]() Mia Tuominen wrote:
Mia Tuominen wrote:
Missäs mahtaa olla housujen ohje? :O
07.09.2017 - 09:26DROPS Design answered:
Housut neulotaan vartalon yhteydessä (vaaleankeltainen osuus).
25.09.2017 - 14:07
![]() Camilla wrote:
Camilla wrote:
Hej! Jag förstår inte hur jag ska börja mitt på bakstycket. Min andra ärm kommer in på slutet men efter den så har beskrivningen att det ska vara 10-15 maskor kvar. Ska jag sticka runt så att stycket sitter ihop? Eller är det fel i beskrivningen? Ska ärmarna vara i två "hål" i tröjan?
26.06.2017 - 16:45DROPS Design answered:
Hei Camilla. Når du har satt ermene sammen med bolen har du tråden mellom bakstykket og et erme. Klipp tråden og begynn og strikk 1. omg i masken midt bak (i 13. maske på bakstykket). Du starter og slutter 1. omg med 1 rille maske (= 1 rätst kantm). Nå strikkes det frem og tilbake. Hullet som blir under ermene sys sammen i ytterste ledd av ytterste maske til slutt. God Fornøyelse!
27.06.2017 - 11:23
![]() Camill wrote:
Camill wrote:
Hej! Tröjan: När jag har satt på armarna på samma sticka som fra m och bakstycket står det börja mitt på bakstycket. Hur gör jag det? Hoppar jag över 10 maskor?
25.06.2017 - 12:17DROPS Design answered:
Hei Camill. Du kan klippe tråden og begynne midt bak. God Fornøyelse!
26.06.2017 - 14:29
![]() Moa wrote:
Moa wrote:
När man har stickat fram- och bakstycke samt ärmar till tröjan så står det att alla maskor sa sitta på samma stickor. Det står att det då ska vara totalt 76 maskor. Jag förstår inte hur det kan bli 76 stycken. Fram-och bakstycke borde vara 50m och ärmarna borde ha 15m var då man ska maska av 6 m och sticka resterande 14 m. Jag får det då till 80m. Hur kan det stå 76 maskor? Var gör jag fel?
14.11.2016 - 13:17DROPS Design answered:
Hej Moa. Du har lukket forkert af til ermhull. Du lukker 2x 6 m af til ermhull paa tröjen: 48 m. Du har to ermer med hver 14 m: 48+14+14 = 76 m.
14.11.2016 - 14:31
![]() Helene wrote:
Helene wrote:
Fin opskrift :-) Hvad er formålet med knappen bagpå?
10.06.2016 - 18:49DROPS Design answered:
Hej Helene. Tror den kun er til pynt
13.06.2016 - 13:58
![]() Nyffeler Renate wrote:
Nyffeler Renate wrote:
Ich wollte die Hose von diesem Hasen stricken, habe aber die Anleitung dazu nicht gefunden Hase mit Pullover und Hose Vielen Dank für eine Antwort
14.03.2016 - 13:46DROPS Design answered:
Liebe Renate, die Hose ist Bestandteil des Beins und beginnt an der Stelle: "Zu hellgelb wechseln..."
14.03.2016 - 14:25
![]() Marianne wrote:
Marianne wrote:
Har I en hækle opskrift på en And. ( på dansk )
14.02.2016 - 01:42DROPS Design answered:
Hej Marianne. Hvad siger du til denne her? Fundet ved at söge paa "and" og "haeklet" i vores sögefunktion.
15.02.2016 - 14:24
![]() Marianne wrote:
Marianne wrote:
Har I en nem hæklet baby krave opskrift?
14.02.2016 - 01:40DROPS Design answered:
Hej Marianne. Nej, det har vi desvaerre ikke, men vi har til börn, se her. Maaske kan du tilpasse den.
15.02.2016 - 14:25
|
|
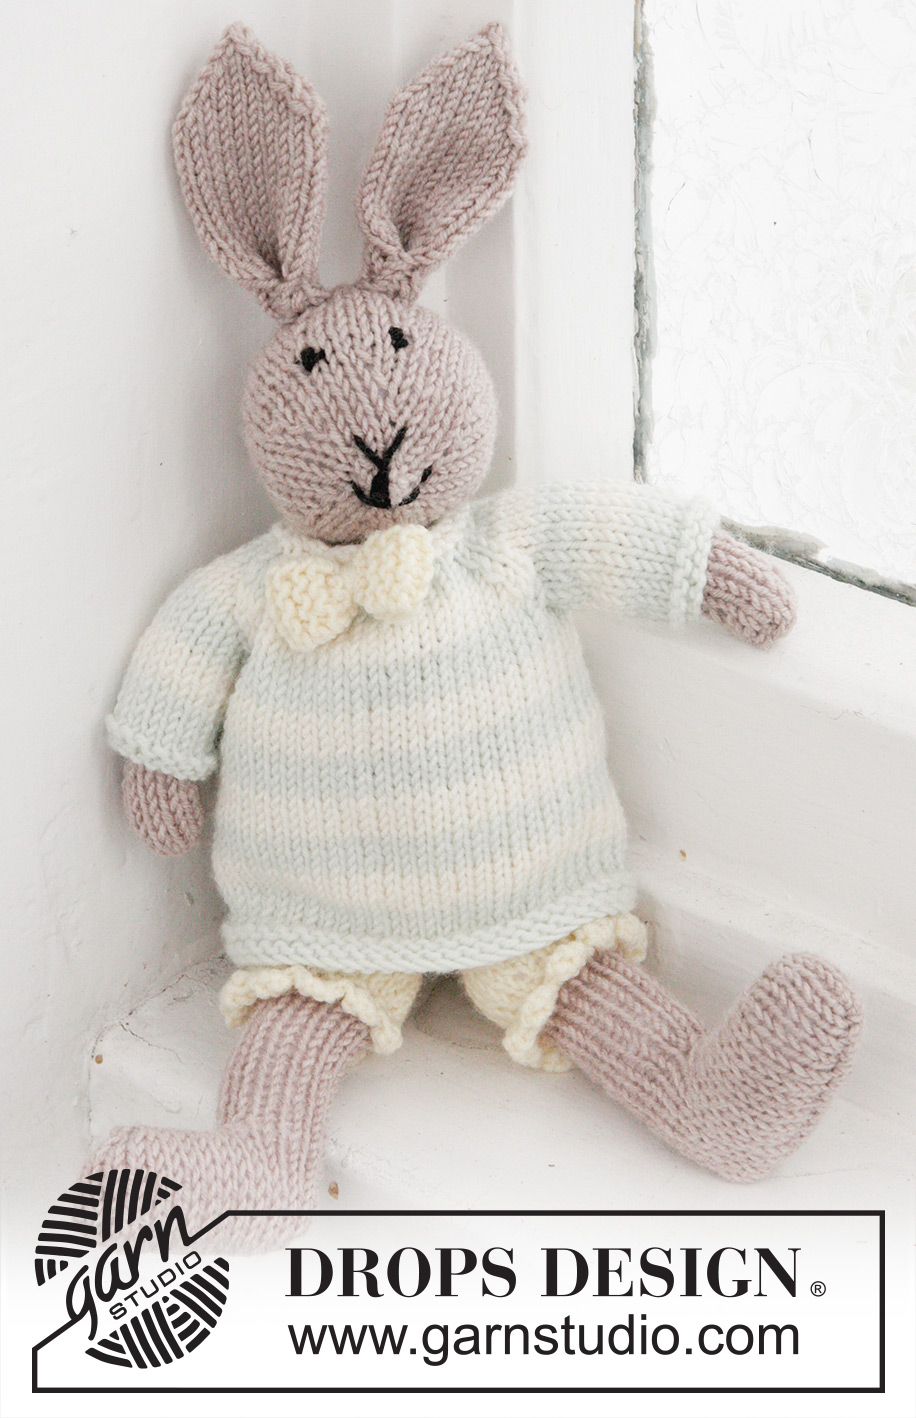
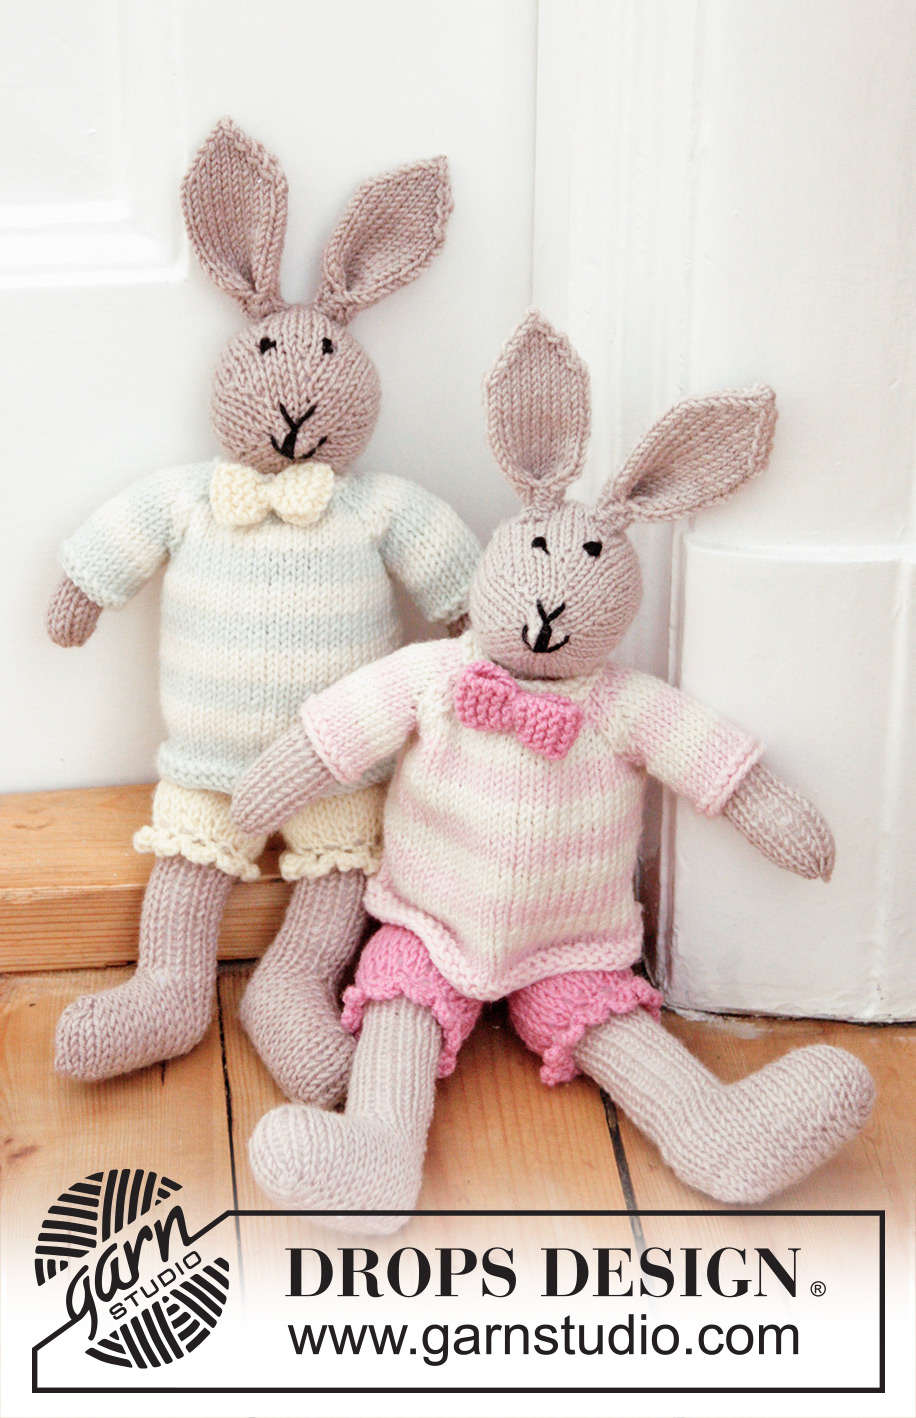
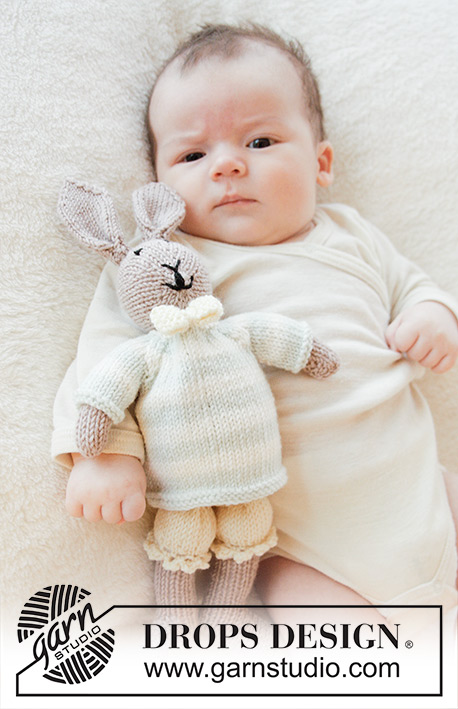
Mr. Bunny#dropsmrbunny |
|
 |
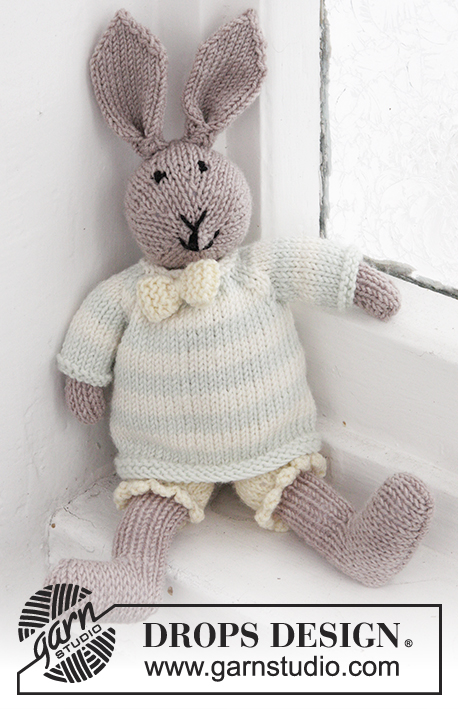 |
Knitted bunny toy with pants, jumper and bow in DROPS BabyMerino
DROPS Baby 25-8 |
|
|
MAGIC CIRCLE: To avoid holes in the middle beg with this technique: Hold yarn end in the left hand and make a loop around left index finger (from left to right). Hold the loop with left thumb and index finger. Insert needle through loop, get yarn from ball (i.e. place yarn 1 time over needle from you), pull yarn back through loop, 1 YO (now place yarn from the back and towards you) and pull YO through sts on needle, * insert needle through loop, 1 YO (place yarn from the back and towards you), pull YO through loop, 1 YO (from the back and towards you) and pull YO through outermost st on right needle (i.e. the last st made) *, repeat from *-* until there are 6 sts on needle. Then work as explained in pattern – AT THE SAME TIME pull yarn end so that loop is tighten tog and the hole disappears. INCREASE TIP: Inc 1 st by making 1 YO. On next round/row work YO twisted to avoid holes. GARTER ST (back and forth on needle): K all rows. 1 ridge = 2 rows K. STRIPES: * 4 rounds/rows light mint, 4 rounds/rows off white *, repeat from *-*. ---------------------------------------------------------- HEAD: Worked in the round on double pointed needles from snout and back. Make a MAGIC CIRCLE with light beige - see explanation above = 6 sts on needle. Distribute sts on 3 double pointed needles size 3 mm (work with fourth needle) and work in the round as follows: ROUND 1: K all sts. ROUND 2: * K 1, 1 YO *, repeat from *-* the entire round = 12 sts. ROUND 3: K all sts (always K YOs twisted to avoid holes). ROUND 4: * K 2, 1 YO *, repeat from *-* the entire round = 18 sts. ROUND 5: K all sts. ROUND 6: * K 3, 1 YO *, repeat from *-* the entire round = 24 sts. ROUND 7: K all sts. ROUND 8: * K 4, 1 YO *, repeat from *-* the entire round = 30 sts. ROUND 9: K all sts. ROUND 10: * K 5, 1 YO *, repeat from *-* the entire round = 36 sts. ROUND 11-12: K all sts = 36 sts. Insert 1 marker after the first 3 sts at beg of round and 1 marker after another 6 sts. Then inc 1 st inside the 2 markers - READ INCREASE TIP (= 2 sts inc). Repeat inc every other round 2 more times (= 3 inc in total in each side) = 42 sts. ROUND 18-19: K all sts = 42 sts. ROUND 20: * K 5, K 2 tog *, repeat from *-* the entire round = 36 sts. ROUND 21: K all sts. ROUND 22: * K 4, K 2 tog *, repeat from *-* the entire round = 30 sts. ROUND 23: K all sts. Continue dec like this on every other round (i.e. on every round with dec work 1 st less before working 2 sts tog = 6 sts dec per round) until 12 sts remain on needle, cut the yarn and pull it through sts on needle (without tightening). Embroider eyes, mouth and snout with black, fill the head with cotton wool, tighten tog sts and fasten (= mid back of head). EAR: Worked in the round from bottom up. Cast on 8 sts with light beige and distribute sts on 2 double pointed needles (work with third needle). ROUND 1-2: K all sts. ROUND 3: * K 1, 1 YO, K 2, 1 YO, K 1 *, repeat from *-* 1 more time = 12 sts on needle. ROUND 4: K all sts (always K YOs twisted to avoid holes). ROUND 5: * K 1, 1 YO, K 4, 1 YO, K 1 *, repeat from *-* 1 more time = 16 sts on needle. ROUND 6: K all sts. ROUND 7: * K 1, 1 YO, K 6, 1 YO, K 1 *, repeat from *-* 1 more time = 20 sts on needle. Then work in stocking st in the round until piece measures approx. 5½ cm. Then dec as follows: ROUND 1: * Slip 1 st as if to K, K 1, psso, K 6, K 2 tog *, repeat from *-* 1 more time = 16 sts. ROUND 2: K all sts. ROUND 3: * Slip 1 st as if to K, K 1, psso, K 4, K 2 tog *, repeat from *-* 1 more time = 12 sts. ROUND 4: K all sts. Continue dec like this every other round until 4 sts remain on needle (i.e. on every round with dec work 2 sts less between dec in each side). On next round K tog sts 2 by 2. Cut the yarn and pull it through sts, tighten tog and fasten. Fold each side at the bottom of ear towards the middle so that a pleat is formed in the mid of ear. Sew tog at the bottom with a couple of stitches and fasten ear on head. Work another ear the same way. BODY: Worked in the round, top down. Cast on 16 sts with light beige and distribute sts on 4 double pointed needles (work with fifth needle). ROUND 1-2: K all sts. ROUND 3: * K 2, 1 YO *, repeat from *-* the entire round = 24 sts. ROUND 4: K all sts (always K YOs twisted to avoid holes). ROUND 5: * K 2, 1 YO *, repeat from *-* the entire round = 36 sts. ROUND 6: K all sts. ROUND 7: * K 3, 1 YO *, repeat from *-* the entire round = 48 sts. Then work in stocking st in the round until piece measures 5½ cm. Switch to light yellow and K 1 round and P 1 round. Then work 8 rounds in stocking st. Continue to dec as follows: ROUND 1: * K 6, K 2 tog *, repeat from *-* the entire round = 42 sts. ROUND 2: K all sts. ROUND 3: * K 5, K 2 tog *, repeat from *-* the entire round = 36 sts. ROUND 4: K all sts. Continue dec like this on every other round (i.e. on every round with dec work 1 st less before working 2 sts tog = 6 sts dec per round) until 12 sts remain on needle, cut the yarn and pull it through sts on needle (without tightening). Fill body with cotton wool, tighten tog sts on yarn and fasten. Sew head to body (light yellow should be down (= pants)). LEG: Worked back and forth, bottom up. Cast on 30 sts on double pointed needles size 3 mm with light beige. Work in stocking st back and forth for 3 cm. Then work as follows: ROW 1 (= RS): 1 edge st in GARTER ST – see explanation above, K 10, K the next 8 sts tog 2 by 2, K 10 and 1 edge st in garter st = 26 sts. ROW 2 (= WS): 1 edge st in garter st, P 5, cast off the next 14 sts, P 5 and 1 edge st in garter st = 6 sts remain in each side. ROW 3 (= RS): Work the first 6 sts on needle and then the next 6 sts on needle (the 14 cast off sts form a hole in the mid of piece). Then work in stocking st back and forth over the 12 sts with 1 edge st in garter st in each side until leg measures approx. 8 cm. Switch to light yellow, K 1 row from RS and K 1 row from WS. Then work as follows: ROW 1 (= RS): * K 1, 1 YO *, repeat from *-* until 1 st remains and finish with K 1 = 23 sts. ROW 2 (= WS): P but K edge sts in each side and P YOs twisted to avoid holes. ROW 3: * K 2, 1 YO *, repeat from *-* until 1 st remains and finish with K 1 = 34 sts. Then work in stocking st back and forth with 1 edge st in garter st in each side until leg measures approx. 12 cm, cast off. Sew opening mid on top of foot with grafting/kitchener sts. Sew foot tog mid under and continue up along mid back - sew in front loop of outermost st. Fill leg with some cotton wool. Baste a strand up and down through cast-off edge at the top of leg (on the yellow). Tighten tog to make it baggy. Work another leg the same way and fasten both legs on body. Crochet a lace edge on hook size 3 mm with light yellow at the bottom around pants on each leg as follows (crochet in P sts): 1 dc in first st, * 4 ch, 1 tr in 4th ch from hook, 1 dc in next P st on pants *, repeat from *-* the entire round and finish with 1 sl st in first dc from beg of round. Fasten off. ARM: Work back and forth on double pointed needles from top and down. Cast on 10 sts with light beige and work in stocking st back and forth with 1 edge st in garter st in each side until arm measures 9 cm. Cut the yarn (make it long enough to use for sewing the arm tog), pull yarn through sts on needle (= at the bottom of arm), tighten tog and then sew arm tog in front loop of outermost st. Fill arm with cotton wool and fasten at the top of body by neck (below the head). Work another arm the same way and fasten in the opposite side. JUMPER: Piece is worked in the round on double pointed needles up to armhole, then work back and forth on needle. BODY: Cast on 60 sts with light mint. P 1 round, K 1 round and P 1 round. Then work in stocking st and STRIPES - see explanation above. When piece measures approx. 9 cm – adjust so that last round in a stripe with light mint remains, work next round as follows: Cast off 6 sts for armhole, work 24 sts, cast off the next 6 sts for armhole and work the last 24 sts. Put piece aside and knit the sleeves. SLEEVE: Worked in the round on double pointed needles. Cast on 20 sts with light mint. K 1 round and P 1 round. Then work in stocking st and STRIPES in the round. When 11 rounds with stripes have been worked (i.e. last round in a stripe with light mint remains), work next round as follows: Cast off 6 sts for armhole and work the remaining 14 sts. Cut the yarn, put piece aside and knit another sleeve. YOKE: Slip sleeves on to same needle as body where armholes were cast off (without working them first) = 76 sts on needle. Beg round from RS mid back on body and continue stripes as follows (1st round = off white): ROUND 1: 1 edge st in garter st, K 9, K 2 tog, K 2 twisted tog, K 10 (= sleeve), K 2 tog, K 2 twisted tog, K 20 (= front), K 2 tog, K 2 twisted tog, K 10 (= sleeve), K 2 tog, K 2 twisted tog, K 9 and 1 edge st in garter st = 68 sts. Then work back and forth from mid back. ROW 2 (= WS): P but work edge sts in garter st. ROW 3 (= RS): 1 edge st in garter st, K 8, K 2 tog, K 2 twisted tog, K 8 (= sleeve), K 2 tog, K 2 twisted tog, K 18 (= front), K 2 tog, K 2 twisted tog, K 8 (= sleeve), K 2 tog, K 2 twisted tog, K 8 and 1 edge st in garter st = 60 sts. ROW 4 (= WS): P but work edge sts in garter st. ROW 5 (= RS): Switch to light mint and work 1 edge st in garter st, K 7, K 2 tog, K 2 twisted tog, K 6 (= sleeve), K 2 tog, K 2 twisted tog, K 16 (= front), K 2 tog, K 2 twisted tog, K 6 (= sleeve), K 2 tog, K 2 twisted tog, K 7 and 1 edge st in garter st = 52 sts. ROW 6 (= WS): P but work edge sts in garter st. ROW 7 (= RS): 1 edge st in garter st, K 6, K 2 tog, K 2 twisted tog, K 4 (= sleeve), K 2 tog, K 2 twisted tog, K 14 (= front), K 2 tog, K 2 twisted tog, K 4 (= sleeve), K 2 tog, K 2 twisted tog, K 6 and 1 edge st in garter st = 44 sts. ROW 8 (= WS): P but work edge sts in garter st. Switch to off white and work next row as follows: 1 edge st in garter st, * K 1, K 2 tog *, repeat from *-* until 1 st remains and finish with 1 edge st in garter st = 30 sts. K 1 row from WS, K 1 row from RS and K 1 row from WS before casting off with K from RS. Fasten off. BOW: Cast on 5 sts on double pointed needles size 3 mm with light yellow. Work in garter st back and forth for 8 cm, cast off. Sew short sides tog in front loop of outermost st to form a ring. Fasten off. Find a new strand, wind it a couple of times around the middle of bow and fasten bow in the neck on jumper. Put the jumper on the bunny and fasten the button through both layers at the top of neck at the back. |
|
Have you finished this pattern?Tag your pictures with #dropspattern #dropsmrbunny or submit them to the #dropsfan gallery. Do you need help with this pattern?You'll find 29 tutorial videos, a Comments/Questions area and more by visiting the pattern on garnstudio.com. © 1982-2026 DROPS Design A/S. We reserve all rights. This document, including all its sub-sections, has copyrights. Read more about what you can do with our patterns at the bottom of each pattern on our site. |
|


With over 40 years in knitting and crochet design, DROPS Design offers one of the most extensive collections of free patterns on the internet - translated to 17 languages. As of today we count 325 catalogues and 12298 patterns translated into English (UK/cm). 12298
We work hard to bring you the best knitting and crochet have to offer, inspiration and advice as well as great quality yarns at incredible prices! Would you like to use our patterns for other than personal use? You can read what you are allowed to do in the Copyright text at the bottom of all our patterns. Happy crafting!
Post a comment to pattern DROPS Baby 25-8
We would love to hear what you have to say about this pattern!
If you want to leave a question, please make sure you select the correct category in the form below, to speed up the answering process. Required fields are marked *.