
Popular categories
Looking for a yarn?


Comments / Questions (266)
![]() Hilde wrote:
Hilde wrote:
Hei! Litt usikker på dette med forkortede pinner. Skal det være forkortet pinne kun 1 gang pr. 24 rader, eller hver 2. og 3. rad gjennom alle 24 radene? I så fall kan jo ikke alle 8. forkortede pinner pr mønsterrapport (24 rader) på høyre side bli på retten? Og skal det være forskjell på høyre og venstre forstykke, altså 2. på venstre og 3. på høyre? Mvh Hilde
25.10.2015 - 09:09DROPS Design answered:
Hej Hilde, det er forklaret under "FORKORTET P" øverst i opskriften. Højre forstk: Det strikkes 1 forkortet p på 3.p i hver mønsterrapport i høyden til ferdig mål slik. Venstre forstk: Det strikkes 1 forkortet p på 2.p i hver mønsterrapport i høyden til ferdig mål. God fornøjelse!
30.10.2015 - 14:27
![]() Hilde wrote:
Hilde wrote:
Hei! Jeg ser at man kan bruke både Lima og Cotton Merino, hvilket anbefaler dere mest? Mvh Hilde
19.10.2015 - 07:01DROPS Design answered:
Hej Hilde. Du kan bruge begge lige godt, det er afhaengigt af hvad du selv önsker: En uld/bomuldsblanding eller ren uld/alpaca. Modellen paa billedet er strikket i Lima.
19.10.2015 - 15:03
![]() Annette wrote:
Annette wrote:
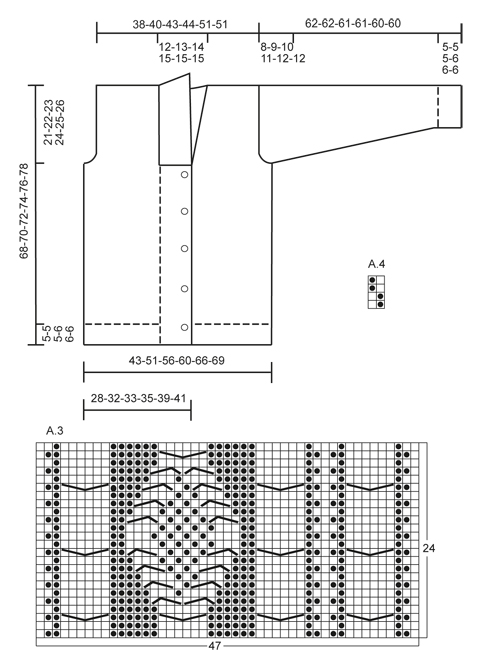
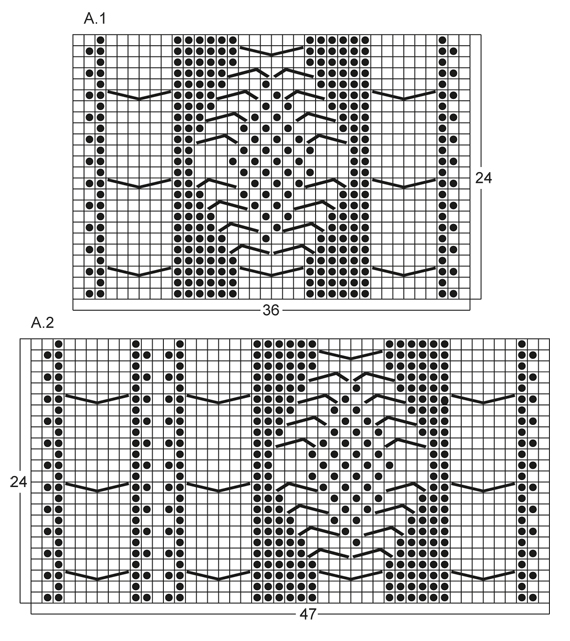
I meant I didn't understand 24 stitches in A4? How could that be in one row?
05.10.2015 - 17:44DROPS Design answered:
See answer below.
06.10.2015 - 08:59
![]() Annette wrote:
Annette wrote:
Hi. Love the look of this pattern. I am confused about what A1 means. I am on the back and I don't understand the diagram for A1
05.10.2015 - 17:40DROPS Design answered:
Dear Annette, diagram A.1 is 36 sts and 24 rows: start at the bottom corner on the right side and read from the right towards the left from RS and from the left towards the right from WS. read more about diagrams here. Happy knitting!
06.10.2015 - 08:58
![]() Manon Ruel wrote:
Manon Ruel wrote:
Si je comprend bien je dois faire les rangs raccourcis au rang 3-27-51-75 etc. ce qui me donne mon 3e rang du point de fantaisie? J'ai fait mes 30 mailles bordure j'ai tourné mon tricot j'ai glissé 1maille j'ai tricoté 29 mailles restantes de bordure puis je tricote encore mes 30 mailles bordure et poursuit le reste de mon tricot. Si c'est ça je ne vois pas de différence dans le style.
24.08.2015 - 14:49DROPS Design answered:
Bonjour Mme Ruel, c'est tout à fait ainsi qu'il faut procéder. La différence se verrait sur la hauteur: sans les rangs raccourcis, la bordure au point mousse contracterait l'ouvrage en hauteur. Bon tricot!
24.08.2015 - 14:55
![]() Manon Ruel wrote:
Manon Ruel wrote:
Je suis désolé mais je ne comprend vraiment pas où dois-je faire mes rangs raccourcis. Un diagramme a 12 rangs endroit et 12 rangs envers. Quel est le rang 3 du diagramme? Est-ce que c'est mon 3e rang, 11e rang, 19e rang etc.? Les rang où il y a des toursades ? Bref je ne comprend pas le sens du rang 3 et du rang 2.
10.08.2015 - 23:41DROPS Design answered:
Bonjour Mme Ruel, chaque diag. se répète effectivement sur 24 rangs, à chaque fois que vous devez tricoter le 3ème rang du diagramme (devant droit, sur l'endroit), tricotez les rangs raccourci sur la bordure devant, et à chaque fois que vous devez tricoter le 2ème rang du diagramme (devant gauche, sur l'envers), tricotez les rangs raccourcis sur la bordure devant. Terminez les diagrammes jusqu'au 24ème rang inclus et reprenez ensuite au 1er rang, les prochains rangs raccourcis se feront de nouveau au moment de tricoter le 3ème rang (devant droit) / 2ème rang (devant gauche) des diagrammes. Bon tricot!
11.08.2015 - 09:11
![]() Manon Ruel wrote:
Manon Ruel wrote:
Bonjour, Vous avez plusieurs questions sur les rangs raccourcis. J'ai compris comment il se faisait, ce que je ne comprend pas c'est à quel rang dois-je les faire. Est-ce que je les fais au 3e, 5e 7e, etc. ou est-ce que je les fais seulement au 3e, 11e, 19e etc. Finalement jusqu'où j'en fais? Est-ce que j'en fais jusqu'aux emmanchures?
10.08.2015 - 16:26DROPS Design answered:
Bonjour Mme Ruel, les rangs raccourcis se tricotent à chaque fois que vous tricotez le rang 3 du point fantaisie (sur l'endroit) pour le devant droit et à chaque fois que vous tricotez le rang 2 du point fantaisie (sur l'envers) pour le devant gauche. (3ème rang/2ème rang des diagrammes A.1 et A.2/A.3). Ils se tricotent jusqu'à ce que vous rabattiez les maille de la bordure devant (= à 47-52 cm, cf taille). Bon tricot!
10.08.2015 - 18:58
![]() Manon Ruel wrote:
Manon Ruel wrote:
Est-ce que ce modèle a des corrections?
26.06.2015 - 15:56DROPS Design answered:
Bonjour Mme Ruel, quand l'onglet "corrections" n'apparaît pas à droite de la photo, c'est qu'il n'y a pas de corrections, quand il y en a, les explications ont été corrigées, n'imprimez la page que si vous l'avez fait avant la date des corrections. Bon tricot!
26.06.2015 - 18:39
![]() Manon Ruel wrote:
Manon Ruel wrote:
Bonjour, Je veux faire la veste Drops Extra 0-850 Modèle LI-014 Je commence par étudier le patron, Lorsque je lis le devant droit la maille lisière apparait tout de suite. Il est écrit: Tricoter en côte ainsi: 30m point mousse *2m end, 2m env* répéter de *-* terminer par 1m li. Pour le devant gauche on dit de faire comme le côté droit mais à l'envers. Je lis: *2m env, 2m end* répéter de *-* avec 30m point mousse. On ne parle pas de la maille lisière avant la diminution. Est-ce normal?
23.06.2015 - 14:04DROPS Design answered:
Bonjour Mme Ruel, pour le devant gauche, on aura aussi la m lis, mais on commencera de l'autre côté: 1 m lis, côtes, et la bordure devant. Bon tricot!
23.06.2015 - 19:25Lourdes wrote:
Me gusta ! Este y los demás diseños muy buenos. Intentaré hacer este, luego les comento.
19.05.2015 - 18:28
|
||||||||||||||||
Rambling Man#ramblingmancardigan |
||||||||||||||||
 |
 |
|||||||||||||||
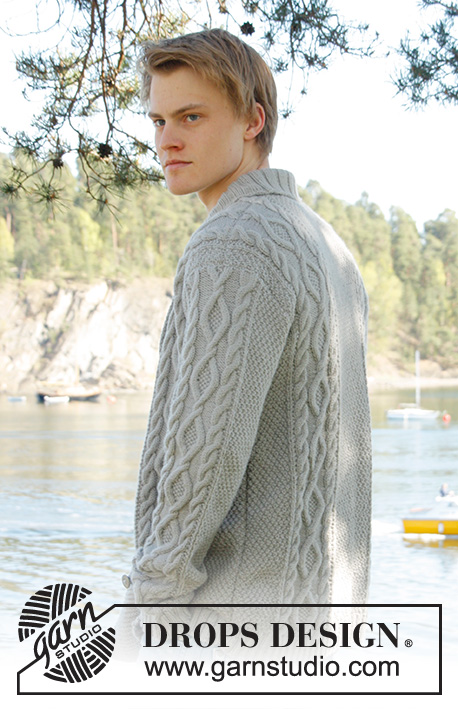
Men's knitted jacket in DROPS Lima, with cable pattern and shawl collar. Size: S - XXXL.
DROPS Extra 0-850 |
||||||||||||||||
|
KNITTING TIPS: This design is written with button holes on right front edge, if you wish standard button holes for men, you can make the button holes on left front edge. GARTER ST (back and forth on needle): K all rows. NOTE: All edge sts are worked in garter st. PATTERN: See diagram A.1 to A.4, diagrams show all rows in 1 pattern repetition from RS. SHORT ROWS: RIGHT FRONT PIECE: Work 1 short row on row 3 of every pattern repetition vertically until finished measurements as follows: On 3rd row in pattern (= RS), work 26-26-26-26-30-30 band sts, turn and K back. Then work over all sts on row as before. LEFT FRONT PIECE: Work 1 short row on row 2 of every pattern repetition vertically until finished measurements as follows: On 2nd row in pattern (= WS), work 26-26-26-26-30-30 band sts, turn and K back. Then work over all sts on row as before. BUTTON HOLES: Cast off for 5 button holes from RS on right band. 1 BUTTON HOLE = cast off 7th and 8th st from mid front and cast on 2 new sts on next row over these sts. Cast off for button holes when piece measures: SIZE S: 14, 22, 30, 38 and 46 cm SIZE M: 15, 23, 31, 39 and 47 cm SIZE L: 16, 24, 32, 40 and 48 cm SIZE XL: 17, 25, 33, 41 and 49 cm SIZE XXL: 18, 26, 34, 42 and 50 cm SIZE XXXL: 19, 27, 35, 43 and 51 cm INCREASE TIP: Inc 1 st by making 1 YO, on next row work YO twisted (i.e. work in back loop of st instead front) to avoid holes. ---------------------------------------------------------- BACK PIECE: Worked back and forth on needle. Cast on 136-156-168-180-196-204 sts (incl 1 edge st in each side) on circular needle size 3.5 mm with Lima. Work rib as follows (1st row = RS): 1 edge st in GARTER ST - see explanation above, * K 2, P 2 *, repeat from *-*, finish with K 2 and 1 edge st in garter st. Continue to work like this until rib measures 5-5-5-6-6-6 cm. On last row from WS, P while AT THE SAME TIME dec 20-22-24-26-26-26 sts evenly = 116-134-144-154-170-178 sts. Then switch to needle size 4 mm and work next row from RS as follows: 1 edge st in garter st, 8-16-20-24-20-24 sts in A.4, work A.1 one time in size S - XL, work A.2 one time in size XXL and XXXL, 26-28-30-32-34-34 sts in A.4, then work A.1 one time in size S - XL, work A.3 one time in size XXL and XXXL, finish with 8-16-20-24-20-24 sts in A.4 and 1 edge st in garter st. REMEMBER THE KNITTING TENSION! Continue to work like this until piece measures 47-48-49-50-51-52 cm. Then cast off for armholes at the beg of every row in each side as follows: Cast off 3 sts 0-1-1-2-2-2 times, 2 sts 1-1-1-2-2-2 times, 1 st 4-7-9-8-4-8 times = 104-110-116-118-142-142 sts. Continue with pattern as before until piece measures 66-68-70-72-74-76 cm. Now cast off the middle 20-22-24-26-28-28 sts for neck and finish each part separately. Cast off 2 sts on next row from neck = 40-42-44-44-55-55 sts remain on shoulder. Continue with pattern as before. When piece measures 68-70-72-74-76-78 cm, loosely cast off sts with K over K and P over P. RIGHT FRONT PIECE: Worked back and forth on needle. Cast on 83-91-95-99-111-115 sts (incl 1 edge st in the side) on circular needle size 3.5 mm with Lima. Work rib as follows (1st row = RS): 26-26-26-26-30-30 sts in garter st (= band sts), * K 2, P 2 *, repeat from *-*, finish with 1 edge st in garter st. Continue with rib and band sts in garter st until rib measures 5-5-5-6-6-6 cm. On last row from WS, P over all sts in rib while AT THE SAME TIME dec 12-12-12-12-13-13 sts evenly (do not dec over band sts) = 71-79-83-87-98-102 sts. Then switch to needle size 4 mm and work next row from RS as follows: 26-26-26-26-30-30 band sts, work A.1 one time in size S - XL, work A.3 one time in size XXL and XXXL, 8-16-20-24-20-24 sts in A.4 and 1 edge in garter st. On next row from RS (= 3rd row in pattern) work SHORT ROWS - read explanation above. Continue with pattern and band sts at the front - while AT THE SAME TIME work 1 short row on 3rd row in every pattern repetition vertically until finished measurement. When piece measures 14-15-16-17-18-19 cm, cast off for BUTTON HOLES on right band - see explanation above! Continue to work until piece measures 47-48-49-50-51-52 cm. Then cast off at beg of next row from RS as follows: Cast off the first 25-25-25-25-29-29 sts, insert a marker (this marks where to beg the knit up for collar), work the rest of row. Then cast off for armhole on every row from WS as follows: 3 sts 0-1-1-2-2-2 times, 2 sts 1-1-1-2-2-2 times, 1 st 4-7-9-8-4-8 times = 40-42-44-44-55-55 sts remain on shoulder. Continue with pattern as before. When piece measures 68-70-72-74-76-78 cm, loosely cast off sts with K over K and P over P. LEFT FRONT PIECE: Cast on and work rib as on right front piece but reversed (i.e. * P 2, K 2 *, repeat from *-*) with 26-26-26-26-30-30 band sts in garter st. Continue to work until rib measures 5-5-5-6-6-6 cm. On last row from WS, P over all sts in rib while AT THE SAME TIME dec 12-12-12-12-13-13 sts evenly (do not dec over band sts) = 71-79-83-87-98-102 sts. Then switch to needle size 4 mm and work next row from RS as follows: 1 edge st in garter st, 8-16-20-24-20-24 sts in A.4, work A.1 one time in size S - XL, work A.2 one time in size XXL and XXXL, 26-26-26-26-30-30 band sts in garter st. On next row from WS (= 2nd row in pattern) work SHORT ROWS - read explanation above. Continue to work the same way as on right front piece but without button holes. SLEEVE: Worked back and forth on needle. Cast on 74-78-82-86-90-90 sts (incl 1 edge st in each side) on circular needle size 3.5 mm with Lima. Work rib as follows (1st row = RS): 1 edge st in garter st, * K 2, P 2 *, repeat from *-* and finish with 1 edge st in garter st. Continue to work like this until rib measures 5-5-5-6-6-6 cm. On last row from WS, P while AT THE SAME TIME dec 12-14-16-18-18-18 sts evenly = 62-64-66-68-72-72 sts. Then switch to needle size 4 mm and work next row from RS as follows: 1 edge st in garter st, 12-13-14-15-17-17 sts in A.4, work A.1 one time, 12-13-14-15-17-17 sts in A.4, finish with 1 edge st in garter st. AT THE SAME TIME when piece measures 6 cm, inc 1 st inside 1 edge st in each side - Read INCREASE TIP above. NOTE: Work the inc sts in A.4. Repeat inc every 3½-3-2½-2½-2½-2½ cm a total of 14-15-16-17-16-17 times = 90-94-98-102-104-106 sts. Continue until piece measures 54-53-51-50-48-48 cm (shorter measurements in the larger sizes because of longer sleeve cap and broader shoulder width), cast off at beg of every row in each side: 3 sts 1-1-1-2-2-2 times, 2 sts 1-1-2-2-2-2 times and 1 st 2-2-3-3-4-4 times. Then cast off 2 sts in each side until piece measures 61-61-60-60-59-59 cm, then cast off 3 sts 2 times in each side. When piece measures approx. 62-62-61-61-60-60 cm, loosely cast off sts with K over K and P over P. ASSEMBLY: Sew shoulder seams and sew in sleeves inside 1 edge st. Sew sleeve and side seams in one inside 1 edge st. Sew buttons on to left front piece, approx. 2½ cm from last K st in pattern. SHAWL COLLAR: Knit up sts from RS inside 1 edge st on circular needle size 3.5 mm. Start mid front at marker on right front piece as follows: Knit up approx. 60-70 sts up to shoulder, then 30-40 sts along the neck and 60-70 sts down along left front piece until marker = 150-180 sts. K 1 row from WS while AT THE SAME TIME adjusting no of sts to 144-148-156-164-172-180. Then work rib on next row from RS as follows: 1 sts in garter st, * K 2, P 2 *, repeat from *-* and finish with K 2 and 1 st in garter st. Continue like this until collar measures approx. 5-5-5-6-6-6 cm. Now inc 1 st in each of the middle 14-14-14-16-16-16 P-sections seen from RS (= back of neck) = 158-162-170-180-188-196 sts. Continue until collar measures approx. 12-12-12-12-14-14 cm, then loosely cast off with K over K and P over P. Fasten collar with stitches at the bottom in each side towards band from WS (so that the seam is not visible from RS) – sew edge to edge to avoid a chunky seam. |
||||||||||||||||
Diagram explanations |
||||||||||||||||
|
||||||||||||||||
 |
||||||||||||||||
 |
||||||||||||||||
Have you finished this pattern?Tag your pictures with #dropspattern #ramblingmancardigan or submit them to the #dropsfan gallery. Do you need help with this pattern?You'll find 23 tutorial videos, a Comments/Questions area and more by visiting the pattern on garnstudio.com. © 1982-2026 DROPS Design A/S. We reserve all rights. This document, including all its sub-sections, has copyrights. Read more about what you can do with our patterns at the bottom of each pattern on our site. |
||||||||||||||||


With over 40 years in knitting and crochet design, DROPS Design offers one of the most extensive collections of free patterns on the internet - translated to 17 languages. As of today we count 324 catalogues and 12245 patterns translated into English (UK/cm). 12245
We work hard to bring you the best knitting and crochet have to offer, inspiration and advice as well as great quality yarns at incredible prices! Would you like to use our patterns for other than personal use? You can read what you are allowed to do in the Copyright text at the bottom of all our patterns. Happy crafting!
Post a comment to pattern DROPS Extra 0-850
We would love to hear what you have to say about this pattern!
If you want to leave a question, please make sure you select the correct category in the form below, to speed up the answering process. Required fields are marked *.