
Popular categories
Looking for a yarn?


Comments / Questions (112)
Gilberto wrote:
Este modelo é lindo e eu queria um igual. A Drops tem loja de venda dos produtos? Estão de parabéns pelos lindos modelos de pontos de tricot.
12.07.2018 - 20:38Andrea Díaz wrote:
Buenos días, donde dice "rem para el copete de manga en cada lado, en vtas alternas, de la manera sig: Rem 2 pts 2-2-3-3-5-5 veces..." La cantidad de veces es por lado? O es en total? Sería en la talla 1 sería así: *vuelta 1 (der) dem 2, vuelta 2 (rev) dem 2, vuelta 2 (der) dem 2, vuelta 3 (rev) dem 2 * ?
15.06.2018 - 13:17DROPS Design answered:
Hola Andrea. Los patrones de Drops están preparados para varias tallas (desde S hasta XXXL). Cuando solo hay un número de puntos/veces en las explicaciones este número se aplica para todas las tallas, cuando hay varios números trabajamos como sigue, por ejemplo, Rem 2 pts 2-2-3-3-5-5 veces ( cerrar/rematar 2 puntos 2 veces a cada lado de la manga ( para la talla S), 2 veces ( para la tallas M), 3 veces (para la talla L) etc.).
24.06.2018 - 12:33
![]() Stéphanie wrote:
Stéphanie wrote:
Merci infiniment
11.05.2018 - 14:47
![]() Stéphanie wrote:
Stéphanie wrote:
Rebonjour, même avec vos explications, je n'arrive pas à rabattre 50 mailles pour le xxxl??
11.05.2018 - 14:17DROPS Design answered:
Bonjour Stéphanie, en taille XXXL vous rabattez de chaque côté: 1 x 3 m, 6x2 m et 5 x 1 m soit 20 m de chaque côté et un total de 40 m rabattues pour les emmanchures, vous aviez 124 m - 40 m = il doit vous rester 84 m quand toutes les mailles des emmanchures sont rabattues. Bon tricot!
11.05.2018 - 14:29
![]() Stéphanie wrote:
Stéphanie wrote:
Bonjour, lorsque je suis rendu à faire le dos, je ne comprends pas les diminutions des emmanchures? Est-ce que vous avez des explications plus claires pour une débutante comme moi ou un vidéo? Merci
11.05.2018 - 11:05DROPS Design answered:
Bonjour Stéphanie, quand vous continuez uniquement sur les mailles du dos, rabattez au début de chaque rang de chaque côté (= sur l'endroit et sur l'envers): 1 fois 3 m, puis en fonction de la taille: 0-1-2-4-6-8 fois 2 m et 1-2-3-4-5-6 fois 1 m = il reste 76-78-80-82-84-86 m. Par ex en taille S, vous rabattez 3 m au début des 2 rangs suivants (= 1 fois sur l'endroit, 1 fois sur l'envers), puis 1 m au début des 2 rangs suivants (1 fois sur l'endroit et 1 fois sur l'envers) = vous avez rabattu 4 m de chaque côté soit 84- 2x4= 76 m. Bon tricot!
11.05.2018 - 11:51Maria wrote:
I don’t understand why the pattern asks for a decrease of 58 stitches right after the rib. Wouldn’t it give an odd shape? Wouldn’t it cause the jumper to be very small? This is my first knitting project!
20.04.2018 - 03:46DROPS Design answered:
Dear Maria, the rib will tighten piece in width so that you need more sts in rib than in stocking st to get the same width, that"s the reason why you will dec at the end of rib. If your tension is correct both in width and height, you will get the finished measurements as in measurement chart. Happy knitting!
20.04.2018 - 08:53
![]() Clawur wrote:
Clawur wrote:
Ich habe den Pullover schon zum zweiten Mal gestrickt und er ist wieder richtig toll geworden. Das Modell ist lustig zu stricken. Ich freue mich sehr über das Ergebnis!
13.04.2018 - 06:53
![]() Nathalie wrote:
Nathalie wrote:
Bonjour, j'aimerais tricoter ce modèle en une seule couleur, dois-je seulement additionner les quantités des deux couleurs ou y a-t-il une quantité plus réduite ? Merci.
28.11.2017 - 16:59DROPS Design answered:
Bonjour Nathalie, il vaut mieux additionner les 2 couleurs, il est probable que vous en ayez besoin d'un peu moins, mais vous serez certaine de ne pas en manquer. Bon tricot!
29.11.2017 - 08:53
![]() Thomas wrote:
Thomas wrote:
Hallo. Meine Frage bezieht sich auf den Ärmel. Nach dem Abmaschen der 6M unter dem Ärmel ist fir Abnahme der weiteren Maschen dann jeweils auf beiden Seiten der Markierung oder nur am Anfang und wird dann weiter in Runden oder dann in Reihen gestrickt? Danke für die schnelle Beantwortung 😀
28.05.2017 - 19:25DROPS Design answered:
Lieber Thomas, nach dem die 6 mittleren Maschen unten am Ärmel abegekettet sind, stricken Sie weiter Hin- und Zurück, dann am Anfang jeder Reihe (Hin- sowie Rückreihe) Maschen abketten. Viel Spaß beim stricken!
30.05.2017 - 13:20
![]() Sherri Nordwall wrote:
Sherri Nordwall wrote:
Hello! I am having trouble finishing the arms. When I cast (or bind) off on either side of the stitch marker am I then no longer working in the round?
21.03.2017 - 00:59DROPS Design answered:
Dear Mrs Nordwall, after you have cast off the 6 sts mid under arm, continue back and forth casting off at the beg of every row in each side as explained for your size. Happy knitting!
21.03.2017 - 09:48
|
|
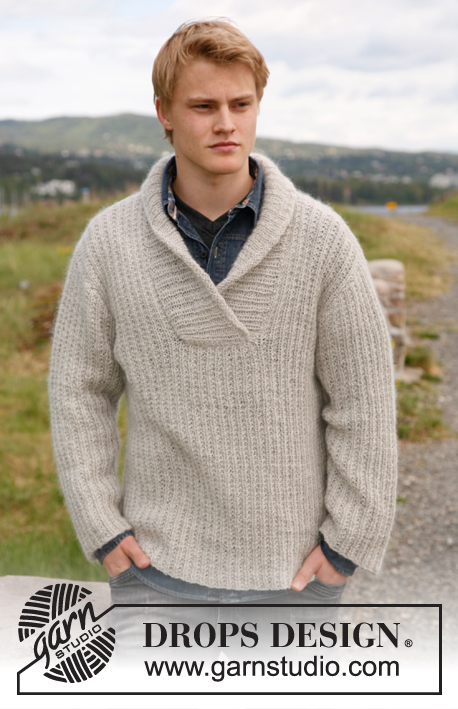
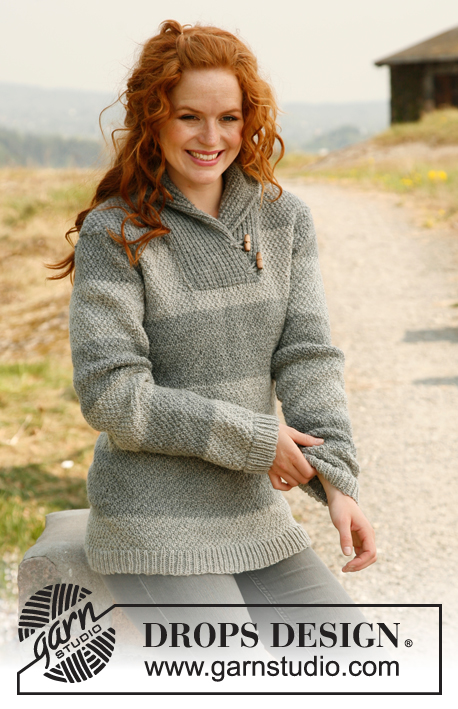
Limestone#limestonesweater |
|
 |
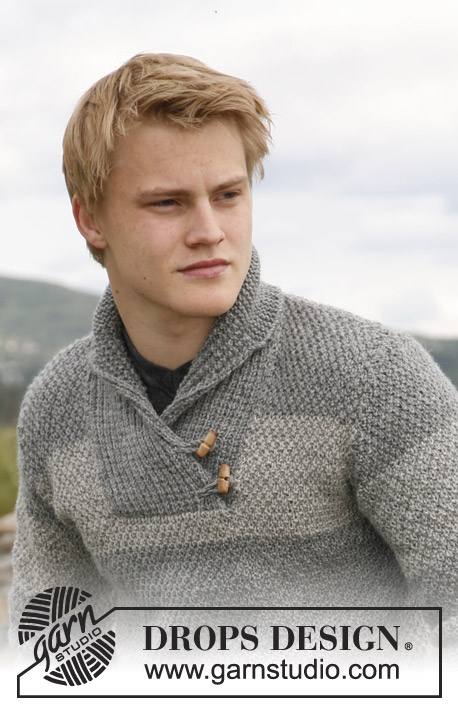 |
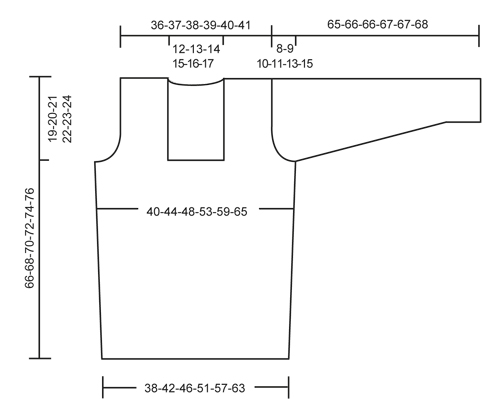
Men's knitted jumper with shawl collar, stripes and moss stitch in DROPS Karisma or DROPS Merino Extra Fine. Size S-XXXL.
DROPS 135-1 |
|
|
DOUBLE MOSS ST: 1st round: * K 1, P 1 *, repeat from *-*. 2nd round: K over K and P over P. 3rd round: * P 1, K 1 *, repeat from *-*. 4th round: P over P and K over K. Repeat rounds 1-4. STRIPES: Work medium grey and light grey alternately every 11-11-11½-12-12-12½ cm. NOTE: Measure first stripe from cast on edge. Work medium grey in the last stripe on the body and sleeve until finished measurements. INCREASE TIP: Inc 1 st by making 1 YO, on next round work YO twisted (i.e. work in back loop of st instead front) to avoid holes. PATTERN 1: Row 1 (= from RS): K all sts. Row 2 (= from WS): * K 1, P 1 *, repeat from *-*. Repeat 1st and 2nd row. GARTER ST (back and forth on needle): K all rows. -------------------------------------------------------- BODY: Worked in the round on circular needle. Cast on 213-234-255-288-318-351 sts on circular needle size 3.5 mm with light grey. Work rib as follows: * K 1, P 2 *, repeat from *-*. When piece measures 4 cm, K 1 round while AT THE SAME TIME dec 53-58-63-72-78-87 sts evenly (dec by K tog approx. every 3rd and 4th st) = 160-176-192-216-240-264 sts. Then switch to circular needle size 4 mm and continue in the round with DOUBLE MOSS ST and STRIPES - See explanation above. REMEMBER THE KNITTING TENSION! When piece measures 15-15-16-16-17-17 cm, insert 2 markers in the piece; 1 at beg of round and 1 after 80-88-96-108-120-132 sts (marks the sides). On next round, inc 1 st on each side of every marker - Read INCREASE TIP above = 4 new sts on round. NOTE: Work the new sts in double moss st. Repeat inc one more time when piece measures 30-30-32-32-34-34 cm = 168-184-200-224-248-272 sts. When piece measures 47-48-49-50-51-52 cm, divide the piece at the markers and finish each part separately. BACK PIECE: = 84-92-100-112-124-136 sts (1st row = RS). Continue with stripes and double moss st - while AT THE SAME TIME casting off for armholes in each side on every other row as follows: Cast off 3 sts 1 time, 2 sts 0-1-2-4-6-8 times and 1 st 1-2-3-4-5-6 times = 76-78-80-82-84-86 sts. When piece measures 64-66-68-70-72-74 cm, cast off the middle 24-26-28-30-32-34 sts for neck and finish each shoulder separately. Then dec 1 st on next row from neck (dec by working the outermost 2 sts towards the neck tog) = 25 sts remain on shoulder in all sizes. Loosely cast off all sts when piece measures 66-68-70-72-74-76 cm. FRONT PIECE: = 84-92-100-112-124-136 sts. Continue with stripes and double moss st. Start cast offs for armholes as on back piece on 1st row (= RS) - AT THE SAME TIME slip the middle 26-28-30-32-34-36 sts on a stitch holder for neck at the front, now finish each part separately. Cast off for armholes in each side as on back piece. When all cast offs are done, 25 sts remain on each shoulder. Continue in double moss st and with stripes. When piece measures 66-68-70-72-74-76 cm, loosely cast off all sts. SLEEVE: Worked in the round on double pointed needles. Cast on 63-66-69-72-75-78 sts on double pointed needles size 3.5 mm with light grey. Work rib as follows: * K 1, P 2 *, repeat from *-*. When piece measures 4 cm, K 1 round while AT THE SAME TIME dec 15-16-17-18-19-20 sts evenly (dec by K tog approx. every 3rd and 4th st) = 48-50-52-54-56-58 sts. Switch to double pointed needles size 4 mm and insert a marker at beg of round. Continue in the round with DOUBLE MOSS ST and STRIPES. When piece measures 8-8-7-7-7-6 cm, inc 1 st on each side of marker = 2 new sts. Repeat inc every 5-4½-3½-3-2½-2½ cm a total of 10-11-13-15-17-18 times = 68-72-78-84-90-94 sts. When piece measures 57-57-56-56-54-53 cm (shorter measurements in the larger sizes because of longer sleeve cap and broader shoulder width) cast off 3 sts on each side of marker (= 6 sts mid under sleeve). Then work back and forth on circular needle. Continue to cast off for sleeve cap in each side on every other row as follows: Cast off 2 sts 2-2-3-3-5-5 times, and then 1 st 3-4-4-5-5-6 times. Then cast off 2 sts in each side until piece measures 64-65-65-66-66-67 cm, then cast off 3 sts 1 time in each side. Loosely cast off all sts. Piece measures approx. 65-66-66-67-67-68 cm. ASSEMBLY: Sew the shoulder seams tog. Sew in the sleeves. RIGHT COLLAR: Worked back and forth on circular needle size 4 mm with medium grey as follows: Knit up sts from stitch holder mid front (leave the stitch holder) = 26-28-30-32-34-36 sts, P 1 row from WS. Then work PATTERN 1 from RS - See explanation above. When collar measures 19-20-21-22-23-24 cm (last row = 2nd row in PATTERN 1 = WS), insert a marker at the end of row seen from RS. Continue in GARTER ST - See explanation above - until finished measurements - At the same time work short rows as follows: * Work 2 rows over all sts, work 2 rows over the outermost 20 sts towards mid front *, repeat from *-* until piece measures 8-9-9-10-10-11 cm from marker (in the shorter side). Cast off. LEFT COLLAR: Knit up the sts from stitch holder from RS behind right collar = left collar is underneath right collar. Work the same way as on right collar but reversed (work short rows over the outermost 20 sts towards mid front). ASSEMBLY: Sew right collar to right front piece and left collar to left front piece in outermost sts. Sew collar tog mid back and sew the neck on back piece. STRAP: Make 1 strap as follows: Twine 2 threads of 40 cm medium grey and fold them double. Make another strap the same way. Fasten the straps approx. 4 and 11 cm up from bottom edge on right collar (approx. 1 cm from edge mid front). Pull the threads through the collar and fasten the ends on the back. Sew button on left collar approx. 2 and 4 cm in from seam for left front piece. |
|
 |
|
Have you finished this pattern?Tag your pictures with #dropspattern #limestonesweater or submit them to the #dropsfan gallery. Do you need help with this pattern?You'll find 17 tutorial videos, a Comments/Questions area and more by visiting the pattern on garnstudio.com. © 1982-2026 DROPS Design A/S. We reserve all rights. This document, including all its sub-sections, has copyrights. Read more about what you can do with our patterns at the bottom of each pattern on our site. |
|


With over 40 years in knitting and crochet design, DROPS Design offers one of the most extensive collections of free patterns on the internet - translated to 17 languages. As of today we count 324 catalogues and 12260 patterns translated into English (UK/cm). 12260
We work hard to bring you the best knitting and crochet have to offer, inspiration and advice as well as great quality yarns at incredible prices! Would you like to use our patterns for other than personal use? You can read what you are allowed to do in the Copyright text at the bottom of all our patterns. Happy crafting!
Post a comment to pattern DROPS 135-1
We would love to hear what you have to say about this pattern!
If you want to leave a question, please make sure you select the correct category in the form below, to speed up the answering process. Required fields are marked *.