
Popular categories
Looking for a yarn?


Comments / Questions (68)
![]() Doris Tuma wrote:
Doris Tuma wrote:
Guten Tag schon wieder eine Frage! Nach dem Blattmuster folgt beim Taufkleid M2. Das Blattmuster endet mit einer Runde der Vorderseite und M2 beginnt mit der VS! Fehlt da nicht 1 Rückrunde? Ich habe nun 1 Rückrunde LI gestrickt. Mit freundlichen Grüssen Doris PS Danke für Ihre Antwort. Werde weisses Seidenband einziehen.
26.06.2014 - 10:20DROPS Design answered:
Liebe Frau Tuma, ja Sie haben Recht, da treffen zwei Hin-R aufeinander. Sie können das Problem so lösen, wie Sie es gemacht haben, oder einfach die erste R von M.2 weglassen und direkt die 2. R (= Rück-R) stricken. Ich werde das Problem an die Designerinnen weiterleiten, jedoch wird eine Antwort eine ganze Weile auf sich warten lassen, da sich gerade alles um die neue Kollektion dreht.
27.06.2014 - 14:17
![]() Tuma Doris wrote:
Tuma Doris wrote:
Taufkleid - BLATTMUSTER Werde nun Runde 21 vom Blattmuster stricken. Meine Frage betrifft Runde 22 Sollten die Blattspitzen nicht zusmmenlufen mit einem überzogenen Doppelabnehmen? Das heisst 1M abheben 2 M rechts zusammenstricken, die abgehobene M. über die gestrickte ziehen? £Das wäre in meinen Augen für den Musterverlauf korrekter. Ich jedenfalls werde Runde 22 nach meiner Variante stricken. Darf ich eine Antwort erwarten?? Mit freundlichen Grüssen. Doris Tuma
25.06.2014 - 15:15DROPS Design answered:
Liebe Doris, ja Sie dürfen, hier ist die Antwort: Sie liegen richtig, in der Übersetzung hatte sich ein Fehler eingeschlichen, die 22. Rd muss wie von Ihnen beschrieben gestrickt werden. Die Anleitung wird umgehend korrigiert. Vielen Dank für Ihre Aufmerksamkeit und weiterhin gutes Gelingen!
25.06.2014 - 22:02
![]() Tuma Doris wrote:
Tuma Doris wrote:
Beim Blattmuster wäre es vorteilhaft, wenn auch ein Diagramm erstellt würde. Zudem käme eine Angabe über den Musterrapport sehr gelegen. (Anzahl Maschen = Rapport)Das Video zum Stricken der Biesen ist SEHR hilfreich. Habe nun Muster 1 beendet. Die Arbeit wird wunderschön, aber blaues Band werde ich nicht einziehen, eher ein weisses Seidenband. Macht weiter so mir gefällt es bei Euch. D. Tuma
16.06.2014 - 14:10
![]() Choi wrote:
Choi wrote:
Ich habe eine frage,kleid striecken 2 te muster M2 mit verstehe nicht nicht.koenen sie helfen?
12.05.2014 - 11:40DROPS Design answered:
Liebe Choi, können Sie genauer beschreiben, wo bei M.2 Sie ein Problem haben? Sie können die Stelle gerne einfach aus der Anleitung kopieren und hier bei den Kommentaren einfügen, dann weiß ich, um welche Stelle es geht.
14.05.2014 - 09:40
![]() Lehna Adelstorp wrote:
Lehna Adelstorp wrote:
Hej.Har i går fundet en fejl i opskriften. Nå man er igeng med mønster M2. Man strikke 1 pind, hvor man tag 11 - 13 masker ind. hvilken gør at man starte de 4 pinde fra M2. på vrang siden. Og i opskiften står der at alle mønster starte på ret-siden. Min Strikkedame.M ent man kunne lave 1 pind glat mere. Så mønster kom til at start rigtig, selvom det ikke stod der. og det ville hun gør hver gang man tag ind. Så komme alle mønster til at starte fra retsieden. Mvh. Lehna
06.03.2014 - 13:16
![]() Martine wrote:
Martine wrote:
Bonjour, je fais la robe de baptême et j'ai fait la nervure les rangs de jersey avec les premières diminutions et arrivée à M2(4 iers rangs) tricoter en jersey endroit les mailles qui ne rentrent pas dans le rang de jours. Or, je n'ai pas de jours après cette nervure ??? merci de m'aider
07.02.2014 - 12:28DROPS Design answered:
Bonjour Martine, au 3ème rang de M2, vous tricotez *2 m ens à l'end, 1 jeté* tout le tour, chaque diminution (2 m ens à l'end) doit être compensée par 1 jeté. Si à la fin du tour, il vous reste 1 m, tricotez cette m à l'end (pas en suivant M2). Bon tricot!
07.02.2014 - 13:39
![]() Martine wrote:
Martine wrote:
Bonjour, je fais la robe de baptême et je suis arrivée au rang après la nervure (environ rang 60) et je voudrais faire M2mais je ne comprends plus : sur le dessin c'est endroit sur envers et envers sur endroit mais sur l'explication c'est tricoter en jersey endroit les mailles qui ne rentrent pas dans le rang de jours. Or, sur mon tricot je n'ai pas de jours. ce n'est que du jersey.quelqu'un peut-il m'aider?... merci .
07.02.2014 - 08:50DROPS Design answered:
Bonjour Martine,Quand vous tricotez les 4 premiers rangs de M2, au 3ème rang vous faites (2 m ens à l'end, 1 jeté) et vous avez 1 dim compensée par 1 jeté pour conserver le même nombre de mailles. S'il vous reste 1 m, tricotez la en jersey (sans dim ni jeté). Bon tricot!
07.02.2014 - 09:09
![]() Siri wrote:
Siri wrote:
Hei. Jeg driver å stikker denne dåpskjolen, men lurer på hvordan jeg skal strikke bisen, skjønner hvordan den skal gjøres, men skal de to maskene som skal strikkes i rillestrikk også strikkes som bise ved å ta opp maskene eller skal disse kun strikkes som riller? Håper noen forsto hva jeg mente og at dere svarer så fort som mulig. Tusen takk for svar:-)
09.09.2013 - 11:09DROPS Design answered:
Hej Siri. Du skal strikke de to maskene i rillestrikk og ikke som bise. God fornöjelse med denne!
12.09.2013 - 11:32
![]() GhitaAagaard wrote:
GhitaAagaard wrote:
Jeg er ved at strikke buks og er nået til mønster M6 men kan ikke finde den i opskriften, er det evt en skrive fejl eller er det mig som læser det forkert ??? hilsen Ghita
29.05.2013 - 08:47DROPS Design answered:
Hej Ghita. M.6 er de sidste 4 raekker af M.2. Der staar M.2 til höjre og til venstre ser du angivelsen af M.6.
29.05.2013 - 12:27
![]() Julie wrote:
Julie wrote:
Hej. overvejer at få min svigermor til at strikke denne. hvor lang tid vil det typisk tage. ??
27.04.2012 - 20:29
|
|||||||||||||||||||||||||
Angel Kissed#angelkissedchristeninggown |
|||||||||||||||||||||||||
 |
 |
||||||||||||||||||||||||
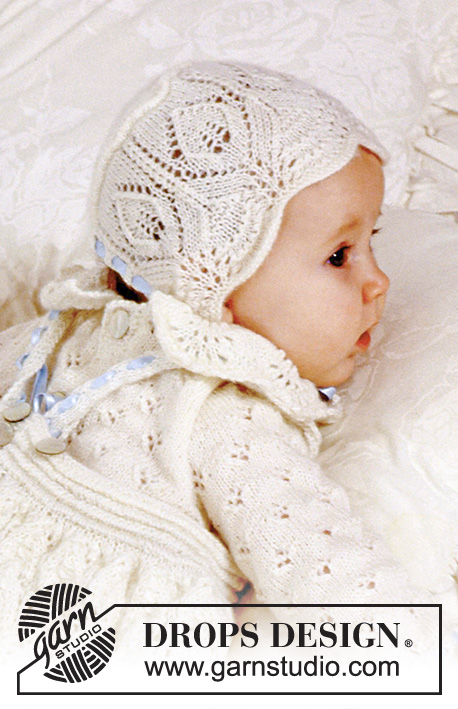
The set comprises: Christening gown, bonnet and trousers.
DROPS Baby 11-15 |
|||||||||||||||||||||||||
|
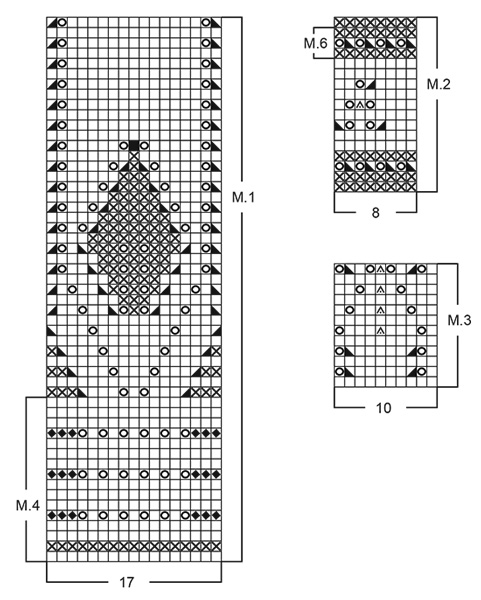
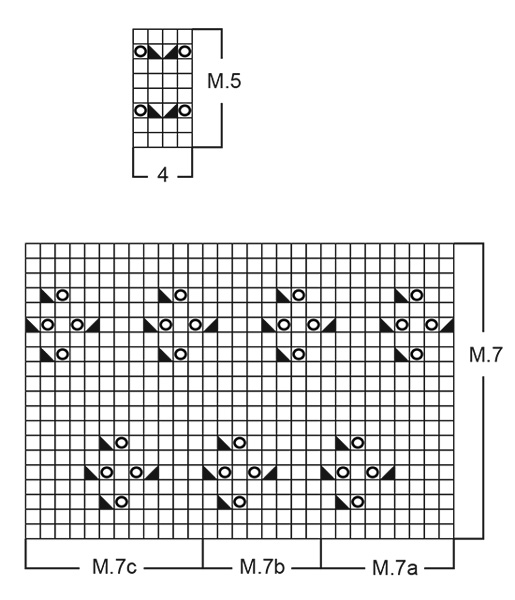
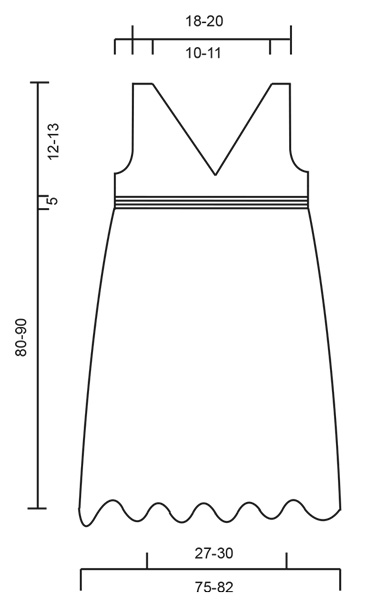
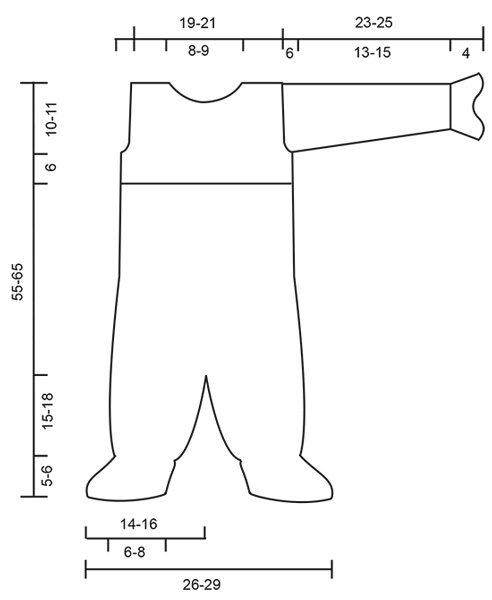
Knitting tension: 25 sts x 34 rows on needles size 2.5 mm in stocking sts = 10 x 10 cm. Note! The pattern will have more rows per 10 cm. Garter sts (back and forth on needle): Knit all rows. Moss sts: 1st row: *K1, P1*, repeat from *-*. 2nd row: K over P, P over K. Repeat 2nd row. Pin tuck: P 1 row from the RS and then 4 rows stocking sts. Knit next row as follows from the WS: *Pick up the upper part of st under the purled row, put loop on right needle, P1, lift the loop over P st to close the loop*, repeat from *-*. Knit 2 rows stocking sts between each pin tuck. Decreasing tips I (apply to the dress yoke): Dec inside 2 edge sts in garter sts from the RS. There are two different dec, one with hole and one without. 1st dec (dec with hole): after 2 edge sts: slip 1 st as if to knit, K2 tog, psso, make a yo. before 2 edge sts: make a yo, K3 tog. 2nd dec (dec without hole): after 2 edge sts: slip 1 st as if to knit, K1, psso. before 2 edge sts: K2 tog. Decreasing tips II (apply to mid front trousers): Dec on each side of 2 K sts as follows: Before 2 sts: slip 1 st as if to knit, K 1, psso. After 2 sts: K2s tog. Leaf Pattern: 1st row: (= WS): *K5, P5*, repeat from *-* and finish with K5. 2nd row: (= RS): P2, *yo, K1, yo, P2, K5, P2*, repeat from *-* until there are 3 sts left. Knit these as follows: yo, K1, yo, P2. 3rd -5th - 8th - 9th - 11th – 13th – 16th – 17th row: K over K and P over P. P all yo’s. 4th row: P2, *K1, yo, K1, yo, K1, P2, sl 1 st as if to knit, K1, psso, K1, K2 tog, P2*, repeat from *-* until there are 5 sts left. Knit these as follows: K1, yo, K1, yo, K1 and P2. 6th row: P2, * K2, yo, K1, yo, K2, P2, slip 1 st as if to knit, K2 tog, psso, P2*, repeat from *-* until there are 7 sts left. Knit these as follows: K2, yo, K1, yo, K2 and P2. 7th row: K2, *P7, K5, *repeat from *-* until there are 9 sts left. Knit these as follows: P7, K2. 10th row: P2, slip 1 st as if to knit, K1, psso, K3, K2 tog, P2, * yo, K1, yo, P2, slip 1 st as if to knit, K1, psso, K3, K2 tog, P2*, repeat from *-*. 12th row: P2, slip 1 st as if to knit, K1, psso, K1, K2 tog, P2, *K1, yo, K1, yo, K1, P2, slip 1 st as if to knit, K1, psso, K1, K2 tog, P2*, repeat from *-*. 14th row: P2, slip 1 st as if to knit, K2 tog, psso, P2, *K2, yo, K1, yo, K2, P2, slip 1 st as if to knit, K2 tog, psso, P2*, repeat from *-*. 15th row: K5, *P7, K5*, repeat from *-*. 18th row: P5, *slip 1 st as if to knit, K1, psso, K3, K2 tog, P5*, repeat from *-*. 19th row: K over K and P over P. At the same time inc in the 5 K sts between each leaf as follows: (inc by picking up st from previous row) K1, inc 1 st, K3, inc 1 st, K1. 20th row: P all sts except the sts in leaves. Knit these as follows: slip 1 st as if to knit, K1, psso, K1, K2 tog. 21st row: P the 3 sts in leaves and knit all other sts. At the same time inc between each leaf as follows: (inc by picking up st from previous row) K1, inc 1 st, K5, inc 1 st. 22nd row: P all sts except the sts in leaves. Knit these as follows: slip 1 st as if to knit, K2 tog, psso. Pattern M.1 – M.7: See diagrams. The diagrams show the pattern from the right side. English Translations for the wording in the diagrams are given at the bottom of this pattern, and they are given in the vertical order in which they appear in the diagram. CHRISTENING GOWN: Dress: Knitted back and forth on circular needle from mid back. Loosely cast on 378-412 sts on circular needle size 2.5 mm. Work M.1 (1st row = RS) but knit 2 edge sts each side in garter sts until finished measurements. After M.1 knit 1 row stocking sts and continue with 2 pin tucks – see explanation above. Now work the 4 first rows of M.2 whilst dec 11-13 sts evenly on row (knit sts not fitting into row of holes in stocking sts). 367-399 sts. Work the next 9 rows of M.2 as follows: 2 edge sts in garter sts, *1 repeat with holes, 3 repeats without holes (= 24 sts in stocking sts)*, repeat from *-* until there are 13 sts left. Knit these as follows: 1 repeat with holes, 3 sts in stocking sts and 2 edge sts in garter sts (in the section with 24 sts without holes you may add the names of the children christened in the gown). Now knit the last 4 rows of M.2 over all sts (knit sts not fitting into row of holes in stocking sts). Continue in leaf pattern – see explanation above - at the same time dec 18-20 sts on the first row = 349-379 sts. After the leaf pattern knit M2 with 2 edge sts each side in garter sts, at the same time dec 6-4 sts evenly = 343-375 sts. Knit 1 row in stocking sts, at the same time dec 18-20 sts evenly = 325-355 sts. Now knit 2 pin tucks and 1 row in stocking sts, at the same time dec 21-31 sts evenly = 304-324 sts. Continue in M.3 until piece measures approx 63-72 cm – adjust after a full repeat. Knit next row as follows from WS: 2 edge sts in garter sts, *P2 tog*, repeat from *-* over all sts and finish with 2 edge sts in garter sts = 154-164 sts. Knit 2 rows in stocking sts (1st row = RS), at the same time dec 18-14 sts evenly on last row = 136-150 sts. Now knit 4 pin tucks and 1 row in stocking sts. Knit next row as follows from WS: K 38-42, P 60-66, K 38-42. Cast off 36-40 sts each side on next row. Piece now measures approx 68-77 cm. Front piece: = 64-70 sts. Read all of the following section before knitting it! Knit stocking sts with M.5 over the four middle sts. At the same time dec for armhole each side on every other row a total of 10 times – see Dec tips above. Alternate between 1st and 2nd dec. After all dec are complete continue knitting holes on every 4th row (from RS) along the armhole as follows: After 2 sts in garter sts: slip 1 st as if to knit, K1, psso, yo. Before 2 sts in garter sts: yo, K2 tog. Neckline: At the same time when piece measures approx 4 cm from where the front piece starts (adjust to after 3 or 4 holes in M.5) cast off the middle 2 sts for neck – cast off from the RS in P sts. Put sts on left side (when worn) on a thread. Right side: Dec 1 st towards neckline on every other row a total of 11-13 times – see Dec tips above. Alternate between 1st and 2nd dec. After all dec for armhole and neckline are complete = 10-11 sts left on shoulder (= 2 sts in garter sts, 6-7 sts in stocking sts, 2 sts in garter sts). Continue over these 11 sts (= strap) and continue knitting holes on every 4th row (from RS) as described for armhole. Cast off when piece measures approx 28-32 cm from where the front piece starts. Left side: Put sts from thread back on needle and knit as right side. Assembly: Buttonhole loops: Crochet along the pin tucks on the right back piece as follows (start at the top and crochet towards bottom edge of dress): 9 dc. Then crochet next row as follows: *1 sl st, 5 ch, skip 1 dc, 1 sl st in next st*, repeat from *-* until you have 3 loops. Sew on 3 buttons along the pin tucks on the left side. Mark the strap where it will have a suitable length for the child and crochet a loop from the right side on each strap by the mark. 1 loop = 1 sl st, 5 ch and 1 sl st in the same st (the remainder of the strap will hang inside the gown). Sew on a button at the upper edge 3-4 cm in from each side mid back. Silk ribbon: Cut 3 ribbons measuring 170 cm each in each of the upper 3 rows of holes from M.2 (i.e. 2 over and 1 under the leaf pattern). Attach the ends inside the gown. Cut 1 ribbon measuring 50 cm and pull it through the row of holes on each side of the neckline and the straps. TROUSERS Knit each leg separately, put them together, knit the body and finish with the sleeves. Left leg: Cast on 32-40 sts on double pointed needles size 2.5 mm. Knit 5-6 cm moss sts. Knit 1 round in stocking sts, at the same time inc 8 sts evenly = 40-48 sts. Knit next round as follows: *K2 tog, yo*, repeat from *-*. Knit 1 round in stocking sts, at the same time inc 8 sts evenly = 48-56 sts. Now knit M.2 and continue in stocking sts. At the same time on the first round of stocking sts inc 12 sts evenly = 60-68 sts. Insert a marking thread at beg of round = inside of leg. At the same time when piece measures 11-12 cm inc 1 st on each side of MT on every 4th round a total of 6 times = 72-80 sts. When piece measures 18-21 cm split the piece by the MT and knit back and forth on needles (to make it easier to put both legs on the same circular needle to knit the body). Inc 1 st each side for seam = 74-82 sts. When piece measures 20-23 cm cast off 5 sts each side = 64-72 sts. Put the piece aside and knit right leg the same way. Back and front piece: Put right and left leg on the same circular needle = 128-144 sts. Insert a marking thread in the transition between the legs mid front and mid back. Knit 3 rounds in stocking sts. Continue in stocking sts and now inc 1 st on each side of the 2 middle sts mid back on every other round a total of 8 times, and dec 1 st on each side of the middle 2 sts mid front on every other row a total of 8 times – see Dec tips above = 128-144 sts. When piece measures 30-40 cm cast off 8 sts mid back (= opening) and continue back and forth on needles = 120-136 sts. When piece measures 39-48 cm knit M.6 (1st row = WS and knit 1 edge st each side in garter sts). At the same time on the last row of M.6 knit tog the 2 middle sts = 119-135 sts. Knit next row as follows: 1 edge st, M.7A (= 9 sts), M.7B over 96-112 sts, M.7C (= 12 sts) and 1 edge st. At the same time when piece measures 45-54 cm knit next row as follows from the RS: K 25-29 sts (= left back piece), cast off 6 sts for armhole, 57-65 sts (= front piece), cast off 6 sts for armhole, 25-29 sts (= right back piece). Knit each piece separately. Right back piece: = 25-29 sts. Knit M.7, at the same time dec for armhole at the side on every other row: 2 sts 1-1 time and 1 st 3-4 times = 20-23 sts. NB! Knit stocking sts over sts not fitting into pattern towards armhole. When piece measures 53-63 cm cast off the middle 5-6 sts mid back for neck and dec 1 st on neckline on every other row 2 times = 13-15 sts left on shoulder. Cast off when piece measures 55-65 cm. Left back piece: Knit as right back piece. Front piece: = 57-65 sts. Knit M.7, at the same time dec for armhole as described for back piece = 47-53 sts. When piece measures 51-60 cm cast off the middle 11-13 sts for neck and dec towards the neckline on every other row: 2 sts 1 time and 1 st 3 times = 13-15 sts left on each shoulder. Cast off when piece measures approx 55-65 cm – adjust to back piece. Sleeve: Loosely cast on 68-68 sts on double pointed needles size 2.5 mm. Knit M.4 and dec 28-20 sts evenly on the last round = 40-48 sts. Knit M.2 and then finish the sleeve in M.7. At the same time when the piece measures 8 cm inc 2 sts mid under arm on every 6-9 round a total of 5-4 times = 50-56 sts – knit the inc sts in stocking sts. When piece measures 17-19 cm cast off 6 sts mid under arm and finish the piece back and forth on needle. Dec for sleeve cap on every other row: 2 sts 2-3 times, 1 st 5-3 times and then 2 sts each side until piece measures 23-25 cm. Cast off. Knit another sleeve. Assembly: Sew the shoulder seams. Left edge: Pick up approx 60-65 sts along left back piece on needle size 2.5 mm. Knit back and forth as follows: K 1 row from WS, knit 2.5 cm in moss sts, cast off. Right edge: Pick up and knit as left edge, but make 5 buttonholes evenly distributed after 1 cm. 1 buttonhole = cast off 2 sts and cast on 2 new sts on next row. Place right edge over left edge and sew at the bottom of the slit. Lace collar: Pick up approx 55 to 65 sts from the WS round the neckline on needle size 2.5 mm (do not pick up over the edges on back piece). Knit 4 rows garter sts and 1 row in stocking sts, inc evenly to 123 sts on the stocking sts row. Now knit M.4 – start on the 3rd row in diagram – with 2 edge sts each side in garter sts. After M.4 cast off loosely. Crochet round the collar with hook size 2.5 mm as follows: 1 sl st in first st, *4 ch, skip 2 sts, 1 sl st in next st*, repeat from *-*. Sew in sleeves. Sew tog between legs and under foot. Sew on buttons. Cut 2 silk ribbons measuring 20 cm each and pull through row of holes at sleeves. Cut 2 silk ribbons measuring 60 cm each and pull through the lower row of holes on each leg. BONNET: To fit head circumference: approx 40/42 – 44/46 cm Cast on 87-104 sts (incl 1 edge st each side, knitted in garter sts throughout) on pointed needles size 2.5 mm. Knit M.1 until piece measures 10-12 cm. Now knit a pin tuck – see explanation above – at the same for size 6/9 months dec 1 st on first row in pin tuck = 87 -103 sts. Now cast off 28-36 sts each side = 31 sts left (= middle piece on back). Measure piece from this point onwards! Continue as follows: 1 edge st, M.7A (= 9 sts), M.7B (= 8 sts), M.7C (=12 sts) and 1 edge st. Cast off when the middle piece measures 11-14 cm. Sew to side pieces. Pick up approx 86 to 98 sts (divisible by 4+2 to get an even number of holes for the silk ribbon) along the front edge on needle size 2.5 mm and knit M.6 with 1 edge st each side. Cast off in P sts (seen from the RS). Cut a silk ribbon measuring approx 80 cm and pull through row of holes. |
|||||||||||||||||||||||||
Diagram explanations |
|||||||||||||||||||||||||
|
|||||||||||||||||||||||||
 |
|||||||||||||||||||||||||
 |
|||||||||||||||||||||||||
 |
|||||||||||||||||||||||||
 |
|||||||||||||||||||||||||
Have you finished this pattern?Tag your pictures with #dropspattern #angelkissedchristeninggown or submit them to the #dropsfan gallery. Do you need help with this pattern?You'll find 34 tutorial videos, a Comments/Questions area and more by visiting the pattern on garnstudio.com. © 1982-2026 DROPS Design A/S. We reserve all rights. This document, including all its sub-sections, has copyrights. Read more about what you can do with our patterns at the bottom of each pattern on our site. |
|||||||||||||||||||||||||


With over 40 years in knitting and crochet design, DROPS Design offers one of the most extensive collections of free patterns on the internet - translated to 17 languages. As of today we count 324 catalogues and 12245 patterns translated into English (UK/cm). 12245
We work hard to bring you the best knitting and crochet have to offer, inspiration and advice as well as great quality yarns at incredible prices! Would you like to use our patterns for other than personal use? You can read what you are allowed to do in the Copyright text at the bottom of all our patterns. Happy crafting!
Post a comment to pattern DROPS Baby 11-15
We would love to hear what you have to say about this pattern!
If you want to leave a question, please make sure you select the correct category in the form below, to speed up the answering process. Required fields are marked *.