
Popular categories
Looking for a yarn?


Comments / Questions (45)
![]() Anne wrote:
Anne wrote:
Står enten dårlig forklart eller feil i mønster. Mønsterstikk er greit å forstå men så står det videre....strikk glattstrikk...enten må det tilføyes at "strikk glattstrikk med vrangen ut" eller så må det stå "rett-strikk" eller rillestrikk. Utifra bildet er verken øvre del av arm eller bærestykket strikket i glatt strikk Mvh Anne
27.03.2010 - 04:03
![]() Rachel wrote:
Rachel wrote:
Is it possible to knit this pattern in one piece to make a pull-over ? If it is OK, could you explain me what I have to adjust in your explainations ? Best regards, Rachel
22.12.2008 - 07:55
![]() DROPS / Lena wrote:
DROPS / Lena wrote:
Work M.1 for 4 rows. Then work M.2 until approx 34-35-36-37-38 cm. Then it says to knit one row from RS, knit one row from WS and then continue in stocking sts.
28.11.2007 - 19:45
![]() Andie wrote:
Andie wrote:
I'm having difficulty with the part of the pattern that instructs you to work until "pattern 1" and "pattern 2" is complete. I cannot figure out how to determine you have completed the chart. Is it a measurement I'm not seeing somewhere? Thanks!
28.11.2007 - 17:23
![]() Sally Shea wrote:
Sally Shea wrote:
Re' the "pattern" in the directions, a "chart" is referred to and I'm not finding the "chart". Please advise. Thanks!
16.09.2006 - 00:14
|
||||||||||
DROPS 88-4 |
||||||||||
|
|
||||||||||
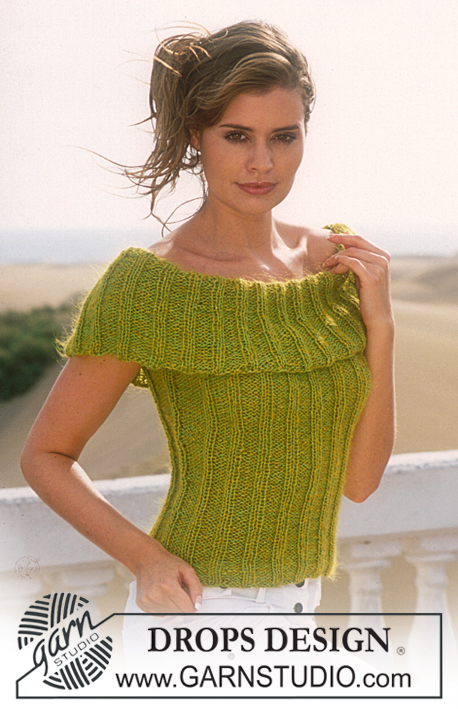
DROPS Cardigan in Alpaca with glitter
DROPS 88-4 |
||||||||||
|
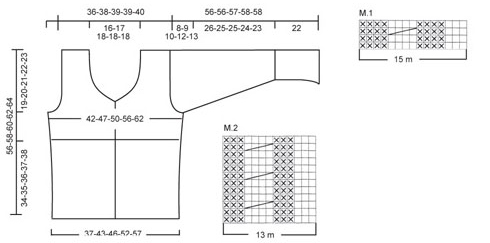
Knitting Tension: 3.5mm needle: 23 sts x 30 rows = 10 x 10 cm. 4.5mm needle: 20 sts x 26 rows = 10 x 10 cm Front band: knitted in garter stitch. Buttonholes: Make buttonholes on right front band from the right side as follows: K 1, K2 tog, yon. On next row knit yon. Make buttonholes as follows: XS/S: 10, 20, 30 and 40 cm S/M: 11, 21, 31 and 41 cm M/L: 10, 18, 26, 34 and 42 cm XL: 10, 19, 27, 35 and 43 cm XXL: 10, 18, 27, 36 and 45 cm Neckline: *knit until there’s 1 st left on needle, turn, put this st on thread*, repeat from *-* until finished measurements. Pattern: See chart M.1 and M.2. The pattern is seen from the right side and the entire pattern is knitted in stocking stitch. English translations for the wording in the diagram are given at the bottom of this pattern, and they are given in the vertical order in which they appear in the diagram. Body: The jumper is knitted back and forth on circular needles. Cast on 223-253-268-313-343 sts (incl 5 front band sts either side)on 3.5 needle and 1 thread Alpaca and 1 thread glitter. Purl one row and continue as follows: 5 front band sts in garter, M.1 over the next 210-240-255-300-330 sts, 3 sts in stocking stitch, 5 front band sts in garter. After 1 report of M.1 (4 rows), decrease the 4 purled sts to 3 = 195-221-234-273-299 sts. Continue as follows: 5 front band sts in garter, M.2 over the next 182-208-221-260-286 sts, 3 sts in stocking stitch, 5 front band sts in garter. Remember buttonholes! Read all of the next section before knitting it: Yoke: When piece measures approx 34-35-36-37-38 cm (adjust so that you’ve knitted one row after a cable) put the 5 front band sts either side on thread = 185-211-224-263-289 sts. Knit 1 row from the right side and 1 from wrong side (garter), change to needle 4.5mm and stocking sts and at the same time, decrease 17-23-24-39-41 sts evenly on row = 168-188-200-224-248 sts. Insert a marking thread 42-47-50-56-62 sts from each side = 84-94-100-112-124 sts between marking threads = back piece. Armhole: At the same time, when piece measures 37-38-39-40-41 cm, decrease 6-6-6-8-10 sts each side for armhole (i.e. 3-3-3-4-5 sts either side of the marking threads) = 78-88-94-104-114 sts on back piece and 39-44-47-52-57 sts on each front piece. Finish each piece separately. Back piece: = 78-88-94-104-114 sts. Decrease for armhole each side on every other row as follows: 2 sts 0-1-2-3-4 times and 1 st 3-4-4-7-9 times = 72-76-78-78-80 sts. When piece measures 54-56-58-60-62 cm, cast off middle 28-30-32-32-32 sts for neckline and finish each shoulder separately. Decrease 1 st on every other row twice = 20-21-21-21-22 sts left on shoulder. Cast off when piece measures 56-58-60-62-64 cm. Right Front: = 39-44-47-52-57 cm. Decrease for armhole as on back piece. At the same time, when piece measures 41-42-43-44-46 cm, put the 5-6-7-7-7 sts towards mid front on thread for neckline. Decrease to shape the neckline on every other row as follows: 2 st 2 times, 1 st 4 times; thereafter on every 4th row: 1 st 3 times. After all decreases for armhole and neck, there are 20-21-21-21-22 sts left on shoulder. Cast off when piece measures 56-58-60-62-64 cm. Left Front: as right, but mirrored. Sleeves: Back and forth on circular needle. Cast on 77-77-77-92-92 sts loosely on needle 3.5mm and 1 thread Alpaca and 1 thread Glitter. Purl one row and continue in M.1 with 1 edge st each side. After 1 report of M.1 (4 rows), decrease the 4 purled sts to 3 = 67-67-67-80-80 sts. Continue in M.2 with one edge st each side. When sleeve measures approx 20 cm (adjust so that you’ve knitted one row after a cable), knit one row from the right side and one from the wrong side (garter), change to needle 4.5mm and stocking sts whilst decreasing 13-9-7-18-16 sts evenly on row = 54-58-60-62-64 sts. At the same time, when sleeve measures 22 cm, increase 1 st each side every 4-3-2.5-2-1.5 cm a total of 7-8-9-11-13 times = 68-74-78-84-90 sts. When sleeve measures 48-47-47-46-45 cm, decrease for armhole each side on every other row as follows: 4 sts 1 time, 3 sts 1 time, 2 sts 2 times and 1 st 2-4-4-7-8 times. Thereafter decrease 2 sts each side until sleeve measures 55-55-56-57-57 cm. On next row decrease 3 sts each side and cast off remaining sts when sleeve measures approx 56-56-57-58-58 cm. To make up: Join shoulders. Front band: Put the 5 front band sts from one piece on needle 3.5mm. Knit approx 7-7-7-7-8 cm (to fit front piece up to neck line), put sts on thread and repeat on other front piece- remember button holes on right front piece. Sew on front bands to front pieces. Neck line: From the right side, pick up approx 116-128 sts (incl sts on thread at front)round neck line using 1 thread Alpaca and 1 thread Glitter and needle 3.5mm. Knit reverse stocking stitch, putting last st on thread on every row (see Neckline). At the same time, when neckline measures 2 cm, increase 1 st in every 4th st = approx 137-152 sts. When neckline measures 4 cm, put sts on thread back on needle and knit 1 row before casting off all sts. To ensure that the neckline doesn't become too tight, make a "yarn over needle" after every 8 sts whilst casting off – the yarn over needle is cast off like a st. Set in sleeves and join sleeve seams. Sew on buttons. Rosette: Use a remnant of Alpaca and Glitter (pictured: Alpaca colour no 3720, Glitter no 07) and crochet with 1 thread of each quality and crochet hook size 3.5. Crochet 4 ch and form a ring with a sl st. 1st round: 6 dc in ring and finish with a sl st in first dc 2nd round: 1 dc in first dc, *3 ch, 1 dc in next dc*, repeat from *-* a total of 5 times and finish with a sl st in first dc from beg of round = 6 ch-loops 3rd round: 1 ch, *1 dc, 1 ch, 1 tr, 1 ch, 1 dc* in each ch-loop and finish with a sl st in first ch from beg of round 4th round: *1 dc round dc from 2nd round (i.e. crochet round dc from behind the leaf), 5 ch*, repeat from *-* a total of 6 times and finish with a sl st in first dc from beg of round 5th round: 1 ch, *1 dc, 1 ch, 5 tr, 1 ch, 1 dc* in each ch-loop and finish with a sl st in first ch from beg of round 6th round: *1 dc round dc from 2nd round (as in round 4), 7 ch*, repeat from *-* a total of 6 times and finish with a sl st in first ch from beg of round 7th round: *1 dc, 1 ch, 1 tr, 5 dtr, 1 tr, 1 ch, 1 dc* in each ch-loop and finish with a sl st in first ch from beg of round 8th round: *1 dc round dc from 2nd round (as in round 4), 8 ch*, repeat from *-* a total of 6 times and finish with a sl st in first dc from beg of round 9th round: 1 ch, *1 dc, 1 ch, 1 tr, 3 dtr, 1 ttr, 3 dtr, 1 tr, 1 ch, 1 dc* in each ch-loop and finish with a sl st in first ch from beg of round. Cut the thread and attach rosette to cardigan. |
||||||||||
Diagram explanations |
||||||||||
|
||||||||||
 |
||||||||||
Have you finished this pattern?Tag your pictures with #dropspattern or submit them to the #dropsfan gallery. Do you need help with this pattern?You'll find 32 tutorial videos, a Comments/Questions area and more by visiting the pattern on garnstudio.com. © 1982-2026 DROPS Design A/S. We reserve all rights. This document, including all its sub-sections, has copyrights. Read more about what you can do with our patterns at the bottom of each pattern on our site. |
||||||||||


With over 40 years in knitting and crochet design, DROPS Design offers one of the most extensive collections of free patterns on the internet - translated to 17 languages. As of today we count 324 catalogues and 12245 patterns translated into English (UK/cm). 12245
We work hard to bring you the best knitting and crochet have to offer, inspiration and advice as well as great quality yarns at incredible prices! Would you like to use our patterns for other than personal use? You can read what you are allowed to do in the Copyright text at the bottom of all our patterns. Happy crafting!
Post a comment to pattern DROPS 88-4
We would love to hear what you have to say about this pattern!
If you want to leave a question, please make sure you select the correct category in the form below, to speed up the answering process. Required fields are marked *.