
Popular categories
Looking for a yarn?


Comments / Questions (97)
![]() Anita wrote:
Anita wrote:
Hvorfor skal man øke før vrangbord nede på bol?
18.12.2023 - 23:51DROPS Design answered:
Hei Anita, Vi anbefaler at det økes masker før vrangborden, slik at den ikke blir for stramm. Du kan la være å øke hvis du ønsker en strammere vrangbord. God fornøyelse!
19.12.2023 - 06:46
![]() Saskia Havinga wrote:
Saskia Havinga wrote:
Hallo, Ik heb voor dit vest ( Foggy Autumn Cardigan) 5 verschillende breinaalden aangeschaft, maar behalve voor de boord en dommige andere onderdelen wordt niet verteld met welke naalddikte ik moet beginnen. IK gebruik de aanbevolen wol Drops air mix. Ik snap dat e.e.a afhankelijk is van je proeflapje, maar wil toch graag de volgorde van naalddikte gebruik weten. Ik hoor graag van u. Met vriendelijke groet, Saskia
06.12.2023 - 17:08DROPS Design answered:
Dag Saskia,
Voor elk onderdeel staat bij de betreffende paragraaf aangegeven welke naald(en) je gebruikt. Je start met de dubbele hals met 2 rondbreinaalden maten 4 en 5,5 samen gehouden. Zie pargagraaf 'DUBBELE HALS'. In die paragraaf staat ook met welke naalden je verder breit. Als er niets staat brei je verder met de naald(en) waar je mee bezig was. Voor de mouw gebruik je de naalden zonder knop.
06.12.2023 - 19:47
![]() Dagny Kristin Thomassen wrote:
Dagny Kristin Thomassen wrote:
Hei. Går det an å strikke denne rundt etter fra halskant og ned ? Jeg får så mye strekk i arbeidet med å strikke frem og tilbake
23.11.2023 - 12:06DROPS Design answered:
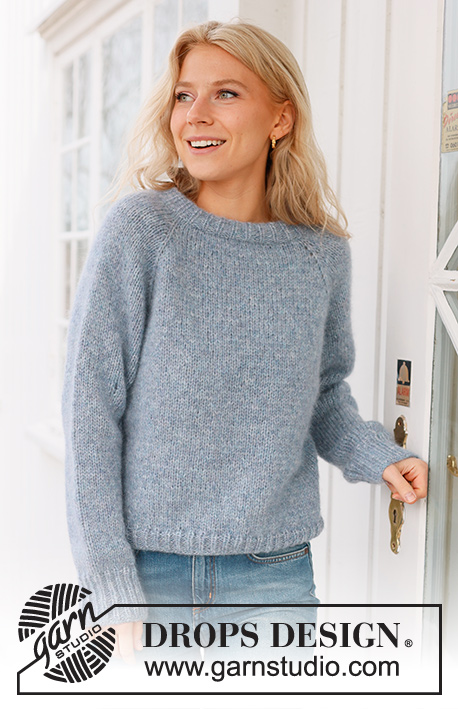
Hej Dagny, hvis du vil strikke den rundt og få en genser istedet for en jakke, så kan du strikke efter DROPS 236-34 :)
24.11.2023 - 14:46
![]() Judith Nowlan wrote:
Judith Nowlan wrote:
I would like to know what size needles are used to thework the gauge swatch for the Foggy Autumn cardigan. Thank you
26.10.2023 - 14:32DROPS Design answered:
Dear Mrs Nowlan, the larger size are used for tension (needle size 5,5 mm) in stocking stitch. Happy knitting!
27.10.2023 - 08:15
![]() Marithe Roman wrote:
Marithe Roman wrote:
Bien reçu - Merci... a bientôt -
07.09.2023 - 06:07
![]() Marithe wrote:
Marithe wrote:
Comment tricoter ce modèle avec des aiguilles droites en aller retour merci!
05.09.2023 - 18:37DROPS Design answered:
Bonjour Marithe, comme le col, l'empiècement et le bas du gilet se tricotent en allers et retours sur aiguille circulaire, vous pouvez simplement utiliser des aiguilles droites, vos mailles seront juste plus serrées, pensez à bien conserver la bonne tension. Pour les manches, cette leçon pourra vous aider. Bon tricot!
06.09.2023 - 08:56
![]() Aniek De Vos wrote:
Aniek De Vos wrote:
Het zou fijn zijn als direct duidelijk was in de beschrijving bovenin (bij de steekwoorden), of er sprake is van verkorte toeren aan het achterpand. Het is zo lastig zoeken namelijk en een patroon zonder deze verkorte toeren is mijns inziens zonde van werk en geld want niet bruikbaar. Fijn dat er inmiddels meerdere patronen zijn met verkorte toeren!
01.09.2023 - 10:26
![]() Diderica wrote:
Diderica wrote:
Ik ben nu toe aan de bies. Moet ik deze tot en met de halsboord doorbreien of blijft het boordje een beetje los?
03.08.2023 - 20:38DROPS Design answered:
Dag Diderica,
De bies brei je inderdaad tot en met de halsboord. Dit is ook te zien op de laatste foto.
03.08.2023 - 21:11
![]() Murielle Osborn wrote:
Murielle Osborn wrote:
Hello, I'm working the transition Neck/yoke. After increases, I have the 110 required stitches but the next step confuses me. I'm supposed to place 4 markers to divide the different pieces but 19+14+40+14+19 stitches add up to 106 not 110 stiches. Am I missing a step? Thank you for your reply.
29.07.2023 - 17:20DROPS Design answered:
Hi Murielle, The markers are inserted into the stitches rather than between stitches. So you count 19 stitches and insert the first marker into the 20th stitch, then count 14 more stitches and insert the second marker into the 35th stitch, etc. This gives you your missing 4 stitches. Happy knitting!
31.07.2023 - 06:43
![]() Jeannette K wrote:
Jeannette K wrote:
Bonjour, j’aimerais réaliser ce modèle qui me plaît beaucoup, mais j’ai une laine qui se tricoté avec des aiguilles n°4. Y a t il un moyen pour recalculer les explications ? Merci !
25.07.2023 - 16:48DROPS Design answered:
Bonjour Jeanette, nous ne sommes malheureusement pas en mesure de pouvoir ajuster chacun de nos modèles à chaque demande individuelle. Pour toute assistance complémentaire, vous pouvez vous adresser à votre magasin DROPS qui saura vous conseiller et vous renseigner. Autre solution est de tricoter avec 2 fils - l'un que vous avez deja et l'autre, par exemple DROPS Kid-Silk. De cette facon votre tension/echantillon peut correspondre mieux à celle indiquée dans les explications. Bon tricot!
25.07.2023 - 16:57
|
|
Foggy Autumn Cardigan#foggyautumncardigan |
|
 |
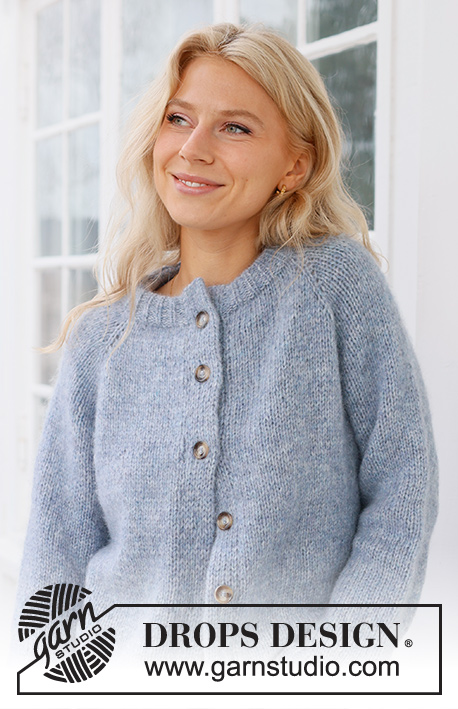 |
Knitted jacket in DROPS Air. The piece is worked top down, with raglan and double bands. Sizes S - XXXL.
DROPS 236-33 |
|
|
------------------------------------------------------- EXPLANATIONS FOR THE PATTERN: ------------------------------------------------------- RIDGE/GARTER STITCH (worked back and forth): Knit all rows. 1 ridge = knit 2 rows. RAGLAN: All increases are worked from the right side! Increase to raglan on each side of each marker-stitch as follows: Work to the marker-stitch, 1 yarn over, knit the marker-stitch, 1 yarn over (= 8 stitches increased). On the next row (wrong side) work the yarn overs as follows: BEFORE marker-stitch: Purl the yarn over twisted. AFTER marker-stitch: Slip the yarn over onto the right needle as if to knit, place it back onto the left needle the other way round (twisted), purl the yarn over. DECREASE TIP (sleeves): Decrease 1 stitch on either side of the marker as follows: Work until there are 3 stitches left before the marker, knit 2 together, knit 2 (marker sits between these 2 stitches), slip 1 stitch as if to knit, knit 1 and pass the slipped stitch over the knitted stitch (2 stitches decreased). BUTTONHOLES: The buttonholes are worked on the right band: Work the first 6 stitches, turn and work the same stitches back, turn and work these 6 stitches again. Cut the strand. Work 4 rows over the remaining 6 band stitches (first row from the right side) and knit together the last stitch from the right side and the stitch on the edge of the jacket. On the last row from the right side work all the band stitches as before. Work the buttonholes when the band measures: S: 4, 13, 22, 31, 40 and 48 cm. M: 4, 14, 23, 33, 41 and 50 cm. L: 4, 14, 24, 34, 43 and 52 cm. XL: 6, 16, 26, 36, 45 and 54 cm. XXL: 4, 13, 22, 31, 40, 48 and 56 cm. XXXL: 5, 14, 23, 32, 41, 50 and 58 cm. ------------------------------------------------------- START THE PIECE HERE: ------------------------------------------------------- JACKET – SHORT OVERVIEW OF THE PIECE. The neck and yoke are worked back and forth with circular needle, top down. The yoke is divided for body and sleeves and the body continued back and forth with circular needle. The sleeves are worked in the round with double pointed needles. DOUBLE NECK: Cast on 79-82-88-91-94-97 stitches with DROPS Air using 2 circular needles, sizes 4 and 5.5 mm, held together. Pull out the needle size 5.5 mm and work with circular needle size 4 mm (doing this gives you an elastic cast-on edge). Purl 1 row from the wrong side. Work rib from the right side as follows: 1 edge stitch in GARTER STITCH – read description above, * purl 2, knit 1 *, work from *-* until there are 3 stitches left, purl 2, 1 edge stitch in garter stitch. When the rib measures 9 cm, fold the neck double to the inside. On the next row, knit from right side, at the same time work every 2nd stitch together with every 2nd stitch from the cast-on edge. Change to circular needle size 5.5 mm. Insert 1 marker inside the 1 edge stitch; the yoke is measured from this marker! YOKE: Purl 1 row from the wrong side and increase 13-14-16-9-10-13 stitches evenly spaced = 92-96-104-100-104-110 stitches. Insert 4 markers (without working the stitches) as follows: Count 15-16-18-17-18-19 stitches (front piece), insert 1 marker in the next stitch, count 14 stitches (sleeve), insert 1 marker in the next stitch, count 30-32-36-34-36-40 stitches (back piece), insert 1 marker in the next stitch, count 14 stitches (sleeve), insert 1 marker in the next stitch, there are 15-16-18-17-18-19 stitches after the last marker-stitch (front piece). Continue with stocking stitch and 1 edge stitch in garter stitch on each side. On the next row from the right side increase 1 stitch on each side of each marker-stitch – read RAGLAN above. Increase like this, each row from the right side, a total of 17-19-20-24-26-27 times = 228-248-264-292-312-326 stitches. REMEMBER THE KNITTING TENSION! Continue with stocking stitch and 1 edge stitch in garter stitch on each side until the yoke measures 20-22-24-25-27-29 cm. Now divide for the body and sleeves as follows: Work 34-37-39-43-47-49 stitches, place the next 46-50-54-60-62-64 stitches on a thread for the sleeve, cast on 8-8-10-10-12-12 stitches under the sleeve, work 68-74-78-86-94-99 stitches, place the next 46-50-54-60-62-64 stitches on a thread for the sleeve, cast on 8-8-10-10-12-12 stitches under the sleeve, work the last 34-37-39-43-47-50 stitches. BODY: = 152-164-176-192-212-222 stitches. Continue with stocking stitch and 1 edge stitch in garter stitch on each side for a further 24-24-24-25-25-25 cm. Now increase 14-14-17-19-20-22 stitches evenly on the next row from the right side = 166-178-193-211-232-244 stitches. Change to circular needle size 4 mm. Work rib from the wrong side as follows: 1 edge stitch in garter stitch, * knit 2, purl 1 *, work from *-* until there are 3 stitches left, knit 2 and 1 edge stitch in garter stitch. Continue this rib for 4 cm. Cast off. The jacket measures approx. 52-54-56-58-60-62 cm, from the shoulder down. SLEEVES: Place the 46-50-54-60-62-64 stitches from the thread on the one side of the piece on double pointed needles size 5.5 mm and knit up 1 stitch in each of the 8-8-10-10-12-12 stitches cast on under the sleeve = 54-58-64-70-74-76 stitches. Insert a marker in the middle of the new stitches under the sleeve. Work stocking stitch in the round for 2 cm. Now decrease 2 stitches under the sleeve – read DECREASE TIP. Decrease like this every 4½-4-3-2-2-1½ cm a total of 7-8-10-13-14-14 times = 40-42-44-44-46-48 stitches. When the sleeve measures 34-33-31-31-29-28 cm from the division, increase 5-6-7-7-5-6 stitches evenly spaced = 45-48-51-51-51-54 stitches. Change to double pointed needles size 4 mm and work rib (purl 2, knit 1) for 8 cm. Cast off. The sleeve measures approx. 42-41-39-39-37-36 cm from the division. Work the other sleeve in the same way. RIGHT BAND: The band is worked bottom up. Wind out a 90 to 120 cm yarn-end and use it to knit up stitches along the front piece (this means you can continue working without cutting the strand afterwards): Start at the bottom and knit up 1 stitch in each row, inside the 1 edge stitch, with circular needle size 5 mm and DROPS Air. Work from the end of the needle, where the wool-ball is = bottom of the front piece. Cast on 12 stitches from the wrong side, extending the band outwards. Work back and forth over these 12 stitches and work the band together with the front piece as follows: ROW 1 (right side): Slip the first stitch onto the right needle as if to purl, keeping the strand at the front, * knit 1, slip 1 stitch onto the right needle as if to purl, keeping the strand in front *, work from *-* until there is 1 stitch left on the band, slip the last stitch onto the right needle as if to knit, keeping the strand at the back, knit the next stitch and pass the slipped stitch over the knitted stitch, turn. ROW 2 (wrong side): * Slip the first/next stitch onto the right needle as if to purl, keeping the strand in front, knit 1 *, work from *-* over all 12 band-stitches, turn. Repeat rows 1 and 2. Remember the BUTTONHOLES – read description above. When all the stitches on the front piece are worked together with the band, knit all stitches together 2 and 2, then cast off. LEFT BAND: The band is worked bottom up. Start at the top and knit up 1 stitch down the front piece in each row, working inside the 1 edge stitch, with circular needle size 5 mm and DROPS Air. Cast on 12 stitches at the bottom, extending the band outwards. Work back and forth over these 12 stitches and work the band together with the front piece as follows: ROW 1 (wrong side): Knit 1, * slip 1 stitch onto the right needle as if to purl, keeping the strand in front, knit 1 *, work from *-* until there is 1 stitch left on the band, slip the next 2 stitches onto the right needle as if to purl together, keeping the strand in front, turn. ROW 2 (right side): Knit 2 together, * slip 1 stitch onto the right needle as if to purl, keeping the strand in front, knit 1 *, work from *-* until there is 1 stitch left, slip the last stitch onto the right needle as if to purl, keeping the strand in front, turn. Repeat rows 1 and 2. When all the stitches on the front piece are worked together with the band, work together as follows from the right side: Slip 1 stitch onto the right needle as if to knit, knit 1, pass the slipped stitch over, cast off. ASSEMBLY: Sew the buttons onto the left band. |
|

|
|
Have you finished this pattern?Tag your pictures with #dropspattern #foggyautumncardigan or submit them to the #dropsfan gallery. Do you need help with this pattern?You'll find 35 tutorial videos, a Comments/Questions area and more by visiting the pattern on garnstudio.com. © 1982-2025 DROPS Design A/S. We reserve all rights. This document, including all its sub-sections, has copyrights. Read more about what you can do with our patterns at the bottom of each pattern on our site. |
|


With over 40 years in knitting and crochet design, DROPS Design offers one of the most extensive collections of free patterns on the internet - translated to 17 languages. As of today we count 314 catalogues and 11821 patterns translated into English (UK/cm). 11821
We work hard to bring you the best knitting and crochet have to offer, inspiration and advice as well as great quality yarns at incredible prices! Would you like to use our patterns for other than personal use? You can read what you are allowed to do in the Copyright text at the bottom of all our patterns. Happy crafting!
Post a comment to pattern DROPS 236-33
We would love to hear what you have to say about this pattern!
If you want to leave a question, please make sure you select the correct category in the form below, to speed up the answering process. Required fields are marked *.