
Looking for a yarn?


Comments / Questions (59)
![]() Sylvie Nortier wrote:
Sylvie Nortier wrote:
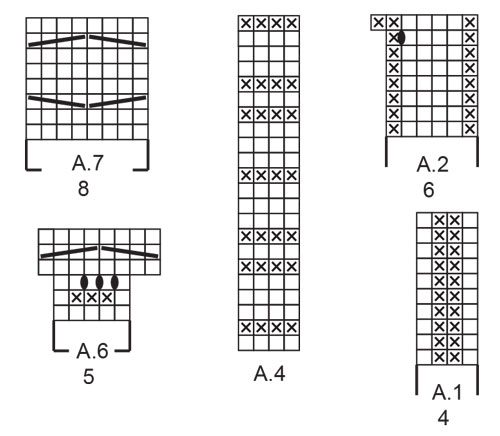
Bonjour je comprends pas l augmentation de A2 il faut faire 1end1jette4enve1end tout le long du rang mais là j' ai plus de 6 augmentations merci de me dire
31.05.2024 - 19:28DROPS Design answered:
Bonjour Mme Nortier, l'augmentation de A.2 se fait sur l'endroit ainsi: *1 m env, 4 m end, 1 jeté, 2 m env*, répétez de *à*; vous allez augmenter 1 maille dans chaque A.2 pour pourvoir ensuite tricoter A.3 au-dessus de chaque A.2 - quand A.2 est terminé, vous avez entre 114 et 170 mailles selon la taille. Bon tricot!
03.06.2024 - 07:09
![]() Sylvie Nortier wrote:
Sylvie Nortier wrote:
Je ne comprends pas comment faire 1 maille lisière au POINT MOUSSE – voir ci-dessus, tricoter A.1 jusqu’à ce qu’il reste 1 maille, 1 maille au point mousse.
23.05.2024 - 19:22DROPS Design answered:
Bonjour Mme Nortier, tricotez ainsi sur l'endroit: 1 m point mousse (- à l'endroit); répétez les 4 mailles de A.1 (= 1 m end, 2 m env, 1 m end) jusqu'à ce qu'il reste 1 maille et terminez par 1 m point mousse (- à l'endroit); tricotez sur l'envers ainsi: 1 m point mousse, répétez les 4 m de A.1 (= 1 m end, 2 m env, 1 m end) jusqu'à c qu'il reste 1 m et terminez par 1 m point mousse. Bon tricot!
24.05.2024 - 07:43
![]() Joelle wrote:
Joelle wrote:
Bonjour . Pour le modèle 235-1 , les diagrammes sont tous sur l endroit ? Si oui à l envers doit on tricoter e cela se présente ? Et pour le diagramme A2 , comment peut on avoir à la fin de celui ci 20 mailles de plus ( taille L) si je ne fais qu une seule fois un jeté ? Ça doit avoir un rapport avec le terme : tricoter 1 fois en hauteur mais ça veut dire quoi ? Désolée mais je suis dessus depuis 1 heure et je n arrive pas a comprendre... merci
15.02.2024 - 00:05DROPS Design answered:
Bonjour Joëlle, tous les rangs figurent dans le diagramme, ceux sur l'endroit aussi bien que ceux sur l'envers; en taille L, on répète 20 fois les 6 mailles de A.2, en augmentant 1 maille dans chaque A.2, vous augmentez 20 mailles au total à l'avant-dernier rang de A2. Tricoter 1 fois en hauteur veut simplement dire que vous tricotez tous les rangs 1 seule fois, du 1er au dernier rang du diagramme. Bon tricot!
15.02.2024 - 07:35
![]() Gaetane wrote:
Gaetane wrote:
Bonjour! Suite à ma 1ère question, je comprends ce que vous expliquez dans votre réponse ! Merci 🙏, mais pourrais-je prendre tout simplement 1 couleur sans tricoter 2 fils en même temps ? Merci 🙏
16.01.2024 - 13:07DROPS Design answered:
Bonjour Gaetane, vous pouvez alors utiliser 1 fil du groupe de fils C pour obtenir la même tension et remplacer ici 1 fil du groupe B + 1 fil du groupe A.Mais pensez bien, comme toujours à vérifier votre tension. Bon tricot!
17.01.2024 - 08:48
![]() Gaetane wrote:
Gaetane wrote:
Bonjour je lis votre patron au début vous parlez de 2 couleur , nougat et amande ! Serait-ce que ça prends 2 sorte de couleur pour réaliser ce pull ? Merci 🙏
13.01.2024 - 18:42DROPS Design answered:
Bonjour Gaetane, tout à fait, on tricote ici avec 2 fils en même temps, soit 1 fil Puna + 1 fil Kid-Silk ou bien 1 fil Merino Extra Fine + 1 fil Kid-Silk, pensez à bien vérifier votre échantillon qui se tricote en jersey avec ces 2 fils (l'une ou l'autre version au choix), et adaptez la taille de vos aiguilles si besoin. Bon tricot!
15.01.2024 - 09:17
![]() Lotta wrote:
Lotta wrote:
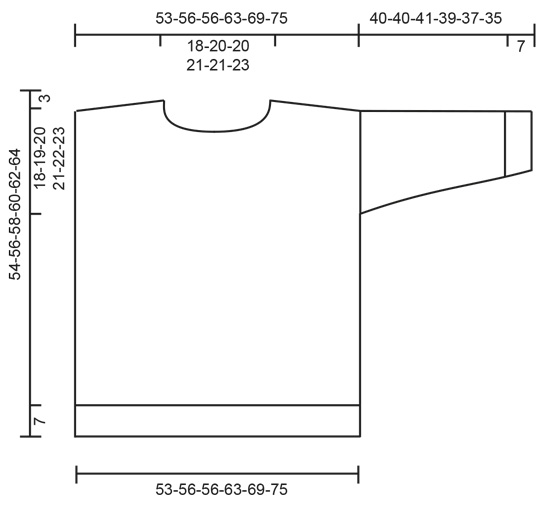
Have you changed size standards recently? I have always used size S. In this model (and in many others) even size XS is much too big for me. I've never had a problem like this before.
07.01.2024 - 16:11DROPS Design answered:
Dear Lotta, our sizing hasn't changed too much from before. But the sizing is established depending on the garment. For example, the chest for this jumper is bigger because it has a looser fit compared to other jumpers. So, even though it's for the same size, there can be slight changes in measurements between patterns. Happy knitting!
07.01.2024 - 18:07
![]() Diane wrote:
Diane wrote:
Ik ben de mouw aan het breien maar moet bij dit model meerderen in gerstekorrel maar wat ik ook doe,ik ga op een gegeven moment of 2 rechte steken of 2 averechte steken naast elkaar krijgen hoe kan ik dit voorkomen? Mooi is het niet.ik ben de mouw op een rond breinaald aan het breien.moet 1steek breien dan een omslag de naald tot 2 steken voor het einde breien dan een omslag dan de laatste 2 steken breien,maar krijg toch 2 dezelfde steken naast elkaar en dat is niet mooi
27.12.2023 - 21:43DROPS Design answered:
Dag Diane,
Klopt, dit is helaas niet te voorkomen. De gerstekorrel wordt een tijdje verbroken totdat je weer meerdert. Gelukkig zit dit aan de onderkant van de mouw, waardoor het niet heel erg opvalt.
30.12.2023 - 18:07
![]() Susi wrote:
Susi wrote:
Kann ich bei diesem Schnitt die Ärmelmaschen auch einfach an den Rändern aufnehmen?. Dann müsste ich sie doch nicht extra einnähen . Was müsste ich dabei beachten?
18.12.2023 - 15:38DROPS Design answered:
Liebe Susi, wenn Sie die Ärmel von oben nach unten stricken dann sind die Muster nicht genauso wie beim Rumfpteil, am besten stricken Sie die Ärmel von unten nach oben genauso wie bei der Anleitung. Viel Spaß beim stricken!
18.12.2023 - 16:26
![]() Abdou wrote:
Abdou wrote:
Bonjour, Je ne suis pas une experte dans le tricot, mais j'aime beaucoup vos modèles. J'ai commencé à tricoté ce modèle et je beugue un peu sur le diagramme A2. Est ce que je tricote 1 maille envers puis 4 endroits et 1 maille envers, puis je recommence à chaque fois 1-4-1 ou pas?? Je ne sais pas si je suis assez claire. Merci d'avance pour votre réponse.
06.10.2023 - 21:26DROPS Design answered:
Bonjour Mme Abdou, tout à fait, sur l'endroit, vous tricotez (1 m env, 4 m end, 1 m env), autrement dit sur l'envers (1 m end, 4 m env, 1 m end) et vous répétez de (à) tout le rang. Bon tricot!
09.10.2023 - 08:17
![]() Broux wrote:
Broux wrote:
Bonjour, quand on a tricoté A8a on termine par un rang endroit.On commence alors l'encolure sur l'envers?
30.05.2023 - 18:22DROPS Design answered:
Bonjour Mme Broux, l'encolure ne se fait pas en fonction du rang de A.8a mais en fonction de la hauteur pour votre taille, adaptez si vous le souhaitez et si besoin pour former l'encolure sur l'endroit. Bon tricot!
31.05.2023 - 08:12
|
||||||||||||||||
Cracked Walnuts Sweater#crackedwalnutssweater |
||||||||||||||||
 |
 |
|||||||||||||||
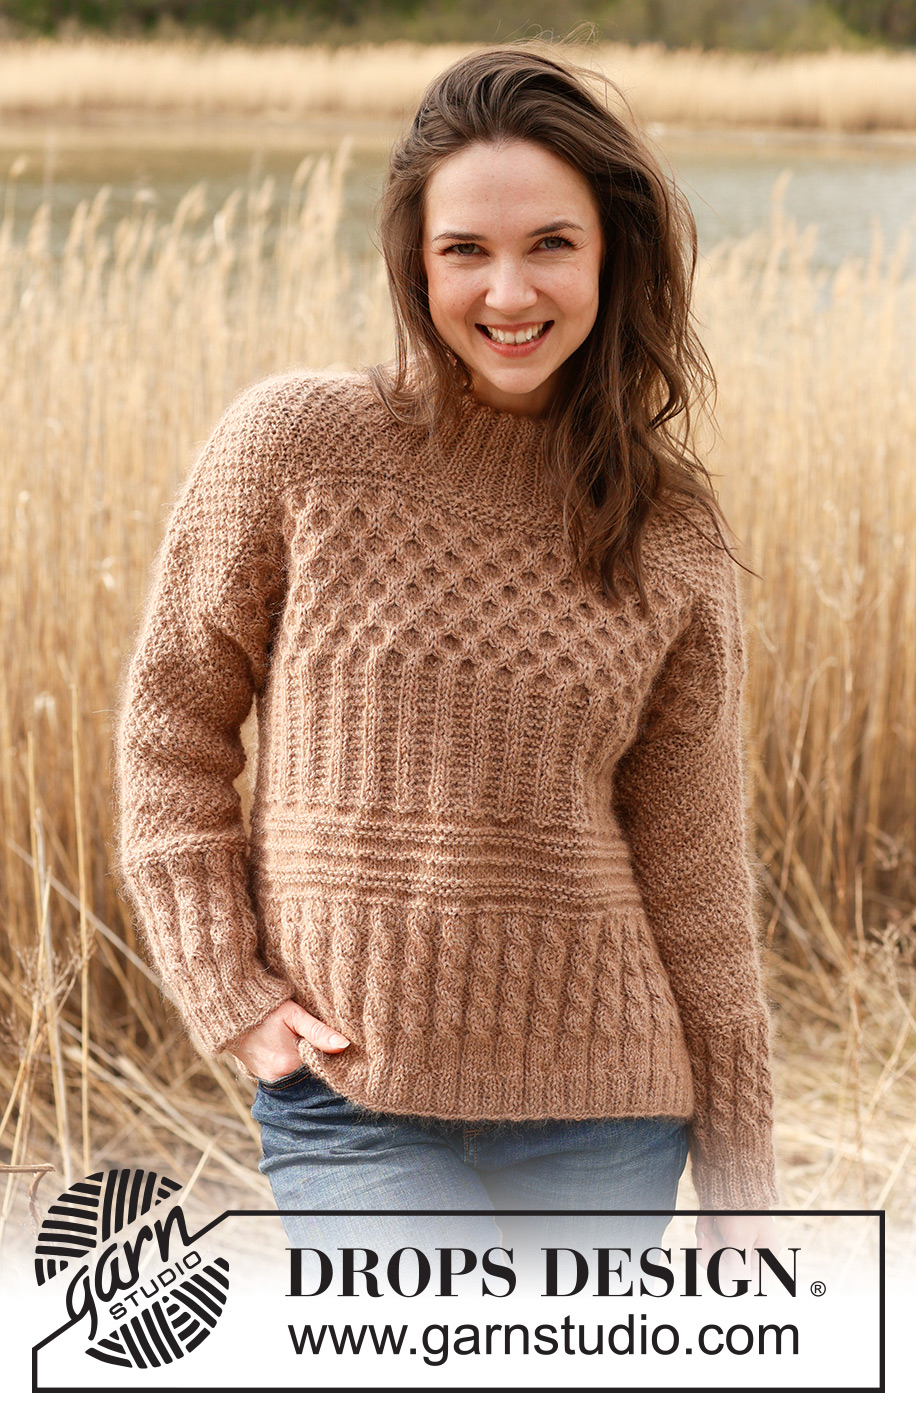
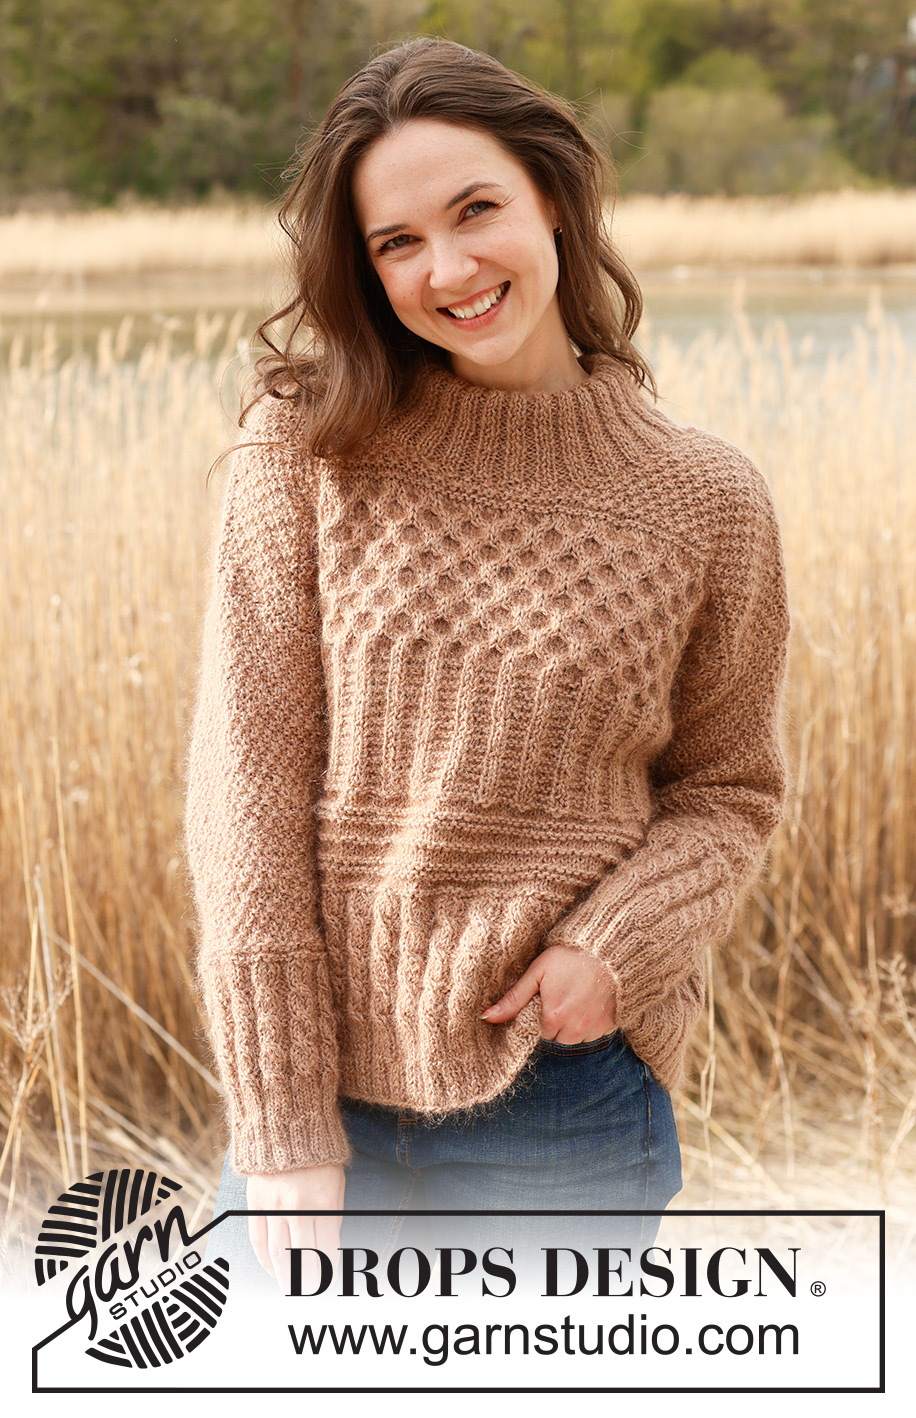
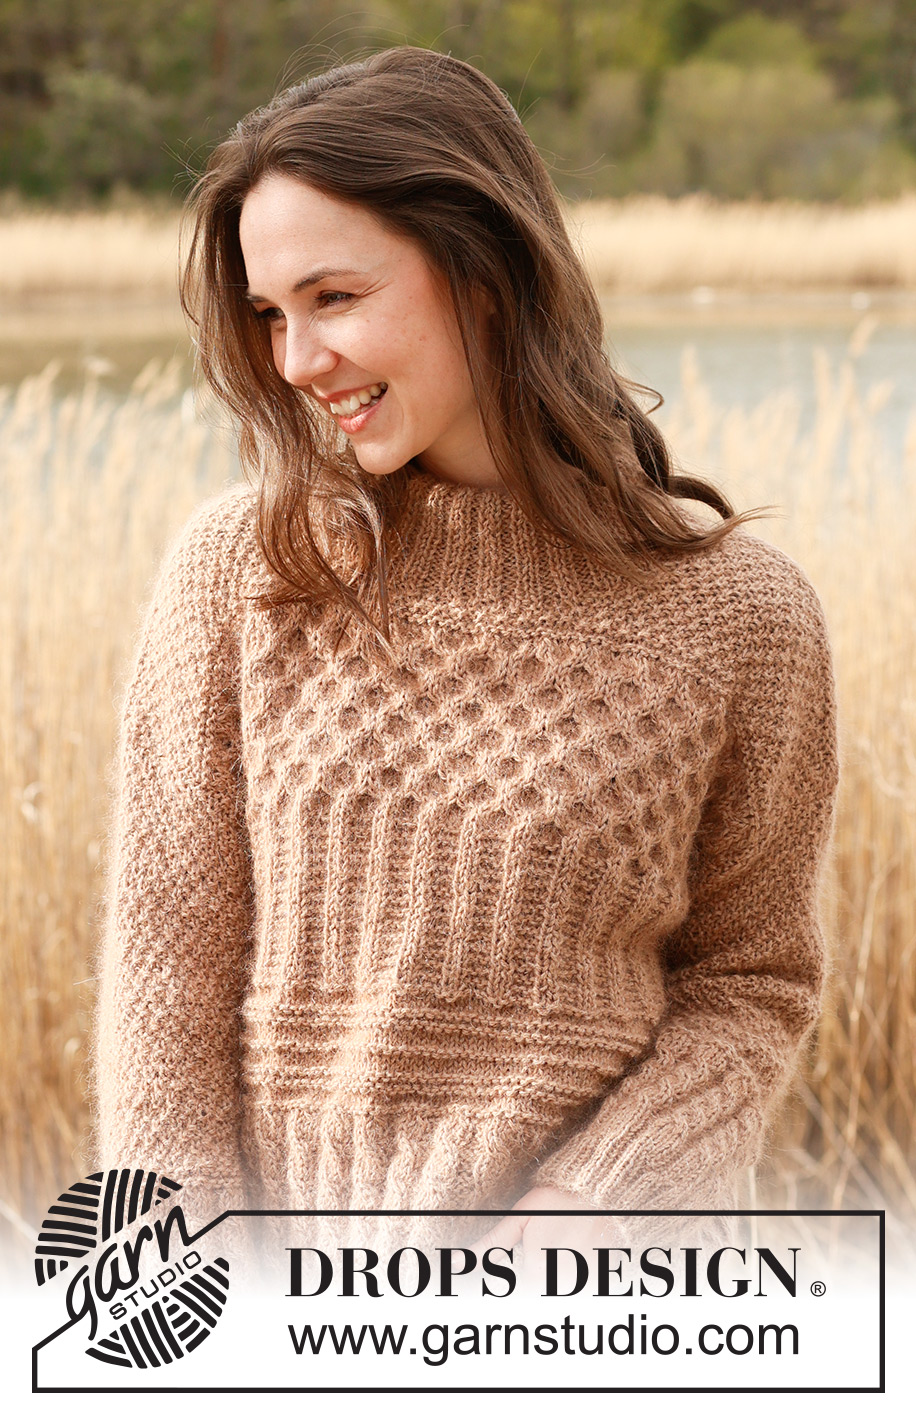
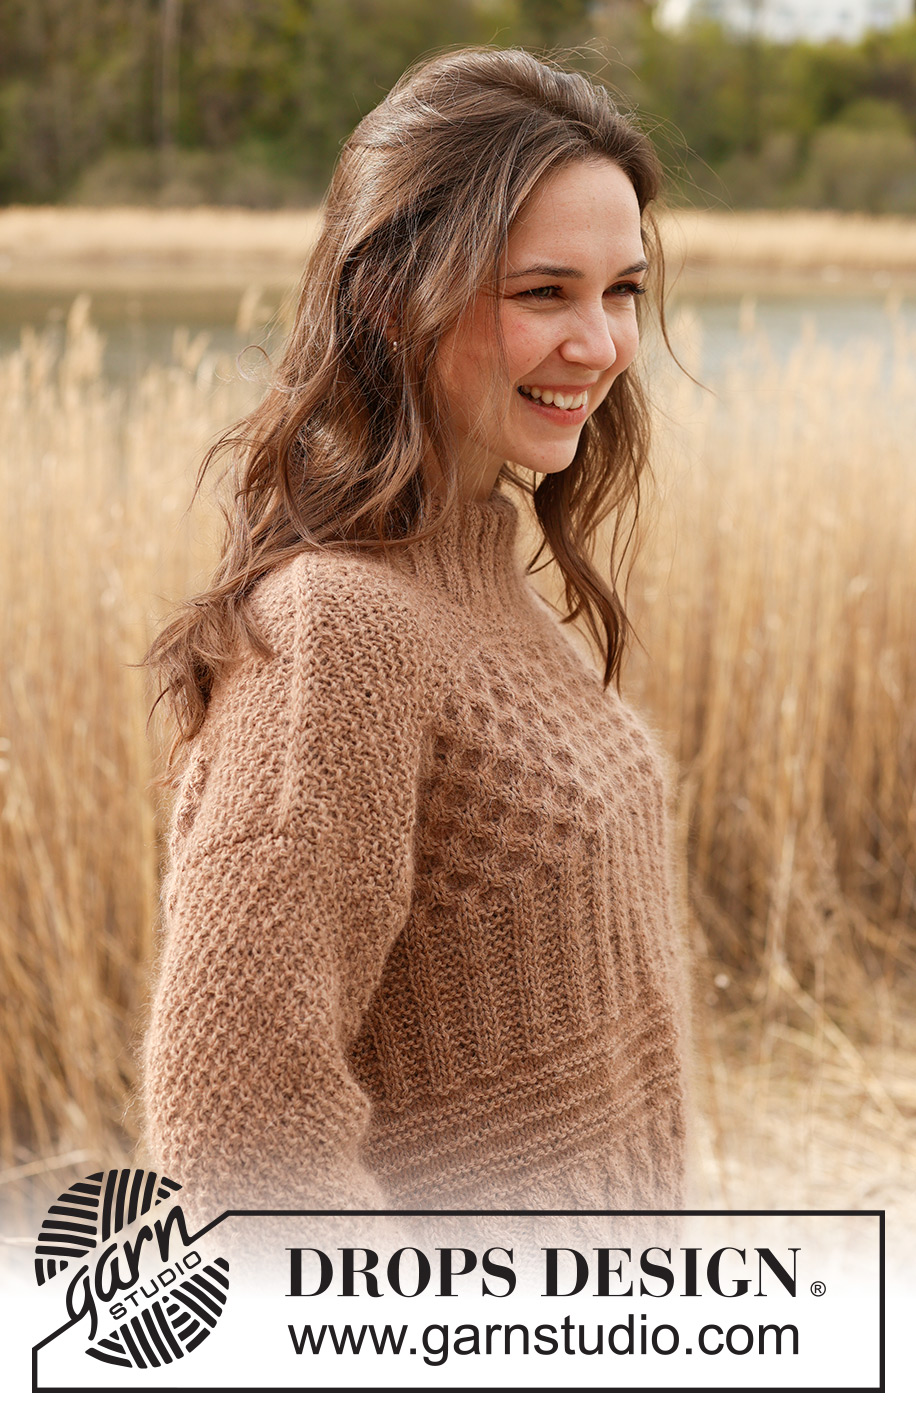
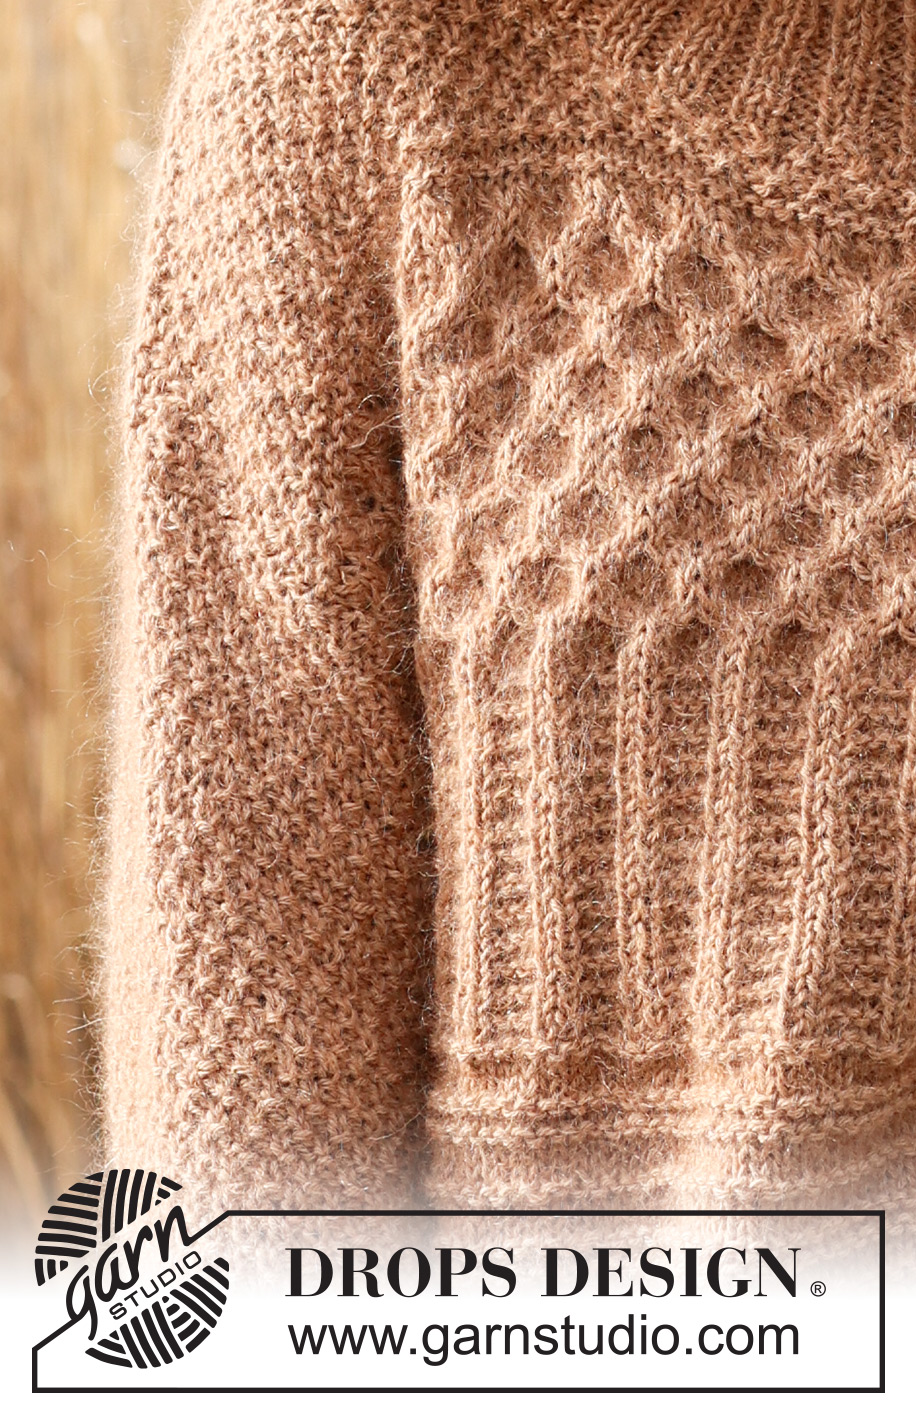
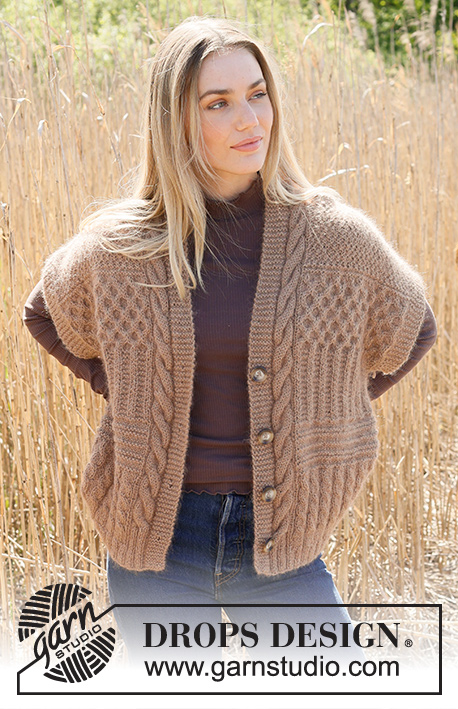
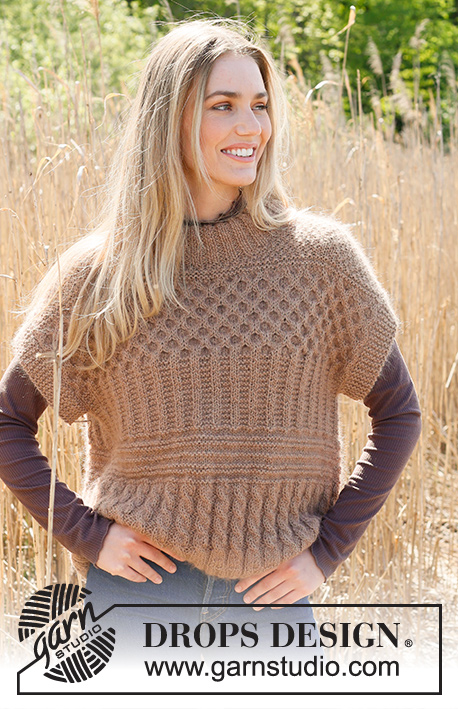
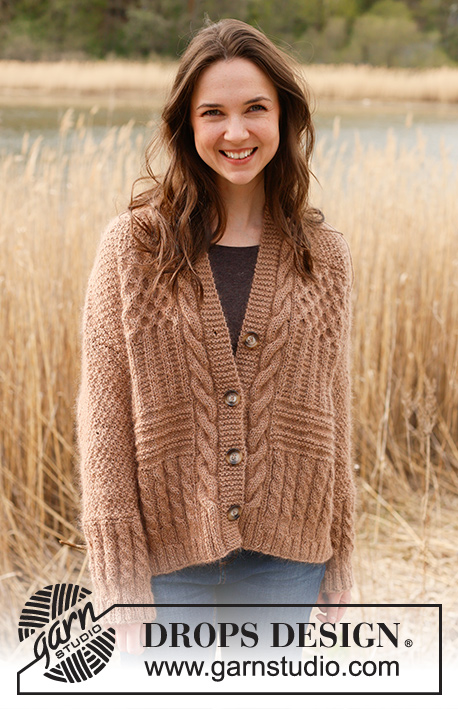
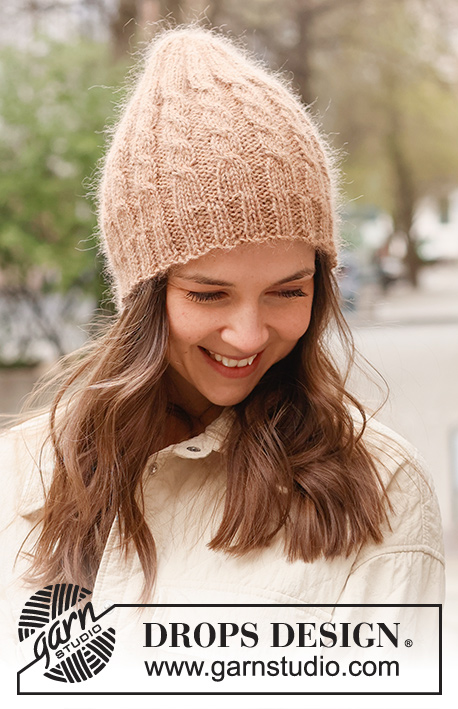
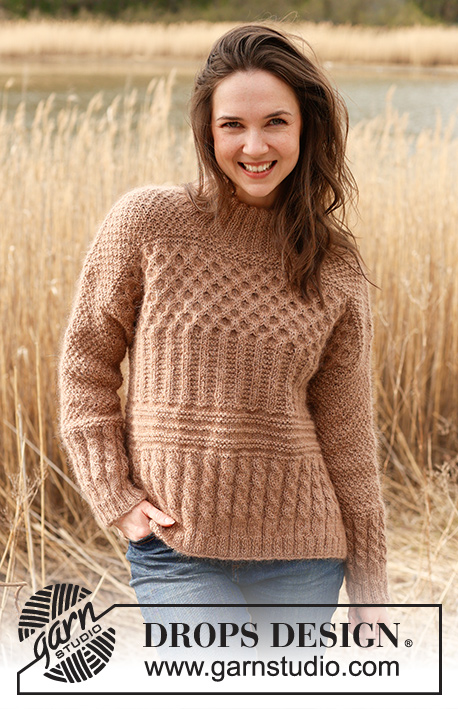
Knitted jumper in DROPS Kid-Silk and DROPS Puna / DROPS Merino Extra Fine. Piece is knitted bottom up with textured pattern, ridges, cables, double neck and rib. Size XS – XXL.
DROPS 235-1 |
||||||||||||||||
|
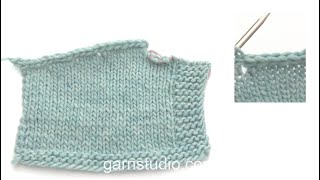
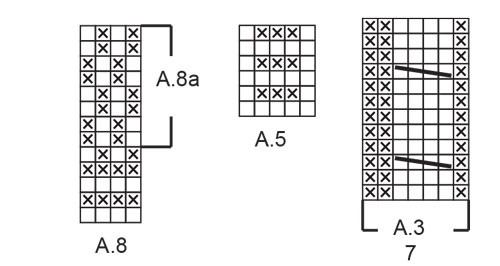
---------------------------------------------------------- EXPLANATION FOR THE PATTERN: ---------------------------------------------------------- GARTER STITCH (back and forth): Knit all rows. 1 ridge vertically = knit 2 rows. PATTERN: See diagrams A.1 to A.8. Diagrams show all rows in pattern seen from the right side. KNIT TOGETHER: FROM RIGHT SIDE: Slip 1 stitch knitwise, knit 1, pass slipped stitch over stitch worked. FROM WRONG SIDE: Purl 2 together. STOCKING STITCH: When working from wrong side, purl and when working from right side, knit. INCREASE TIP (applies to sleeves): Work 1 past marker, make 1 yarn over, work as before until 2 stitches remain before marker at the end of round, make 1 yarn over. On next round work yarn overs twisted. When working A.2, purl the increase, when working A.7, work increase in pattern. ---------------------------------------------------------- START THE PIECE HERE: ---------------------------------------------------------- JUMPER - SHORT OVERVIEW OF THE PIECE: Work front and back piece back and forth separately. Work sleeves bottom up, in the round on double pointed needles/a short circular needle. Finish with a double neck. BACK PIECE: Cast on 98-110-110-122-134-146 stitches on circular needle size 4 mm with 1 strand of each quality (2 strands). Purl 1 row from wrong side. Work next row as follows from right side: 1 edge stitch in GARTER STITCH – read explanation above, work A.1 until 1 stitch remain, 1 stitch in garter stitch. When A.1 has been worked 1 time vertically, work pattern as follows: 1 edge stitch in garter stitch, work A.2 until 1 stitch remains, 1 edge stitch in garter stitch. When A.2 has been worked 1 time vertically, there are 114-128-128-142-156-170 stitches on needle. Switch to circular needle size 5.5 mm. Work pattern as follows: 1 edge stitch in garter stitch, work A.3 until 1 stitch remains, 1 edge stitch in garter stitch. REMEMBER THE KNITTING TENSION! Repeat A.3 vertically until piece measures 16-17-19-19-21-22 cm. Work pattern, begin from right side as follows: 1 edge stitch in garter stitch, work A.4 until 1 stitch remains and decrease at the same time 27-36-36-40-44-48 stitches evenly, 1 edge stitch in garter stitch = 87-92-92-102-112-122 stitches. When A.4 has been worked 1 time vertically, work pattern as follows: 1 edge stitch in garter stitch, work A.5 until 1 stitch remains, 1 edge stitch in garter stitch. Repeat A.5 vertically. Continue pattern like this until piece measures 33-35-36-38-39-41 cm. Work pattern, begin from right side as follows: 1 edge stitch in garter stitch, work A.6 until 1 stitch remains, 1 edge stitch in garter stitch. When A.6 has been worked 1 time vertically, there are 138-146-146-162-178-194 stitches on needle. Work pattern as follows: 1 edge stitch in garter stitch, work A.7 until 1 stitch remains, 1 edge stitch in garter stitch. Work A.7 3 times in total vertically. Piece measures approx. 45-47-48-50-51-53 cm. Work pattern as follows: 1 edge stitch in garter stitch, work A.8 until 1 stitch remains and decrease at the same time 51-54-54-60-66-72 stitches evenly, 1 edge stitch in garter stitch = 87-92-92-102-112-122 stitches. When A.8 has been worked 1 time vertically, work A.8a vertically until finished measurements. When piece measures 50-52-54-56-58-60 cm, cast off the middle 27-30-30-32-32-34 stitches for neck and finish each shoulder (30-31-31-35-40-44 stitches) separately. On next row from neck cast off 1 stitch at the beginning of row = 29-30-30-34-39-43 stitches. When piece measures 51-53-55-57-59-61 cm, work diagonal shoulder, begin on next row from the neck as follows: * Work pattern as before until 7-7-7-8-9-10 stitches remain, turn and work back *, work from *-* 3 times in total. I.e. work 7-7-7-8-9-10 stitches less on every row from the neck. On last row towards neck, cast on 2 new stitches at the end of row = 31-32-32-36-41-45 stitches. Now work and cast off with an edge over shoulder stitches. Work stitches cast on with shoulder stitches as follows: Work * 1 stitch in STOCKING STITCH – read explanation above, work next stitch together with first/next stitch from shoulder – read KNIT TOGETHER, pass the 2 stitches back on the needle they came from with strand on wrong side of piece, make sure not to tighten yarn too much *, work from *-* until all stitches from shoulder have been worked together with the 2 new stitches that were cast on. Cast off the 2 stitches. Work the other shoulder the same way. FRONT PIECE: Cast on and work as back piece until piece measures 46-48-49-51-52-54 cm = 87-92-92-102-112-122 stitches. Now slip the middle 15-18-18-20-20-22 stitches on a thread for neck and finish each shoulder (36-37-37-41-46-50 stitches) separately. Cast off stitches for neck on every row from neck as follows: Cast off 2 stitches 2 times in total and 1 stitch 3 times in total = 29-30-30-34-39-43 stitches remain on shoulder. Then work each shoulder as on back piece. SLEEVES: Cast on 60-60-60-72-72-72 stitches on double pointed needles size 4 mm with 1 strand of each quality. Knit 1 round. Insert 1 marker at beginning of round. Work A.1 in the round. When A.1 has been worked 1 time vertically, work A.2 over all stitches. When A.2 has been worked 1 time vertically, there are 70-70-70-84-84-84 stitches on row. Switch to double pointed needles size 5.5 mm. Work A.3 over all stitches. Work A.3 2 times in total vertically. Work A.8 over all stitches, on first round decrease 22-22-22-26-26-26 stitches evenly = 48-48-48-58-58-58 stitches. Repeat A.8a vertically until finished measurements. AT THE SAME TIME when piece measures 20 cm, increase 1 stitch on each side of marker - read INCREASE TIP! Increase like this every 3½-3½-2½-3-3-2 cm 6-6-8-6-6-8 times in total = 60-60-64-70-70-74 stitches. Work the increased stitches in the pattern. Cast off when sleeve measures 40-40-41-39-37-35 cm. Knit another sleeve the same way. ASSEMBLY: Sew shoulder seams inside 1 stitch on edge. Sew in sleeves. Sew side seams inside 1 edge stitch. DOUBLE COLLAR: Begin in one shoulder seam, pick up approx. 76 to 104 stitches around the neck (including stitches on thread) from right side, on a short circular needle size 4 mm with 1 strand in each quality. Number of stitches must be divisible by 4. Work rib (purl 2/knit 2) over all stitches. When neck measures 14 cm, cast off with knit over knit and purl over purl with circular needle size 5.5 mm (make sure to avoid a tight cast neck-off edge). Fold the rib down on inside of garment. Fasten rib to get a double neck edge. To avoid a tight neck edge that sticks out it is important to keep the seam elastic. |
||||||||||||||||
Diagram explanations |
||||||||||||||||
|
||||||||||||||||
 |
||||||||||||||||
 |
||||||||||||||||
 |
||||||||||||||||
Have you finished this pattern?Tag your pictures with #dropspattern #crackedwalnutssweater or submit them to the #dropsfan gallery. Do you need help with this pattern?You'll find 34 tutorial videos, a Comments/Questions area and more by visiting the pattern on garnstudio.com. © 1982-2025 DROPS Design A/S. We reserve all rights. This document, including all its sub-sections, has copyrights. Read more about what you can do with our patterns at the bottom of each pattern on our site. |
||||||||||||||||


With over 40 years in knitting and crochet design, DROPS Design offers one of the most extensive collections of free patterns on the internet - translated to 17 languages. As of today we count 320 catalogues and 12094 patterns translated into English (UK/cm). 12094
We work hard to bring you the best knitting and crochet have to offer, inspiration and advice as well as great quality yarns at incredible prices! Would you like to use our patterns for other than personal use? You can read what you are allowed to do in the Copyright text at the bottom of all our patterns. Happy crafting!
Post a comment to pattern DROPS 235-1
We would love to hear what you have to say about this pattern!
If you want to leave a question, please make sure you select the correct category in the form below, to speed up the answering process. Required fields are marked *.