
Looking for a yarn?


Comments / Questions (59)
![]() Gaetane wrote:
Gaetane wrote:
Bonjour ! Petite remarque 😉pourquoi dans vos modèles on ne voit jamais le dos du patron en photo ? Merci pour toutes vos réponses , j adores votre site merci !
05.08.2024 - 13:28DROPS Design answered:
Bonjour Gaetane et merci, le dos n'est photographié que lorsqu'il présente un intérêt par rapport au devant, quand il est identique, comme ici, on conserve seulement le devant et les détails. Bon tricot!
05.08.2024 - 15:28
![]() Gaetane wrote:
Gaetane wrote:
Bonjour! Lorsqu’on est rendu à tricoter les rangs (du I-cord, est-ce qu on continue les mailles comme le diagramme ou tout en jersey pour toutes les mailles de l épaule? Merci !
01.08.2024 - 13:21DROPS Design answered:
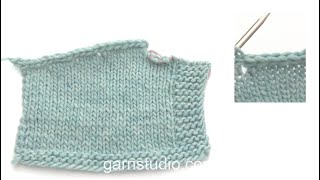
Bonjour Gaetane, dès lors que vous avez monté les 2 mailles pour rabattre en i-cord, toutes les mailles de l'épaule ne sont tricotées qu'ensemble avec la maille du I-cord, cette vidéo devrait vous permettre de mieux comprendre comment on rabat les mailles d'une épaule en I-cord. Bon tricot!
02.08.2024 - 08:38
![]() Gaetane wrote:
Gaetane wrote:
Bonjour! * Tricoter comme avant jusqu’à ce qu’il reste 7-7-7-8-9-10 mailles, tourner et tricoter le rang retour*, tricoter de *-* 3 fois au total. Autrement dit, tricoter 7-7-7-8-9-10 mailles en moins tous les rangs à partir de l’encolure. À la fin du dernier rang vers l’encolure, monter 2 mailles = 31-32-32-36-41-45 mailles. Je comprends pas ça ? On laisse 7 m à toutes les rangs 3 fois ? On les tricote quand ces m ? Merci 🙏
22.07.2024 - 14:16DROPS Design answered:
Bonjour Gaetane, tricotez votre rang à partir de l'encolure vers l'épaule/l'emmanchure jusqu'à ce qu'il reste 7 mailles, laissez ces 7 mailles sur l'aiguille gauche (ou glissez les en attente), tournez et tricotez le rang suivant, tricotez ces 2 rangs encore 2 fois = vous avez 3 fois 7 mailles en attente côté emmanchure. Bon tricot!
29.07.2024 - 11:05
![]() Gaetane wrote:
Gaetane wrote:
Bonjour ! Suis rendu à monter des mailles vers l encolure et vous dites monter 2 m , = 32 m , on avait 31m je saisi pas ça ! Aussi que fait on avec les 7 m laisser de côté? Merci 🙏
22.07.2024 - 14:06DROPS Design answered:
Bonjour Gaetane, vous devez avoir 29 mailles pour l'épaule: 87 m au total - 27 m rabattues pour l'encolure = 30 m pour chaque épaule - 1 maille rabattue pour l'encolure = 29 mailles pour l'épaule. Bon tricot!
29.07.2024 - 11:03
![]() Gaetane wrote:
Gaetane wrote:
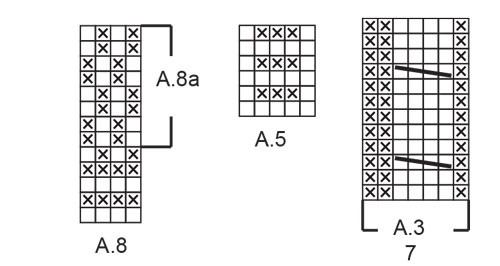
Bonjour ! Lorsque vous dites A8 en hauteur , est-ce jusqu’à La ligne A8a? Aussi on se trouve à finir sur l envers , alors est-ce qu on fait le 1 ère rang de A8a qui se donnes sur l envers pour faire les diminutions sur l endroit ? Merci 🙏
20.07.2024 - 14:21DROPS Design answered:
Bonjour Gaetane, A.8 en hauteur signifie tout le diagramme (avec A.8a). Ensuite vous ne repetez que A.8a. Tenez en compte que sur le diagramme on voit l'endroit de votre ouvrage. Bon tricot!
28.07.2024 - 18:07
![]() Sylvie Nortier wrote:
Sylvie Nortier wrote:
Bonjour j' arrive à la fin du dos pouvez m expliquez comment je tricote et rabat les mailles de l épaule avec la technique i cord Merci
10.07.2024 - 16:48DROPS Design answered:
Bonjour Mme Nortier, cette vidéo montre comment tricoter une épaule biaisée et comment rabattre avec la technique du I-cord, attention à bien respecter le nombre de mailles correspondant à votre taille (celui de la vidéo pouvant être différent). Bon tricot!
29.07.2024 - 08:37
![]() Sylvie Nortier wrote:
Sylvie Nortier wrote:
Et oui encore moi mais torsades ne sont pas belles j' arrive à faire le rang à l endroit nickel mais c'est le rang après d envers qui va pas pouvez vous m aider merci
18.06.2024 - 14:29DROPS Design answered:
Bonjour Mme Nortier, on est toujours sur A.3, correct? Sur l'endroit, vous allez tricoter ainsi: *1 m env, 4 m end (ou bien la torsade), 2 m env*, sur l'envers, vous tricoterez ces mailles ainsi: 2 m end, 4 m env, 1 m end. Bon tricot!
18.06.2024 - 15:24
![]() Sylvie Nortier wrote:
Sylvie Nortier wrote:
Bonjour vraiment désolée je suis novice en tricot Pouvez vous m expliquez dans le A3 le rang un et le rang envers 2 merci J' ai fait pour le 1 une lisiere un envers 4 endroit deux envers Et pour le deux une lisière deux endroit 4 envers deux endroit est ce bien ça
15.06.2024 - 08:42DROPS Design answered:
Bonjour Mme Nortier, tout à fait pour le 1er A.3 du rang, vous répétez ensuite cette séquence (1 m env, 4 m end, 2 m env) jusqu'à la fin du rang; vous aurez ainsi 3 m envers entre chaque (future) torsade de 4 m end; au rang suivant sur l'envers, tricotez les mailles comme elles se présentent. Bon tricot!
17.06.2024 - 08:10
![]() Sylvie Nortier wrote:
Sylvie Nortier wrote:
Et le 4ie rang de A2
07.06.2024 - 23:27DROPS Design answered:
Bonjour Mme Nortier, les diagrammes se lisent de bas en haut, le jeté se fait donc à l'avant-dernier rang de A.2 et pas au 2ème rang de A.2, autrement dit, des rangs 1 à 6 vous tricotez (vu sur l'endroit): 1 m env, 4 m end, 1 m env, puis au 5ème rang, vous tricotez: 1 m env, 4 m end, 1 jeté, 1 m env, et au 6ème rang (sur l'envers): 2 m end (tricotez le jeté torse), 4 m env, 2 m end. Bon tricot!
10.06.2024 - 07:53
![]() Sylvie Nortier wrote:
Sylvie Nortier wrote:
Bonjour comment je fais le rang de 2. Du schéma A2 avec le jeté
07.06.2024 - 14:16DROPS Design answered:
Bonjour Mme Nortier, le dernier rang de A.2 se tricote sur l'envers ainsi: *2 m endroit (= tricotez la 1ère maille à l'endroit, tricotez le jeté torse à l'endroit), 4 m envers et 1 maille endroit*, répétez de *-*. Bon tricot!
07.06.2024 - 16:05
|
||||||||||||||||
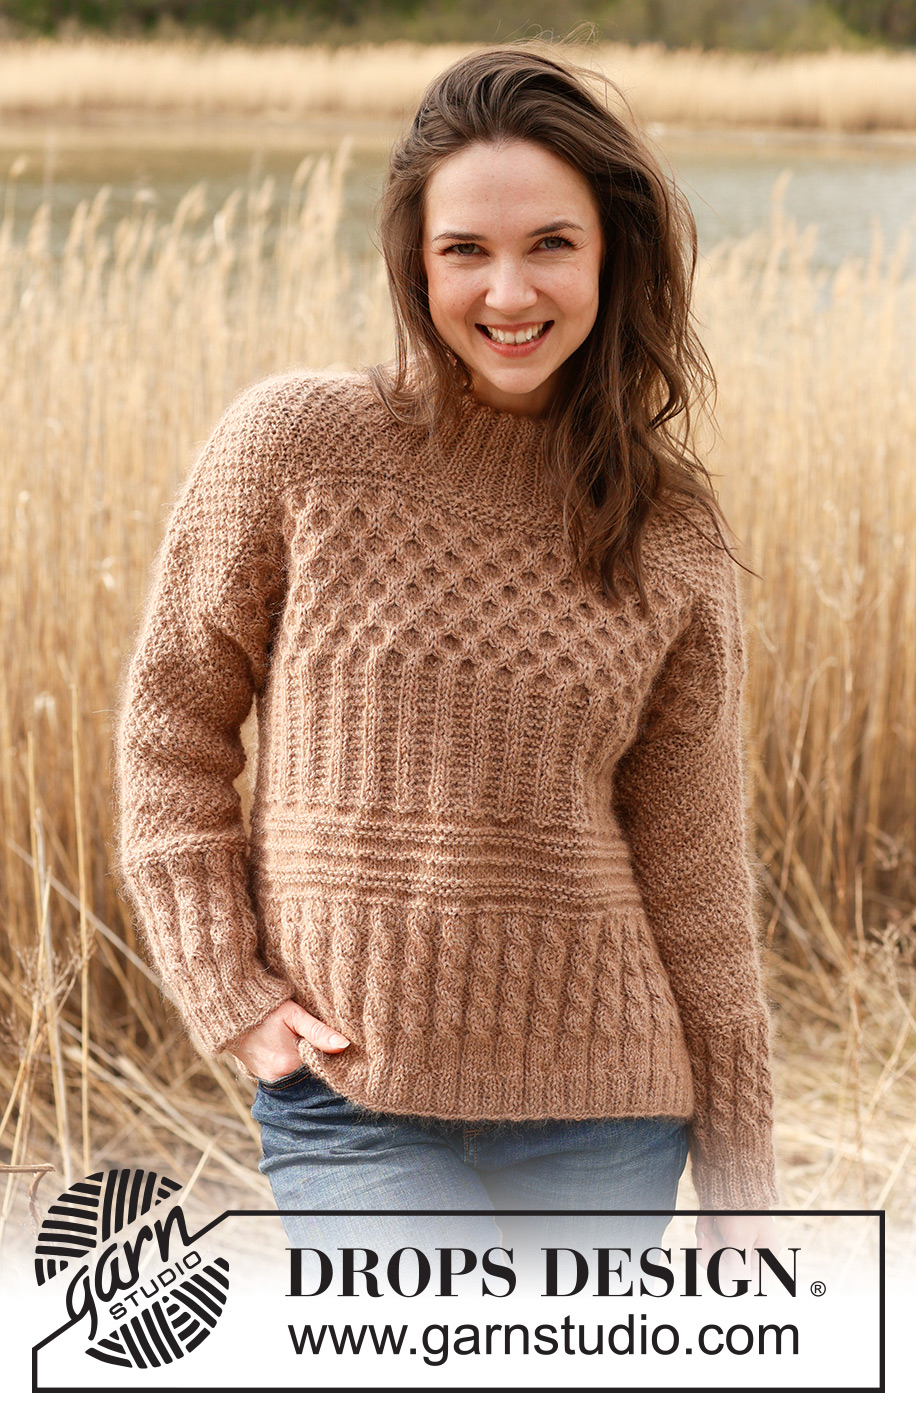
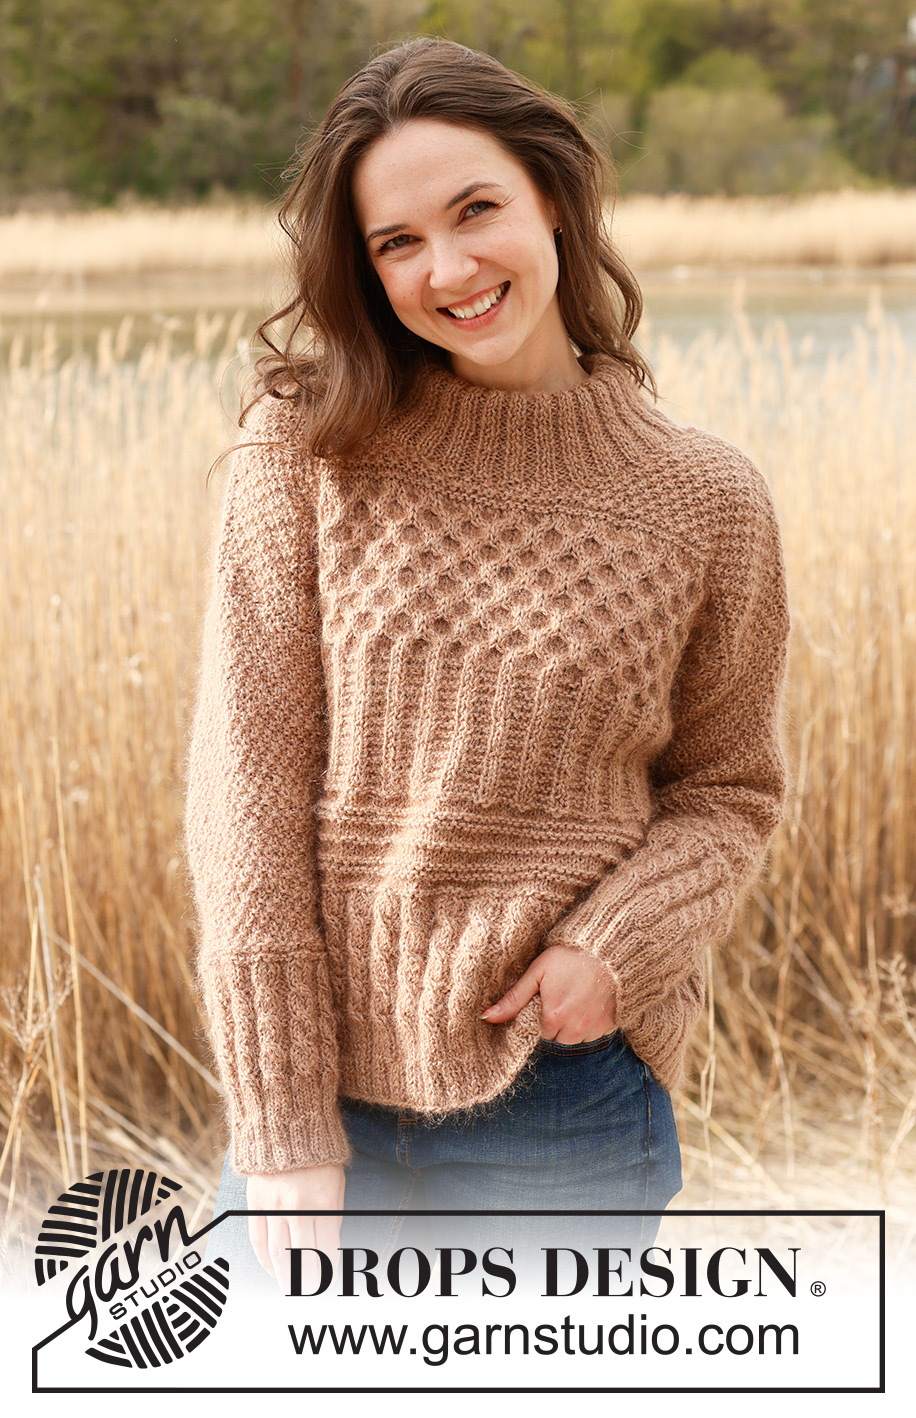
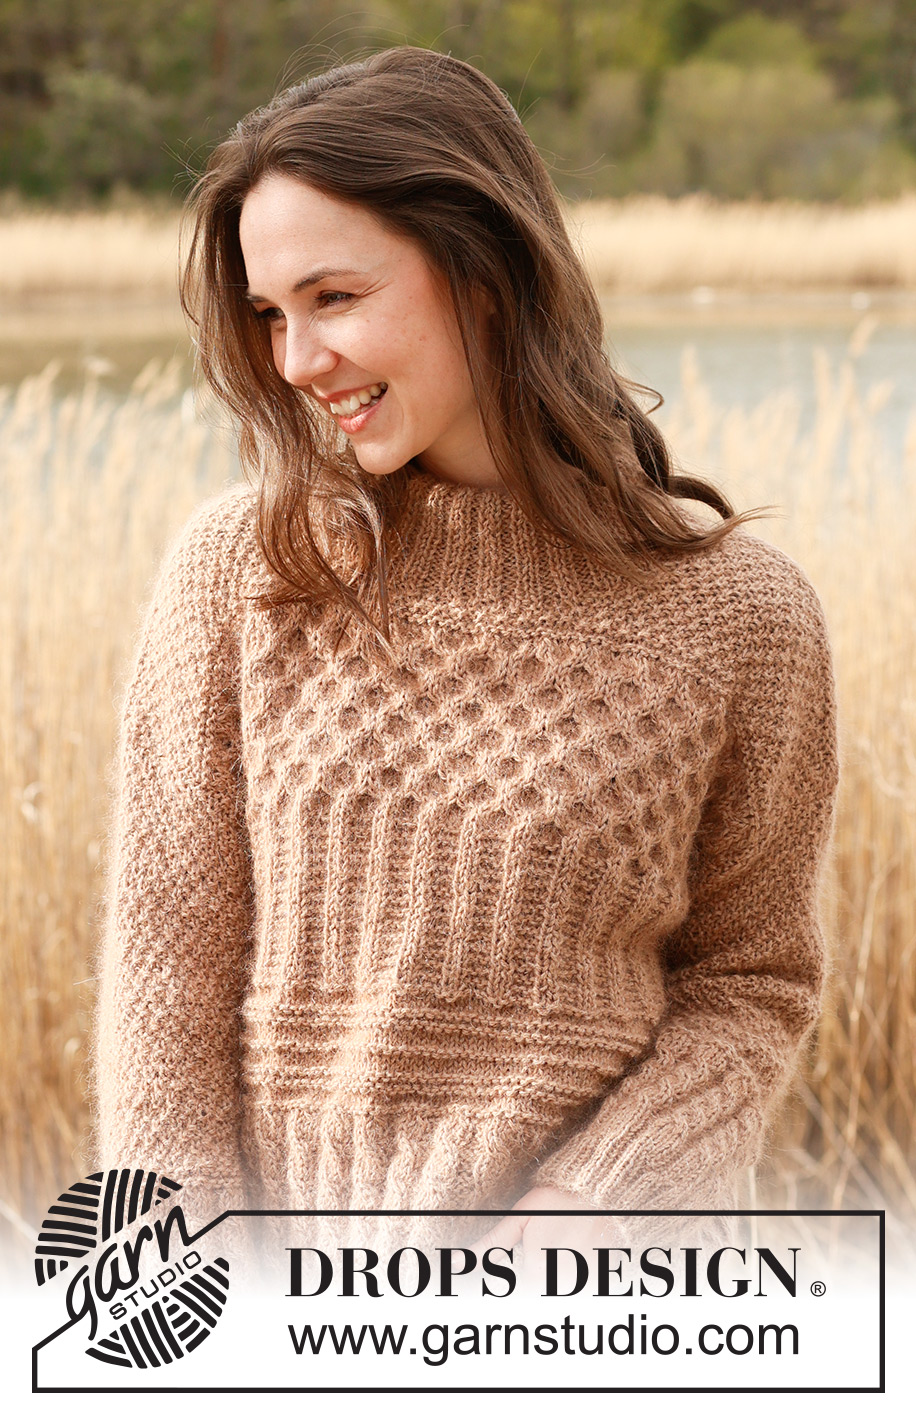
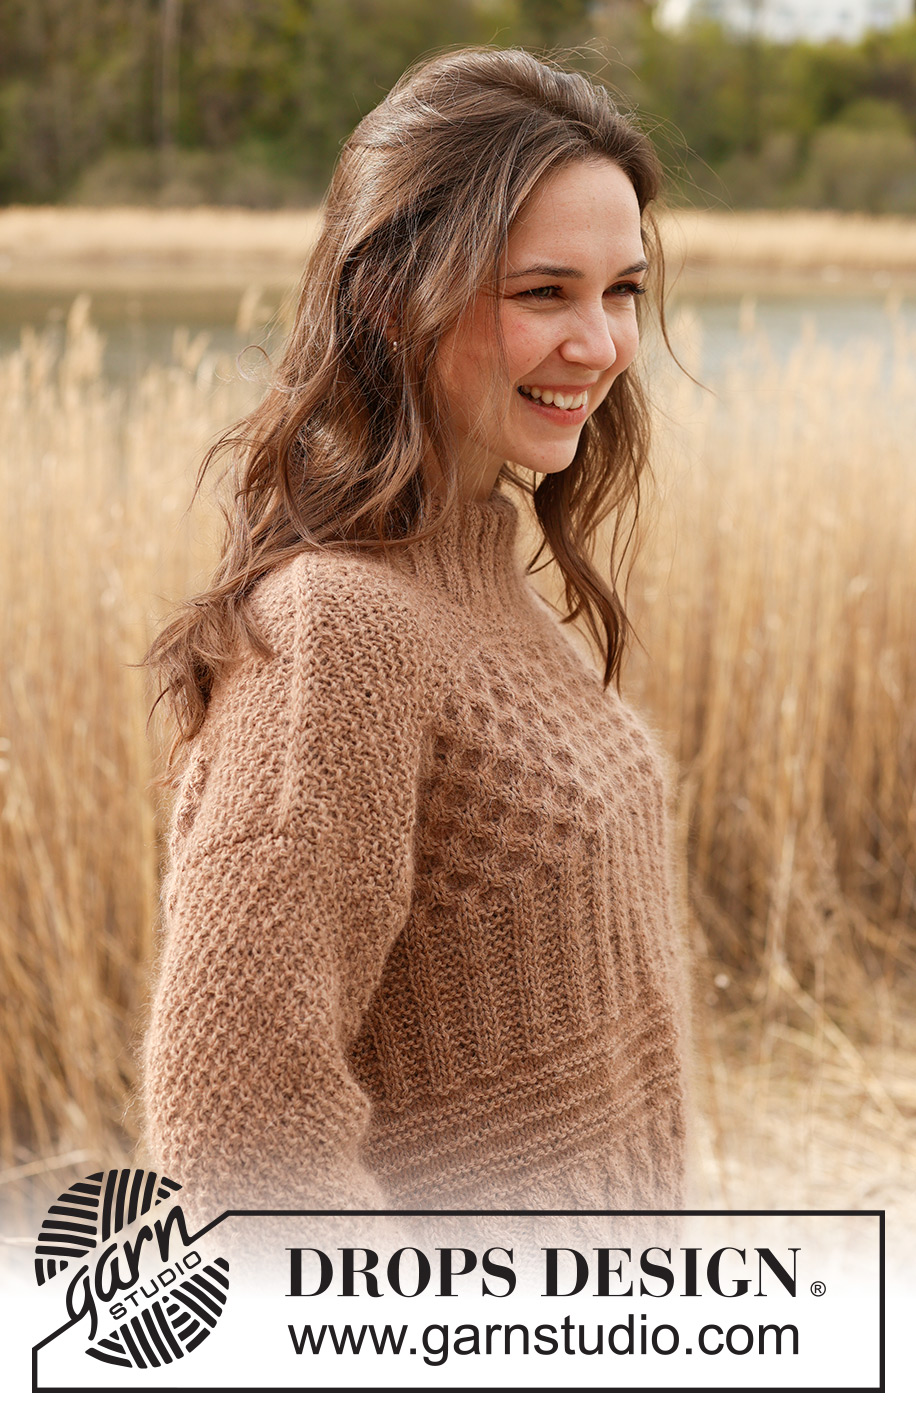
Cracked Walnuts Sweater#crackedwalnutssweater |
||||||||||||||||
 |
 |
|||||||||||||||
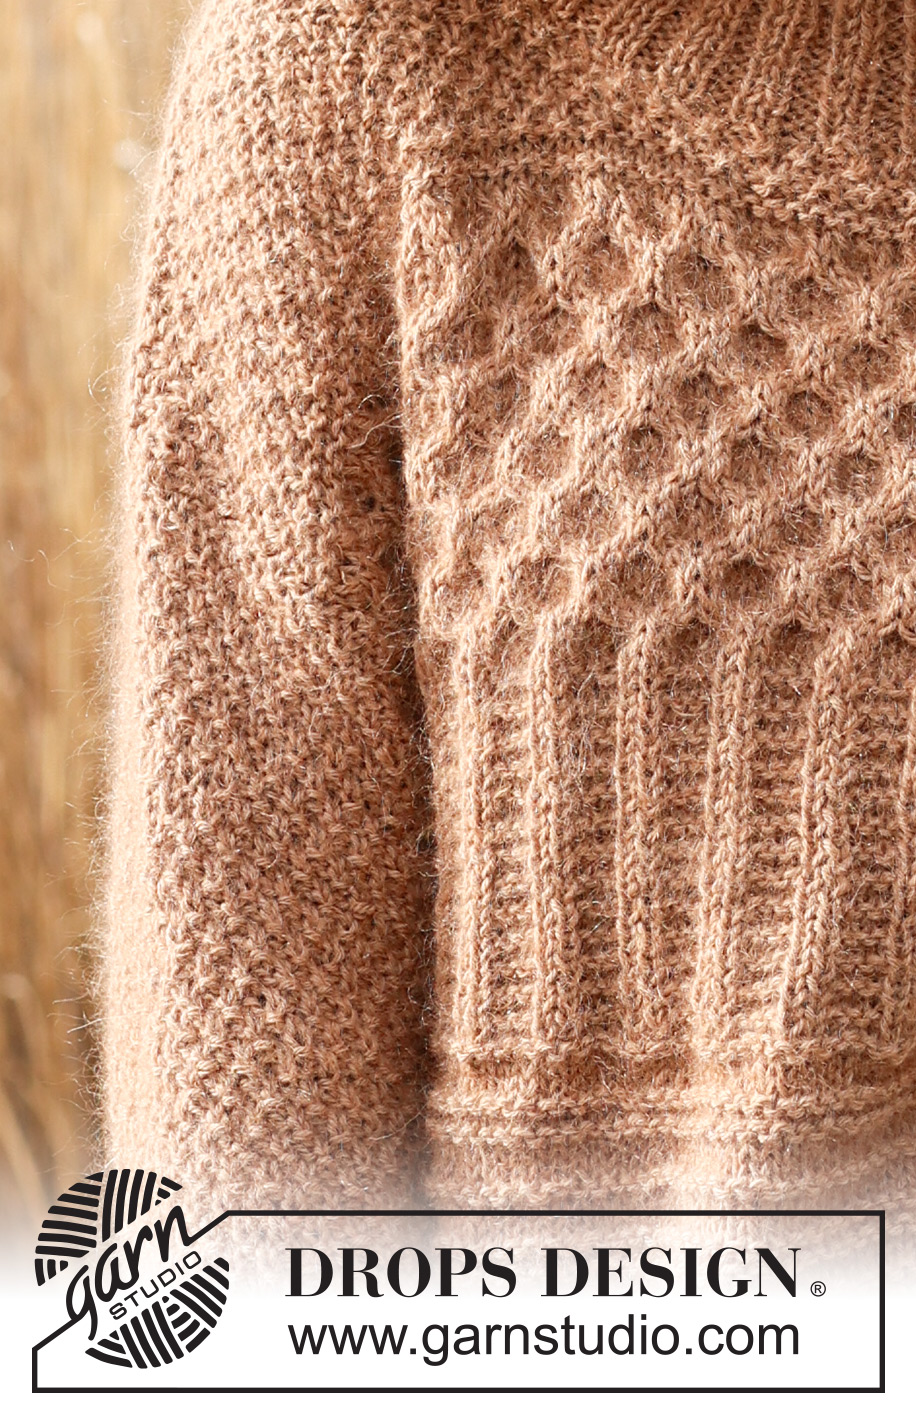
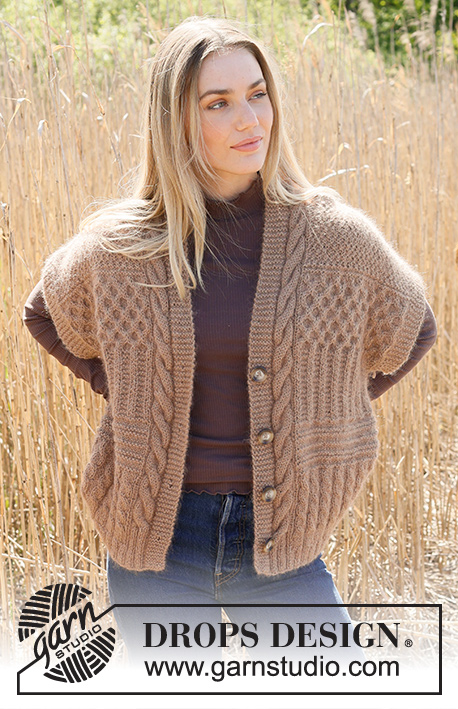
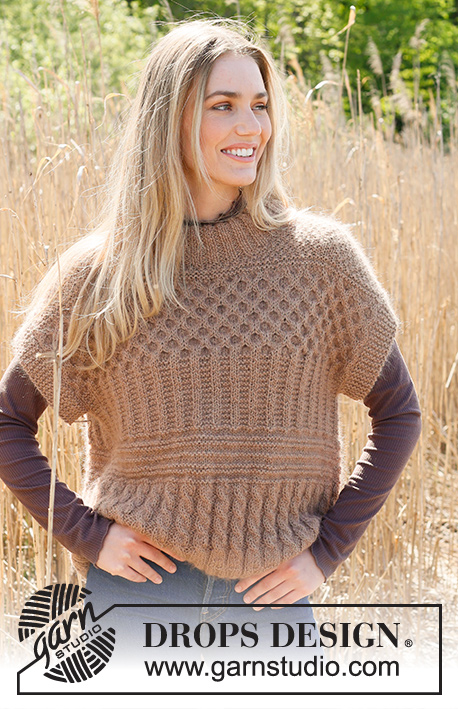
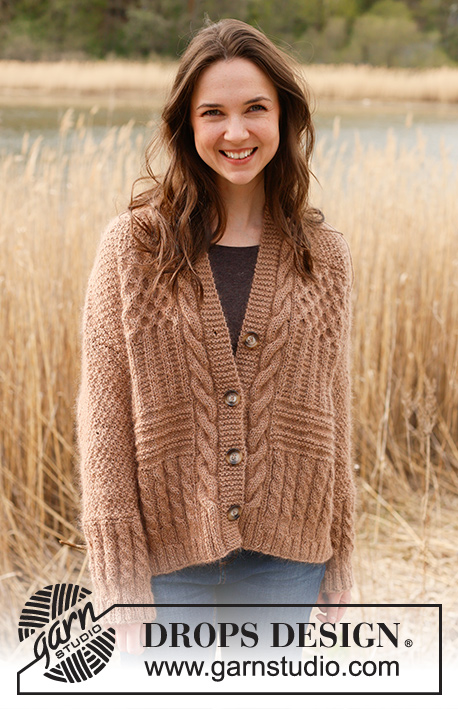
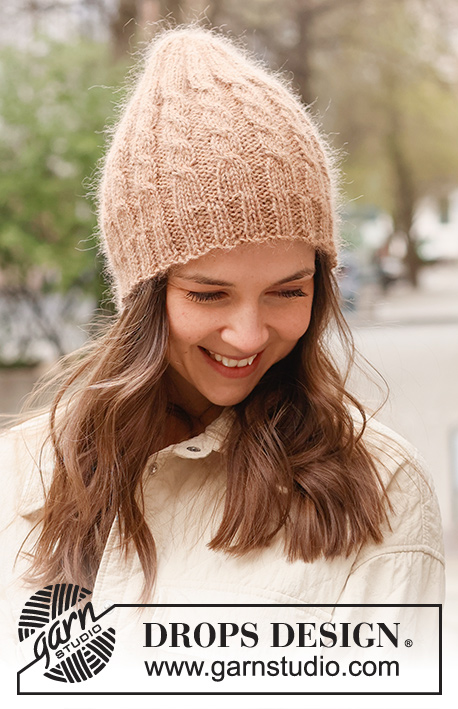
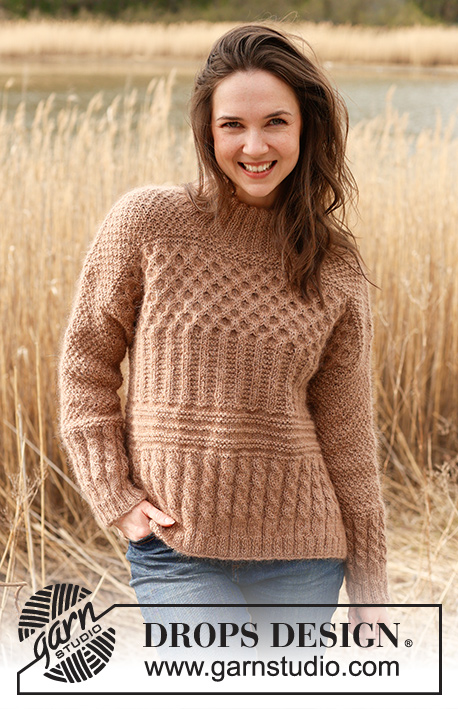
Knitted jumper in DROPS Kid-Silk and DROPS Puna / DROPS Merino Extra Fine. Piece is knitted bottom up with textured pattern, ridges, cables, double neck and rib. Size XS – XXL.
DROPS 235-1 |
||||||||||||||||
|
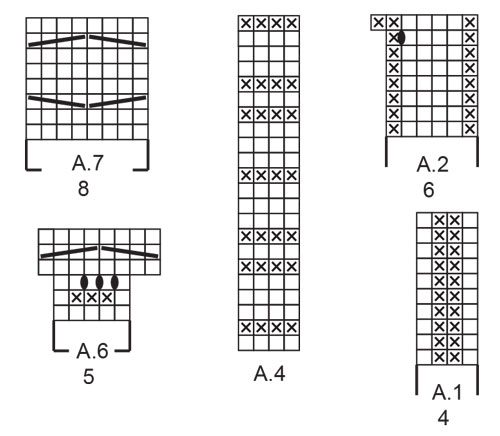
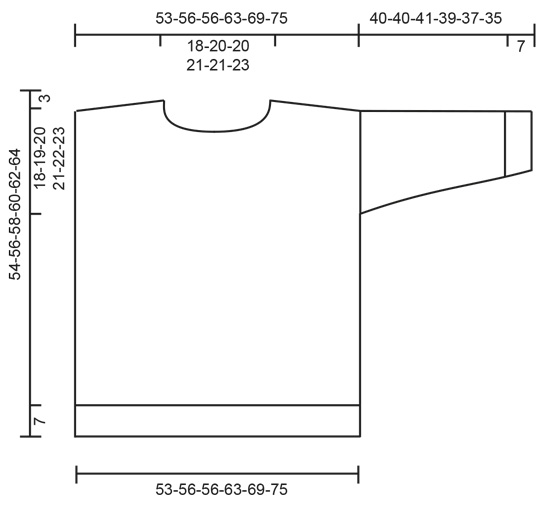
---------------------------------------------------------- EXPLANATION FOR THE PATTERN: ---------------------------------------------------------- GARTER STITCH (back and forth): Knit all rows. 1 ridge vertically = knit 2 rows. PATTERN: See diagrams A.1 to A.8. Diagrams show all rows in pattern seen from the right side. KNIT TOGETHER: FROM RIGHT SIDE: Slip 1 stitch knitwise, knit 1, pass slipped stitch over stitch worked. FROM WRONG SIDE: Purl 2 together. STOCKING STITCH: When working from wrong side, purl and when working from right side, knit. INCREASE TIP (applies to sleeves): Work 1 past marker, make 1 yarn over, work as before until 2 stitches remain before marker at the end of round, make 1 yarn over. On next round work yarn overs twisted. When working A.2, purl the increase, when working A.7, work increase in pattern. ---------------------------------------------------------- START THE PIECE HERE: ---------------------------------------------------------- JUMPER - SHORT OVERVIEW OF THE PIECE: Work front and back piece back and forth separately. Work sleeves bottom up, in the round on double pointed needles/a short circular needle. Finish with a double neck. BACK PIECE: Cast on 98-110-110-122-134-146 stitches on circular needle size 4 mm with 1 strand of each quality (2 strands). Purl 1 row from wrong side. Work next row as follows from right side: 1 edge stitch in GARTER STITCH – read explanation above, work A.1 until 1 stitch remain, 1 stitch in garter stitch. When A.1 has been worked 1 time vertically, work pattern as follows: 1 edge stitch in garter stitch, work A.2 until 1 stitch remains, 1 edge stitch in garter stitch. When A.2 has been worked 1 time vertically, there are 114-128-128-142-156-170 stitches on needle. Switch to circular needle size 5.5 mm. Work pattern as follows: 1 edge stitch in garter stitch, work A.3 until 1 stitch remains, 1 edge stitch in garter stitch. REMEMBER THE KNITTING TENSION! Repeat A.3 vertically until piece measures 16-17-19-19-21-22 cm. Work pattern, begin from right side as follows: 1 edge stitch in garter stitch, work A.4 until 1 stitch remains and decrease at the same time 27-36-36-40-44-48 stitches evenly, 1 edge stitch in garter stitch = 87-92-92-102-112-122 stitches. When A.4 has been worked 1 time vertically, work pattern as follows: 1 edge stitch in garter stitch, work A.5 until 1 stitch remains, 1 edge stitch in garter stitch. Repeat A.5 vertically. Continue pattern like this until piece measures 33-35-36-38-39-41 cm. Work pattern, begin from right side as follows: 1 edge stitch in garter stitch, work A.6 until 1 stitch remains, 1 edge stitch in garter stitch. When A.6 has been worked 1 time vertically, there are 138-146-146-162-178-194 stitches on needle. Work pattern as follows: 1 edge stitch in garter stitch, work A.7 until 1 stitch remains, 1 edge stitch in garter stitch. Work A.7 3 times in total vertically. Piece measures approx. 45-47-48-50-51-53 cm. Work pattern as follows: 1 edge stitch in garter stitch, work A.8 until 1 stitch remains and decrease at the same time 51-54-54-60-66-72 stitches evenly, 1 edge stitch in garter stitch = 87-92-92-102-112-122 stitches. When A.8 has been worked 1 time vertically, work A.8a vertically until finished measurements. When piece measures 50-52-54-56-58-60 cm, cast off the middle 27-30-30-32-32-34 stitches for neck and finish each shoulder (30-31-31-35-40-44 stitches) separately. On next row from neck cast off 1 stitch at the beginning of row = 29-30-30-34-39-43 stitches. When piece measures 51-53-55-57-59-61 cm, work diagonal shoulder, begin on next row from the neck as follows: * Work pattern as before until 7-7-7-8-9-10 stitches remain, turn and work back *, work from *-* 3 times in total. I.e. work 7-7-7-8-9-10 stitches less on every row from the neck. On last row towards neck, cast on 2 new stitches at the end of row = 31-32-32-36-41-45 stitches. Now work and cast off with an edge over shoulder stitches. Work stitches cast on with shoulder stitches as follows: Work * 1 stitch in STOCKING STITCH – read explanation above, work next stitch together with first/next stitch from shoulder – read KNIT TOGETHER, pass the 2 stitches back on the needle they came from with strand on wrong side of piece, make sure not to tighten yarn too much *, work from *-* until all stitches from shoulder have been worked together with the 2 new stitches that were cast on. Cast off the 2 stitches. Work the other shoulder the same way. FRONT PIECE: Cast on and work as back piece until piece measures 46-48-49-51-52-54 cm = 87-92-92-102-112-122 stitches. Now slip the middle 15-18-18-20-20-22 stitches on a thread for neck and finish each shoulder (36-37-37-41-46-50 stitches) separately. Cast off stitches for neck on every row from neck as follows: Cast off 2 stitches 2 times in total and 1 stitch 3 times in total = 29-30-30-34-39-43 stitches remain on shoulder. Then work each shoulder as on back piece. SLEEVES: Cast on 60-60-60-72-72-72 stitches on double pointed needles size 4 mm with 1 strand of each quality. Knit 1 round. Insert 1 marker at beginning of round. Work A.1 in the round. When A.1 has been worked 1 time vertically, work A.2 over all stitches. When A.2 has been worked 1 time vertically, there are 70-70-70-84-84-84 stitches on row. Switch to double pointed needles size 5.5 mm. Work A.3 over all stitches. Work A.3 2 times in total vertically. Work A.8 over all stitches, on first round decrease 22-22-22-26-26-26 stitches evenly = 48-48-48-58-58-58 stitches. Repeat A.8a vertically until finished measurements. AT THE SAME TIME when piece measures 20 cm, increase 1 stitch on each side of marker - read INCREASE TIP! Increase like this every 3½-3½-2½-3-3-2 cm 6-6-8-6-6-8 times in total = 60-60-64-70-70-74 stitches. Work the increased stitches in the pattern. Cast off when sleeve measures 40-40-41-39-37-35 cm. Knit another sleeve the same way. ASSEMBLY: Sew shoulder seams inside 1 stitch on edge. Sew in sleeves. Sew side seams inside 1 edge stitch. DOUBLE COLLAR: Begin in one shoulder seam, pick up approx. 76 to 104 stitches around the neck (including stitches on thread) from right side, on a short circular needle size 4 mm with 1 strand in each quality. Number of stitches must be divisible by 4. Work rib (purl 2/knit 2) over all stitches. When neck measures 14 cm, cast off with knit over knit and purl over purl with circular needle size 5.5 mm (make sure to avoid a tight cast neck-off edge). Fold the rib down on inside of garment. Fasten rib to get a double neck edge. To avoid a tight neck edge that sticks out it is important to keep the seam elastic. |
||||||||||||||||
Diagram explanations |
||||||||||||||||
|
||||||||||||||||
 |
||||||||||||||||
 |
||||||||||||||||
 |
||||||||||||||||
Have you finished this pattern?Tag your pictures with #dropspattern #crackedwalnutssweater or submit them to the #dropsfan gallery. Do you need help with this pattern?You'll find 34 tutorial videos, a Comments/Questions area and more by visiting the pattern on garnstudio.com. © 1982-2025 DROPS Design A/S. We reserve all rights. This document, including all its sub-sections, has copyrights. Read more about what you can do with our patterns at the bottom of each pattern on our site. |
||||||||||||||||


With over 40 years in knitting and crochet design, DROPS Design offers one of the most extensive collections of free patterns on the internet - translated to 17 languages. As of today we count 320 catalogues and 12094 patterns translated into English (UK/cm). 12094
We work hard to bring you the best knitting and crochet have to offer, inspiration and advice as well as great quality yarns at incredible prices! Would you like to use our patterns for other than personal use? You can read what you are allowed to do in the Copyright text at the bottom of all our patterns. Happy crafting!
Post a comment to pattern DROPS 235-1
We would love to hear what you have to say about this pattern!
If you want to leave a question, please make sure you select the correct category in the form below, to speed up the answering process. Required fields are marked *.