
Popular categories
Looking for a yarn?


Comments / Questions (107)
![]() Turid Bergesen wrote:
Turid Bergesen wrote:
Hei. Jeg har lagt opp 76 masker. Når jeg skal sette på 4 markører blir det krøll. En markør mellom 3 og fjerde maske. Tell til 21/markør, tell 24, markør og tell 21/markør. Da sitter jeg igjen med 7 masker der det skal være 3. Hva gjør jeg evt feil? Turid
26.01.2022 - 16:10DROPS Design answered:
Hej Turid, du sætter mærkerne i maskerne :)
27.01.2022 - 15:52
![]() Dua wrote:
Dua wrote:
Hi,I'm confused about 4 stitchs with marker where they should belong befor separating sleves
20.12.2021 - 09:03DROPS Design answered:
Dear Dua, it may vary with the size, if you have the correct number of stitches before dividing, just work the dividing row as explained, ie work the stitch with body or slip it with the stitches for sleeves. Happy knitting!
20.12.2021 - 09:06
![]() Marie-helene wrote:
Marie-helene wrote:
Bonjour , Ontricote d'abord A1 puis A2 , est ce qu'aprés on ne tricote que A2 ou on doit alterner les deux ? Merci
16.12.2021 - 15:09DROPS Design answered:
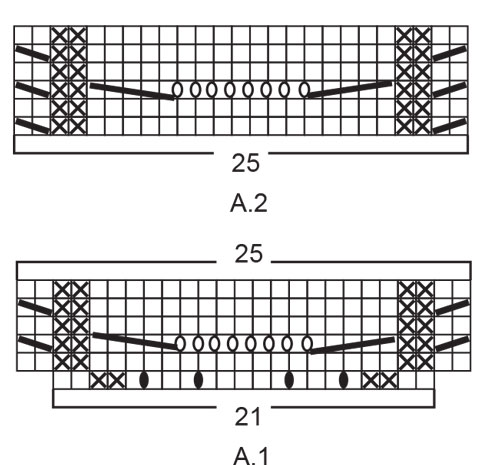
Bonjour Marie-Hélène, on tricote une seule fois A.1 (= on augmente ainsi le nombre de mailles pour avoir la bonne largeur pour le point de vagues), puis on répète toujours les 6 rangs de A.2 (sur25 m). Bon tricot
16.12.2021 - 16:46
![]() Nelly Vignon wrote:
Nelly Vignon wrote:
Bonjour Je ne comprends pas la différence dans le diagramme A1 et A2 au niveau des jetes qui sont représentés par un rond blanc ou noir dans les diagrammes Merci pour votre aide
16.11.2021 - 18:12DROPS Design answered:
Bonjour Mme Vignon, le 3ème symbole = ovale noir, est un jeté que l'on va tricoter torse au rang suivant pour éviter des trous; le 4ème symbole = ovale blanc, est un jeté que l'on va tricoter normalement, à l'envers, pour qu'il forme un trou. Les jetés du 1er rang de A.1 permettent d'augmenter, on ne veut pas de trous à ce niveau; les jetés blancs de A.1 et A.2 sont pour les trous/jours du point de vagues. Bon tricot!
17.11.2021 - 07:37
![]() Marta wrote:
Marta wrote:
To jest i komentarz i pytanie :) Sweter wydaje się ciekawy, ale nie mogę zobaczyć jak się prezentuje bez wyszukanych póz. Modelka niepotrzebnie zadziera dół swetra i nie widać jak się układa w całości. Czy jest możliwość prezentowania swetrów bez przekombinowanych zdjęć? Pozdrawiam zespół :)
15.10.2021 - 12:07DROPS Design answered:
Witaj Marto, weźmiemy to pod uwagę :) Tymczasem zobacz proszę schematyczny rysunek na dole. Poszukaj swetra/ubrania o wymiarach zbliżonych do wybranego przez siebie rozmiaru. Podobnie powinien układać się twój sweter. Nie zapomnij o wykonaniu próbki, aby ostateczne wymiary gotowego swetra były takie same. Pozdrawiamy!
17.10.2021 - 21:52
![]() Inger M wrote:
Inger M wrote:
Hej Jag har börjat sticka denna fina kofta i storlek XXL men får endast 374 maskor efter alla ökningar. Vad kan jag ha missat?
26.09.2021 - 21:39DROPS Design answered:
Hej Inger. Du börjar med 78 maskor, sedan ökar du 4 m per ärm i A.1 (=8 m ökat), sedan ökar du 33 gånger till raglan (33 x 8 m = 264 m), sedan ökar du 2 gånger till raglan endast på fram/bakstycke (2 x 4 m= 8 m), sedan ökar du 11 gånger till v-hals (11 x 2 m= 22 m). 78+8+264+8+22 = 380 m. Mvh DROPS Design
27.09.2021 - 07:47
![]() Hella Prins wrote:
Hella Prins wrote:
Beste mensen van Drops, bij dit patroon is het me niet duidelijk wat op pagina 3 bedoeld wordt met de tweede keer "TEGELIJKERTIJD" (begin V-hals). Tegelijkertijd waarmee wordt dan bedoeld? Direct al gelijk met het A.1 patroon in de mouw of tegelijkertijd met het " Ga nu verder met meerderen op het achterpand en op de voorpanden"? Alvast bedankt voor jullie reactie.
02.09.2021 - 18:10DROPS Design answered:
Dag Hella,
Het meerderen voor de v-hals begint tegelijkertijd Dus nadat je de markeerdraden hebt geplaatst meerder je voor de raglan en ook voor de v-hals. Dus gelijk vanaf het begin.
03.09.2021 - 09:16
![]() Katherine Leue wrote:
Katherine Leue wrote:
Ik ga maat L breien maarals ik de markeerdraden verdeel klopt dit niet,ikmoet4 markeerdraden verdelen over 74 steken,naast,3st,21st,22st,21st en dan3st ov?er ,dan kom ik maar 70st+2kantst is72st? Hoe zit dat aub?
29.06.2021 - 18:49DROPS Design answered:
Dag Katherine,
Je voegt de markeerdraden in de steken en niet tussen twee steken. Hierdor kom je op het volgende: 3 st + 1 markeerdraadsteek + 21 steken + 1 markeerdraadsteek + 22 steken + 1 markeerdraad steek + 21 steken + 1 markeerdraadsteek + 3 steken = 74 steken.
02.07.2021 - 09:36
![]() Céline wrote:
Céline wrote:
Bonjour, combien de pelotes faut-il pour réaliser ce gilet en taille M?
26.06.2021 - 15:14DROPS Design answered:
Bonjour Céline, vous trouverez toujours la quantité indiquée pour chaque taille au début des explications, au poids, autrement dit, il faudra en taille M ici 350 g DROPS Air/50 g la pelote = 7 pelotes DROPS Air. Bon tricot!
28.06.2021 - 07:34
![]() Friederike Andre wrote:
Friederike Andre wrote:
Sorry, doch kein Rechenfehler, sondern ein verkehrtes Wort: es sind zwar nur 3 Knöpfe übrig, aber 4 Abstände dazwischen. The mistake was in the word, not the basic math - there are only 3 buttons left but 4 spaces between them.
10.06.2021 - 12:08
|
|||||||||||||||||||||||||
Bronze Summer#bronzesummercardigan |
|||||||||||||||||||||||||
 |
 |
||||||||||||||||||||||||
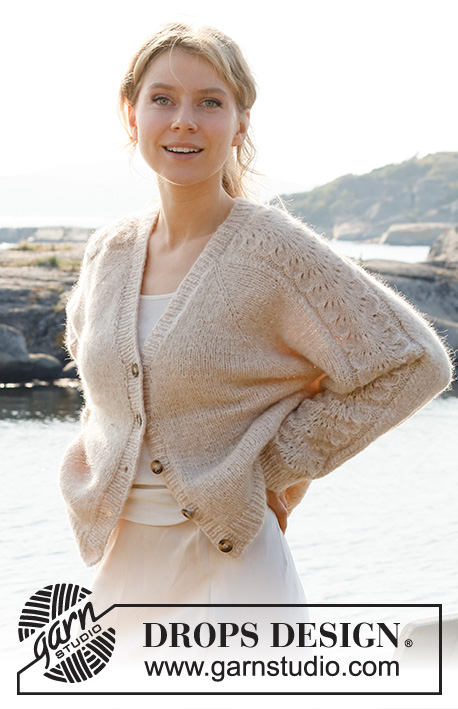
Knitted jacket in DROPS Air. Piece is knitted top down with raglan, lace pattern and V-neck. Size: S - XXXL
DROPS 221-4 |
|||||||||||||||||||||||||
|
------------------------------------------------------- EXPLANATION FOR THE PATTERN: ------------------------------------------------------- GARTER STITCH (back and forth): Knit all rows. 1 ridge vertically = knit 2 rows. PATTERN: See diagrams A.1 and A.2. RAGLAN: Increase 1 stitch on each side of 1 stitch in stocking stitch (stitch with marker thread) in every transition between body and sleeves (= 8 stitches increased on row). Increase 1 stitch by making 1 yarn over. On next row purl yarn overs twisted to avoid holes. Then work the new stitches in stocking stitch. V-NECK: All increases are done from the right side. Make 1 yarn over inside 1 edge stitch in garter stitch (= 1 stitch increased) in each side. On next row (wrong side) purl yarn over twisted to avoid holes. Then work the new stitches in stocking stitch. Increase 2 stitches in total on every increase row (1 stitch in each side). DECREASE TIP (applies to sleeves): Decrease 1 stitch on each side of marker thread as follows: Work until 3 stitches remain before marker thread and knit 2 together, knit 2 (marker thread is between these stitches), slip 1 stitch knitwise, knit 1, pass slipped stitch over stitch worked. CAST-OFF TIP: To avoid a tight cast-off edge you may use a larger needle size. If this also is too tight, work a 1 yarn over after approx. every 4th stitch while casting off (cast off yarn overs as regular stitches). BUTTONHOLES (applies to right band when garment is worn): Decrease for 5 buttonholes on right band. 1 buttonhole = work 2 stitches together and make 1 yarn over. On next row knit yarn over to make holes. Bottom buttonhole should be approx. 2 cm from bottom edge and top buttonhole where V-neck begins. Place the remaining 3 buttonholes evenly, approx. 8-8-8-7½-7½-7½ cm between each buttonhole. ------------------------------------------------------- START THE PIECE HERE: ------------------------------------------------------- JACKET - SHORT OVERVIEW OF THE PIECE: Work yoke back and forth on circular needle from mid front, work top down. AT THE SAME TIME increase V-neck and raglan. Now divide yoke for body and sleeves. Work body back and forth on circular needle, top down. Work sleeves in the round on double pointed needles/short circular needle, top down. At the end work a neck edge/band around the opening on jacket. YOKE: Cast on 70-72-74-76-78-80 stitches (including 1 edge stitch in each side towards mid front) on circular needle size 5 mm with Air. Purl 1 row from wrong side. OVERVIEW OF THE NEXT SECTION: Now start the pattern on the sleeves, at the same time increase for raglan and V-neck – therefore read the entire next section before starting. Insert 4 marker threads in piece as follows (without working the stitches): Count 3 stitches (= front piece), insert 1 marker thread in next stitch, count 21 stitches (= sleeve), insert 1 marker thread in next stitch, count 18-20-22-24-26-28 stitches (= back piece), insert 1 marker thread in next stitch, count 21 stitches (= sleeve), insert 1 marker thread in next stitch, 3 stitches remain on row after last marker thread (= front piece). Then work in stocking stitch on stitches on front pieces and on back piece, and A.1 (= 21 stitches) over stitches on each sleeve, AT THE SAME TIME on first row from right side increase for RAGLAN in every transition between body and sleeves – read explanation above. When A.1 has been worked 1 time vertically continue with A.2 (= 25 stitches) over stitches in A.1 and continue increase for raglan every other row (i.e. on every row from right side) until increase has been done 22-25-27-29-33-36 times in total on each side of the 4 stitches with marker threads. Now continue increase on back piece and on front pieces 2 more times (do not increase on sleeves, increase has been done 24-27-29-31-35-38 times on back piece/front pieces). AT THE SAME TIME on 6th row (i.e. on 3rd row from right side) increase for V-NECK in each side towards mid front – read explanation above, as follows: Increase every 6th row 4-5-6-7-8-9 times, every 4th row 3 times in total (= 7-8-9-10-11-12 stitches in total increased in each side towards mid front). REMEMBER THE KNITTING TENSION! After last increase for raglan continue without increases until piece measures 22-25-27-29-33-36 cm, increases for V-neck should now be finished. There are now 276-304-324-344-380-408 stitches on needle. Work next row as follows: Work the first 35-39-42-45-50-54 stitches (= front piece), slip the next 69-75-79-83-91-97 stitches on a stitch holder for sleeve, cast on 6-6-6-8-10-12 new stitches on row (= in the side under sleeve), work the next 68-76-82-88-98-106 stitches (= back piece), slip the next 69-75-79-83-91-97 stitches on a stitch holder for sleeve, cast on 6-6-6-8-10-12 new stitches on needle (= in the side under sleeve), and work the remaining 35-39-42-45-50-54 stitches (= front piece). NOW MEASURE PIECE FROM HERE! BODY: = 150-166-178-194-218-238 stitches. Continue with stocking stitch and 1 edge stitch in garter stitch in each side. When piece measures 25-24-24-24-22-21 cm from division, knit 1 row from right side while increasing 1 stitch = 151-167-179-195-219-239 stitches. Switch to circular needle size 4 mm. Work next row as follows from wrong side: 1 edge stitch in garter stitch, * purl 1, knit 1 *, repeat from *-* until 2 stitches remain on needle, purl 1 and finish with 1 edge stitch in garter stitch. Continue rib like this for 4 cm. Loosely cast off with knit over knit and purl over purl, read CAST-OFF TIP. Jacket measures approx. 56-58-60-62-64-66 cm from shoulder. SLEEVE: Slip the 69-75-79-83-91-97 stitches from stitch holder in one side of piece on a short circular needle/double pointed needles size 5 mm and pick in addition up 1 stitch in each of the 6-6-6-8-10-12 stitches cast on in the side under sleeve = 75-81-85-91-101-109 stitches. Insert 1 marker thread in the middle of the 6-6-6-8-10-12 stitches under sleeve and move the marker thread upwards when working, it is used for decrease later. Begin round at the marker thread and continue with A.2 and stocking stitch in the round. When piece measures 3 cm from division, decrease 2 stitches mid under sleeve - read DECREASE TIP. Decrease like this every 3½-3-2-1½-1-1 cm 10-11-13-16-19-21 times in total = 55-59-59-59-63-67 stitches. Continue until piece measures 38-36-34-33-29-26 cm from division - or desired length (shorter measurements in the larger sizes because of longer yoke). Work 1 round while decreasing 11 stitches evenly over stitches in A.2 = 44-48-48-48-52-56 stitches. Switch to double pointed needles size 4 mm and work rib in the round = knit 1/purl 1 for 4 cm. Loosely cast off with knit over knit and purl over purl – remember CAST-OFF TIP. Work the other sleeve the same way. BAND + NECK EDGE: Insert 1 marker mid back of neck on back piece, marker should be used to calculate half the stitches on band/neck edge. Pick up band inside 1 edge stitch in garter stitch on front pieces, and in the 1st row worked around the neck. Begin at the bottom on right front piece from right side and pick up approx. 119-125-131-137-143-149 stitches along the entire front edge up to marker in the neck, on circular needle size 4 mm – leave the marker here. Continue to pick up approx. 120-126-132-138-144-150 stitches along the entire front edge on left front piece, total number of stitches should be divisible by 2 + 1 = approx. 239-251-263-275-287-299 stitches. It is important that the rib is not too loose with too many stitches but it should not be too tight either with tight front edges. Work next row as follows from wrong side: 2 stitches in garter stitch, * purl 1, knit 1 *, repeat from *-* until 3 stitches remain, purl 1 and finish with 2 stitches in garter stitch. Continue rib like this. When piece measures 1 ½ cm decrease for BUTTONHOLES on right band - read explanation above. Continue like this until rib measures 3 cm. Loosely cast off with knit over knit and purl over purl, remember cast-off tip. ASSEMBLY Sew the buttons on to the left band. |
|||||||||||||||||||||||||
Diagram explanations |
|||||||||||||||||||||||||
|
|||||||||||||||||||||||||
|
|||||||||||||||||||||||||

|
|||||||||||||||||||||||||
Have you finished this pattern?Tag your pictures with #dropspattern #bronzesummercardigan or submit them to the #dropsfan gallery. Do you need help with this pattern?You'll find 32 tutorial videos, a Comments/Questions area and more by visiting the pattern on garnstudio.com. © 1982-2025 DROPS Design A/S. We reserve all rights. This document, including all its sub-sections, has copyrights. Read more about what you can do with our patterns at the bottom of each pattern on our site. |
|||||||||||||||||||||||||


With over 40 years in knitting and crochet design, DROPS Design offers one of the most extensive collections of free patterns on the internet - translated to 17 languages. As of today we count 314 catalogues and 11820 patterns translated into English (UK/cm). 11820
We work hard to bring you the best knitting and crochet have to offer, inspiration and advice as well as great quality yarns at incredible prices! Would you like to use our patterns for other than personal use? You can read what you are allowed to do in the Copyright text at the bottom of all our patterns. Happy crafting!
Post a comment to pattern DROPS 221-4
We would love to hear what you have to say about this pattern!
If you want to leave a question, please make sure you select the correct category in the form below, to speed up the answering process. Required fields are marked *.