
Popular categories
Looking for a yarn?


Comments / Questions (107)
![]() Deni wrote:
Deni wrote:
Hello, Can you explain how to do yarn over for V neck increases? In the pattern it says to make 1 YO inside 1 edge stitch.
21.03.2024 - 16:05DROPS Design answered:
Dear Dany, please see the explanations under the V_NECK chapter. You knit the edge stitch, do a YO, then knit (as described in the pattern) until the last stitch, YO, and do the edge stitch. In the next row, these yarnovers are knitted TWISTED, so there will be no holes in their places. I hope this helps. Happy Knitting!
21.03.2024 - 21:51
![]() Anna Pędras wrote:
Anna Pędras wrote:
Oczka na dekolt zaczynam dodawać po tym jak skończę dodawanie 22x8? Zaczynam liczyć 6 rząd od momentu gdy dodaję już tylko na przód/tył tak?
10.03.2024 - 20:58DROPS Design answered:
Witaj Aniu, zaczynasz dodawać oczka na reglan, a od 6-tego rzędu (tj. w 3-cim rzędzie na prawej stronie robótki - licząc od początku dodawania oczek na reglan) równocześnie będziesz dodawać oczka na dekolt V z każdej strony. Zobacz SKRÓCONY OPIS KOLEJNEJ CZĘŚCI OPISU. Pozdrawiamy!
11.03.2024 - 08:35
![]() Susi wrote:
Susi wrote:
Kann ich den Zopf auf den Ärmeln einfach weg lassen ? Oder gibt es das Modell auch mit schlichten Ärmeln ?
01.01.2024 - 11:52DROPS Design answered:
Liebe Susi, die Breite von den Ärmeln würde also verschieden, am besten stricken Sie die kleine Zöpfe. Viel Spaß beim stricken!
02.01.2024 - 11:58
![]() Aurélie Chartier wrote:
Aurélie Chartier wrote:
Bonjour, faut il augmenter au niveau du raglan sur tous les rangs (même les rangs envers)ou que sur l'endroit? Merci
27.12.2023 - 20:50DROPS Design answered:
Bonjour Mme Chartier, on augmente pour le raglan d'abord tous les 2 rangs (= tous les rangs sur l'endroit) pour le dos/les devants et les manches (on augmente 8 mailles) puis on va augmenter encore 2 fois juste sur le dos et les devants tous les 2 rangs également (tous les rangs sur l'endroit) (on augmente alors juste 4 mailles). En même temps, augmentez pour l'encolure (également sur l'endroit) d'abord tous les 6 rangs (tous les 3 rangs sur l'endroit) puis tous les 4 rangs (tous les 2 rangs sur l'endroit). Bon tricot!
02.01.2024 - 09:07
![]() Katarzyna wrote:
Katarzyna wrote:
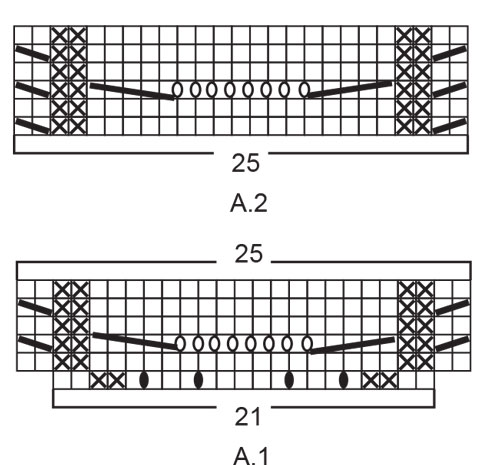
Jeszcze tylko się upewnię , czy schematy A1 i A2 pokazują rzędy prawe i lewe?
21.12.2023 - 11:17DROPS Design answered:
Witaj Kasiu, schemat pokazuje wszystkie rzędy w robótce. Koniecznie zapoznaj się z opisem symboli schematów na dole strony, które wyjaśniają między innymi jak są przerabiane oczka na prawej i lewej stronie robótki. Pozdrawiam!
21.12.2023 - 12:32
![]() Katarzyna wrote:
Katarzyna wrote:
Dziękuję :-)
20.12.2023 - 09:10
![]() Katarzyna wrote:
Katarzyna wrote:
A2: aż oczka zostaną dodane w sumie 22 razy z każdej strony 4 oczek z nitką markerem. Czy to oznacza że 22x8=176.Dodawać teraz jeszcze 2 razy na tyle i przodach -czyli +4 oczka? jak ma mi wyjść na końcu 276 oczek?
19.12.2023 - 14:43DROPS Design answered:
Witaj Kasiu, zaczynasz od 70 oczek, a jak zaczynasz przerabiać schemat A.1 dodajesz po 4 oczka w każdym z 2 schematów (70+8=78). Następnie dodajesz na reglan (22x8)+ (2x4)= 176+8=184 i na dekolt 2x7=14. Czyli 78+184+14= 276. Pozdrawiamy!
20.12.2023 - 08:25
![]() Rosanne wrote:
Rosanne wrote:
Begin ik met de meerderingen voor de V hals vanaf de start van de raglan meerderingen? Of pas als de raglan meerderingen alleen op de panden moeten (dus voor maar M pas na 25 raglan meerderingen?) In de vraag-en antwoorden wordt tegenstrijdig advies gegeven, beide opties worden genoemd.
01.12.2023 - 13:50DROPS Design answered:
Dag Rosanne,
Ja, je meerdert inderdaad tegelijkertijd voor de V-hals, dus als je start met de meerderingen voor de raglan, start je ook met de meerderingen voor de v-hals zoals beschreven (dus voor de v-hals op iedere 6e naald)
01.12.2023 - 17:37
![]() Tine wrote:
Tine wrote:
Aj for den da, det har jeg ikke. Synes ikke at det fremgår helt klart af opskriften. Det vil sige, at det hele skal strikkes om. Jeg skal også lige være helt sikker, man tager ud første gang på pind 6 x flere og derefter på hver 4. pind.
27.09.2023 - 15:03
![]() Tine wrote:
Tine wrote:
Hej Jeg strikker en str. L og er ved at tage ud til hals. Jeg har taget ud to gange, og allerede nu måler arbejdet 30 cm. I opskrift skal arbejdet være 27cm, når der er færdigudtaget til hals, hvad gør jeg her? Strikkefastheden holder stadig. Vh. Tine
18.09.2023 - 21:13DROPS Design answered:
Hej Tine, har du taget ud til hals helt fra starten? Du tager ud til hals SAMTIDIG som til raglan :)
26.09.2023 - 14:51
|
|||||||||||||||||||||||||
Bronze Summer#bronzesummercardigan |
|||||||||||||||||||||||||
 |
 |
||||||||||||||||||||||||
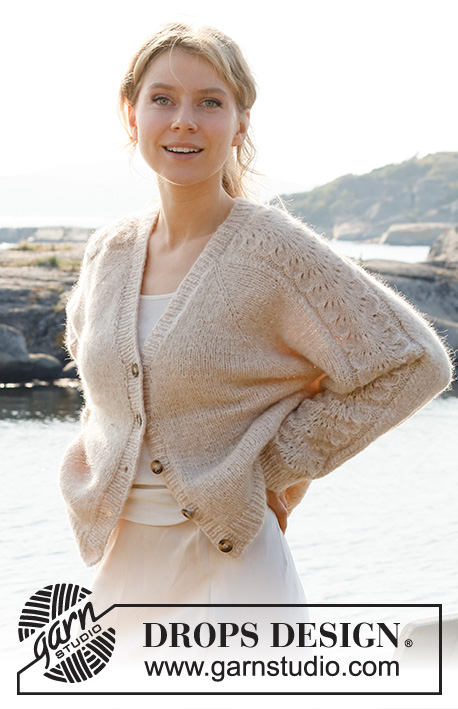
Knitted jacket in DROPS Air. Piece is knitted top down with raglan, lace pattern and V-neck. Size: S - XXXL
DROPS 221-4 |
|||||||||||||||||||||||||
|
------------------------------------------------------- EXPLANATION FOR THE PATTERN: ------------------------------------------------------- GARTER STITCH (back and forth): Knit all rows. 1 ridge vertically = knit 2 rows. PATTERN: See diagrams A.1 and A.2. RAGLAN: Increase 1 stitch on each side of 1 stitch in stocking stitch (stitch with marker thread) in every transition between body and sleeves (= 8 stitches increased on row). Increase 1 stitch by making 1 yarn over. On next row purl yarn overs twisted to avoid holes. Then work the new stitches in stocking stitch. V-NECK: All increases are done from the right side. Make 1 yarn over inside 1 edge stitch in garter stitch (= 1 stitch increased) in each side. On next row (wrong side) purl yarn over twisted to avoid holes. Then work the new stitches in stocking stitch. Increase 2 stitches in total on every increase row (1 stitch in each side). DECREASE TIP (applies to sleeves): Decrease 1 stitch on each side of marker thread as follows: Work until 3 stitches remain before marker thread and knit 2 together, knit 2 (marker thread is between these stitches), slip 1 stitch knitwise, knit 1, pass slipped stitch over stitch worked. CAST-OFF TIP: To avoid a tight cast-off edge you may use a larger needle size. If this also is too tight, work a 1 yarn over after approx. every 4th stitch while casting off (cast off yarn overs as regular stitches). BUTTONHOLES (applies to right band when garment is worn): Decrease for 5 buttonholes on right band. 1 buttonhole = work 2 stitches together and make 1 yarn over. On next row knit yarn over to make holes. Bottom buttonhole should be approx. 2 cm from bottom edge and top buttonhole where V-neck begins. Place the remaining 3 buttonholes evenly, approx. 8-8-8-7½-7½-7½ cm between each buttonhole. ------------------------------------------------------- START THE PIECE HERE: ------------------------------------------------------- JACKET - SHORT OVERVIEW OF THE PIECE: Work yoke back and forth on circular needle from mid front, work top down. AT THE SAME TIME increase V-neck and raglan. Now divide yoke for body and sleeves. Work body back and forth on circular needle, top down. Work sleeves in the round on double pointed needles/short circular needle, top down. At the end work a neck edge/band around the opening on jacket. YOKE: Cast on 70-72-74-76-78-80 stitches (including 1 edge stitch in each side towards mid front) on circular needle size 5 mm with Air. Purl 1 row from wrong side. OVERVIEW OF THE NEXT SECTION: Now start the pattern on the sleeves, at the same time increase for raglan and V-neck – therefore read the entire next section before starting. Insert 4 marker threads in piece as follows (without working the stitches): Count 3 stitches (= front piece), insert 1 marker thread in next stitch, count 21 stitches (= sleeve), insert 1 marker thread in next stitch, count 18-20-22-24-26-28 stitches (= back piece), insert 1 marker thread in next stitch, count 21 stitches (= sleeve), insert 1 marker thread in next stitch, 3 stitches remain on row after last marker thread (= front piece). Then work in stocking stitch on stitches on front pieces and on back piece, and A.1 (= 21 stitches) over stitches on each sleeve, AT THE SAME TIME on first row from right side increase for RAGLAN in every transition between body and sleeves – read explanation above. When A.1 has been worked 1 time vertically continue with A.2 (= 25 stitches) over stitches in A.1 and continue increase for raglan every other row (i.e. on every row from right side) until increase has been done 22-25-27-29-33-36 times in total on each side of the 4 stitches with marker threads. Now continue increase on back piece and on front pieces 2 more times (do not increase on sleeves, increase has been done 24-27-29-31-35-38 times on back piece/front pieces). AT THE SAME TIME on 6th row (i.e. on 3rd row from right side) increase for V-NECK in each side towards mid front – read explanation above, as follows: Increase every 6th row 4-5-6-7-8-9 times, every 4th row 3 times in total (= 7-8-9-10-11-12 stitches in total increased in each side towards mid front). REMEMBER THE KNITTING TENSION! After last increase for raglan continue without increases until piece measures 22-25-27-29-33-36 cm, increases for V-neck should now be finished. There are now 276-304-324-344-380-408 stitches on needle. Work next row as follows: Work the first 35-39-42-45-50-54 stitches (= front piece), slip the next 69-75-79-83-91-97 stitches on a stitch holder for sleeve, cast on 6-6-6-8-10-12 new stitches on row (= in the side under sleeve), work the next 68-76-82-88-98-106 stitches (= back piece), slip the next 69-75-79-83-91-97 stitches on a stitch holder for sleeve, cast on 6-6-6-8-10-12 new stitches on needle (= in the side under sleeve), and work the remaining 35-39-42-45-50-54 stitches (= front piece). NOW MEASURE PIECE FROM HERE! BODY: = 150-166-178-194-218-238 stitches. Continue with stocking stitch and 1 edge stitch in garter stitch in each side. When piece measures 25-24-24-24-22-21 cm from division, knit 1 row from right side while increasing 1 stitch = 151-167-179-195-219-239 stitches. Switch to circular needle size 4 mm. Work next row as follows from wrong side: 1 edge stitch in garter stitch, * purl 1, knit 1 *, repeat from *-* until 2 stitches remain on needle, purl 1 and finish with 1 edge stitch in garter stitch. Continue rib like this for 4 cm. Loosely cast off with knit over knit and purl over purl, read CAST-OFF TIP. Jacket measures approx. 56-58-60-62-64-66 cm from shoulder. SLEEVE: Slip the 69-75-79-83-91-97 stitches from stitch holder in one side of piece on a short circular needle/double pointed needles size 5 mm and pick in addition up 1 stitch in each of the 6-6-6-8-10-12 stitches cast on in the side under sleeve = 75-81-85-91-101-109 stitches. Insert 1 marker thread in the middle of the 6-6-6-8-10-12 stitches under sleeve and move the marker thread upwards when working, it is used for decrease later. Begin round at the marker thread and continue with A.2 and stocking stitch in the round. When piece measures 3 cm from division, decrease 2 stitches mid under sleeve - read DECREASE TIP. Decrease like this every 3½-3-2-1½-1-1 cm 10-11-13-16-19-21 times in total = 55-59-59-59-63-67 stitches. Continue until piece measures 38-36-34-33-29-26 cm from division - or desired length (shorter measurements in the larger sizes because of longer yoke). Work 1 round while decreasing 11 stitches evenly over stitches in A.2 = 44-48-48-48-52-56 stitches. Switch to double pointed needles size 4 mm and work rib in the round = knit 1/purl 1 for 4 cm. Loosely cast off with knit over knit and purl over purl – remember CAST-OFF TIP. Work the other sleeve the same way. BAND + NECK EDGE: Insert 1 marker mid back of neck on back piece, marker should be used to calculate half the stitches on band/neck edge. Pick up band inside 1 edge stitch in garter stitch on front pieces, and in the 1st row worked around the neck. Begin at the bottom on right front piece from right side and pick up approx. 119-125-131-137-143-149 stitches along the entire front edge up to marker in the neck, on circular needle size 4 mm – leave the marker here. Continue to pick up approx. 120-126-132-138-144-150 stitches along the entire front edge on left front piece, total number of stitches should be divisible by 2 + 1 = approx. 239-251-263-275-287-299 stitches. It is important that the rib is not too loose with too many stitches but it should not be too tight either with tight front edges. Work next row as follows from wrong side: 2 stitches in garter stitch, * purl 1, knit 1 *, repeat from *-* until 3 stitches remain, purl 1 and finish with 2 stitches in garter stitch. Continue rib like this. When piece measures 1 ½ cm decrease for BUTTONHOLES on right band - read explanation above. Continue like this until rib measures 3 cm. Loosely cast off with knit over knit and purl over purl, remember cast-off tip. ASSEMBLY Sew the buttons on to the left band. |
|||||||||||||||||||||||||
Diagram explanations |
|||||||||||||||||||||||||
|
|||||||||||||||||||||||||
|
|||||||||||||||||||||||||

|
|||||||||||||||||||||||||
Have you finished this pattern?Tag your pictures with #dropspattern #bronzesummercardigan or submit them to the #dropsfan gallery. Do you need help with this pattern?You'll find 32 tutorial videos, a Comments/Questions area and more by visiting the pattern on garnstudio.com. © 1982-2025 DROPS Design A/S. We reserve all rights. This document, including all its sub-sections, has copyrights. Read more about what you can do with our patterns at the bottom of each pattern on our site. |
|||||||||||||||||||||||||


With over 40 years in knitting and crochet design, DROPS Design offers one of the most extensive collections of free patterns on the internet - translated to 17 languages. As of today we count 314 catalogues and 11820 patterns translated into English (UK/cm). 11820
We work hard to bring you the best knitting and crochet have to offer, inspiration and advice as well as great quality yarns at incredible prices! Would you like to use our patterns for other than personal use? You can read what you are allowed to do in the Copyright text at the bottom of all our patterns. Happy crafting!
Post a comment to pattern DROPS 221-4
We would love to hear what you have to say about this pattern!
If you want to leave a question, please make sure you select the correct category in the form below, to speed up the answering process. Required fields are marked *.