
Popular categories
Looking for a yarn?


Comments / Questions (107)
![]() Cecilia Ekengren wrote:
Cecilia Ekengren wrote:
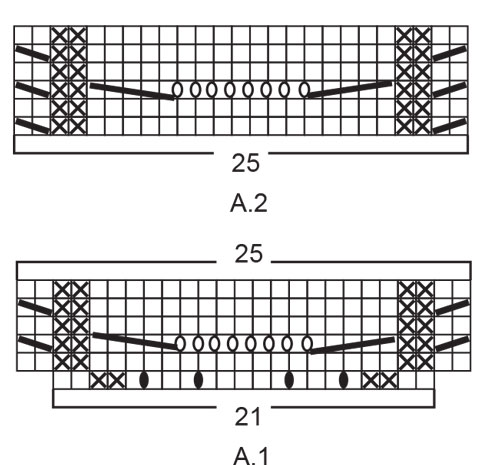
När A1 är stickat en gång på höjden i början av arbetet så ska man sticka A2. Men sen då? Repeterar man (bara) A2 sen?
14.12.2024 - 14:08DROPS Design answered:
Hei Cecilia. Ja, det stemmer :) mvh DROPS Design
16.12.2024 - 11:17
![]() Anette wrote:
Anette wrote:
Hej Jeg skal igang med denne smukke cardigan, men får ikke tallene til at passe. I str L, slå 74 op, raglan (8x27=216) og igen (4x2=8), og hals (9x2=18). Dvs 74+216+8+18=316, men opskriften siger 324 masker. Hvor går det galt? Hilsen Anette
05.12.2024 - 09:36DROPS Design answered:
Hei Anette. Kan du ha glemt de 4 kastene på 1. pinne i A.1. A.1 strikkes 2 ganger = 8 masker? 74+8+216+8+18= 324 masker. mvh DROPS Design
09.12.2024 - 11:38
![]() Susanne Risager Hougaard wrote:
Susanne Risager Hougaard wrote:
Hej Jeg søger en opskrift som er blevet væk. Det er en grøn cardigan med et mønster på ærmet som ligner mønstret i denne opskrift. Derudover var cardigan strikket på pind 5. Og i perle strik. Jeg fandt den på drops den 21 10. 24. Men nu er den væk. Den bliver strikket nede fra, det ene forstykke og derefter ud i ærmet i et. Hvis i kan være behjælpelige med denne opskrift. Vil jeg blive glad. Mvh Susanne.
10.11.2024 - 18:51
![]() Margret Scipio-Verploegen wrote:
Margret Scipio-Verploegen wrote:
In het patroon van de mouwen staat: 5 STEKEN RECHT SAMEN. Plaatsen op linkernld, haal de VOLGENDE tot de LAATSTE steek over. Welke steek wordt bedoeld met de VOLGENDE? de 2e steek vanaf het begin over de 1ste steek op de linkernld en zo verder voor de rest? Hetzelfde is onduidelijk bij 5 STEKEN GEDRAAID RECHT SAMEN. Is de volgende de 5e steek en dan naar voren of begin je bij de 2e steek op de naald?
17.10.2024 - 11:06DROPS Design answered:
Dag Margret,
Er stond een vertaalfout in, het moest een na laatste steek zijn in plaats van volgende tot laatste steek. Als het goed is, is het nu aangepast in het online patroon.
19.10.2024 - 10:52
![]() Nina Kristin Espeland wrote:
Nina Kristin Espeland wrote:
Hei. Kor stor skal bronze summer cardigan bli over bysten i størrelsene M-L-XL? Finner ikkje dette målet på oppskriften.
09.07.2024 - 13:20DROPS Design answered:
Hei Nina. Målskissen med cm mål til oppskriften finner du nederst på siden. Det er ikke felt eller økt masker i siden, så brystmålet er det samme som du ser nederst på jakken. mvh DROPS Design
09.07.2024 - 13:24
![]() Gunnfrid Eide wrote:
Gunnfrid Eide wrote:
Strikkar på ei jakke, Drops 221-4,Bronze Summer. Eg får ikkje mønsteret til å stemme - når eg aukar raglan, skal det bli eit aukande felt med rettstrikk ved sida av mønsteret langs armen. Når eg fylgjer oppskrifta, får eg ikkje dette feltet, berre aukande masketal på framstykket og på ryggen - kva gjer eg feil ?
02.07.2024 - 21:31DROPS Design answered:
Hej Gunnfrid, jo du skal øge på hver side af den glatstrikkede maske (den ene side er på ærmet og den anden side er forstykke eller rygstykke) Se forklaring: RAGLAN: Øk 1 maske på hver side av 1 maske glattstrikk (masken med merketråd) i hver overgang mellom bol og ermer (= 8 masker økt på pinnen). Øk 1 maske ved å lage 1 kast om pinnen. På neste pinne strikkes kastene vridd vrang slik at det ikke blir hull. Videre strikkes de nye maskene i glattstrikk.
03.07.2024 - 08:01
![]() Rochelle wrote:
Rochelle wrote:
Hi, Can you clarify. When do I start the increases on the V neck sides? Every 2nd (right side) row or on the 6th row from the start of pattern, or after A1. is complete, start increases on V neck every 6th row and 4th row ? (size L) Thanks
26.05.2024 - 08:15DROPS Design answered:
Dear Rochelle, after you start knitting the pattern A.2 (on the stitches of the earlier A.1), on the 6th row should you start the increases for the V neck, and then you should "Increase every 6th row 4-5-6-7-8-9 times, every 4th row 3 times in total". Happy Knitting!
26.05.2024 - 11:26
![]() Deni wrote:
Deni wrote:
Can you explain the part where I'm supposed to pick up in addition 1 stitch in each of the 10 sts casted on under sleeves(size xxl)?thanks.
30.04.2024 - 15:08DROPS Design answered:
Dear Deni, if you click on the "Videos" just elow the itle line, you can find a bunch of relevant videos that can help yoi knit this piece. For underarms, you should pick up one stitches in each one you casted on, when divided the body and the sleeves, much like THIS video shows. Happy Crafting!
30.04.2024 - 15:29
![]() Deni wrote:
Deni wrote:
Can you explain please when is V neck increasing supposed to start for size L? I finished diagram A1 and about to start A2.
02.04.2024 - 09:01DROPS Design answered:
Hi Deni, You begin to increase for the V-neck on row 6 in A.2 (3rd row from the right side). Happy knitting!
03.04.2024 - 06:45
![]() Deni wrote:
Deni wrote:
So it is standard YO.I was wondering because in pattern explanation it says do it within the edge stitch. Thanks.
22.03.2024 - 06:38DROPS Design answered:
Dear Deni, yes, it's worked as a standard YO. In this case "within" is used as within the edge/band (not specifically the stitch) so it should be right next to the edge (that is, right after or before the edge stitch). Happy knitting!
24.03.2024 - 23:30
|
|||||||||||||||||||||||||
Bronze Summer#bronzesummercardigan |
|||||||||||||||||||||||||
 |
 |
||||||||||||||||||||||||
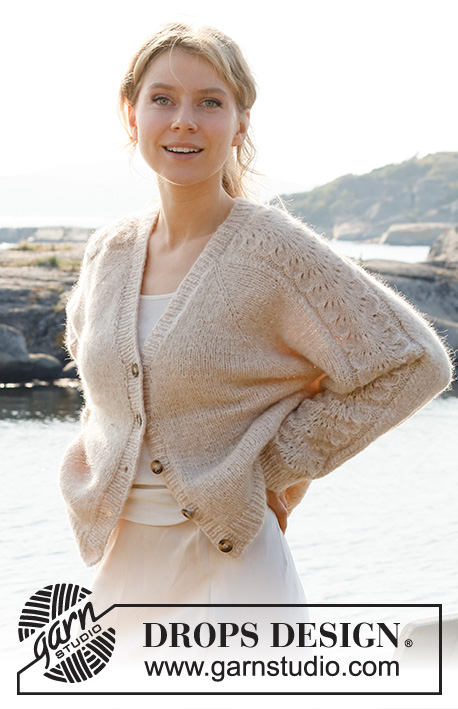
Knitted jacket in DROPS Air. Piece is knitted top down with raglan, lace pattern and V-neck. Size: S - XXXL
DROPS 221-4 |
|||||||||||||||||||||||||
|
------------------------------------------------------- EXPLANATION FOR THE PATTERN: ------------------------------------------------------- GARTER STITCH (back and forth): Knit all rows. 1 ridge vertically = knit 2 rows. PATTERN: See diagrams A.1 and A.2. RAGLAN: Increase 1 stitch on each side of 1 stitch in stocking stitch (stitch with marker thread) in every transition between body and sleeves (= 8 stitches increased on row). Increase 1 stitch by making 1 yarn over. On next row purl yarn overs twisted to avoid holes. Then work the new stitches in stocking stitch. V-NECK: All increases are done from the right side. Make 1 yarn over inside 1 edge stitch in garter stitch (= 1 stitch increased) in each side. On next row (wrong side) purl yarn over twisted to avoid holes. Then work the new stitches in stocking stitch. Increase 2 stitches in total on every increase row (1 stitch in each side). DECREASE TIP (applies to sleeves): Decrease 1 stitch on each side of marker thread as follows: Work until 3 stitches remain before marker thread and knit 2 together, knit 2 (marker thread is between these stitches), slip 1 stitch knitwise, knit 1, pass slipped stitch over stitch worked. CAST-OFF TIP: To avoid a tight cast-off edge you may use a larger needle size. If this also is too tight, work a 1 yarn over after approx. every 4th stitch while casting off (cast off yarn overs as regular stitches). BUTTONHOLES (applies to right band when garment is worn): Decrease for 5 buttonholes on right band. 1 buttonhole = work 2 stitches together and make 1 yarn over. On next row knit yarn over to make holes. Bottom buttonhole should be approx. 2 cm from bottom edge and top buttonhole where V-neck begins. Place the remaining 3 buttonholes evenly, approx. 8-8-8-7½-7½-7½ cm between each buttonhole. ------------------------------------------------------- START THE PIECE HERE: ------------------------------------------------------- JACKET - SHORT OVERVIEW OF THE PIECE: Work yoke back and forth on circular needle from mid front, work top down. AT THE SAME TIME increase V-neck and raglan. Now divide yoke for body and sleeves. Work body back and forth on circular needle, top down. Work sleeves in the round on double pointed needles/short circular needle, top down. At the end work a neck edge/band around the opening on jacket. YOKE: Cast on 70-72-74-76-78-80 stitches (including 1 edge stitch in each side towards mid front) on circular needle size 5 mm with Air. Purl 1 row from wrong side. OVERVIEW OF THE NEXT SECTION: Now start the pattern on the sleeves, at the same time increase for raglan and V-neck – therefore read the entire next section before starting. Insert 4 marker threads in piece as follows (without working the stitches): Count 3 stitches (= front piece), insert 1 marker thread in next stitch, count 21 stitches (= sleeve), insert 1 marker thread in next stitch, count 18-20-22-24-26-28 stitches (= back piece), insert 1 marker thread in next stitch, count 21 stitches (= sleeve), insert 1 marker thread in next stitch, 3 stitches remain on row after last marker thread (= front piece). Then work in stocking stitch on stitches on front pieces and on back piece, and A.1 (= 21 stitches) over stitches on each sleeve, AT THE SAME TIME on first row from right side increase for RAGLAN in every transition between body and sleeves – read explanation above. When A.1 has been worked 1 time vertically continue with A.2 (= 25 stitches) over stitches in A.1 and continue increase for raglan every other row (i.e. on every row from right side) until increase has been done 22-25-27-29-33-36 times in total on each side of the 4 stitches with marker threads. Now continue increase on back piece and on front pieces 2 more times (do not increase on sleeves, increase has been done 24-27-29-31-35-38 times on back piece/front pieces). AT THE SAME TIME on 6th row (i.e. on 3rd row from right side) increase for V-NECK in each side towards mid front – read explanation above, as follows: Increase every 6th row 4-5-6-7-8-9 times, every 4th row 3 times in total (= 7-8-9-10-11-12 stitches in total increased in each side towards mid front). REMEMBER THE KNITTING TENSION! After last increase for raglan continue without increases until piece measures 22-25-27-29-33-36 cm, increases for V-neck should now be finished. There are now 276-304-324-344-380-408 stitches on needle. Work next row as follows: Work the first 35-39-42-45-50-54 stitches (= front piece), slip the next 69-75-79-83-91-97 stitches on a stitch holder for sleeve, cast on 6-6-6-8-10-12 new stitches on row (= in the side under sleeve), work the next 68-76-82-88-98-106 stitches (= back piece), slip the next 69-75-79-83-91-97 stitches on a stitch holder for sleeve, cast on 6-6-6-8-10-12 new stitches on needle (= in the side under sleeve), and work the remaining 35-39-42-45-50-54 stitches (= front piece). NOW MEASURE PIECE FROM HERE! BODY: = 150-166-178-194-218-238 stitches. Continue with stocking stitch and 1 edge stitch in garter stitch in each side. When piece measures 25-24-24-24-22-21 cm from division, knit 1 row from right side while increasing 1 stitch = 151-167-179-195-219-239 stitches. Switch to circular needle size 4 mm. Work next row as follows from wrong side: 1 edge stitch in garter stitch, * purl 1, knit 1 *, repeat from *-* until 2 stitches remain on needle, purl 1 and finish with 1 edge stitch in garter stitch. Continue rib like this for 4 cm. Loosely cast off with knit over knit and purl over purl, read CAST-OFF TIP. Jacket measures approx. 56-58-60-62-64-66 cm from shoulder. SLEEVE: Slip the 69-75-79-83-91-97 stitches from stitch holder in one side of piece on a short circular needle/double pointed needles size 5 mm and pick in addition up 1 stitch in each of the 6-6-6-8-10-12 stitches cast on in the side under sleeve = 75-81-85-91-101-109 stitches. Insert 1 marker thread in the middle of the 6-6-6-8-10-12 stitches under sleeve and move the marker thread upwards when working, it is used for decrease later. Begin round at the marker thread and continue with A.2 and stocking stitch in the round. When piece measures 3 cm from division, decrease 2 stitches mid under sleeve - read DECREASE TIP. Decrease like this every 3½-3-2-1½-1-1 cm 10-11-13-16-19-21 times in total = 55-59-59-59-63-67 stitches. Continue until piece measures 38-36-34-33-29-26 cm from division - or desired length (shorter measurements in the larger sizes because of longer yoke). Work 1 round while decreasing 11 stitches evenly over stitches in A.2 = 44-48-48-48-52-56 stitches. Switch to double pointed needles size 4 mm and work rib in the round = knit 1/purl 1 for 4 cm. Loosely cast off with knit over knit and purl over purl – remember CAST-OFF TIP. Work the other sleeve the same way. BAND + NECK EDGE: Insert 1 marker mid back of neck on back piece, marker should be used to calculate half the stitches on band/neck edge. Pick up band inside 1 edge stitch in garter stitch on front pieces, and in the 1st row worked around the neck. Begin at the bottom on right front piece from right side and pick up approx. 119-125-131-137-143-149 stitches along the entire front edge up to marker in the neck, on circular needle size 4 mm – leave the marker here. Continue to pick up approx. 120-126-132-138-144-150 stitches along the entire front edge on left front piece, total number of stitches should be divisible by 2 + 1 = approx. 239-251-263-275-287-299 stitches. It is important that the rib is not too loose with too many stitches but it should not be too tight either with tight front edges. Work next row as follows from wrong side: 2 stitches in garter stitch, * purl 1, knit 1 *, repeat from *-* until 3 stitches remain, purl 1 and finish with 2 stitches in garter stitch. Continue rib like this. When piece measures 1 ½ cm decrease for BUTTONHOLES on right band - read explanation above. Continue like this until rib measures 3 cm. Loosely cast off with knit over knit and purl over purl, remember cast-off tip. ASSEMBLY Sew the buttons on to the left band. |
|||||||||||||||||||||||||
Diagram explanations |
|||||||||||||||||||||||||
|
|||||||||||||||||||||||||
|
|||||||||||||||||||||||||

|
|||||||||||||||||||||||||
Have you finished this pattern?Tag your pictures with #dropspattern #bronzesummercardigan or submit them to the #dropsfan gallery. Do you need help with this pattern?You'll find 32 tutorial videos, a Comments/Questions area and more by visiting the pattern on garnstudio.com. © 1982-2025 DROPS Design A/S. We reserve all rights. This document, including all its sub-sections, has copyrights. Read more about what you can do with our patterns at the bottom of each pattern on our site. |
|||||||||||||||||||||||||


With over 40 years in knitting and crochet design, DROPS Design offers one of the most extensive collections of free patterns on the internet - translated to 17 languages. As of today we count 314 catalogues and 11820 patterns translated into English (UK/cm). 11820
We work hard to bring you the best knitting and crochet have to offer, inspiration and advice as well as great quality yarns at incredible prices! Would you like to use our patterns for other than personal use? You can read what you are allowed to do in the Copyright text at the bottom of all our patterns. Happy crafting!
Post a comment to pattern DROPS 221-4
We would love to hear what you have to say about this pattern!
If you want to leave a question, please make sure you select the correct category in the form below, to speed up the answering process. Required fields are marked *.