
Popular categories
Looking for a yarn?


Comments / Questions (107)
![]() Daniela wrote:
Daniela wrote:
Hallo! Ich habe eine Frage bezüglich des Schemas. Stricke ich die Rückreihen links ab bzw. so wie sie erscheinen? Wenn ich laut Schema alle Reihen stricke habe ich zu viele Reihen mit den RR . Auf dem Bild sieht es anders aus.
25.04.2025 - 16:37DROPS Design answered:
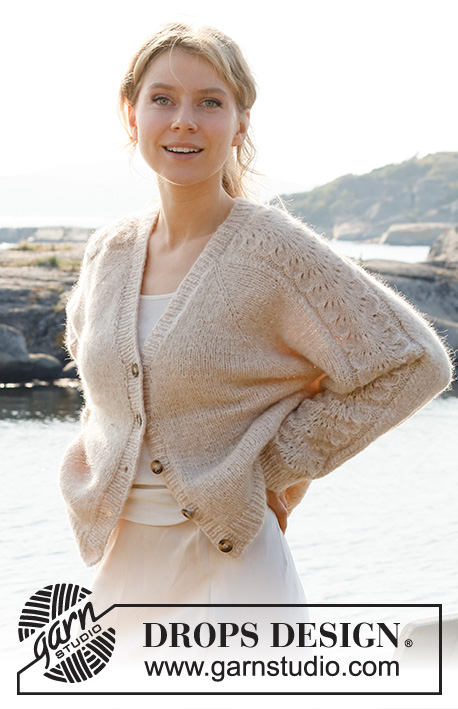
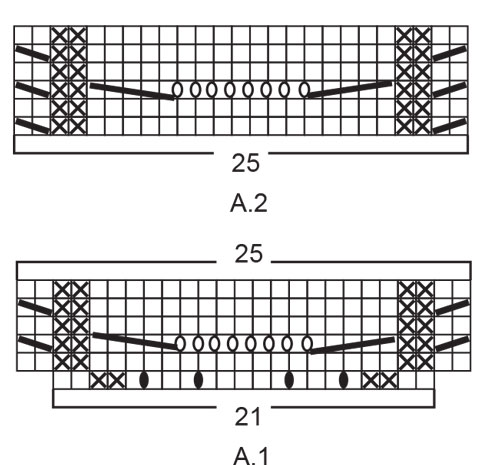
Liebe Daniela, alle Reihen sind im Diagram gezeichnet, dh die Hinreihen lesen Sie rechts nach links, die Rückreihen links nach rechts, so sind beide Diagramme 6 Reihen; wenn A.1 fertig ist stricken Sie dann A.2 bis zur Ende. Viel Spaß beim Stricken!
28.04.2025 - 07:23
![]() Julie wrote:
Julie wrote:
Liebes Drops Team,eine Frage zum v-Ausschnitt: Gleichzeitig in der 6.Reihe (d.h. in der 3.Hinreihe) zunehmen. Die 6.Reihe ist eine Rückreihe, wie kann sie gleichzeitig die 3.Hinreihe sein? Dann in jeder 4.Reihe zunehmen, auch das ist eine Rückreihe. Alle graden Reihen sind ja Rückreihen,wann nehme ich dann zu? Nach der 6. Reihe und danach nach der 4.Reihe?
22.04.2025 - 21:43DROPS Design answered:
Liebe Julie, es wurde 1 Rückreihe links ganz am Anfang gestrickt, so ist die 2. Reihe eine Hinreihe, und die 6. Reihe dann auch eine Hinreihe = die 3. Hinreihe. so sind alle gerade Reihen eine Hinreihen. Viel Spaß beim Stricken!
23.04.2025 - 07:52
![]() Sylvie Leroy wrote:
Sylvie Leroy wrote:
Bonjour Je commence à reprendre les mailles restées en attente pour les manches. J’ai relevé les 10 mailles sous la manche (taille XL) et place l’anneau marqueur au milieu ces 10 mailles relevées. Je ne comprends pas comment le tour peut commencer au marqueur si mon fil est au niveau de la dernière maille relevée sous la manche ? Merci
13.04.2025 - 15:27DROPS Design answered:
Bonjour Mme Leroy, tricotez simplement les 5 premières mailles relevées et placez votre marqueur de début de tour, vous aurez juste un décalage d'1 rang qui ne se verra pas du tout quand la manche est terminée. Bon tricot!
23.04.2025 - 10:21
![]() Henriëtte wrote:
Henriëtte wrote:
Ik kom niet uit met het aantal steken: ik heb 27× 8 steken gemeerderd voor de raglanmouwen, dan 2x meerderen op het voorpand en achterpand, dus 4 steken per keer. ( maat L) Dan kom ik op een totaal van 316 steken in plaats van 324. Hoe nu verder?
04.02.2025 - 21:10DROPS Design answered:
Dag Henriëtte,
In het laatste stukje tekst staat dat je na de laatste meerdering voor de raglan verder gaat met meerderen tot het werk 27 cm meet. Als je op 316 steken zit, komen er dus nog meerderingen bij.
05.02.2025 - 19:50
![]() Amélie M wrote:
Amélie M wrote:
Bonjour, je viens de commencer, et je me demandais s’il fallait, dès le début, tricoter au point mousse les 2 mailles lisières ? C’est noté de tricoter les devants en jersey, sans précision pour les mailles lisières qui sont pourtant comprises dans le nombre de mailles montées. Merci par avance pour votre aide.
29.01.2025 - 12:34DROPS Design answered:
Bonjour Amélie, vous pouvez tricoter les mailles lisières en jersey ou plutôt au point mousse si vous le préférez, au choix. On va relever les mailles de bordure des devants plus tard à 1 maille des bords. Bon tricot!
29.01.2025 - 13:55
![]() Marie-Alix wrote:
Marie-Alix wrote:
Bonjour, je viens de commencer et je me demandais si, lors de A1 il fallait répéter les augmentations du RAGLAN à tous les rangs ? Endroit et envers? Et puis lorsque l'on commence A2, uniquement tous les 2 rangs, sur l'endroit.
27.01.2025 - 21:55DROPS Design answered:
Bonjour Marie-Alix, les augmentations du raglan se font tous les 2 rangs = tous les rangs sur l'endroit, dans A.1 comme dans A.2, autrement dit, on va augmenter dans A.1 aux rangs 1, 3, et 5 (on a augmenté 3 fois 8 m dans A.1 pour le raglan + les 4 mailles du 1er rang), puis on augmente pour le raglan aux rangs 1, 3 et 5 de A.2. Bon tricot!
28.01.2025 - 10:06
![]() Sylvie W wrote:
Sylvie W wrote:
Je complète ma précédente question : pour faire une taille entre le XL et Le XXL en largeur: est ce que le fait de faire 4 fois les dernières augmentations du raglan sur le dos et les devant au lieu de 2 fois (soit au total 31 augmentations raglan) serait une solution ? Et est ce que cela change quelque chose dans les indications pour la suite ? Merci
27.01.2025 - 16:56DROPS Design answered:
Bonjour Sylvie, nous ne sommes malheureusement pas en mesure de pouvoir adapter chacun de nos modèles à chaque demande, n'hésitez pas à demander conseil à votre magasin, même par mail ou téléphone, on saura vous aider. Vous pouvez également demander conseil à d'autres tricoteuses via notre DROPS Workshop. Merci pour votre compréhension. Bon tricot!
28.01.2025 - 08:44
![]() Sylvie W wrote:
Sylvie W wrote:
Bonjour Après avoir mesuré par rapport à d’autres gilets que j’ai: je suis entre la taille XL et la taille XXL (largeur souhaitée =59cm versus 56 en XL et 64 en XXL). Comment pourrais je faire pour adapter le patron (ajout de mailles mais à quels endroits?) afin de ne pas me retrouver avec un pull soit trop petit soit trop grand. Merci
27.01.2025 - 16:14DROPS Design answered:
Bonjour Sylvie, vous pouvez vous inspirer d'un modèle analogue de la largeur souhaitée, ou bien recalculer d'après les mesures souhaitées le nombre de mailles qu'il vous faudrait pour cette largeur et adapter les augmentations en conséquence. Bon tricot!
28.01.2025 - 08:43
![]() Yvonne wrote:
Yvonne wrote:
Danke für die Antwort. Bei A1 ist das korrekt. Aber meine Frage bezieht sich auf A2- da stimmt die Rechnung nicht! Ich verstehe die Musterschrift nicht. Wenn ich in einer Hinreihe zB. 2 Maschen rechts zusammenstricke, wie kann ich in der Rückreihe an derselben Stelle dann 2 Maschen stricken? Es ist doch nur noch eine da? So komme ich bei der A2 insgesamt auf 8 Zunahmen, aber auf 14 Abnahmen! Wo kommen die restlichen Maschen her?
27.01.2025 - 11:41DROPS Design answered:
Liebe Yvonne, die 3. Reihe A.2 ist genauso dieselbe wie die 3. Reihe in A.1 - beachten Sie, daß die 2 ersten/ 2 letzten Maschen in A.1/A.2 keine Abnahmen sind sondern Zöpfe (siehe beide letzte Symbole). dh diese Reihe so stricken: 1 Masche auf eine Zopfnadel hinter die Arbeit legen, 1 Masche rechts, rechts stricken von der Zopfnadel, 2 M links, 5 Maschen rechts zusammen, (1 Umschlag, 1 M rechts) x 7 Mal, 1 Umschlag, 5 Maschen rechts verschränkt zusammen, 2 Maschen links, 1 Masche auf eine Zopfnadel vor die Arbeit legen, 1 Masche rechts, 1 Masche rechts von der Zopfnadel = 2+2+1+14+1+1+2+2=25 Maschen. Viel Spaß beim Stricken!
27.01.2025 - 17:32
![]() Yvonne wrote:
Yvonne wrote:
Ich verstehe die Musterschrift nicht. Wenn ich in einer Hinreihe zB. 2 Maschen rechts zusammenstricke, wie kann ich in der Rückreihe an derselben Stelle dann 2 Maschen stricken? Es ist doch nur noch eine da? So komme ich bei der A2 insgesamt auf 8 Zunahmen, aber auf 14 Abnahmen! Wo kommen die restlichen Maschen her?
25.01.2025 - 20:52DROPS Design answered:
Liebe Yvonne, man wird bei der 2. Reihe A.1 (sowie bei der 3. Reihe A.2) genausoviele Maschen abnehmen als man Umschläge arbeitet: es sind 2 Mal 4 Maschen abgenommen (5 M rechts/5 M rechts verschränkt zusammen) und 8 Umschläge = so soll die Maschenanzahl immer gleich sein. Viel Spaß beim Stricken!
27.01.2025 - 09:18
|
|||||||||||||||||||||||||
Bronze Summer#bronzesummercardigan |
|||||||||||||||||||||||||
 |
 |
||||||||||||||||||||||||
Knitted jacket in DROPS Air. Piece is knitted top down with raglan, lace pattern and V-neck. Size: S - XXXL
DROPS 221-4 |
|||||||||||||||||||||||||
|
------------------------------------------------------- EXPLANATION FOR THE PATTERN: ------------------------------------------------------- GARTER STITCH (back and forth): Knit all rows. 1 ridge vertically = knit 2 rows. PATTERN: See diagrams A.1 and A.2. RAGLAN: Increase 1 stitch on each side of 1 stitch in stocking stitch (stitch with marker thread) in every transition between body and sleeves (= 8 stitches increased on row). Increase 1 stitch by making 1 yarn over. On next row purl yarn overs twisted to avoid holes. Then work the new stitches in stocking stitch. V-NECK: All increases are done from the right side. Make 1 yarn over inside 1 edge stitch in garter stitch (= 1 stitch increased) in each side. On next row (wrong side) purl yarn over twisted to avoid holes. Then work the new stitches in stocking stitch. Increase 2 stitches in total on every increase row (1 stitch in each side). DECREASE TIP (applies to sleeves): Decrease 1 stitch on each side of marker thread as follows: Work until 3 stitches remain before marker thread and knit 2 together, knit 2 (marker thread is between these stitches), slip 1 stitch knitwise, knit 1, pass slipped stitch over stitch worked. CAST-OFF TIP: To avoid a tight cast-off edge you may use a larger needle size. If this also is too tight, work a 1 yarn over after approx. every 4th stitch while casting off (cast off yarn overs as regular stitches). BUTTONHOLES (applies to right band when garment is worn): Decrease for 5 buttonholes on right band. 1 buttonhole = work 2 stitches together and make 1 yarn over. On next row knit yarn over to make holes. Bottom buttonhole should be approx. 2 cm from bottom edge and top buttonhole where V-neck begins. Place the remaining 3 buttonholes evenly, approx. 8-8-8-7½-7½-7½ cm between each buttonhole. ------------------------------------------------------- START THE PIECE HERE: ------------------------------------------------------- JACKET - SHORT OVERVIEW OF THE PIECE: Work yoke back and forth on circular needle from mid front, work top down. AT THE SAME TIME increase V-neck and raglan. Now divide yoke for body and sleeves. Work body back and forth on circular needle, top down. Work sleeves in the round on double pointed needles/short circular needle, top down. At the end work a neck edge/band around the opening on jacket. YOKE: Cast on 70-72-74-76-78-80 stitches (including 1 edge stitch in each side towards mid front) on circular needle size 5 mm with Air. Purl 1 row from wrong side. OVERVIEW OF THE NEXT SECTION: Now start the pattern on the sleeves, at the same time increase for raglan and V-neck – therefore read the entire next section before starting. Insert 4 marker threads in piece as follows (without working the stitches): Count 3 stitches (= front piece), insert 1 marker thread in next stitch, count 21 stitches (= sleeve), insert 1 marker thread in next stitch, count 18-20-22-24-26-28 stitches (= back piece), insert 1 marker thread in next stitch, count 21 stitches (= sleeve), insert 1 marker thread in next stitch, 3 stitches remain on row after last marker thread (= front piece). Then work in stocking stitch on stitches on front pieces and on back piece, and A.1 (= 21 stitches) over stitches on each sleeve, AT THE SAME TIME on first row from right side increase for RAGLAN in every transition between body and sleeves – read explanation above. When A.1 has been worked 1 time vertically continue with A.2 (= 25 stitches) over stitches in A.1 and continue increase for raglan every other row (i.e. on every row from right side) until increase has been done 22-25-27-29-33-36 times in total on each side of the 4 stitches with marker threads. Now continue increase on back piece and on front pieces 2 more times (do not increase on sleeves, increase has been done 24-27-29-31-35-38 times on back piece/front pieces). AT THE SAME TIME on 6th row (i.e. on 3rd row from right side) increase for V-NECK in each side towards mid front – read explanation above, as follows: Increase every 6th row 4-5-6-7-8-9 times, every 4th row 3 times in total (= 7-8-9-10-11-12 stitches in total increased in each side towards mid front). REMEMBER THE KNITTING TENSION! After last increase for raglan continue without increases until piece measures 22-25-27-29-33-36 cm, increases for V-neck should now be finished. There are now 276-304-324-344-380-408 stitches on needle. Work next row as follows: Work the first 35-39-42-45-50-54 stitches (= front piece), slip the next 69-75-79-83-91-97 stitches on a stitch holder for sleeve, cast on 6-6-6-8-10-12 new stitches on row (= in the side under sleeve), work the next 68-76-82-88-98-106 stitches (= back piece), slip the next 69-75-79-83-91-97 stitches on a stitch holder for sleeve, cast on 6-6-6-8-10-12 new stitches on needle (= in the side under sleeve), and work the remaining 35-39-42-45-50-54 stitches (= front piece). NOW MEASURE PIECE FROM HERE! BODY: = 150-166-178-194-218-238 stitches. Continue with stocking stitch and 1 edge stitch in garter stitch in each side. When piece measures 25-24-24-24-22-21 cm from division, knit 1 row from right side while increasing 1 stitch = 151-167-179-195-219-239 stitches. Switch to circular needle size 4 mm. Work next row as follows from wrong side: 1 edge stitch in garter stitch, * purl 1, knit 1 *, repeat from *-* until 2 stitches remain on needle, purl 1 and finish with 1 edge stitch in garter stitch. Continue rib like this for 4 cm. Loosely cast off with knit over knit and purl over purl, read CAST-OFF TIP. Jacket measures approx. 56-58-60-62-64-66 cm from shoulder. SLEEVE: Slip the 69-75-79-83-91-97 stitches from stitch holder in one side of piece on a short circular needle/double pointed needles size 5 mm and pick in addition up 1 stitch in each of the 6-6-6-8-10-12 stitches cast on in the side under sleeve = 75-81-85-91-101-109 stitches. Insert 1 marker thread in the middle of the 6-6-6-8-10-12 stitches under sleeve and move the marker thread upwards when working, it is used for decrease later. Begin round at the marker thread and continue with A.2 and stocking stitch in the round. When piece measures 3 cm from division, decrease 2 stitches mid under sleeve - read DECREASE TIP. Decrease like this every 3½-3-2-1½-1-1 cm 10-11-13-16-19-21 times in total = 55-59-59-59-63-67 stitches. Continue until piece measures 38-36-34-33-29-26 cm from division - or desired length (shorter measurements in the larger sizes because of longer yoke). Work 1 round while decreasing 11 stitches evenly over stitches in A.2 = 44-48-48-48-52-56 stitches. Switch to double pointed needles size 4 mm and work rib in the round = knit 1/purl 1 for 4 cm. Loosely cast off with knit over knit and purl over purl – remember CAST-OFF TIP. Work the other sleeve the same way. BAND + NECK EDGE: Insert 1 marker mid back of neck on back piece, marker should be used to calculate half the stitches on band/neck edge. Pick up band inside 1 edge stitch in garter stitch on front pieces, and in the 1st row worked around the neck. Begin at the bottom on right front piece from right side and pick up approx. 119-125-131-137-143-149 stitches along the entire front edge up to marker in the neck, on circular needle size 4 mm – leave the marker here. Continue to pick up approx. 120-126-132-138-144-150 stitches along the entire front edge on left front piece, total number of stitches should be divisible by 2 + 1 = approx. 239-251-263-275-287-299 stitches. It is important that the rib is not too loose with too many stitches but it should not be too tight either with tight front edges. Work next row as follows from wrong side: 2 stitches in garter stitch, * purl 1, knit 1 *, repeat from *-* until 3 stitches remain, purl 1 and finish with 2 stitches in garter stitch. Continue rib like this. When piece measures 1 ½ cm decrease for BUTTONHOLES on right band - read explanation above. Continue like this until rib measures 3 cm. Loosely cast off with knit over knit and purl over purl, remember cast-off tip. ASSEMBLY Sew the buttons on to the left band. |
|||||||||||||||||||||||||
Diagram explanations |
|||||||||||||||||||||||||
|
|||||||||||||||||||||||||
|
|||||||||||||||||||||||||

|
|||||||||||||||||||||||||
Have you finished this pattern?Tag your pictures with #dropspattern #bronzesummercardigan or submit them to the #dropsfan gallery. Do you need help with this pattern?You'll find 32 tutorial videos, a Comments/Questions area and more by visiting the pattern on garnstudio.com. © 1982-2025 DROPS Design A/S. We reserve all rights. This document, including all its sub-sections, has copyrights. Read more about what you can do with our patterns at the bottom of each pattern on our site. |
|||||||||||||||||||||||||


With over 40 years in knitting and crochet design, DROPS Design offers one of the most extensive collections of free patterns on the internet - translated to 17 languages. As of today we count 314 catalogues and 11820 patterns translated into English (UK/cm). 11820
We work hard to bring you the best knitting and crochet have to offer, inspiration and advice as well as great quality yarns at incredible prices! Would you like to use our patterns for other than personal use? You can read what you are allowed to do in the Copyright text at the bottom of all our patterns. Happy crafting!
Post a comment to pattern DROPS 221-4
We would love to hear what you have to say about this pattern!
If you want to leave a question, please make sure you select the correct category in the form below, to speed up the answering process. Required fields are marked *.